Configure Excel file upload settings
Overview
Processing files with CAT tools traditionally required you to copy and paste content from file to file when only some rows or columns needed to be processed. Smartcat streamlines this and removes the need to prepare files in advance.
When you click an Excel file that was added in the first step of the project creation process, Smartcat shows a set of upload options on the right side of the screen. This article explains each option.
Upload settings
Segment splitting
Use this option to split segments based on Sentences or Cells.
If a cell contains the content "Lorem ipsum. Dolor sit amet." and you choose the Cell-based option, you get one segment in the CAT editor:
- Lorem ipsum. Dolor sit amet.
If you choose the Sentence-based option, the content splits into two segments:
-
Lorem ipsum.
-
Dolor sit amet.
💡 Segmenting by sentences is generally better. Smaller segments help your Translation Memory (TM), because you get fewer matches against entire paragraphs than you would with shorter sentence segments.
Parsing direction
This option tells Smartcat whether to parse the Excel spreadsheet horizontally (by rows) or vertically (by columns).
Content inclusion options
The remaining options determine which parts of the file are included in the document upload:
-
Sheet names — include the sheet names in the upload
-
Hidden cells and sheets — include hidden cells and sheets in the upload
-
Header and footer content — include header and footer content in the upload
-
Comments — include comments in the upload
-
Graphics — include graphics in the upload
-
Text from shapes — include text contained in shapes in the upload
-
Nested presentations — include nested presentations in the upload
Upload selected ranges
When you select either Upload selected ranges or Do not upload selected ranges, Smartcat presents more options.
In this section, you decide exactly which portions of an Excel file are uploaded to the project:
-
To select columns, enter the names of the first and last columns you need, for example, A:H
-
To select rows, enter the names of the first and last rows you need, for example, 1:50
-
You can also combine the two
For example, to translate a document that has columns A–Z and rows 1 through 100 but omit column B, apply the following rules:
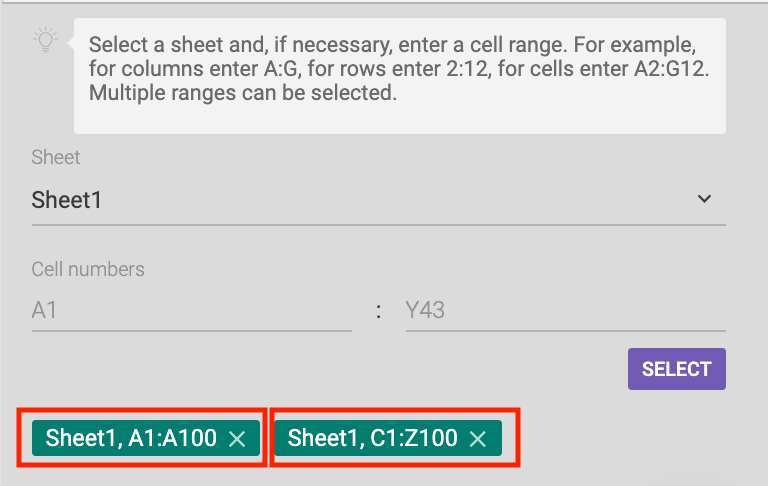
If you had selected Do not upload selected ranges, the only column included in the upload of Sheet1 would be column B.
You can also create separate rules for each sheet in your Excel file. For example, in one sheet column A is processed, while in another sheet column B is processed.
Smartcat gives you flexibility to work with Excel files, so you do not need to hide columns or copy and paste the content to be translated.
Want to learn more?
See how Smartcat can transform your localization workflow.
Still need help?
Our support team responds within one business day.