Sitecore Integration
Overview
The Smartcat–Sitecore integration translates Sitecore pages and asset metadata directly within the Sitecore CMS, keeping structured content, components, and metadata accurately localized while preserving page hierarchy and field integrity across language versions.
Key capabilities:
-
Translation of pages, structured content, and asset metadata (SEO fields, tags, descriptions)
-
An update flow that detects source changes and translates only modified fields or segments instead of reprocessing entire pages
-
Field-level translation control, so you include or exclude specific fields from the translation scope
-
Automatic copying of selected source fields (serial numbers, SKUs, links, technical codes) to target language versions without translation
Prerequisites
Smartcat side:
-
A Smartcat account with API access
-
A Smartcat API key and account ID (generated in Settings → API)
Sitecore side:
-
A supported Sitecore version (connector packages are provided for Sitecore 10.1, 10.2, 10.3, and 10.4)
-
Access to the Sitecore Desktop, Development Tools, and the Installation Wizard
-
Permission to install packages and restart the Sitecore client
Smartcat Plugin v0.6.67 and earlier
How to connect
Install the plugin
-
Download the connector zip archive that matches your Sitecore version (10.1, 10.2, 10.3, or 10.4)
-
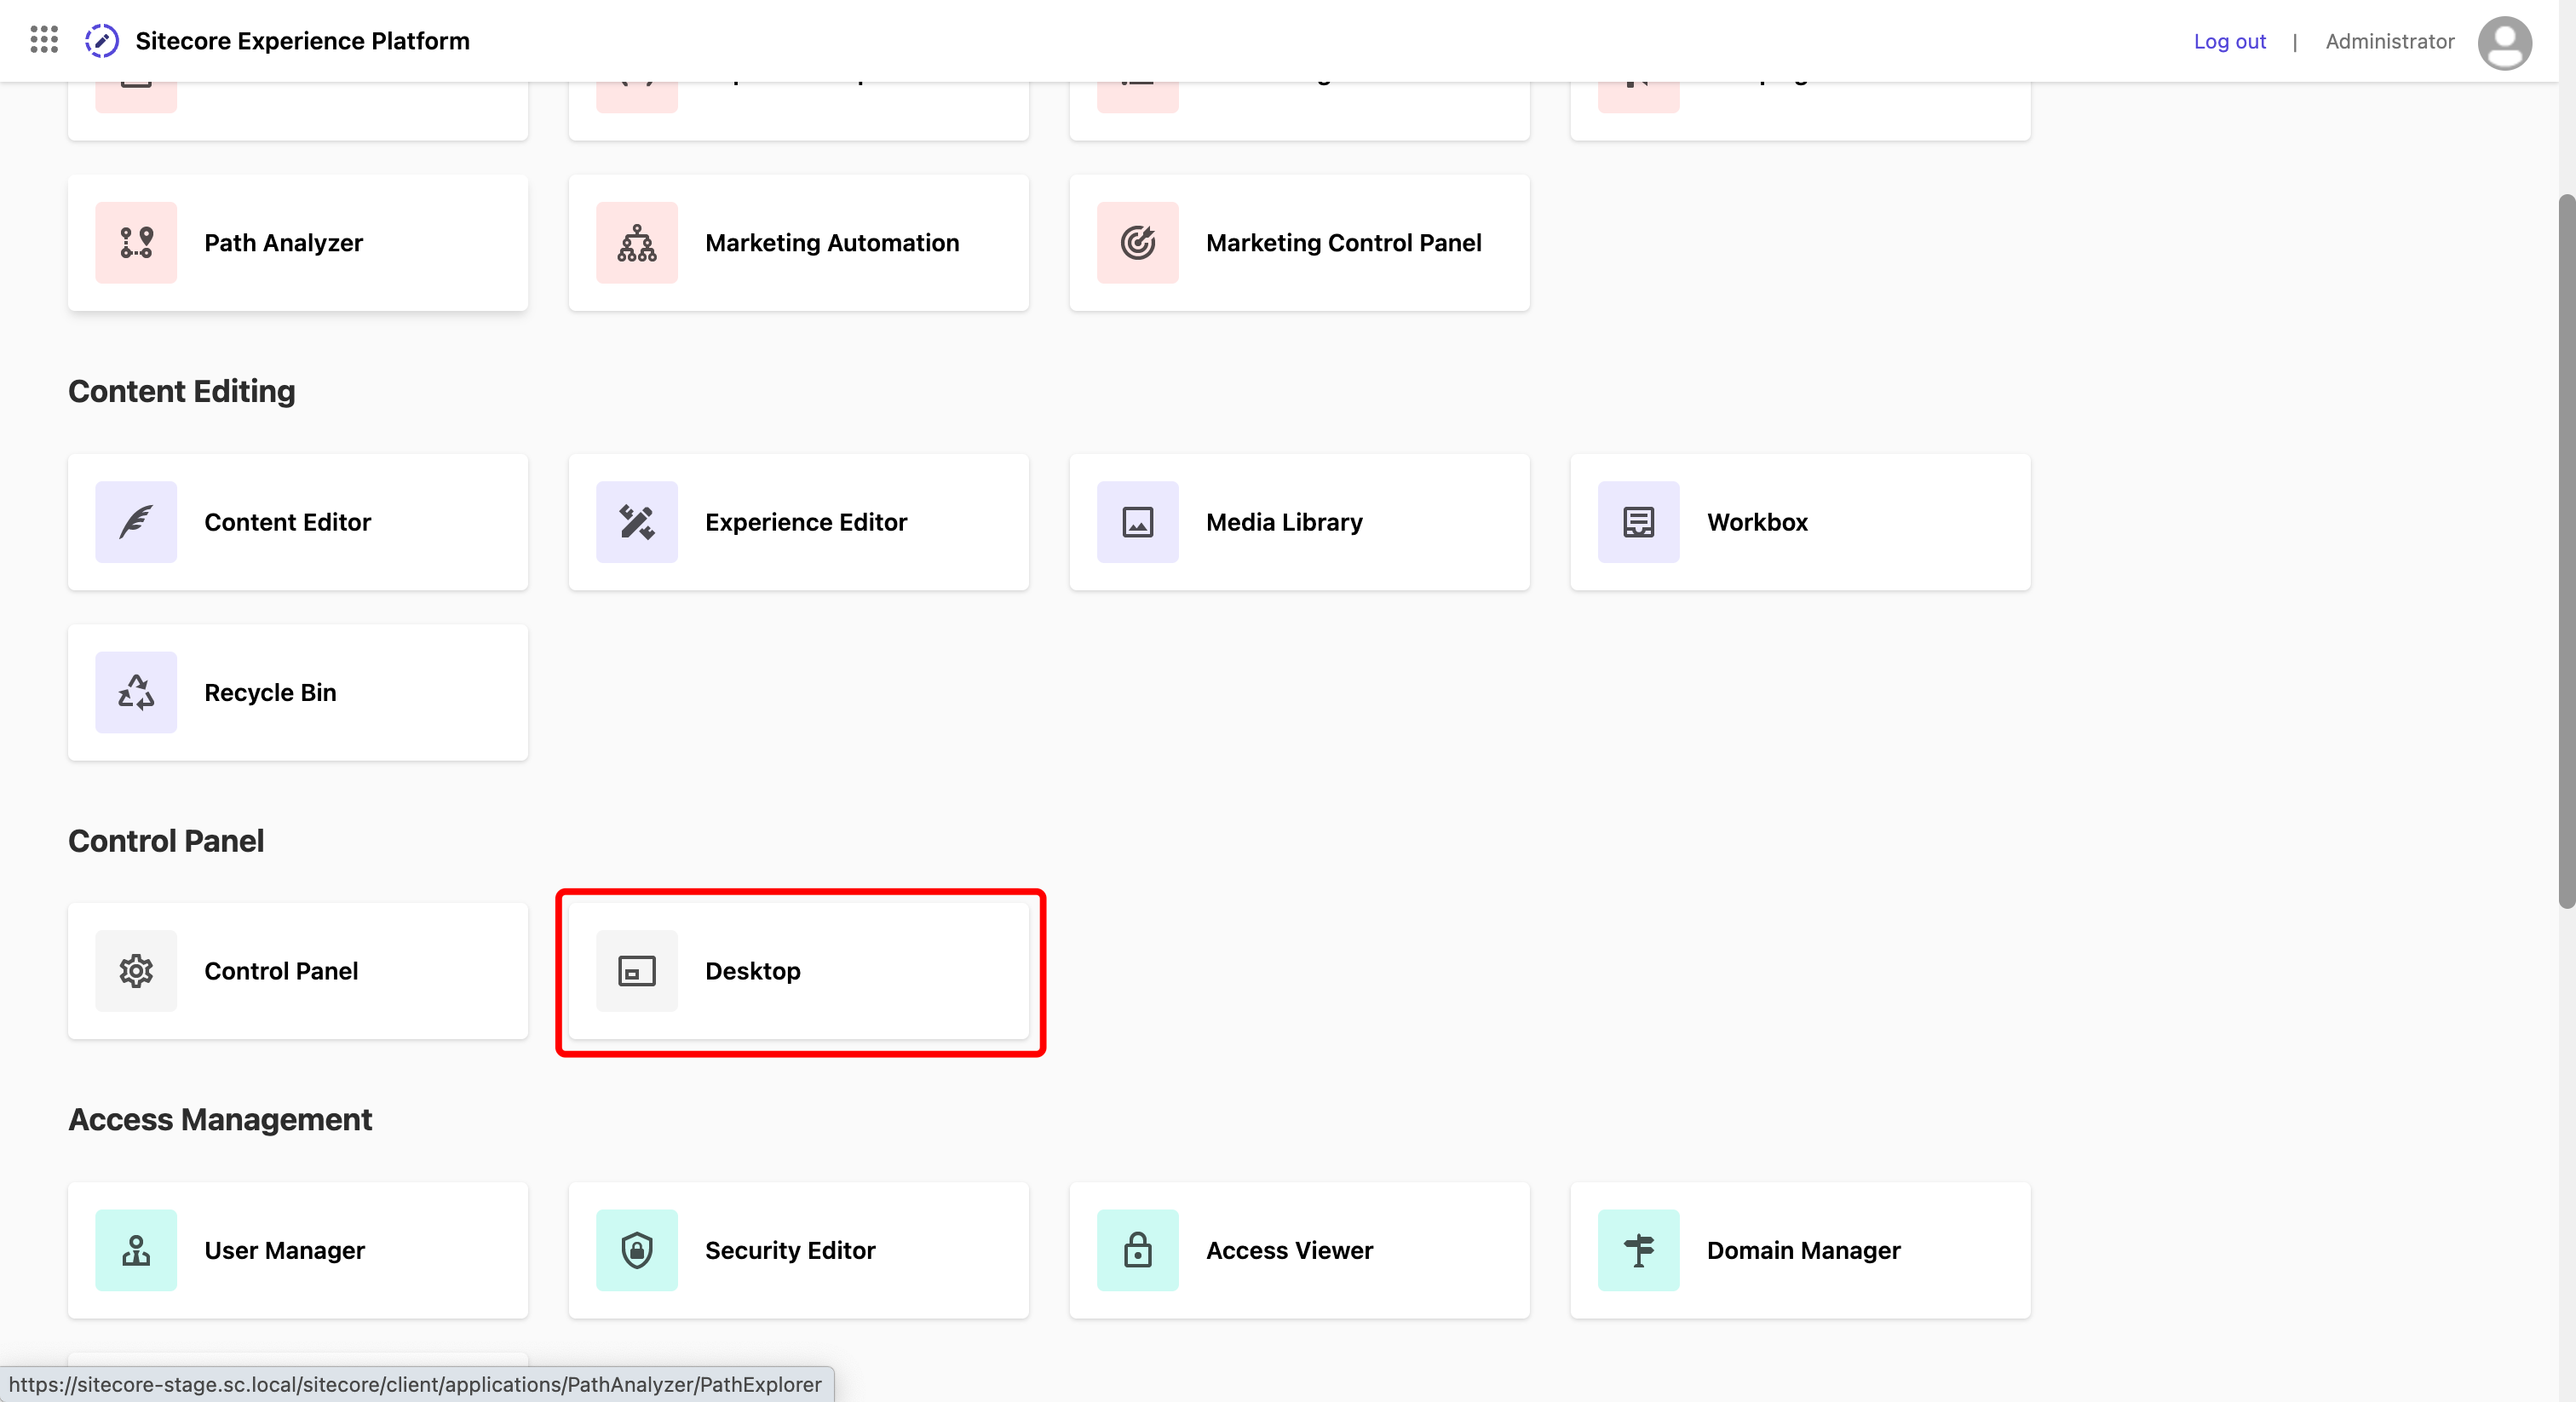
At the Launchpad, go to Control Panel → Desktop
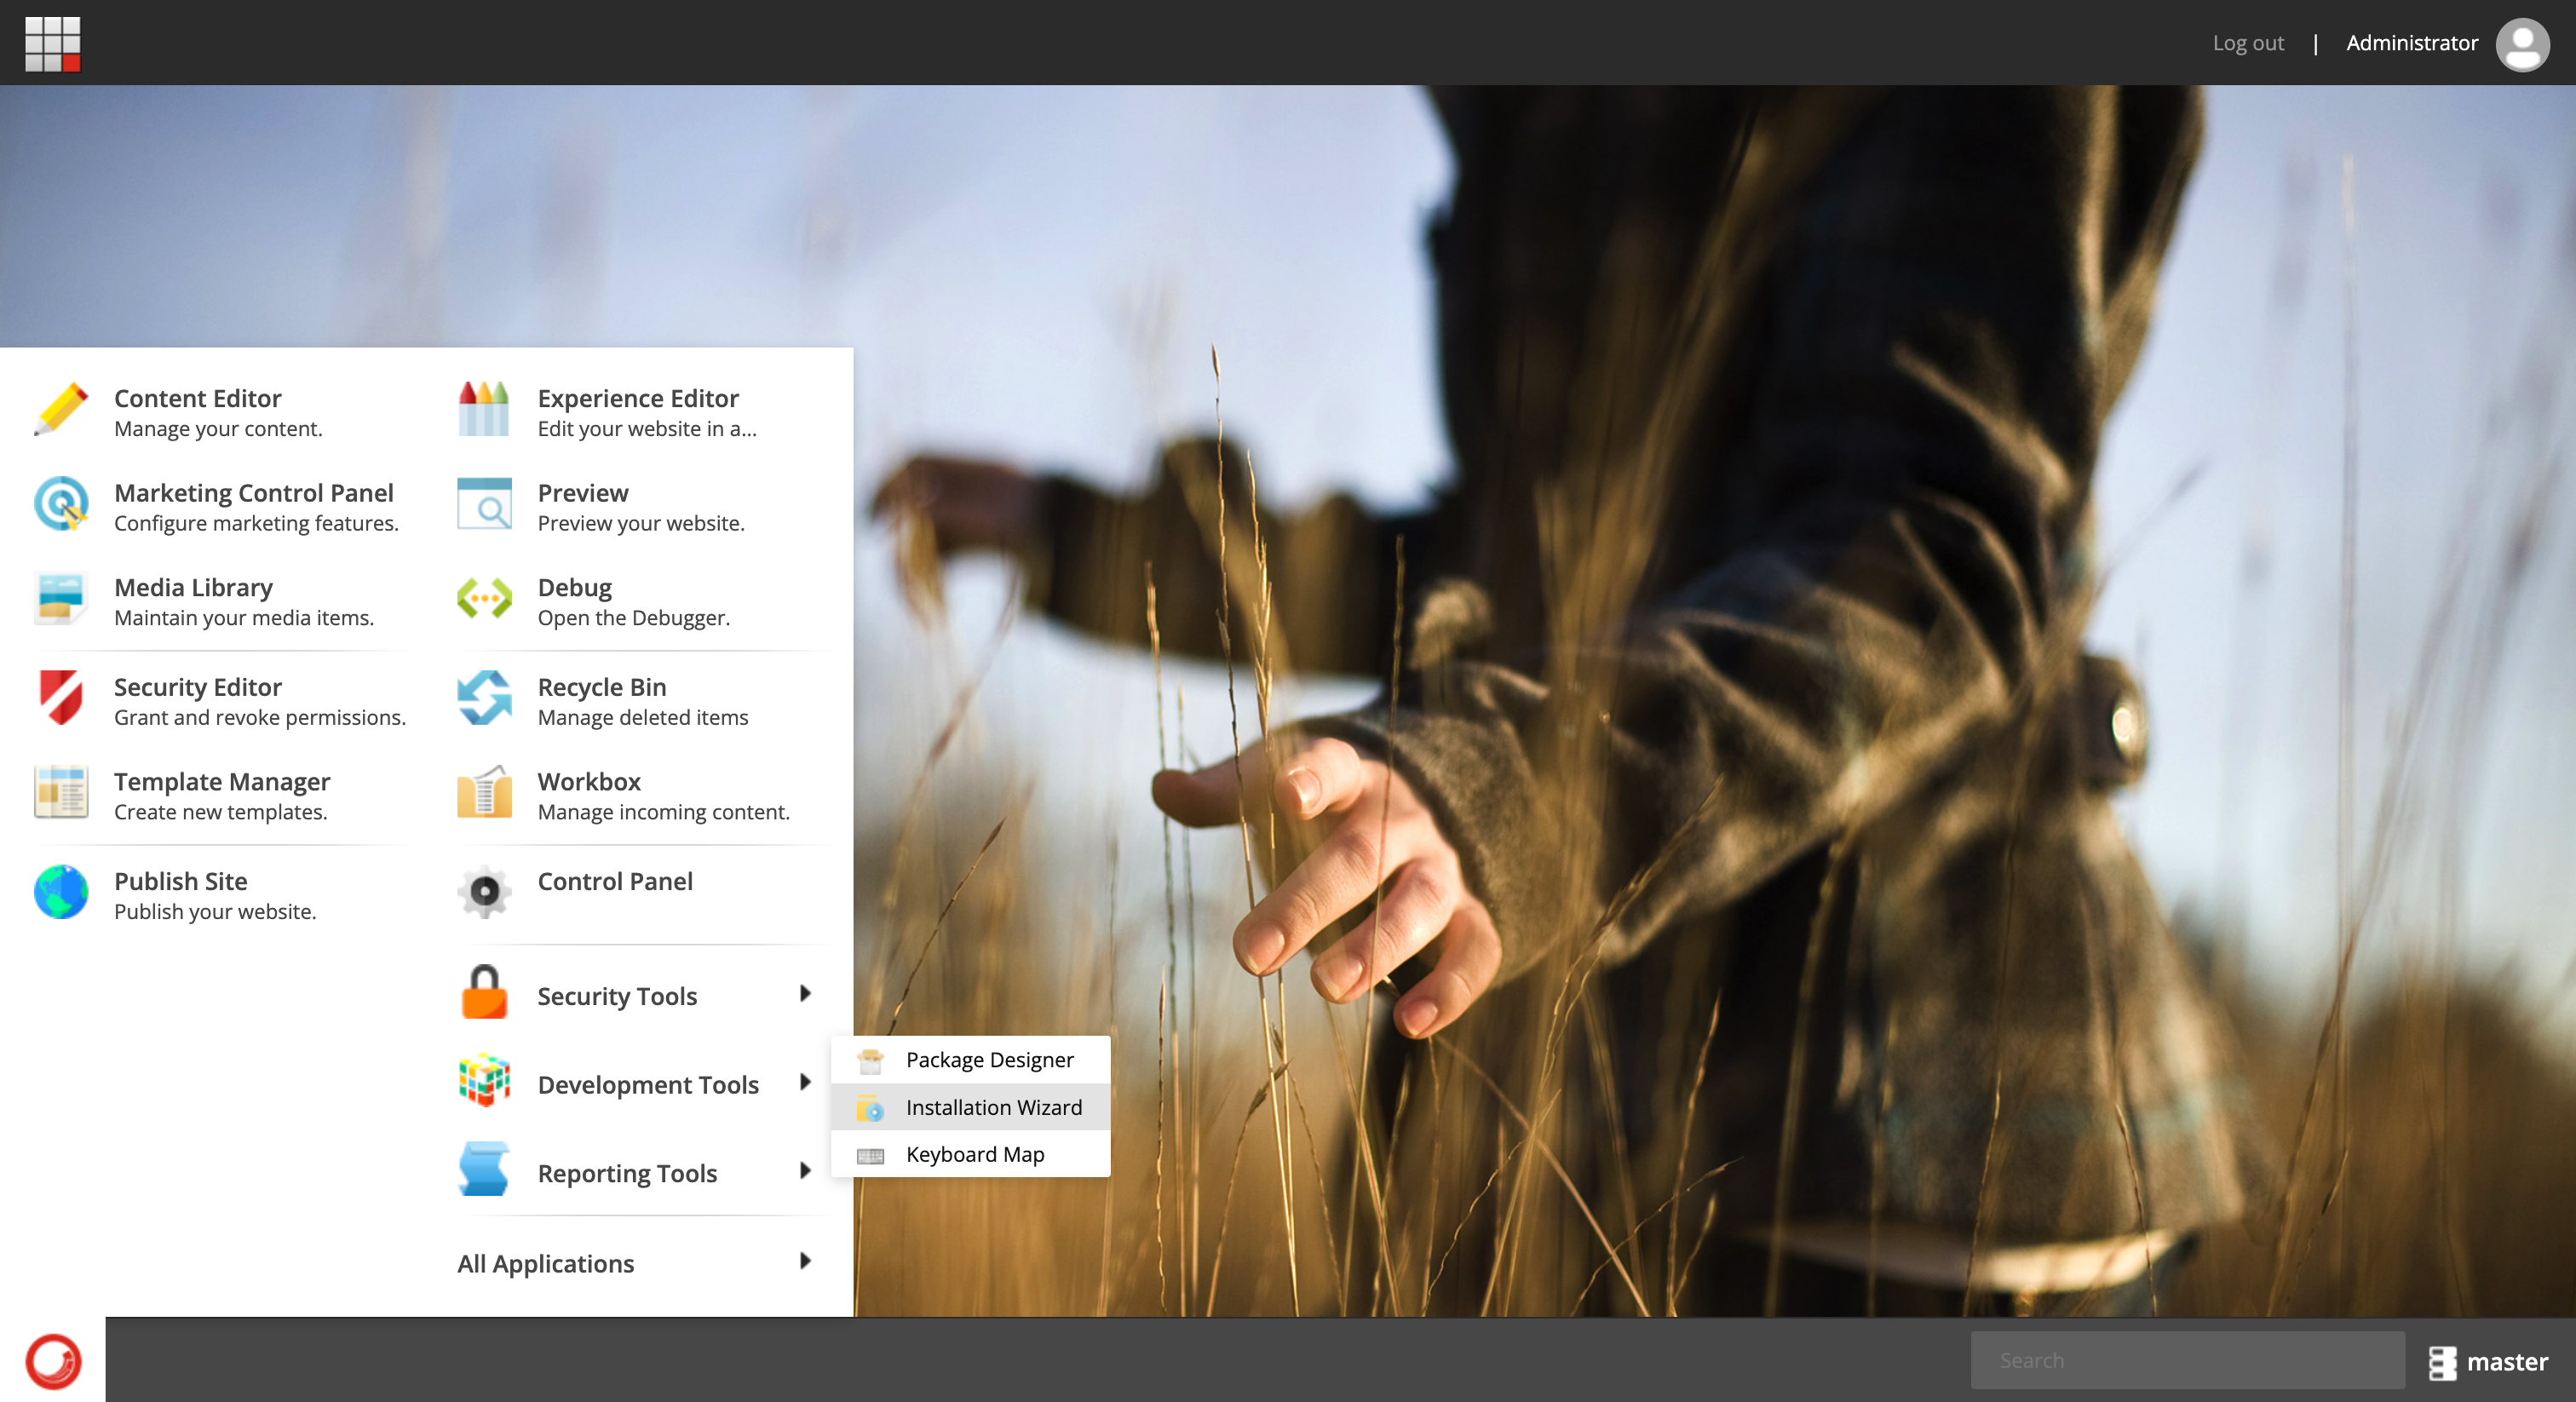
- Open Development Tools → Installation Wizard
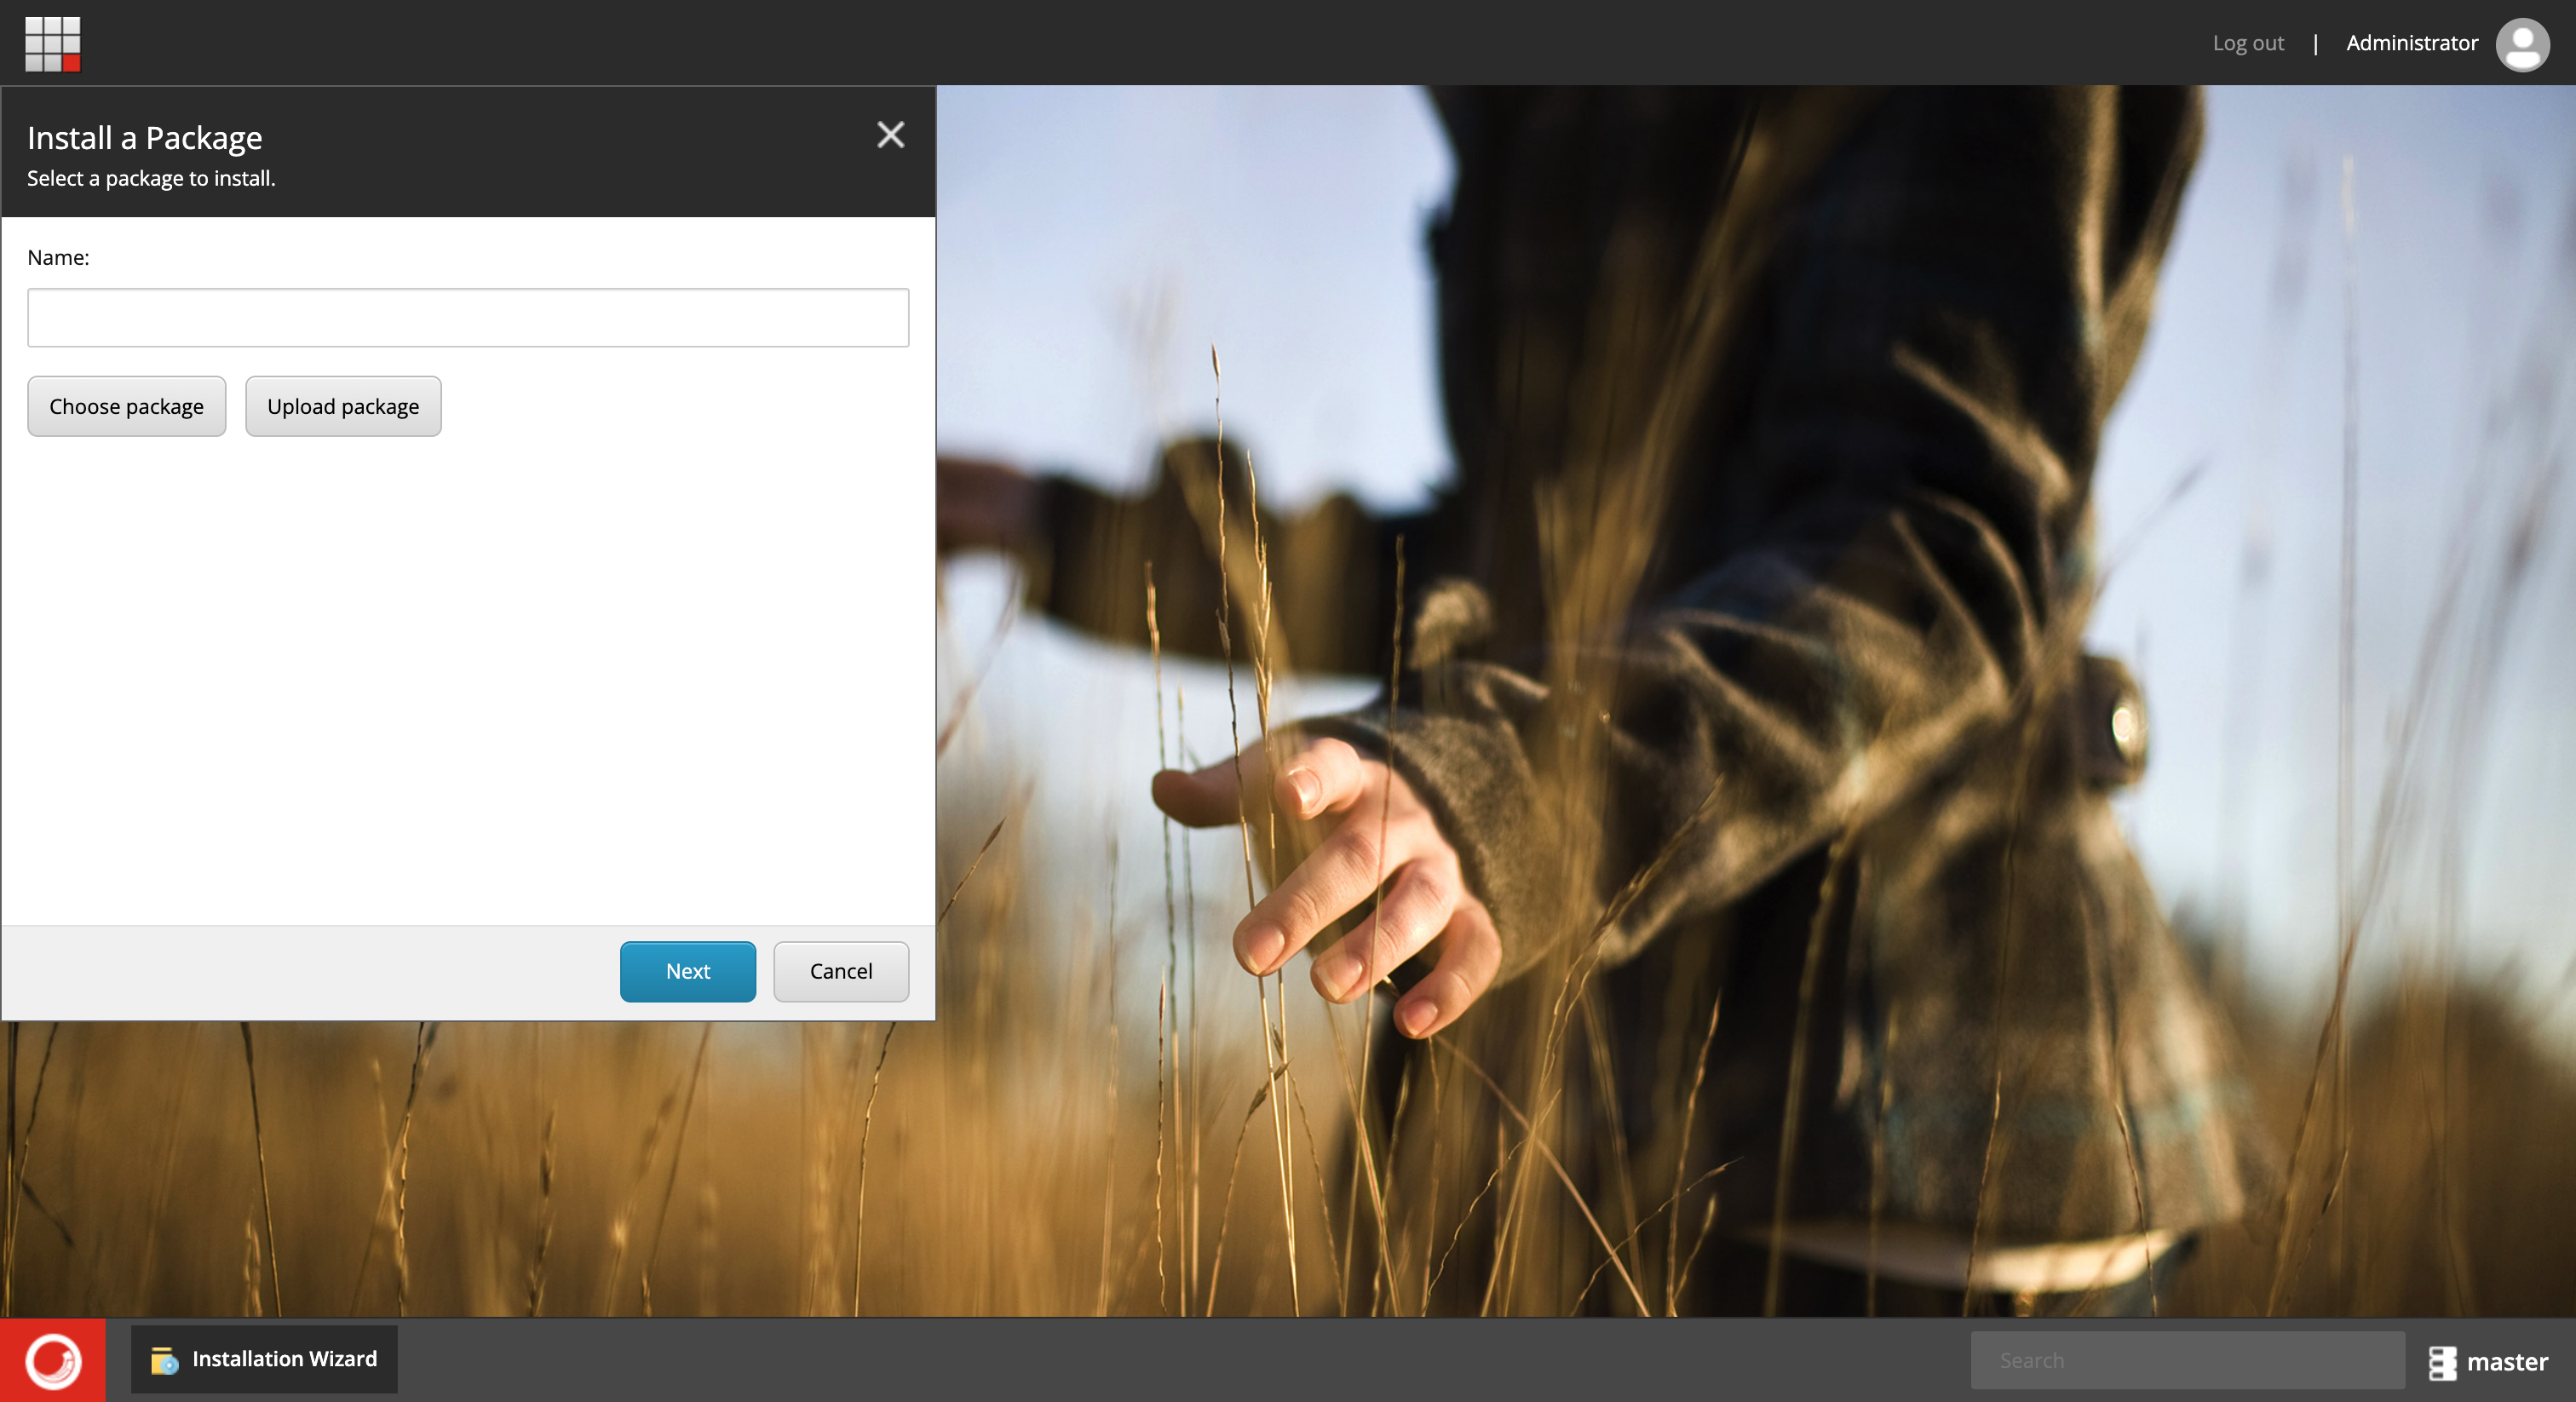
- Click Upload package
- Add the Smartcat plugin zip archive
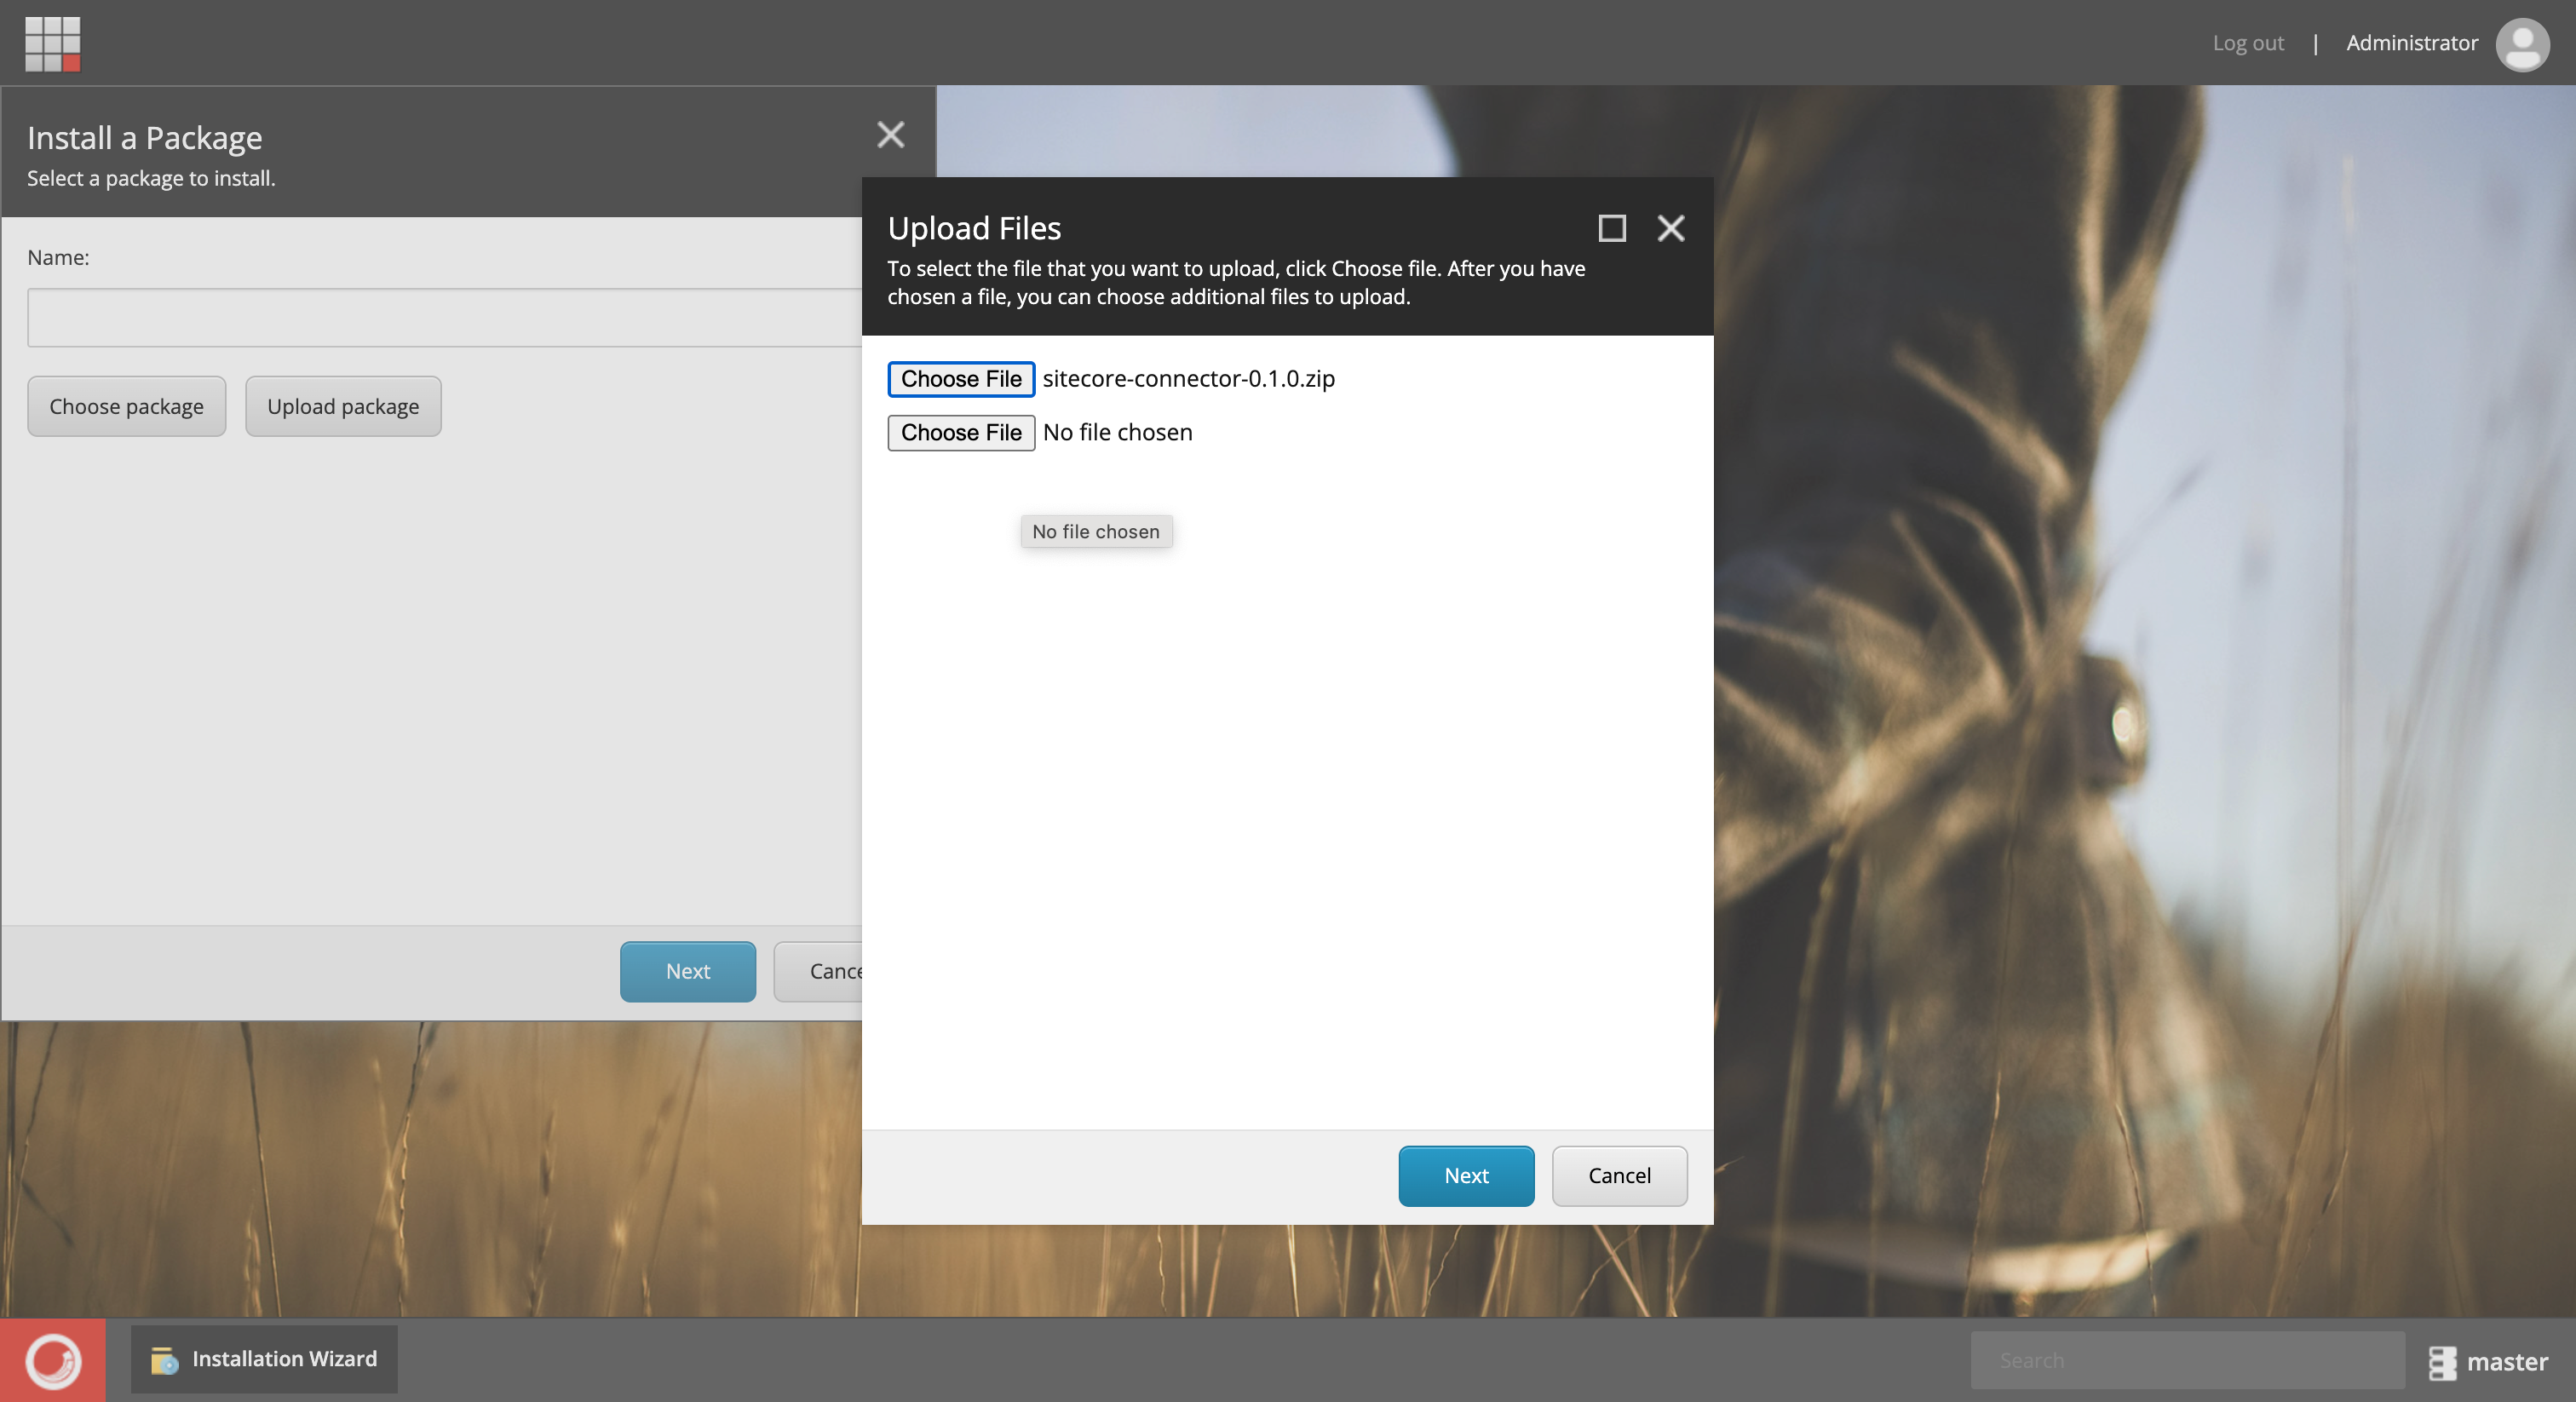
- Select Override existing files and upload the plugin
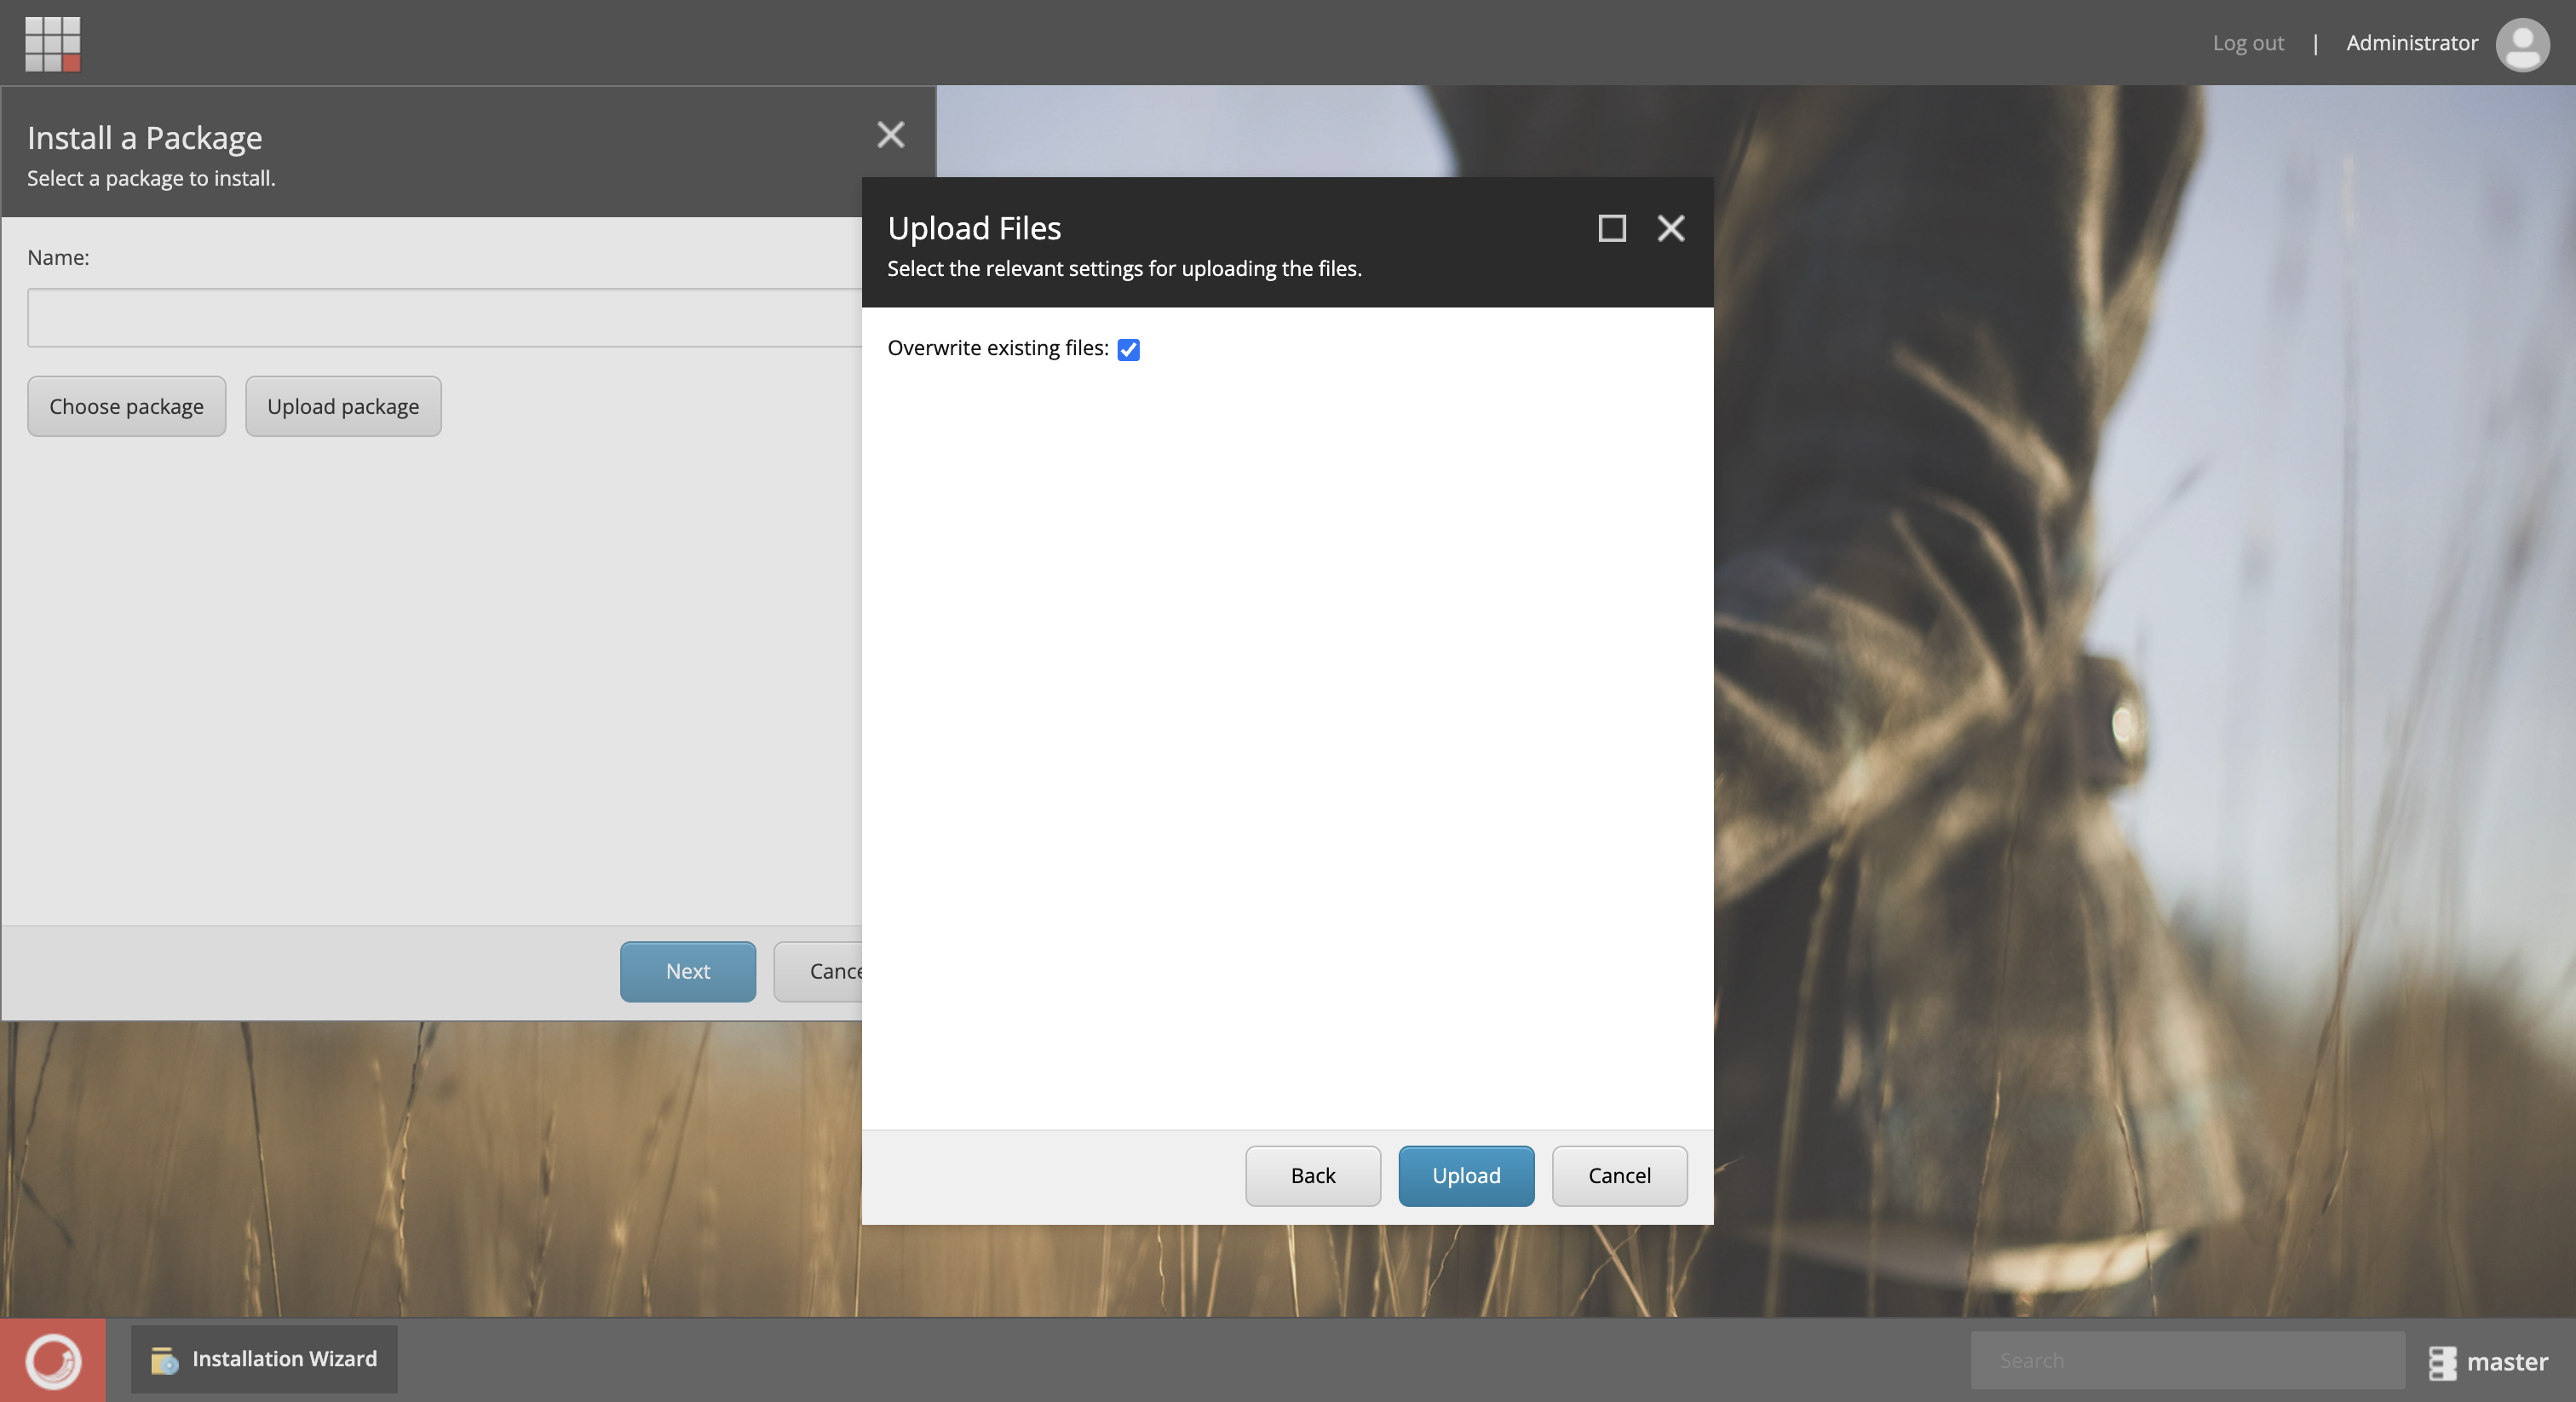
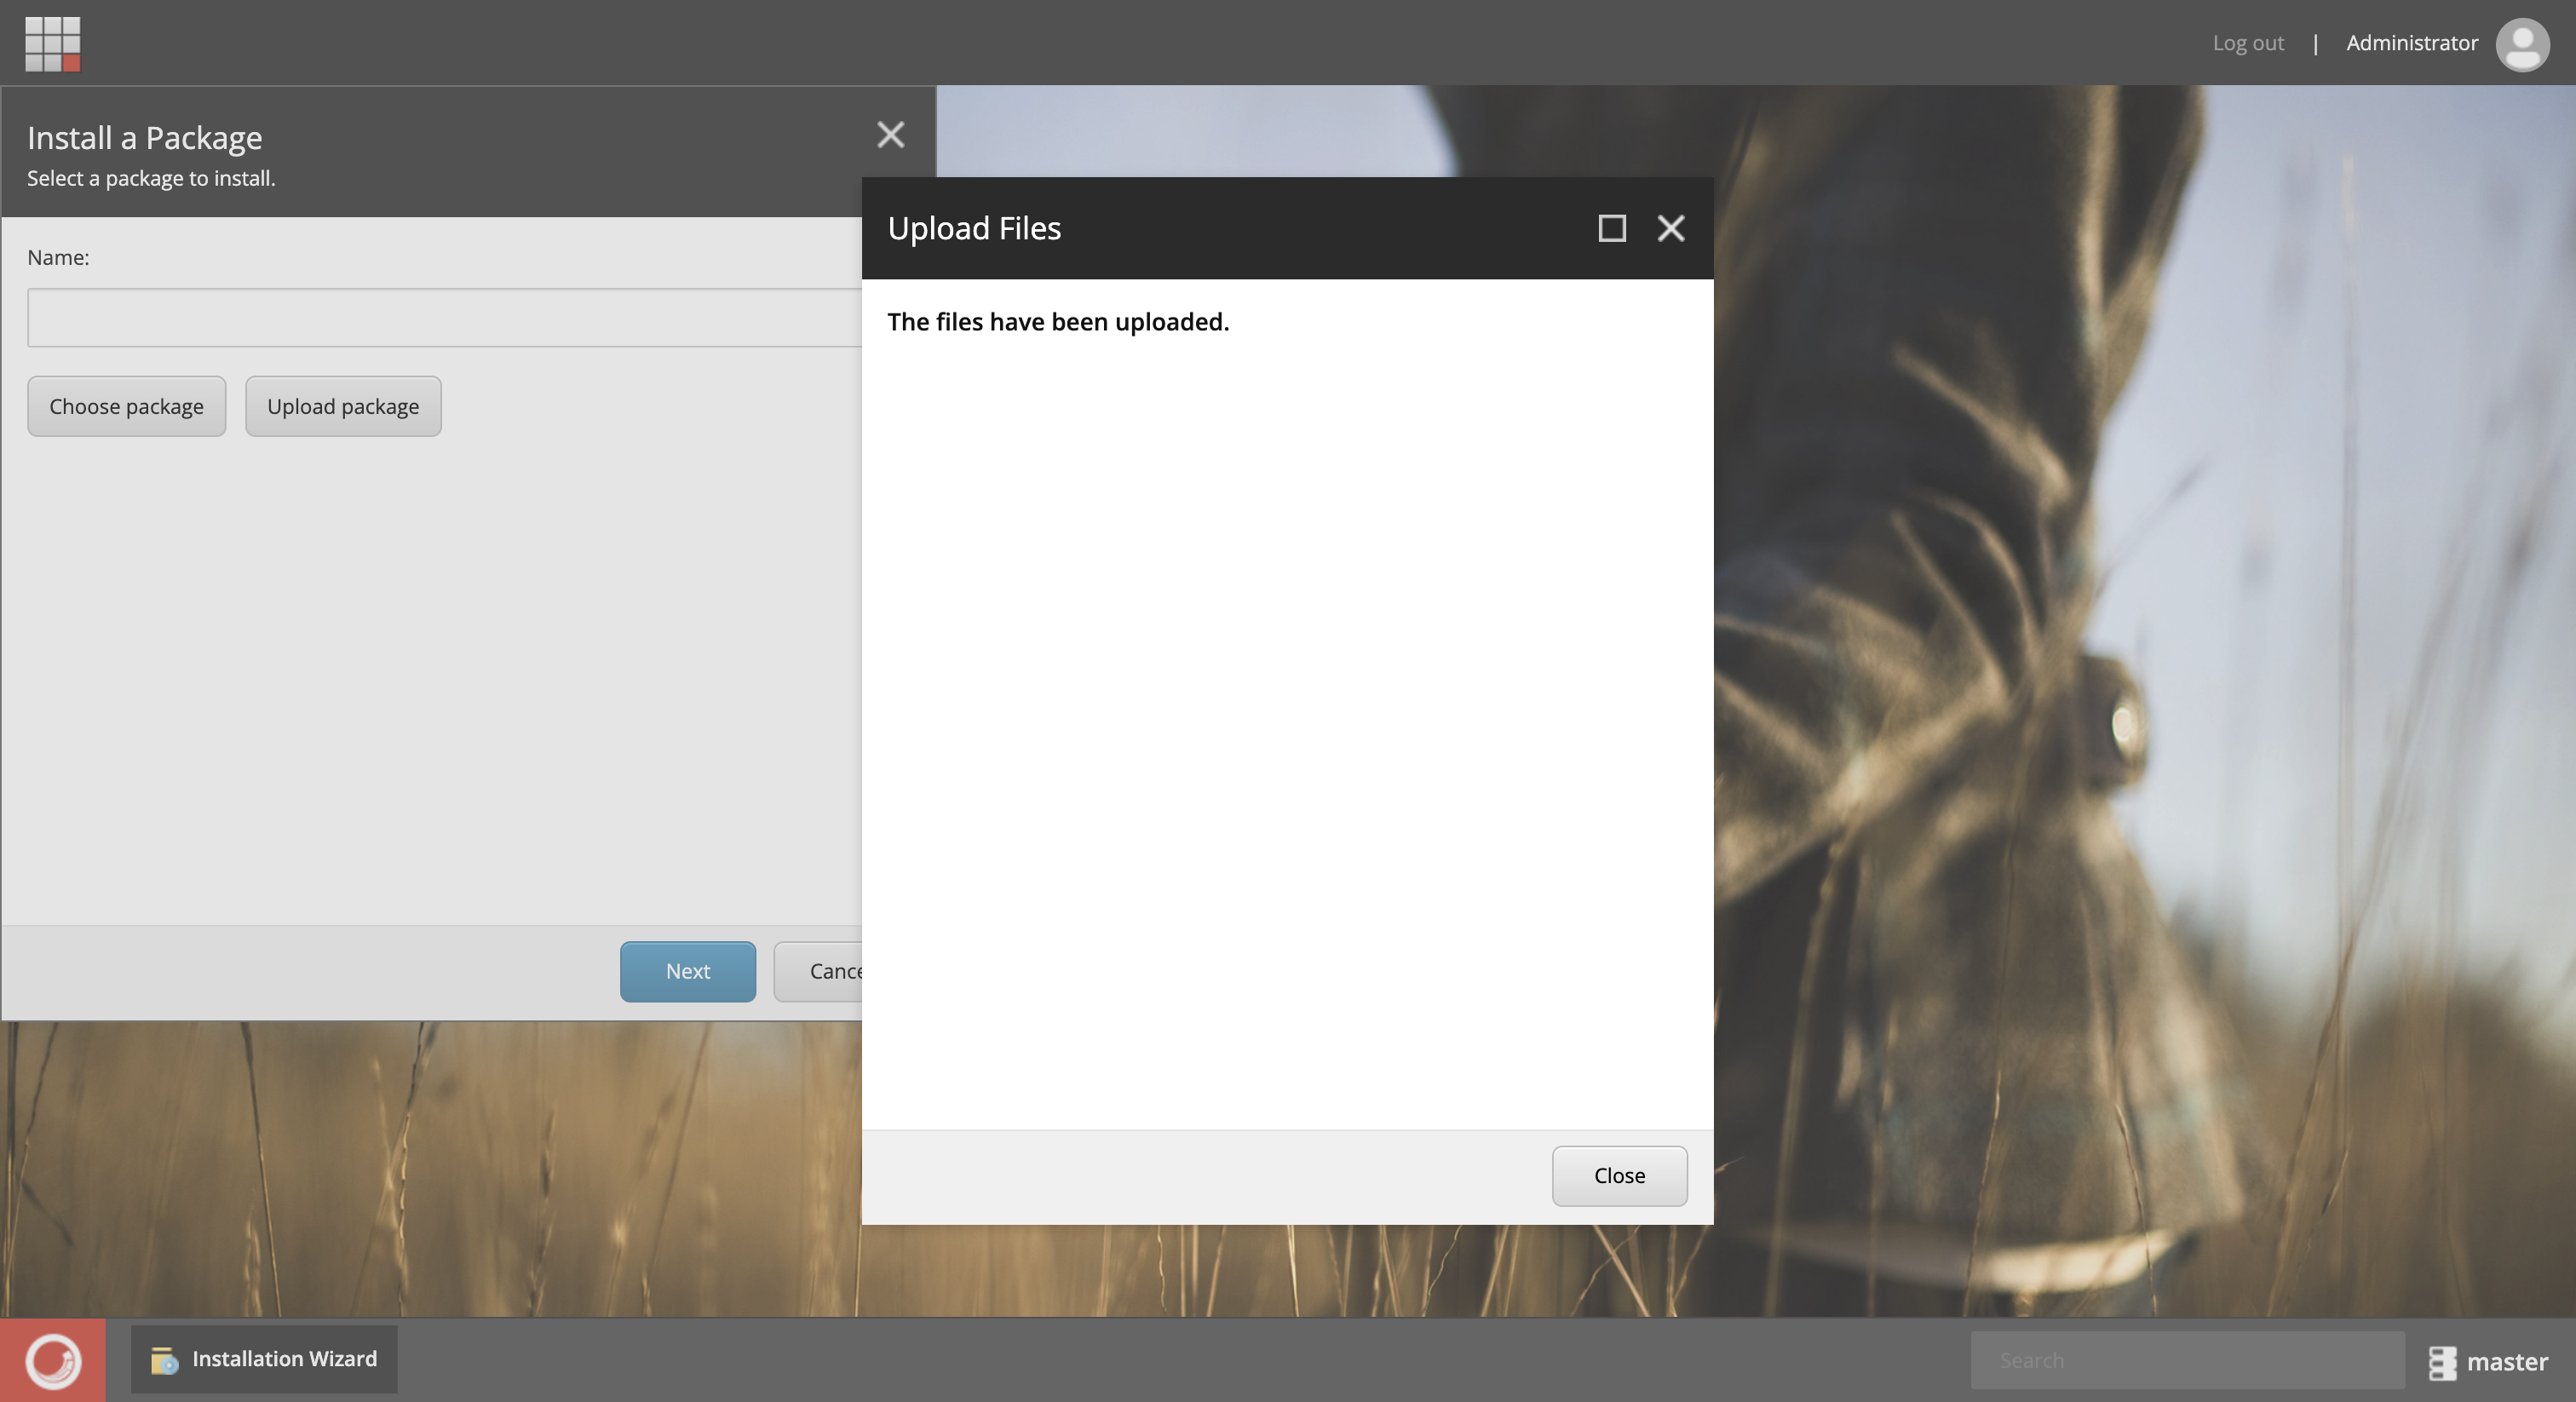
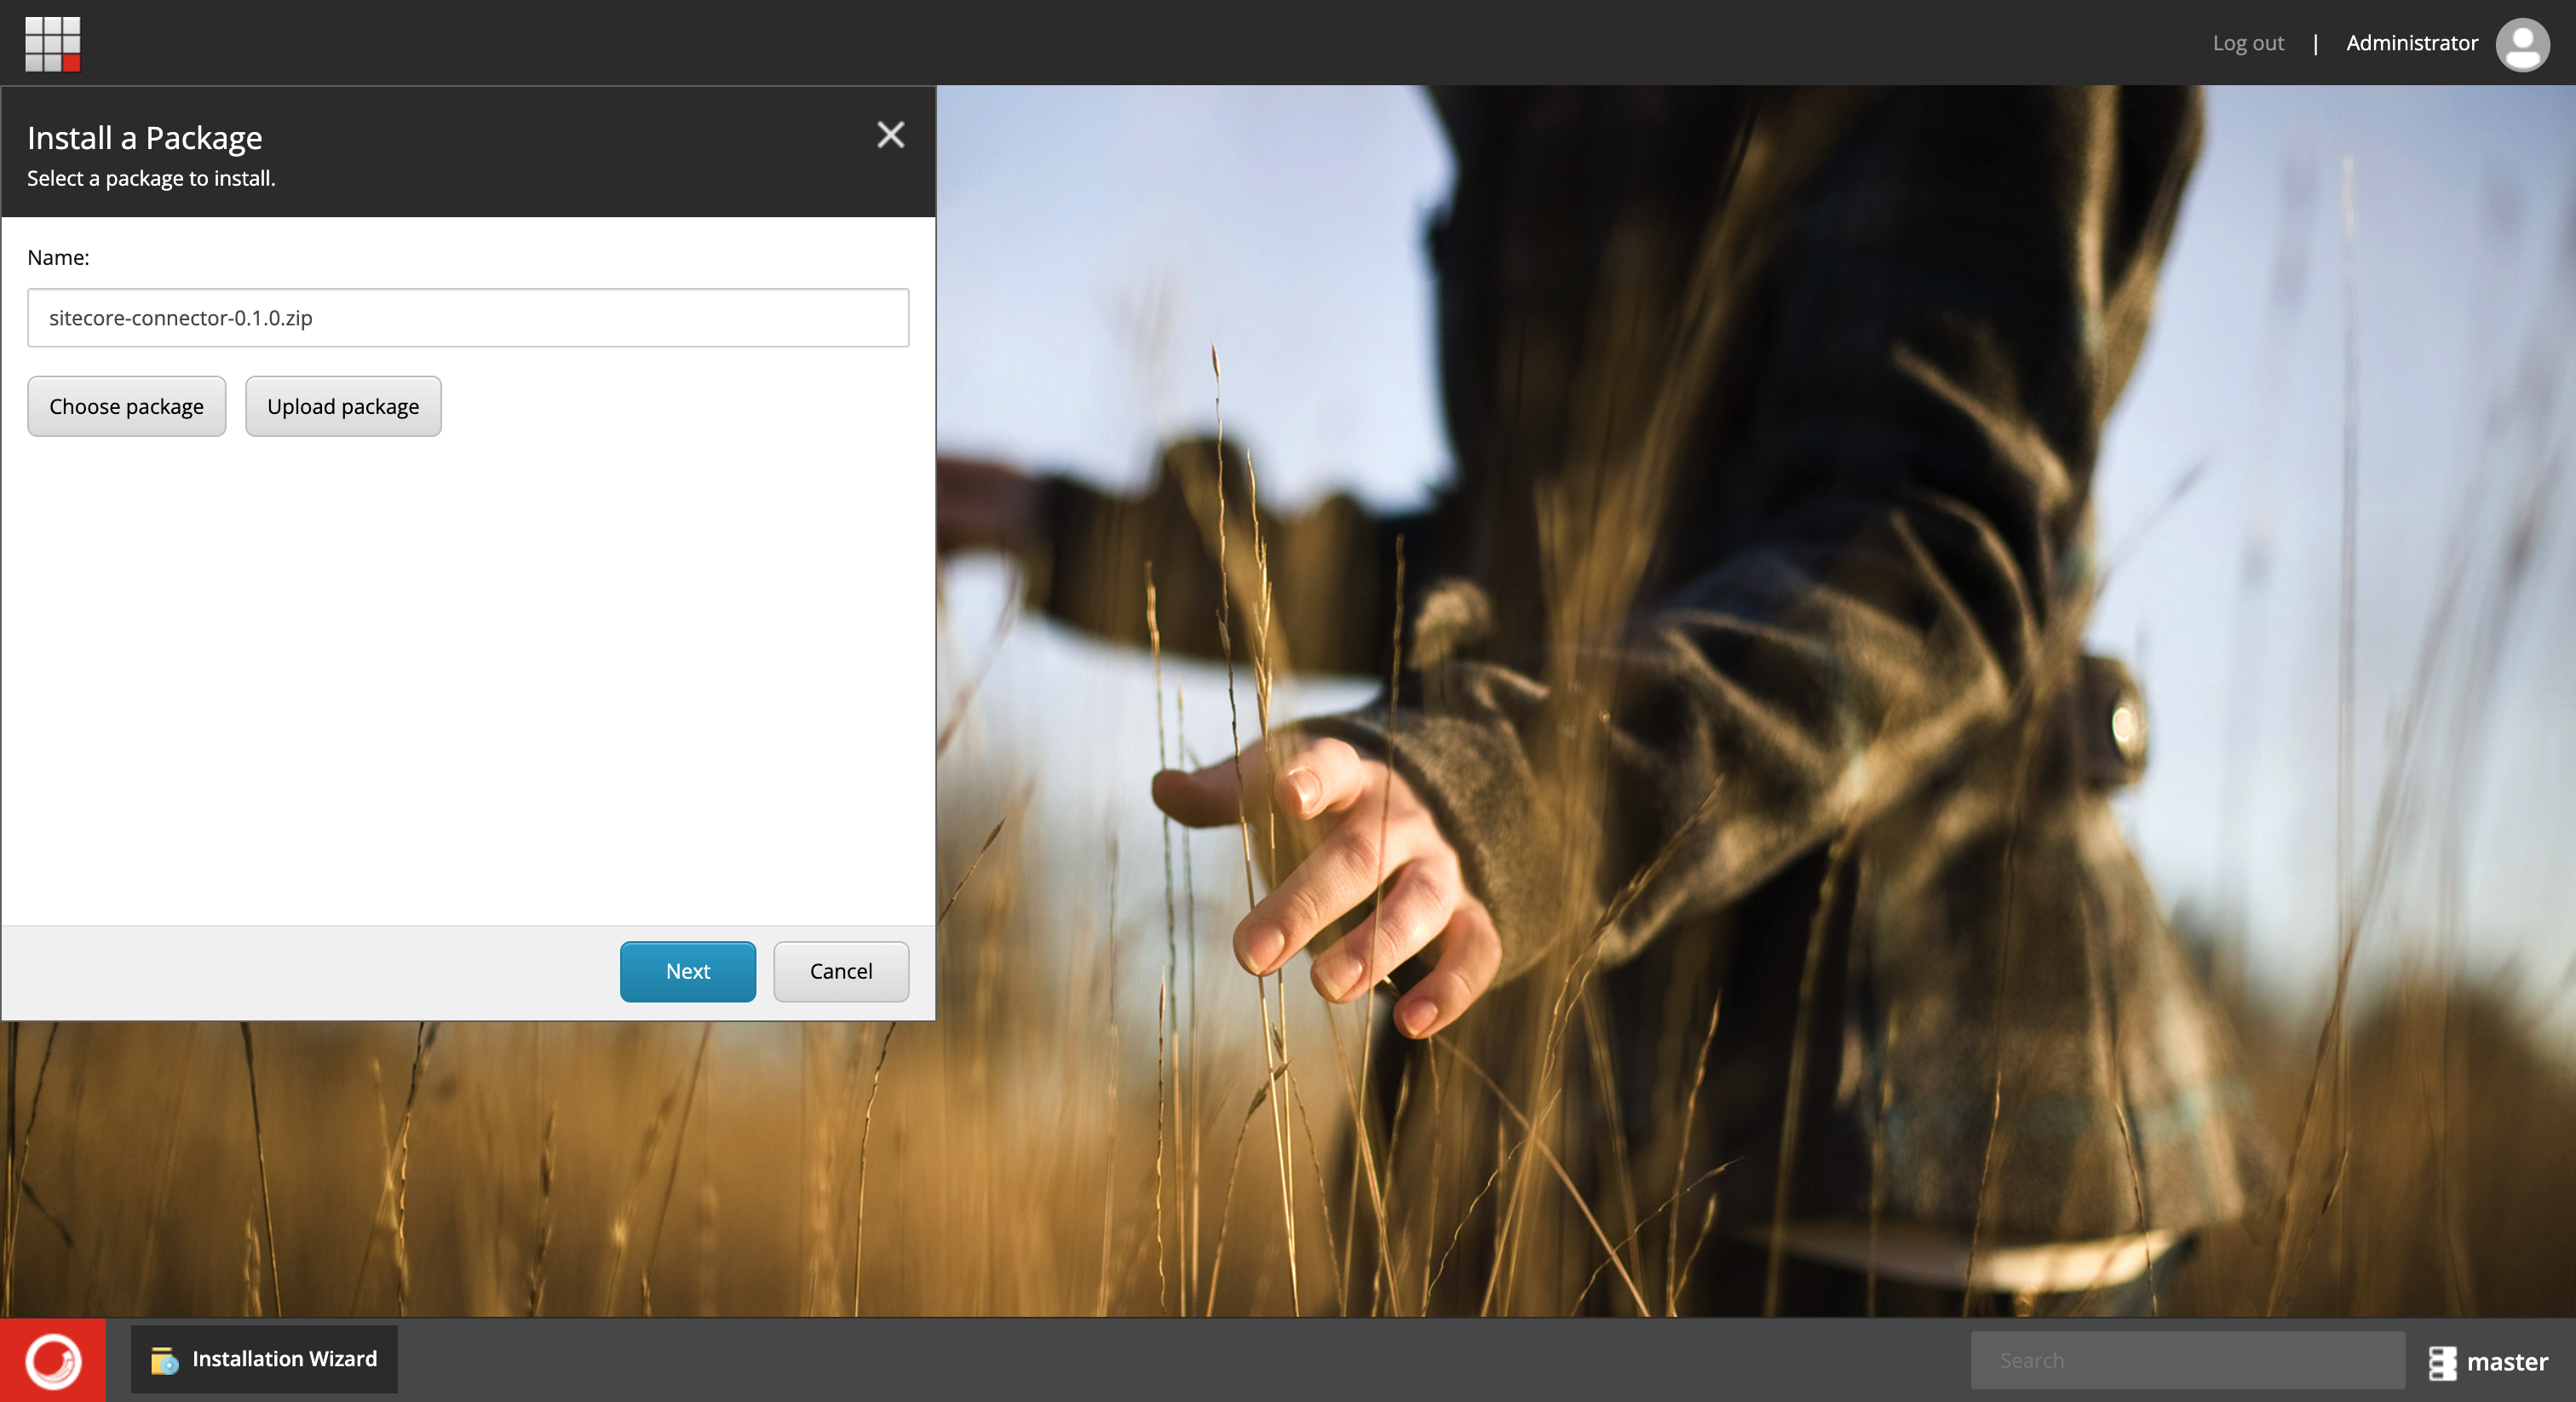
- Choose the uploaded package and click Next
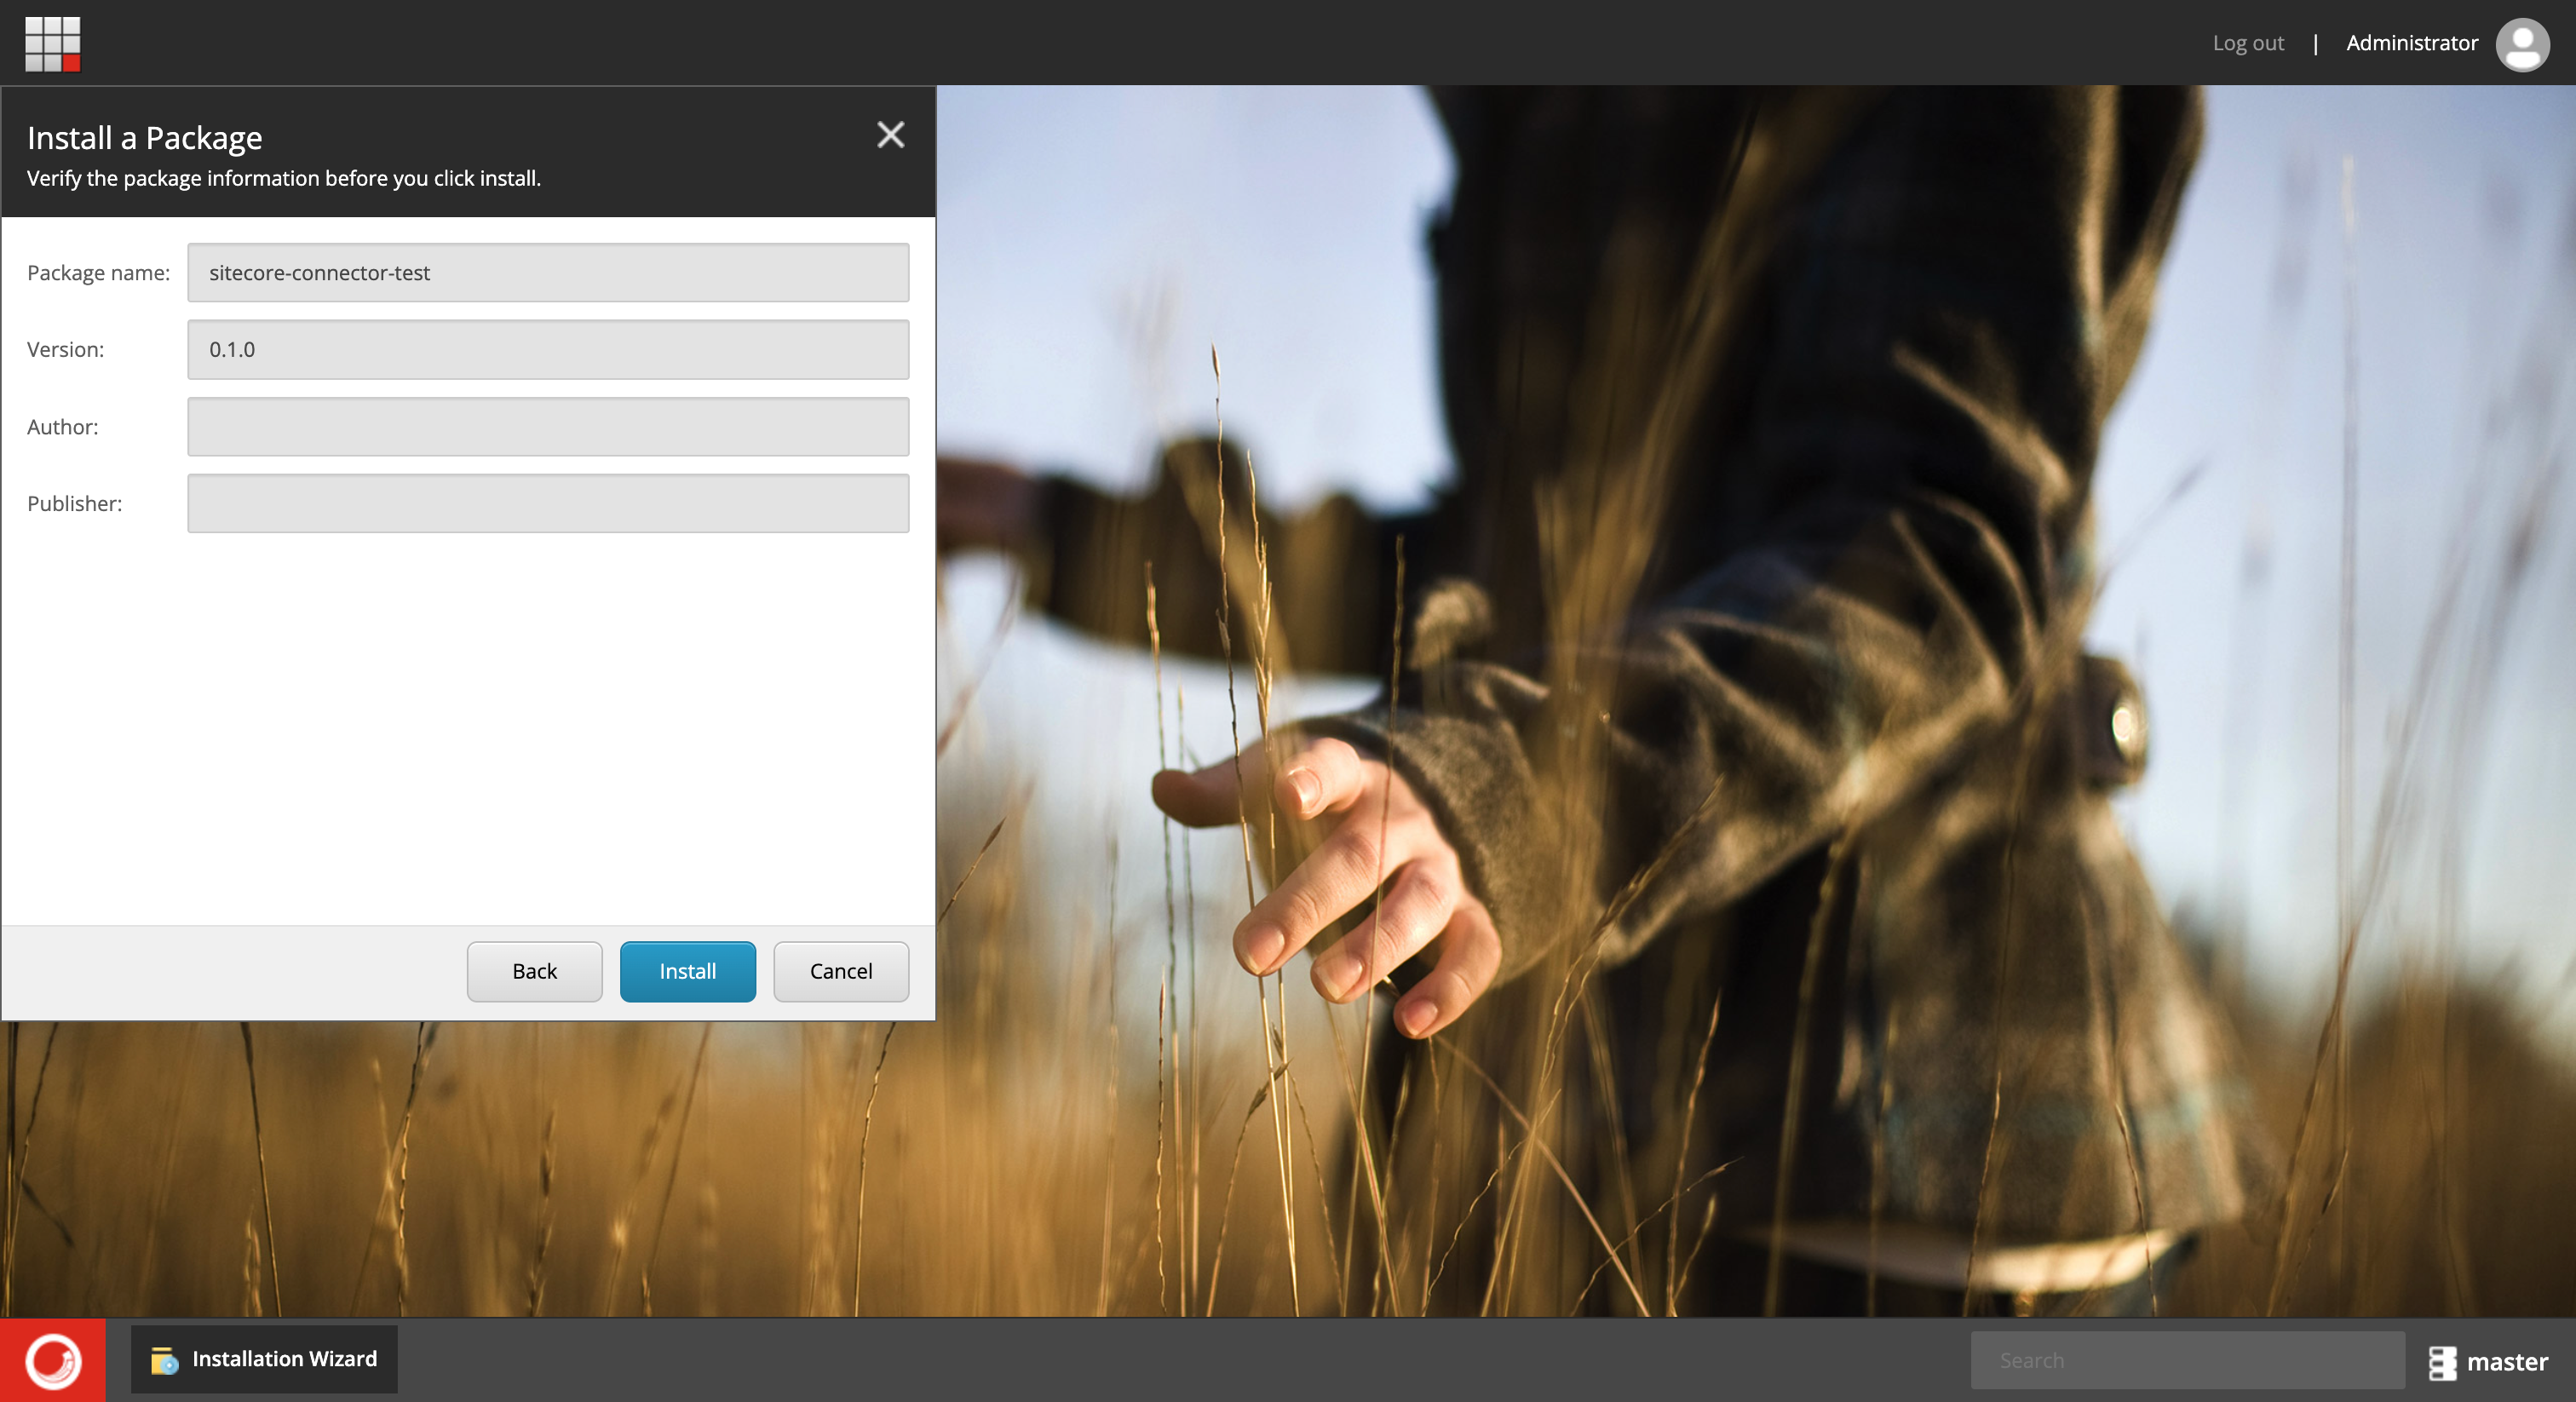
- Click Install to install the plugin
- Restart the Sitecore client when prompted
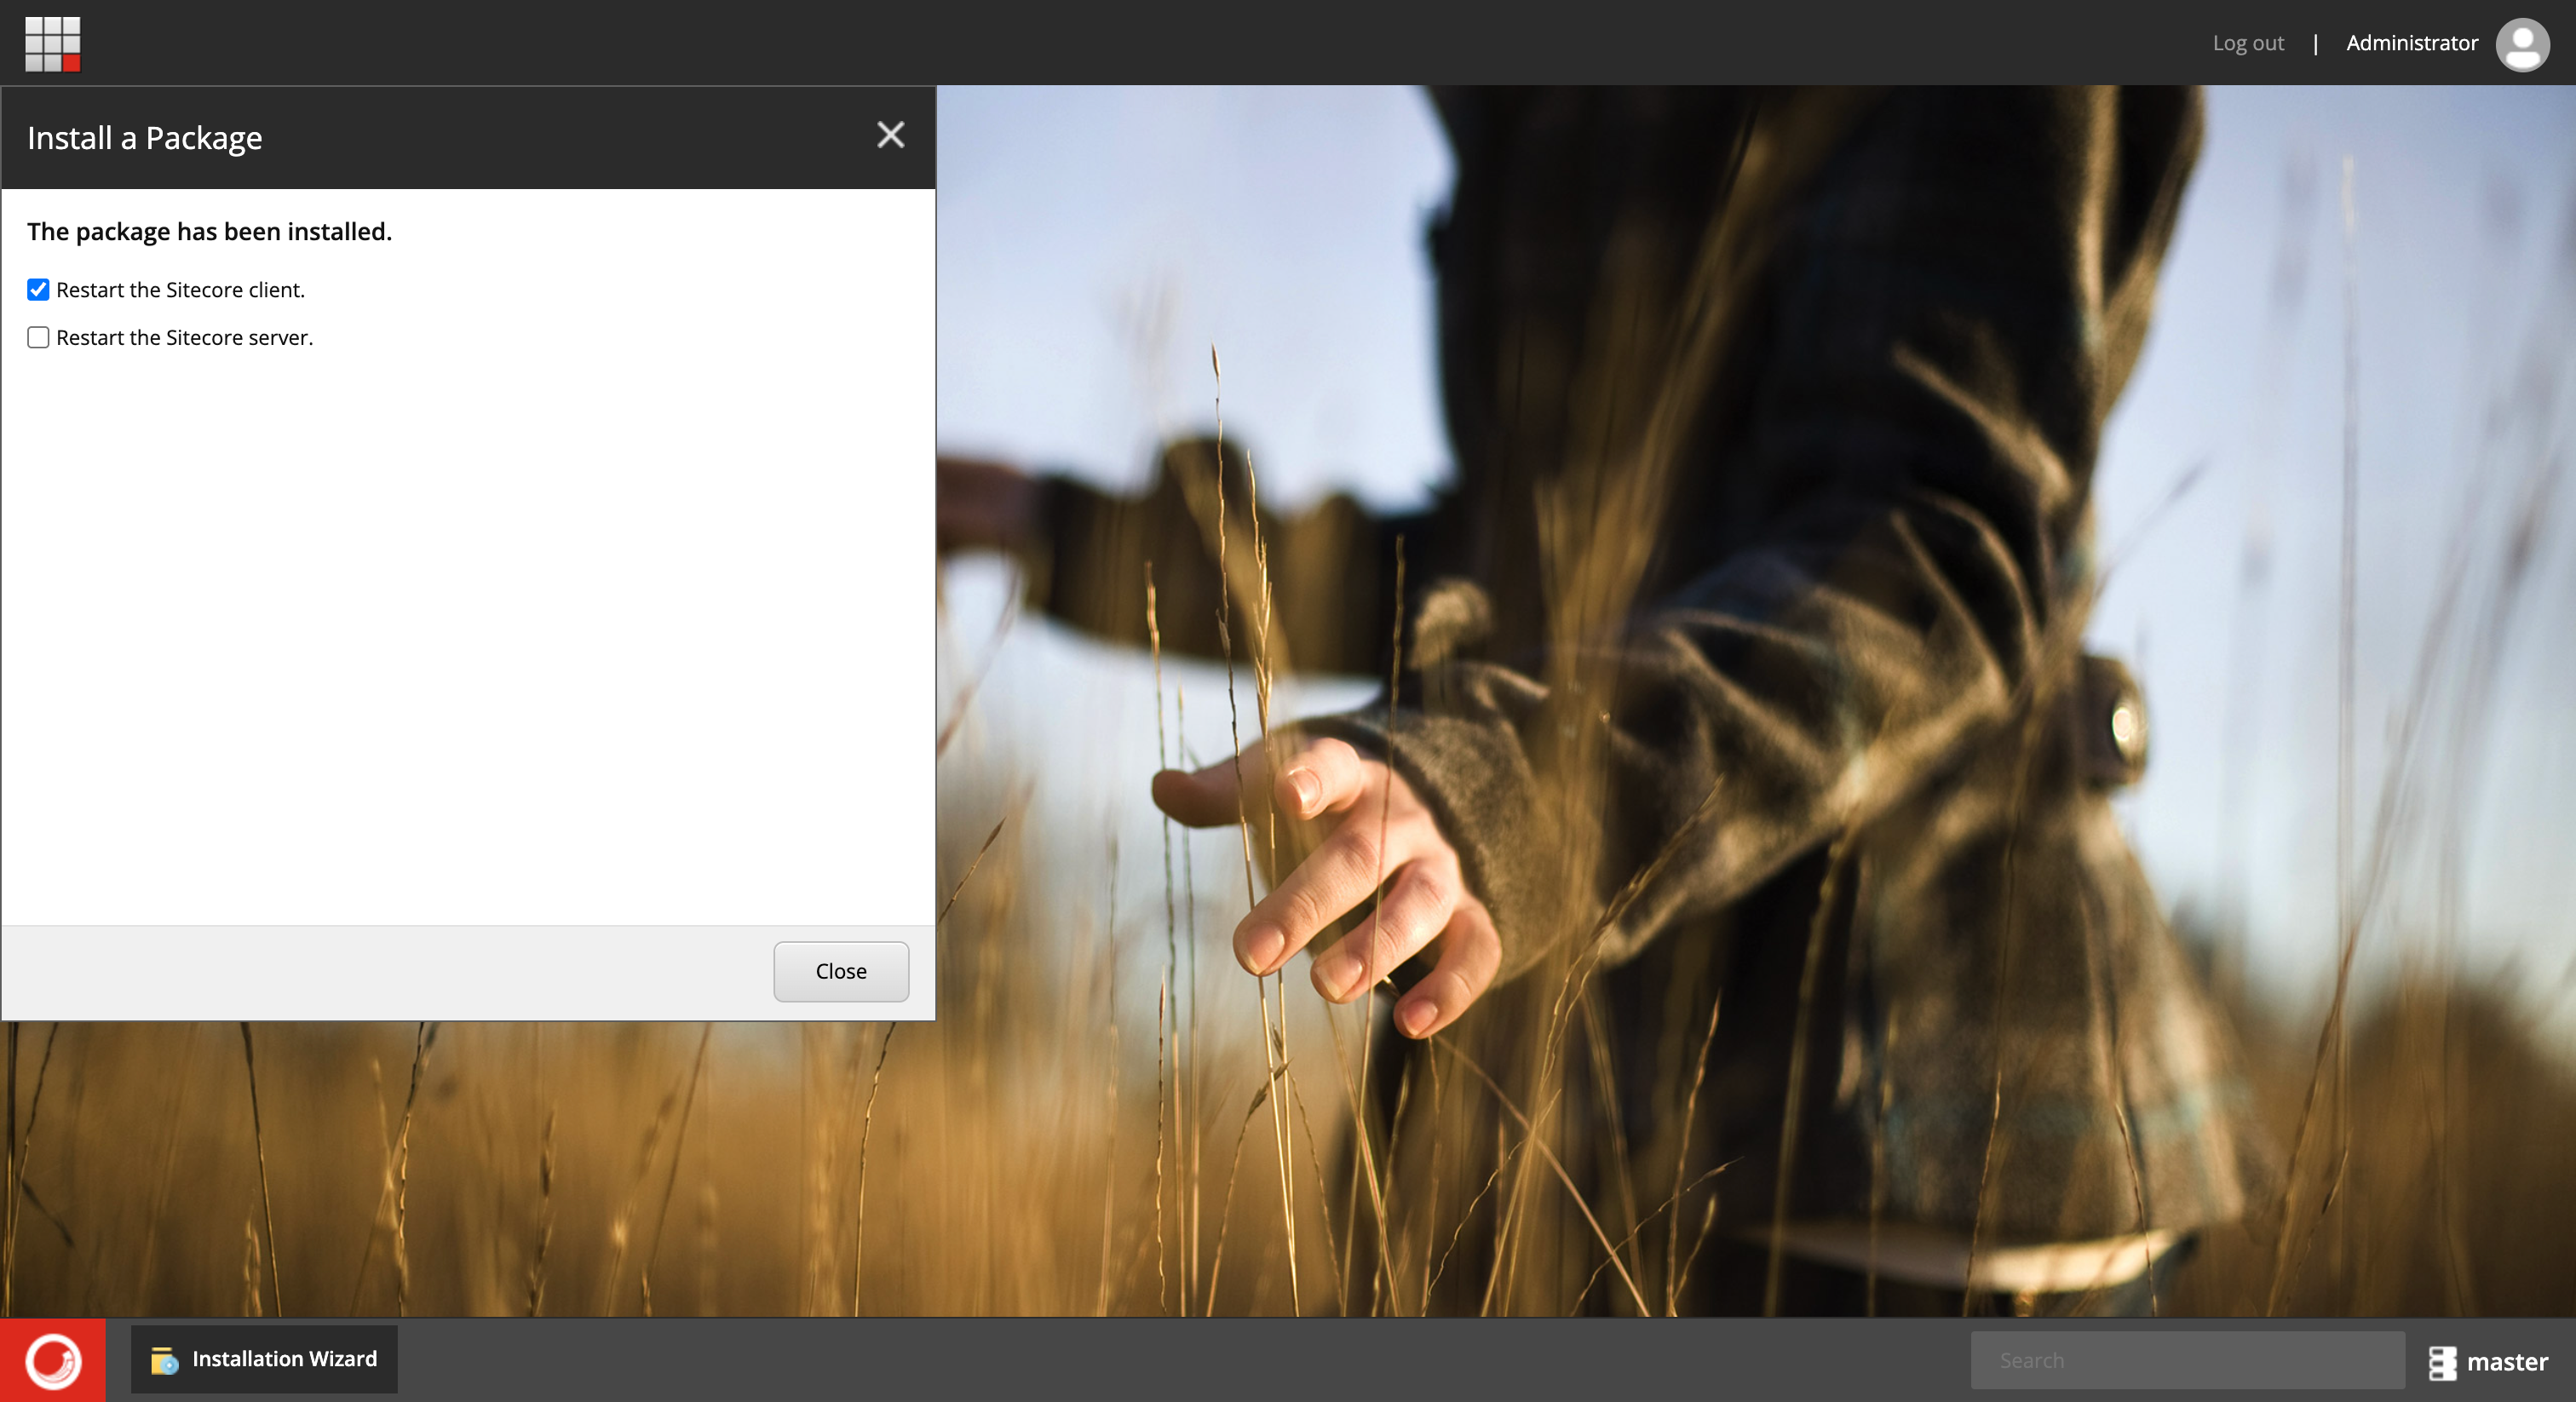
The Smartcat tab appears in the Content Editor, confirming the plugin is installed.
Connect to Smartcat
- In Smartcat, go to Settings → API and click Create New Key. Copy the API key and your account ID
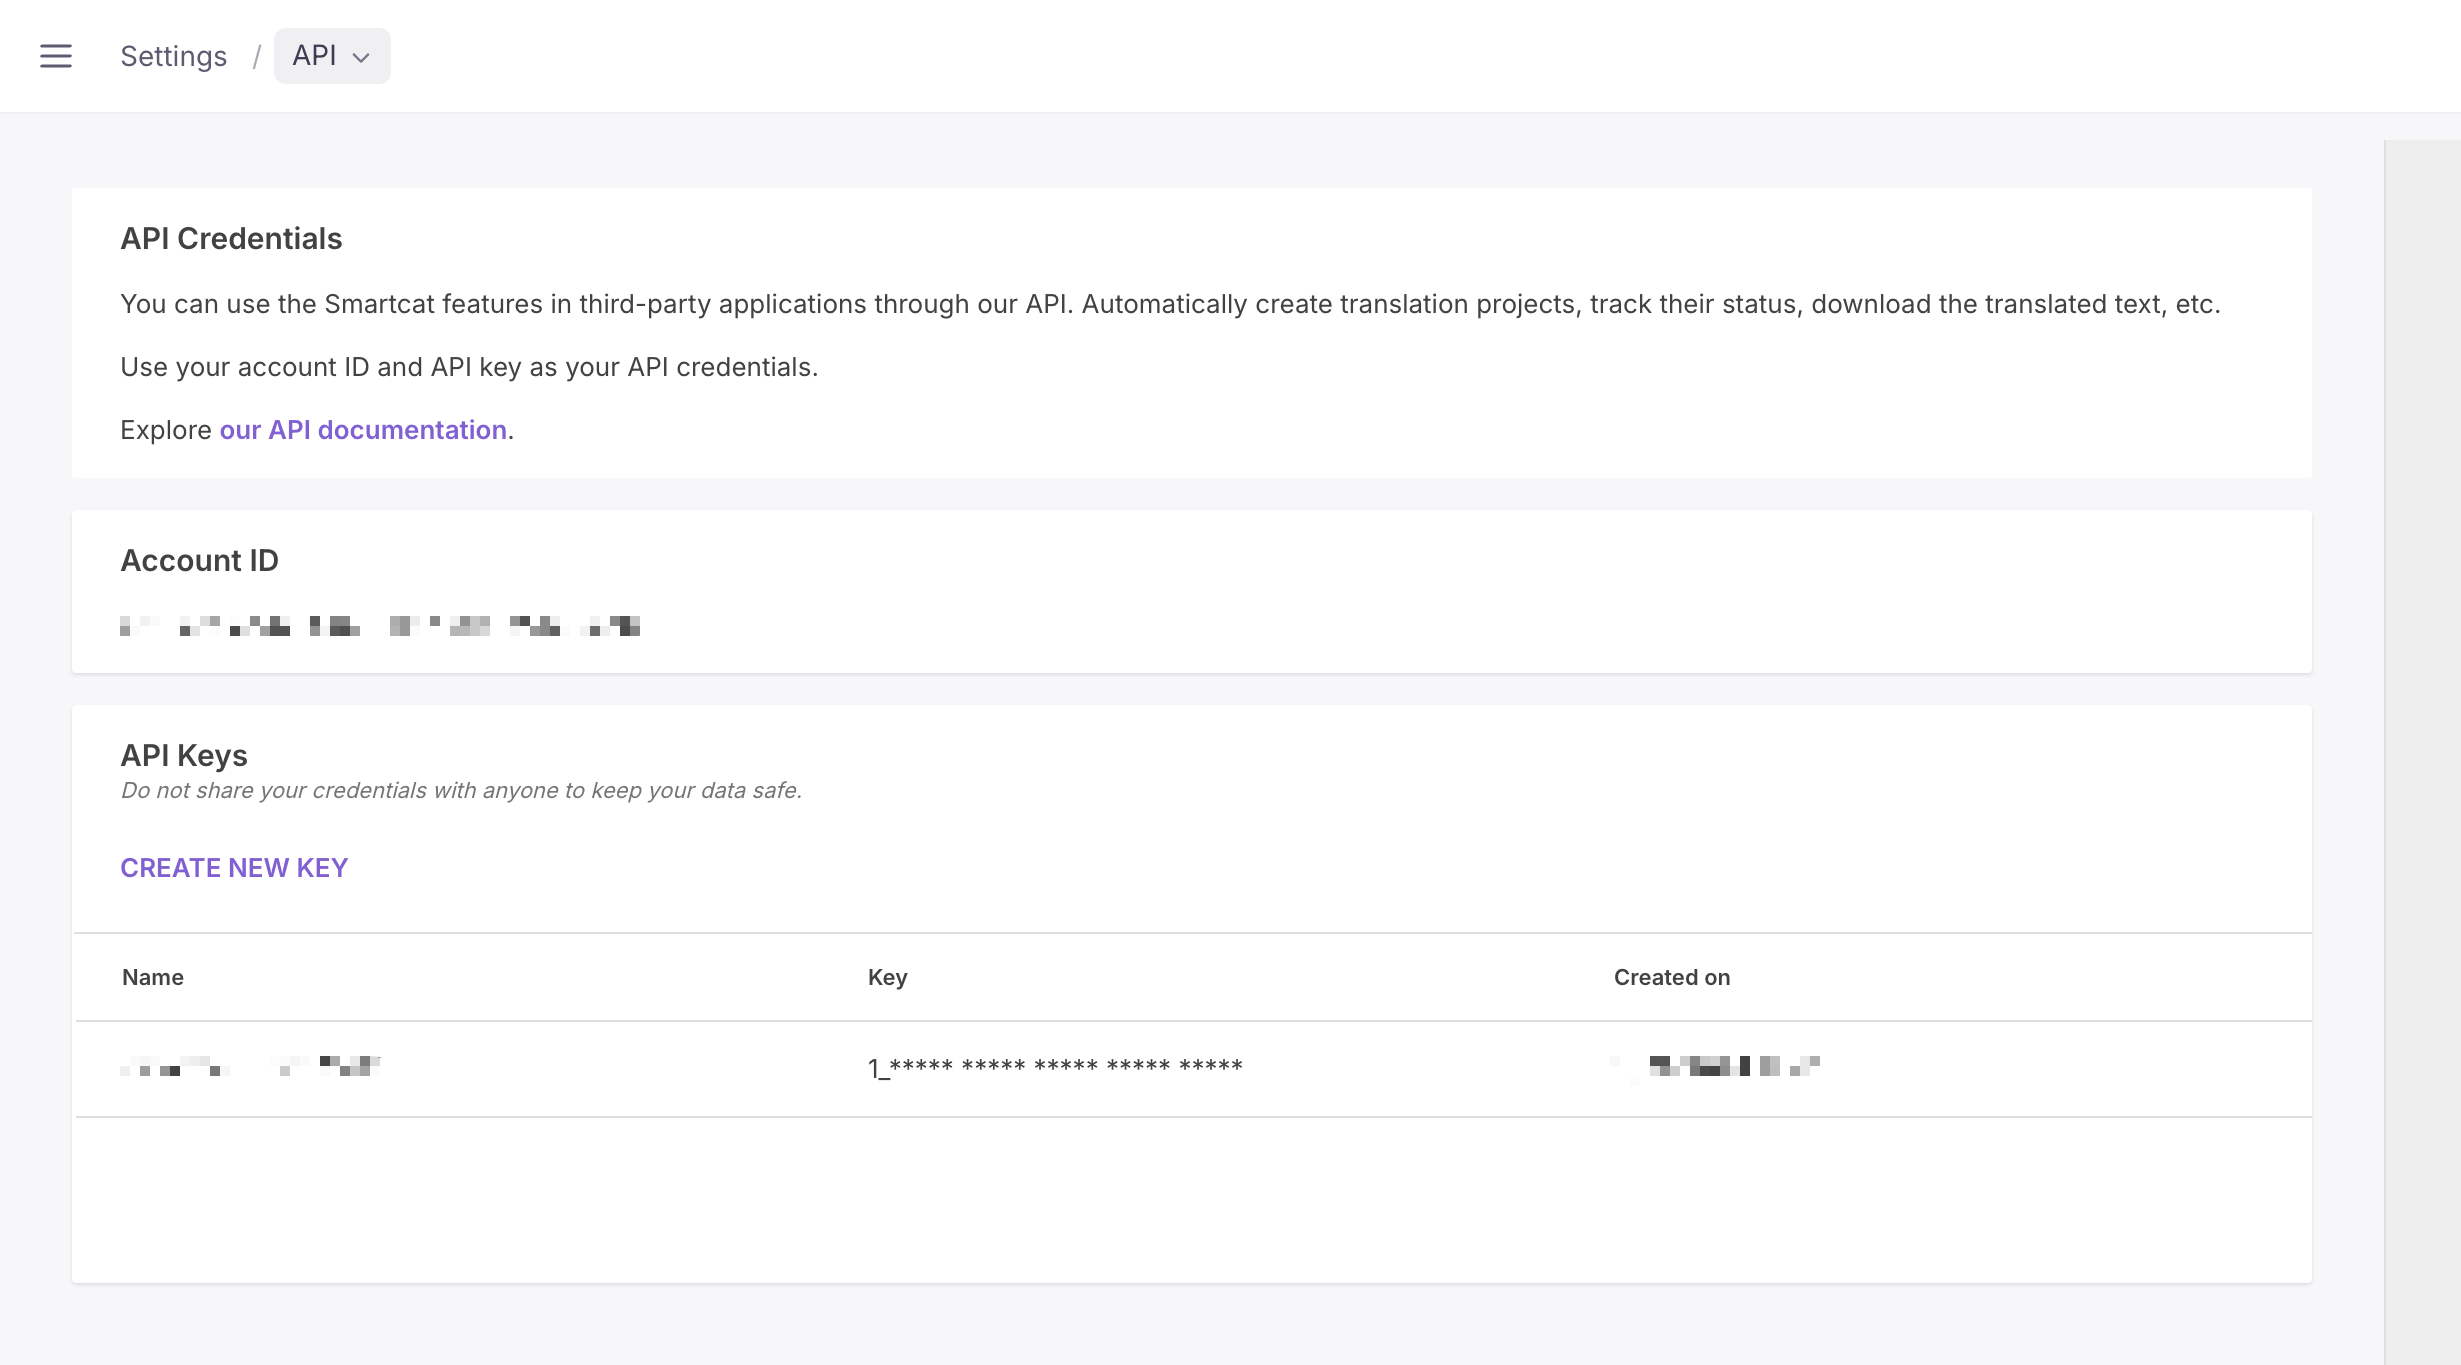
-
In the Sitecore Content Editor, open the Smartcat tab and click Connect workspace
-
Paste your account ID and API key, then confirm
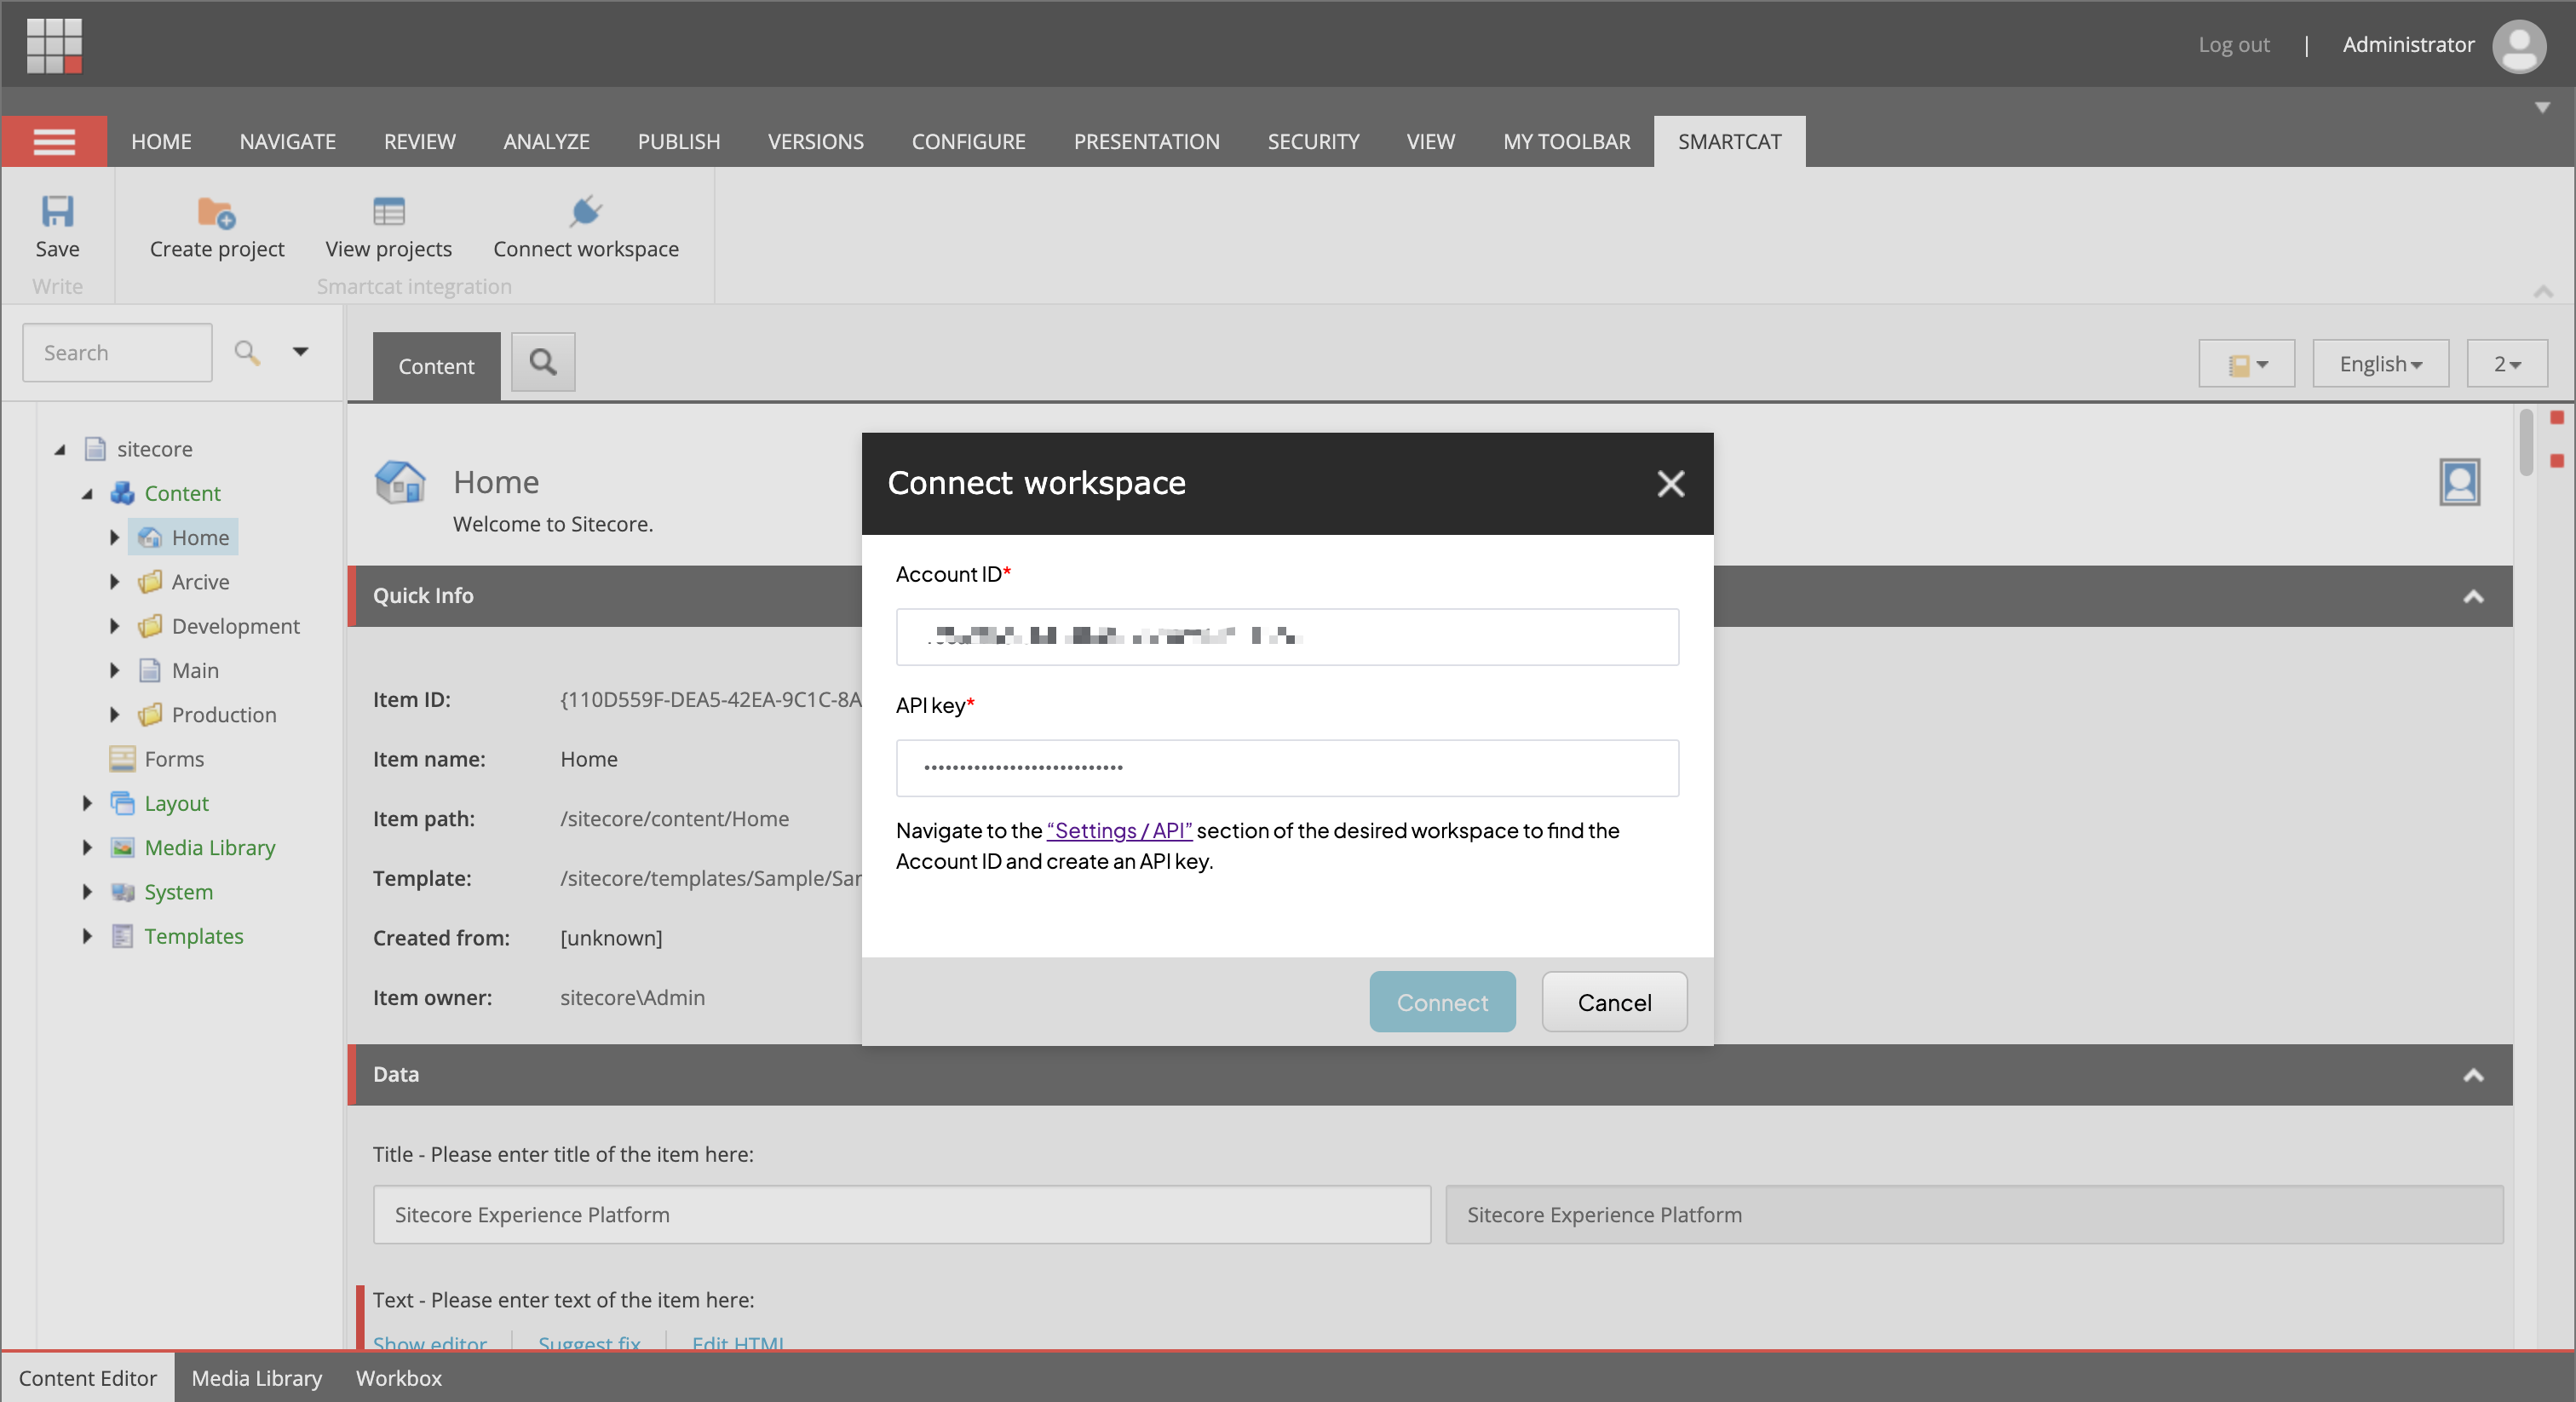
The plugin is connected to your Smartcat workspace and ready to translate.
Core workflow
Translating pages
-
Ensure your Sitecore instance has multiple languages enabled. Verify that several languages have been added under System → Languages in Sitecore.
-
On the Smartcat tab, click Create project
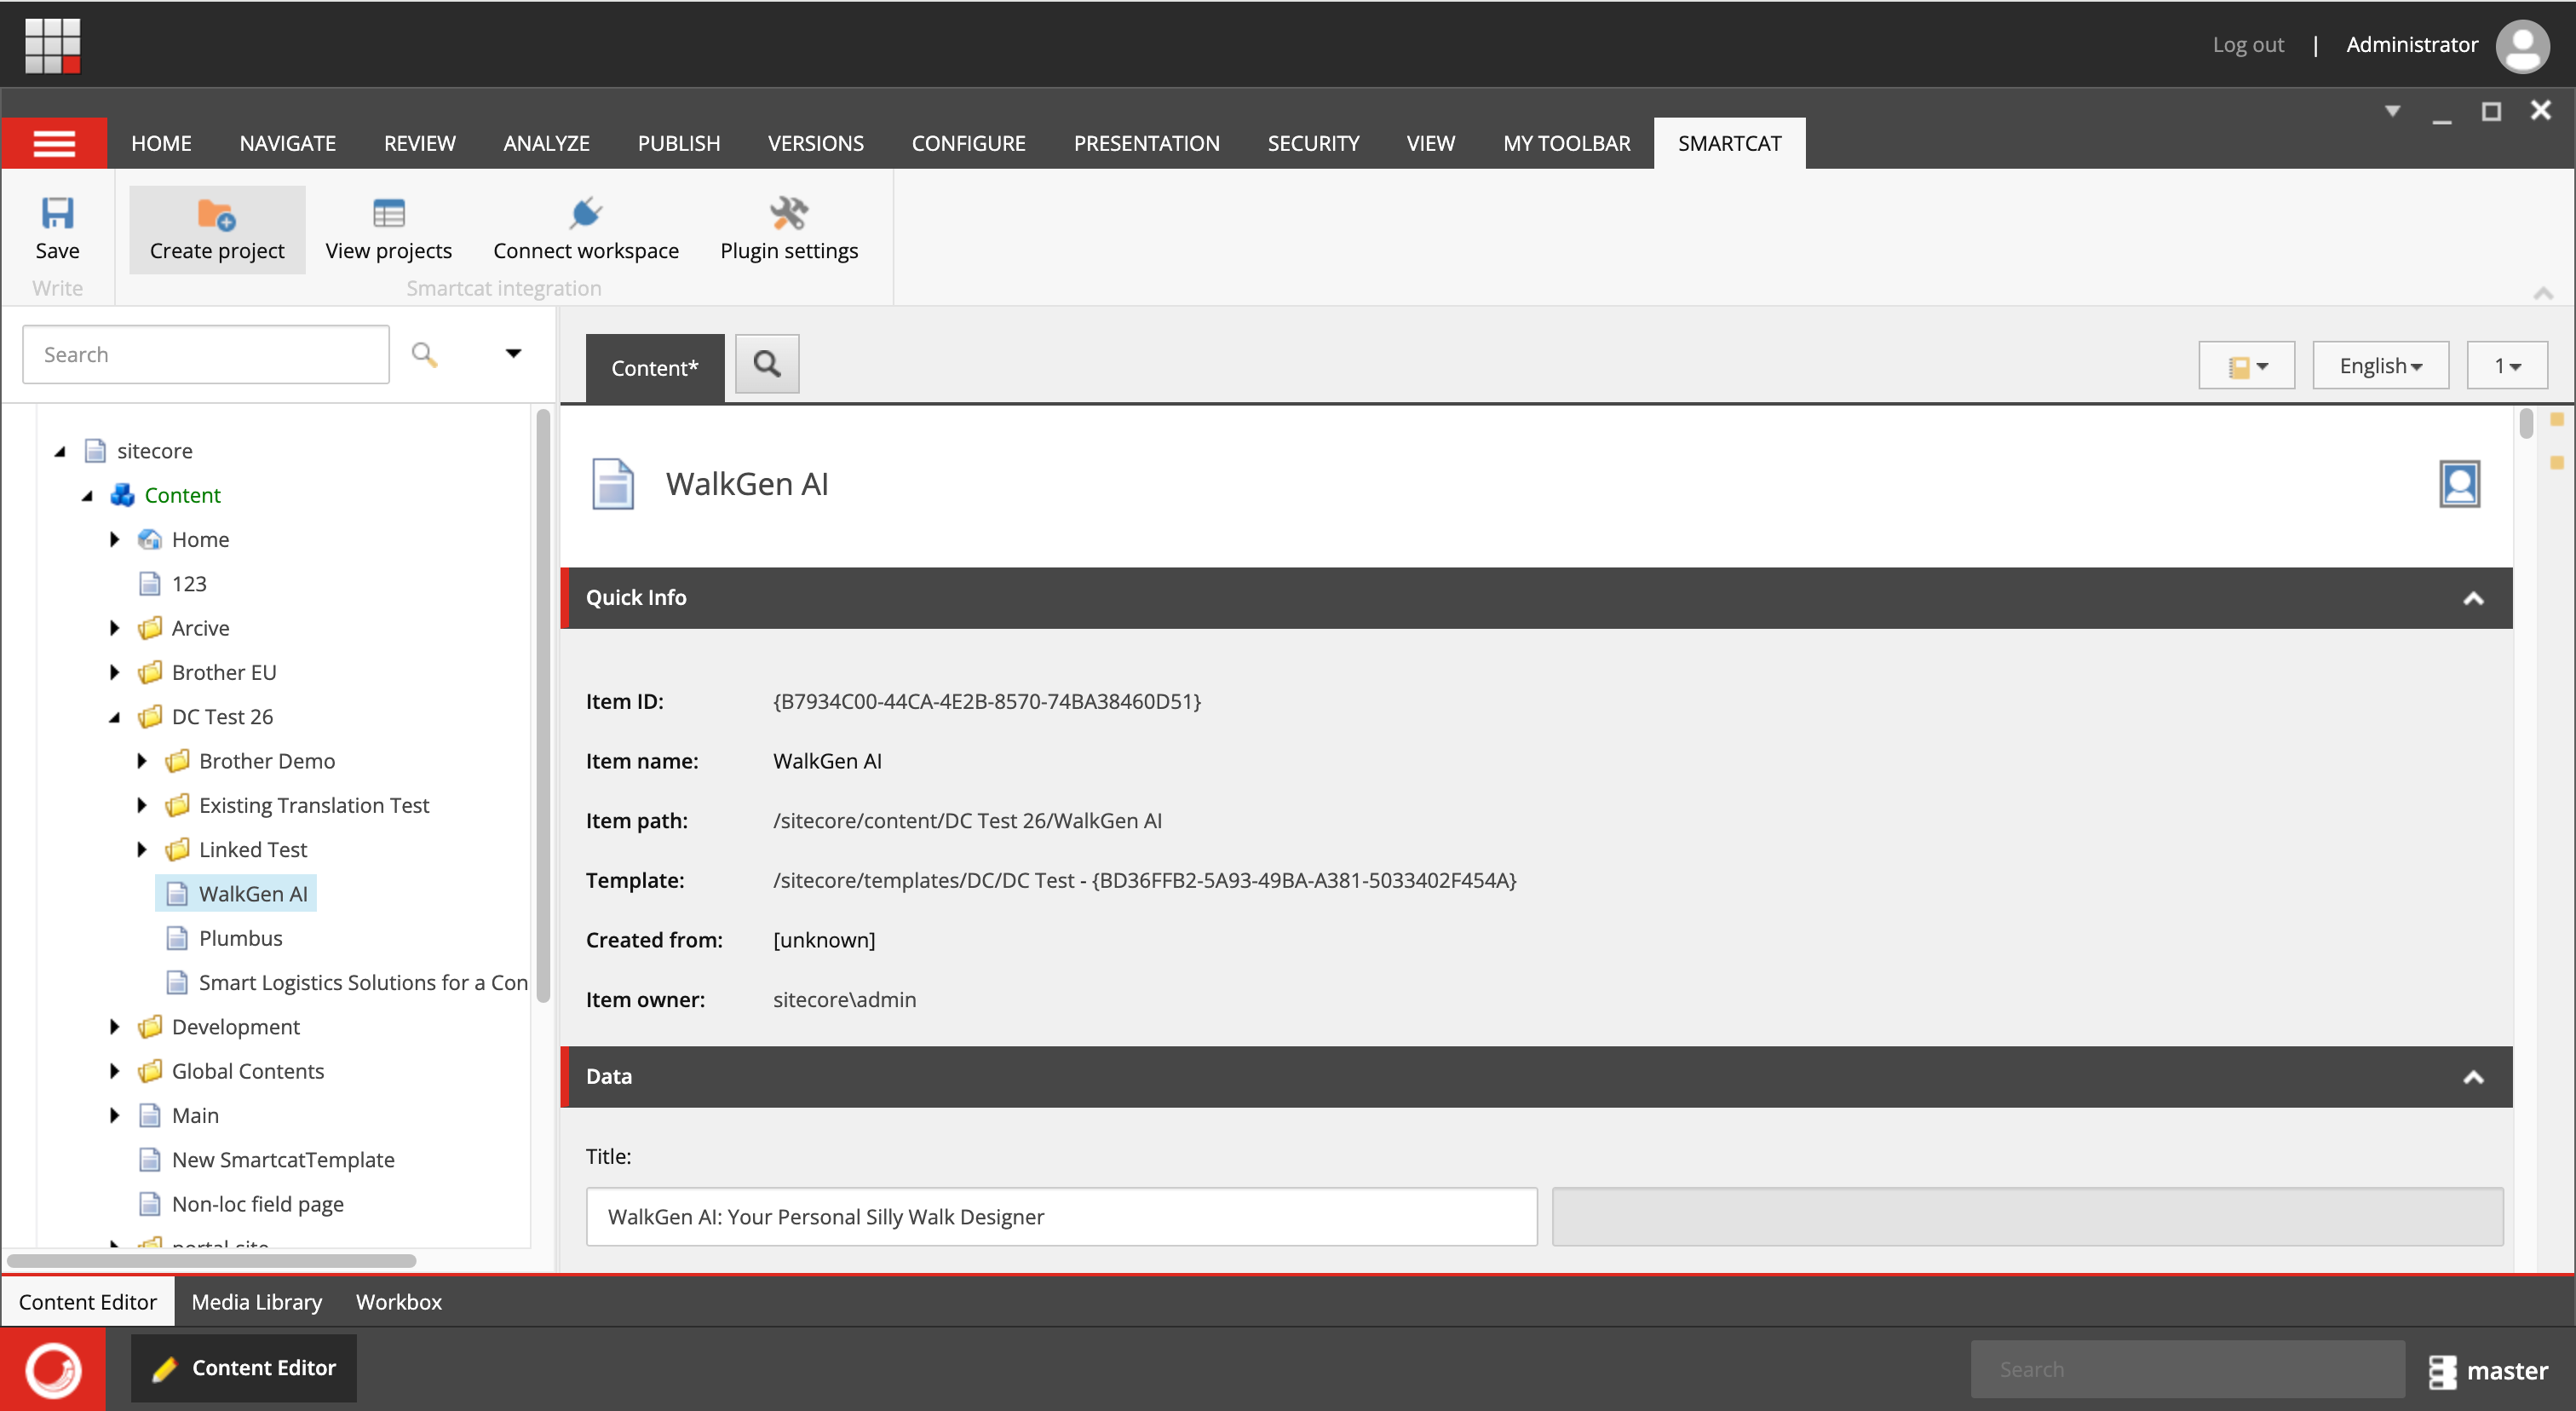
- Select one or several items for translation
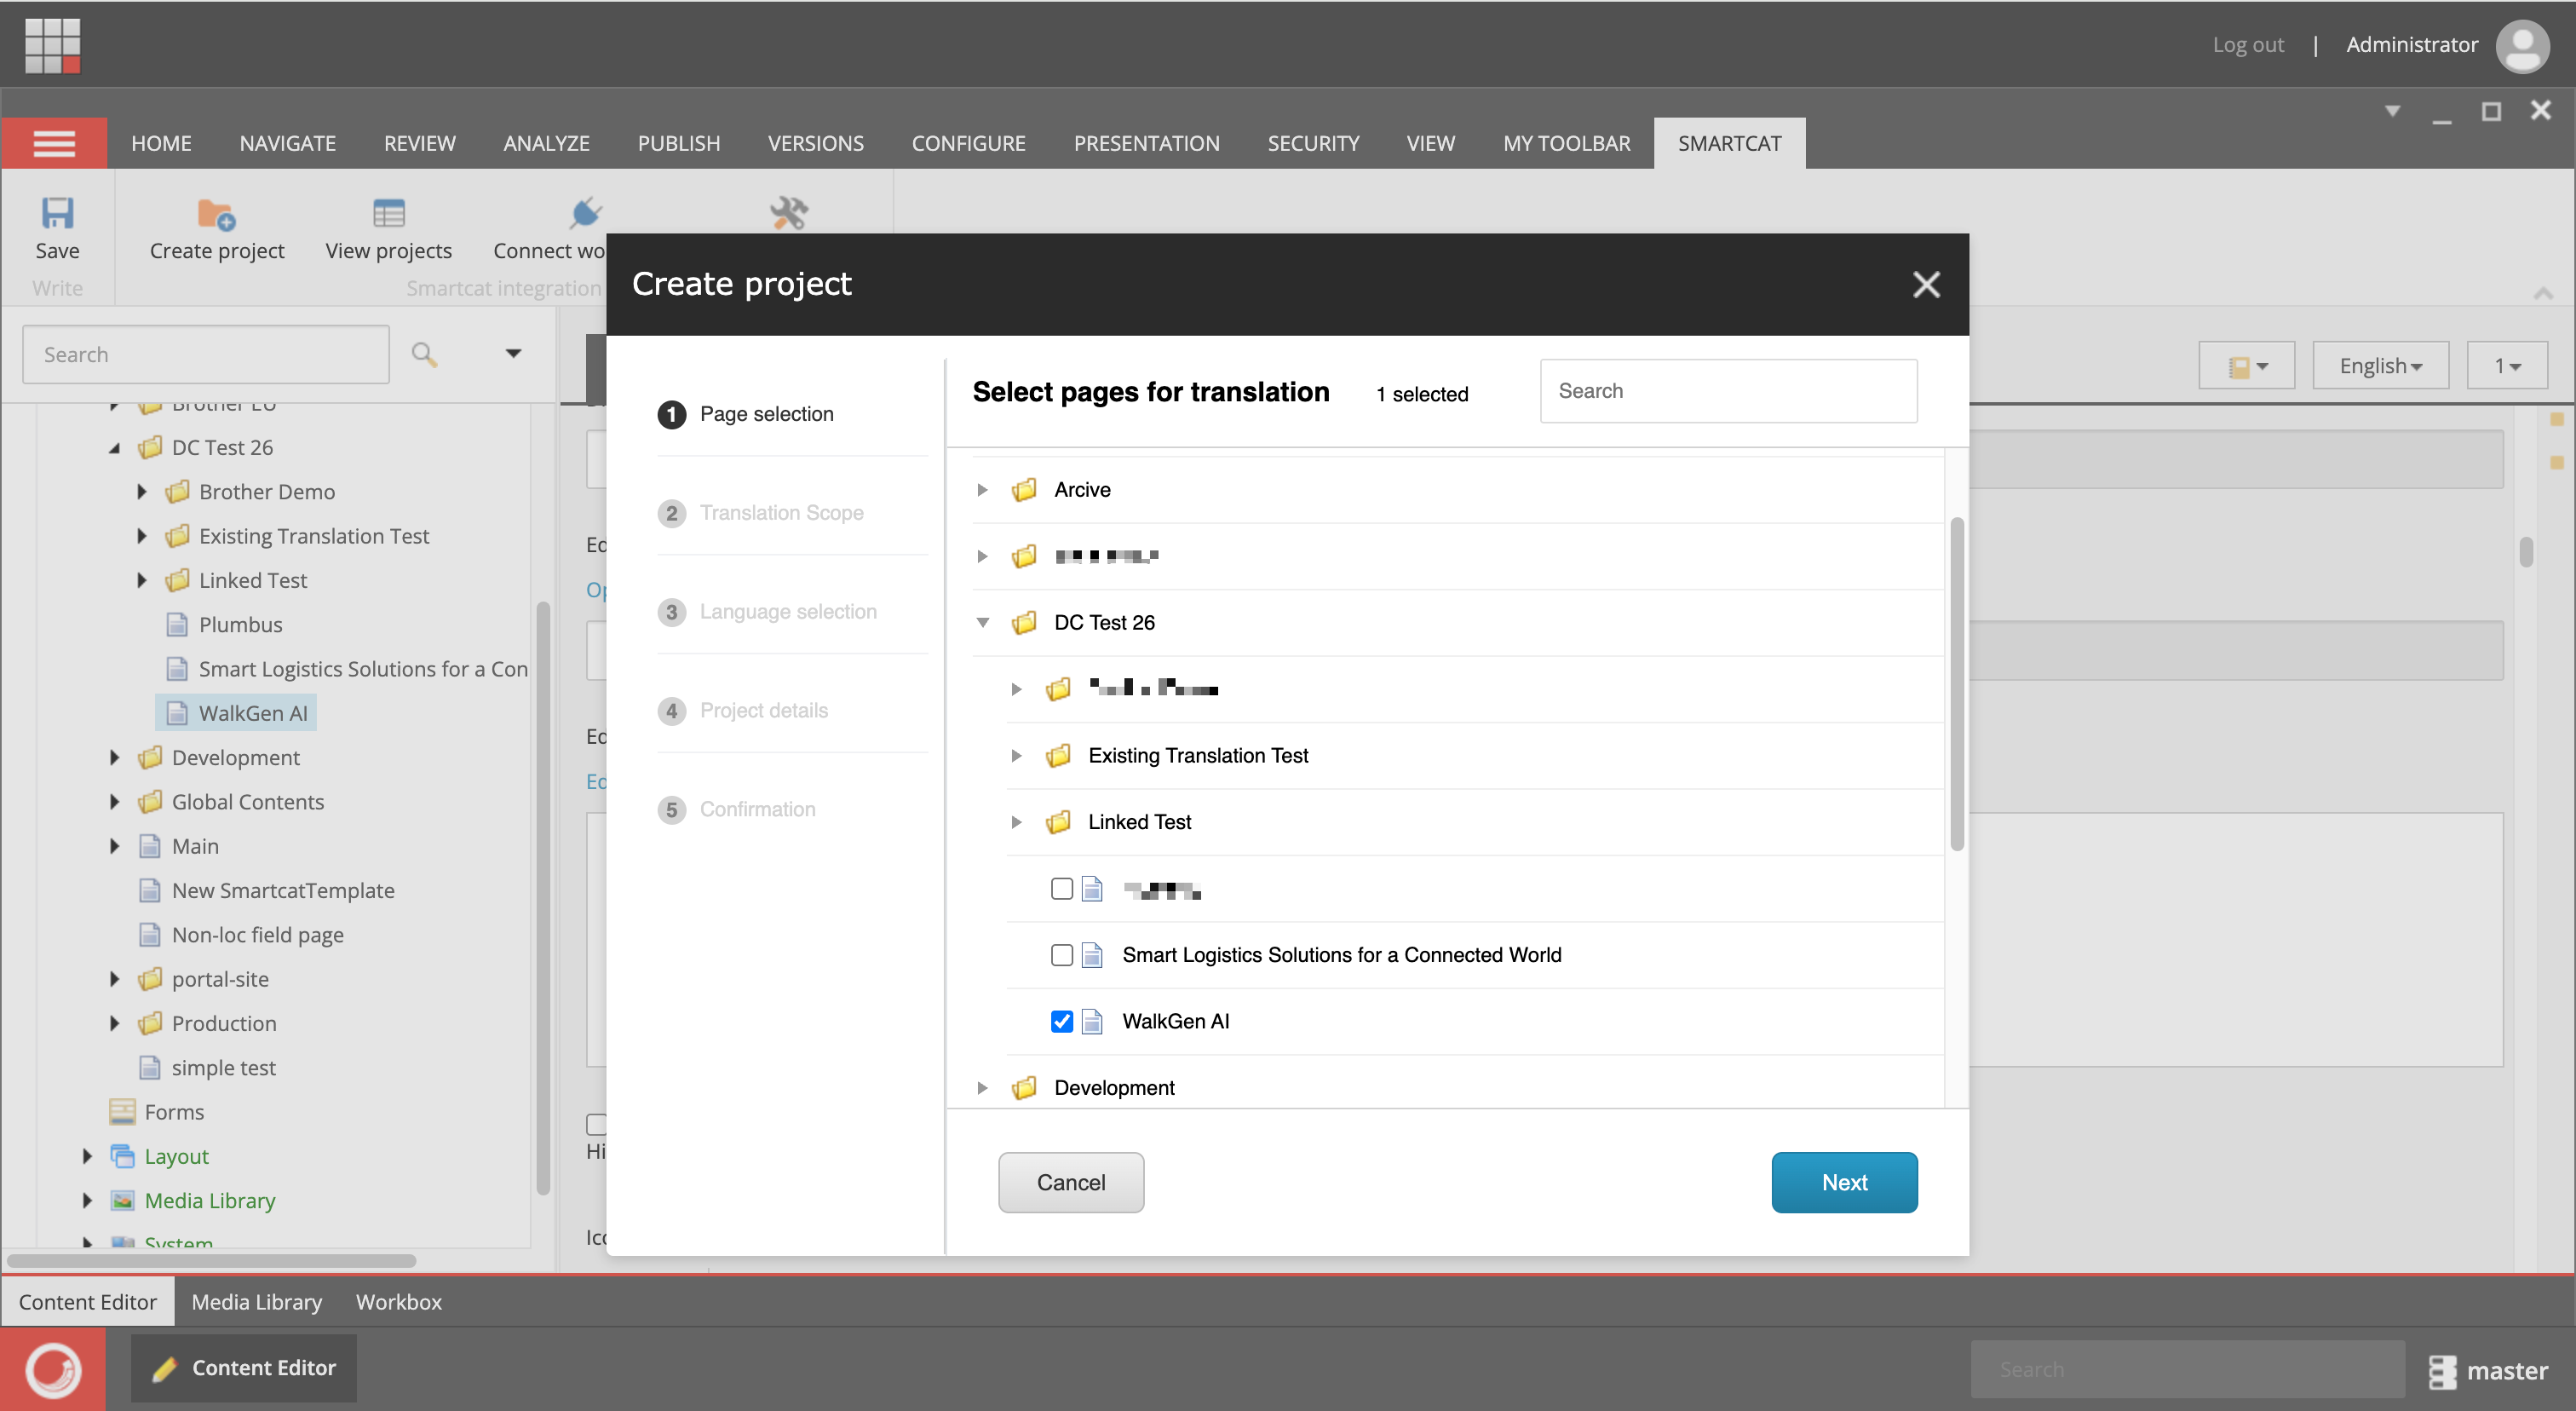
- Configure the translation scope
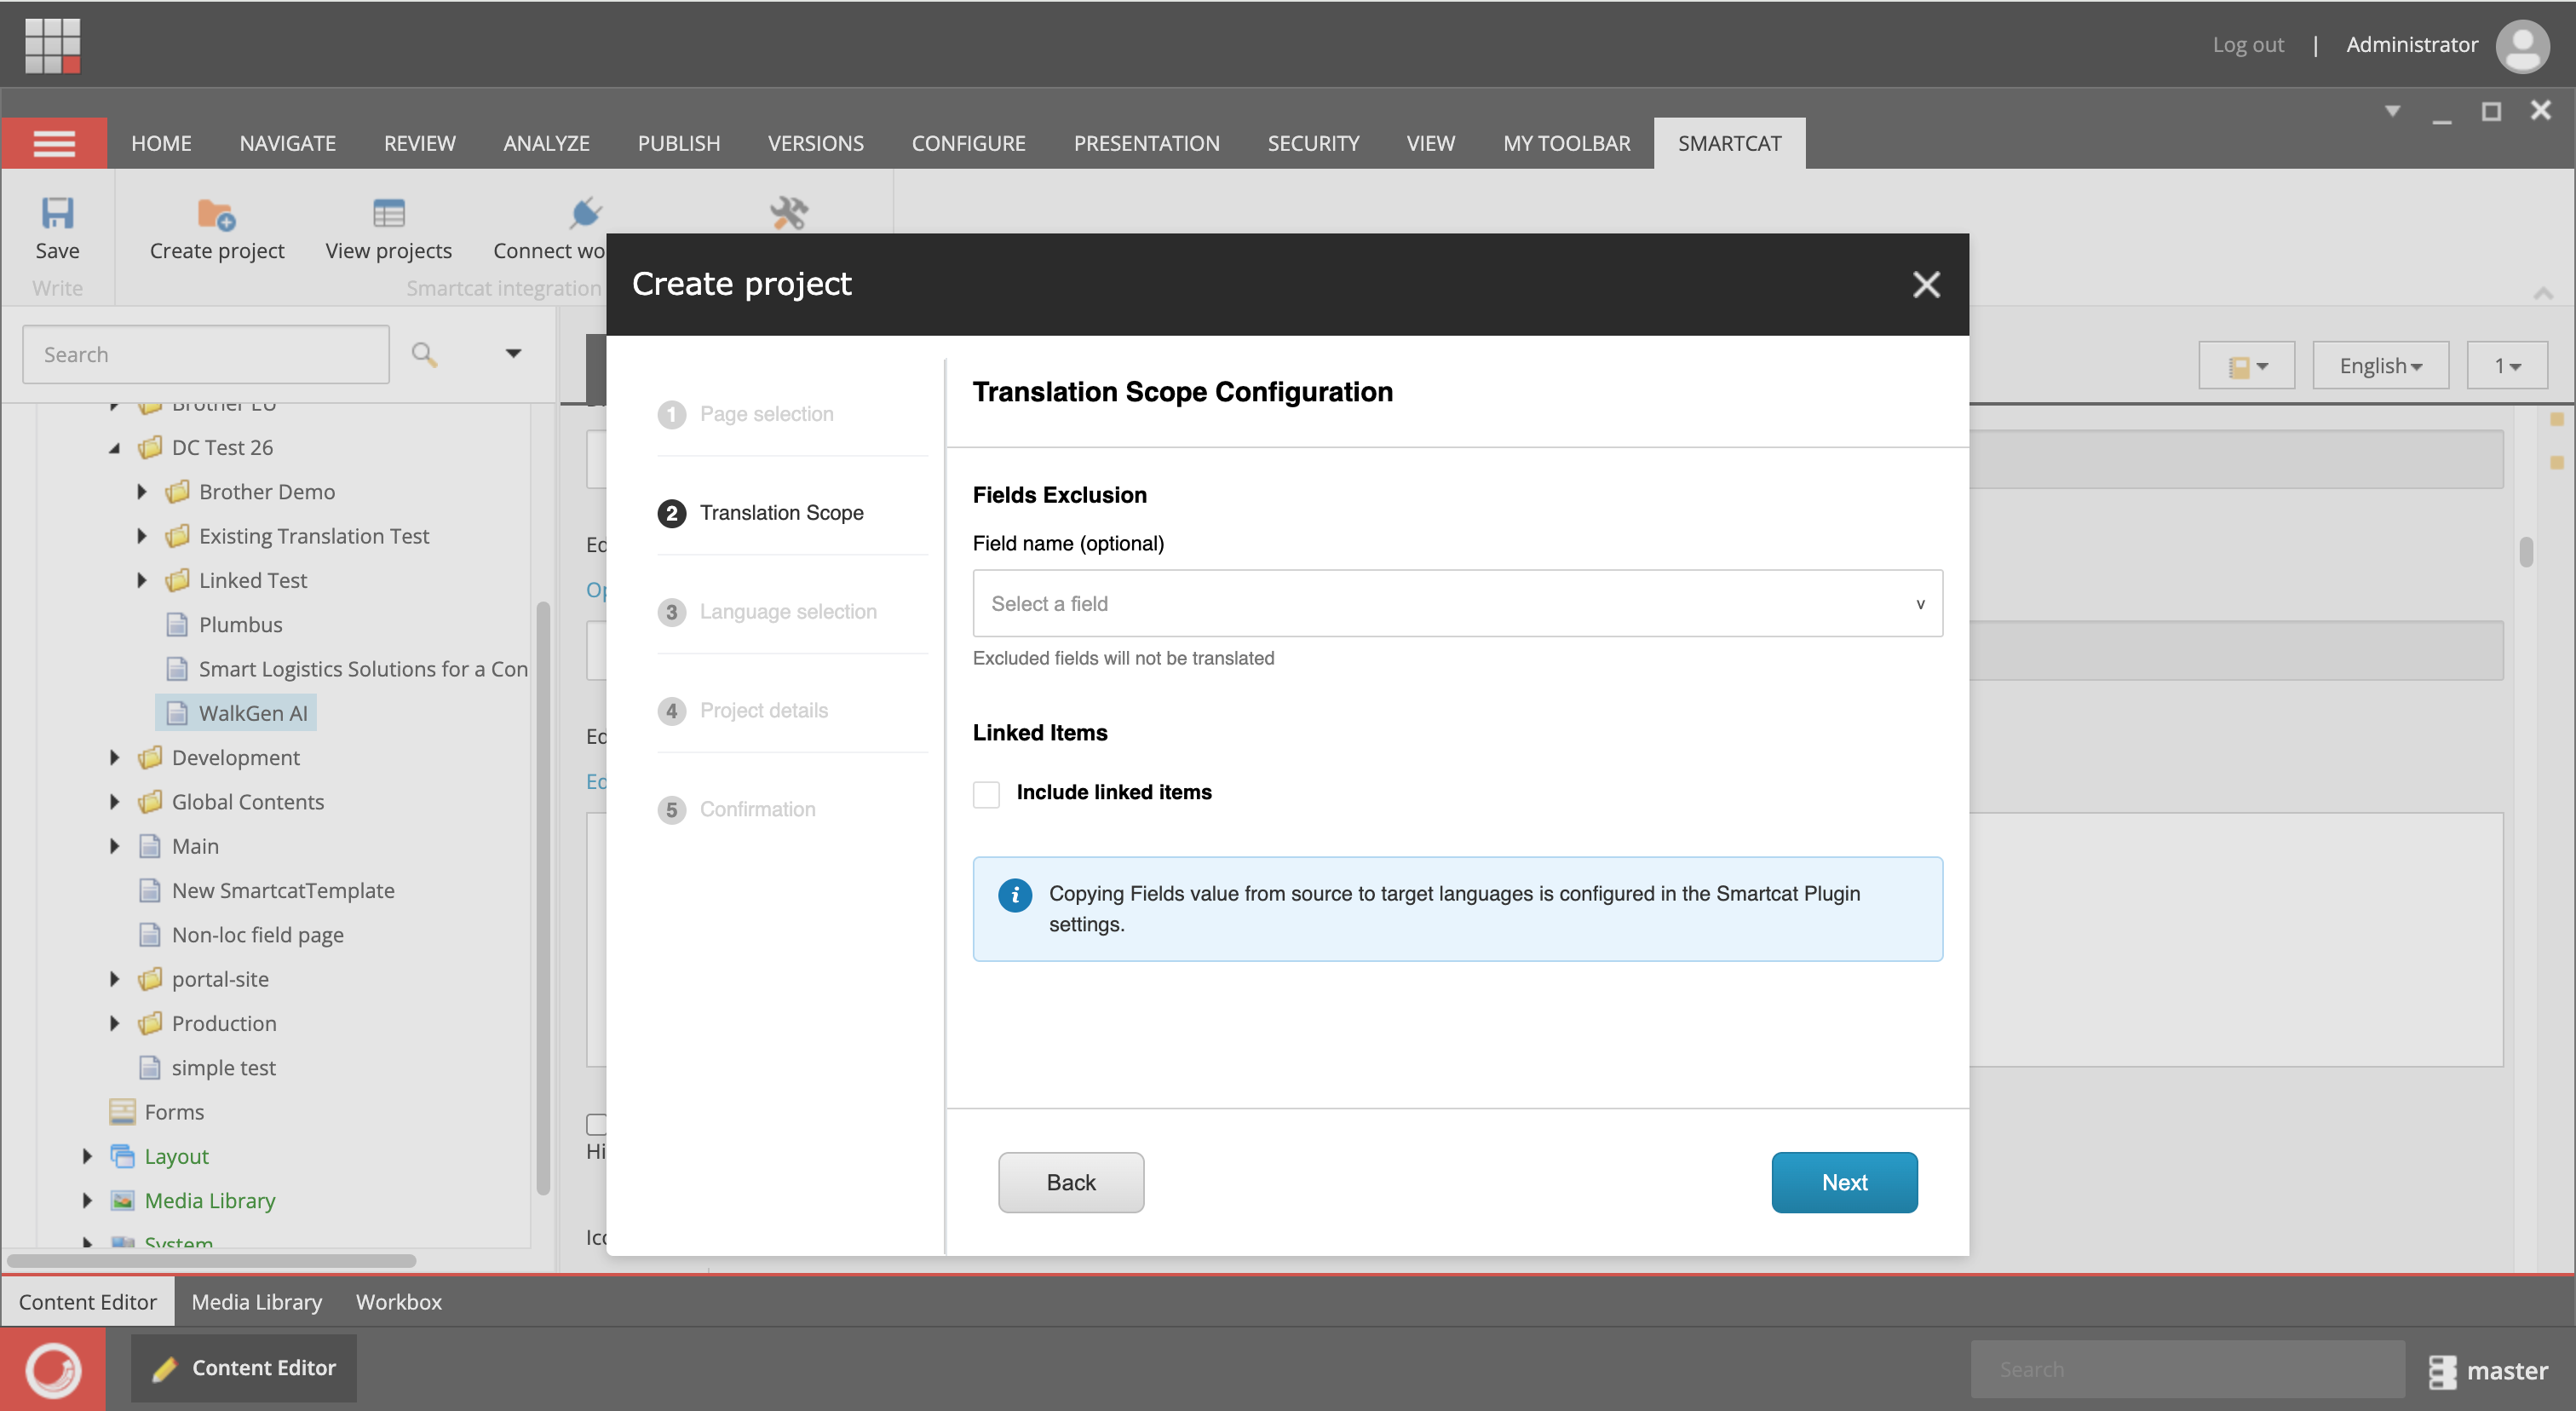
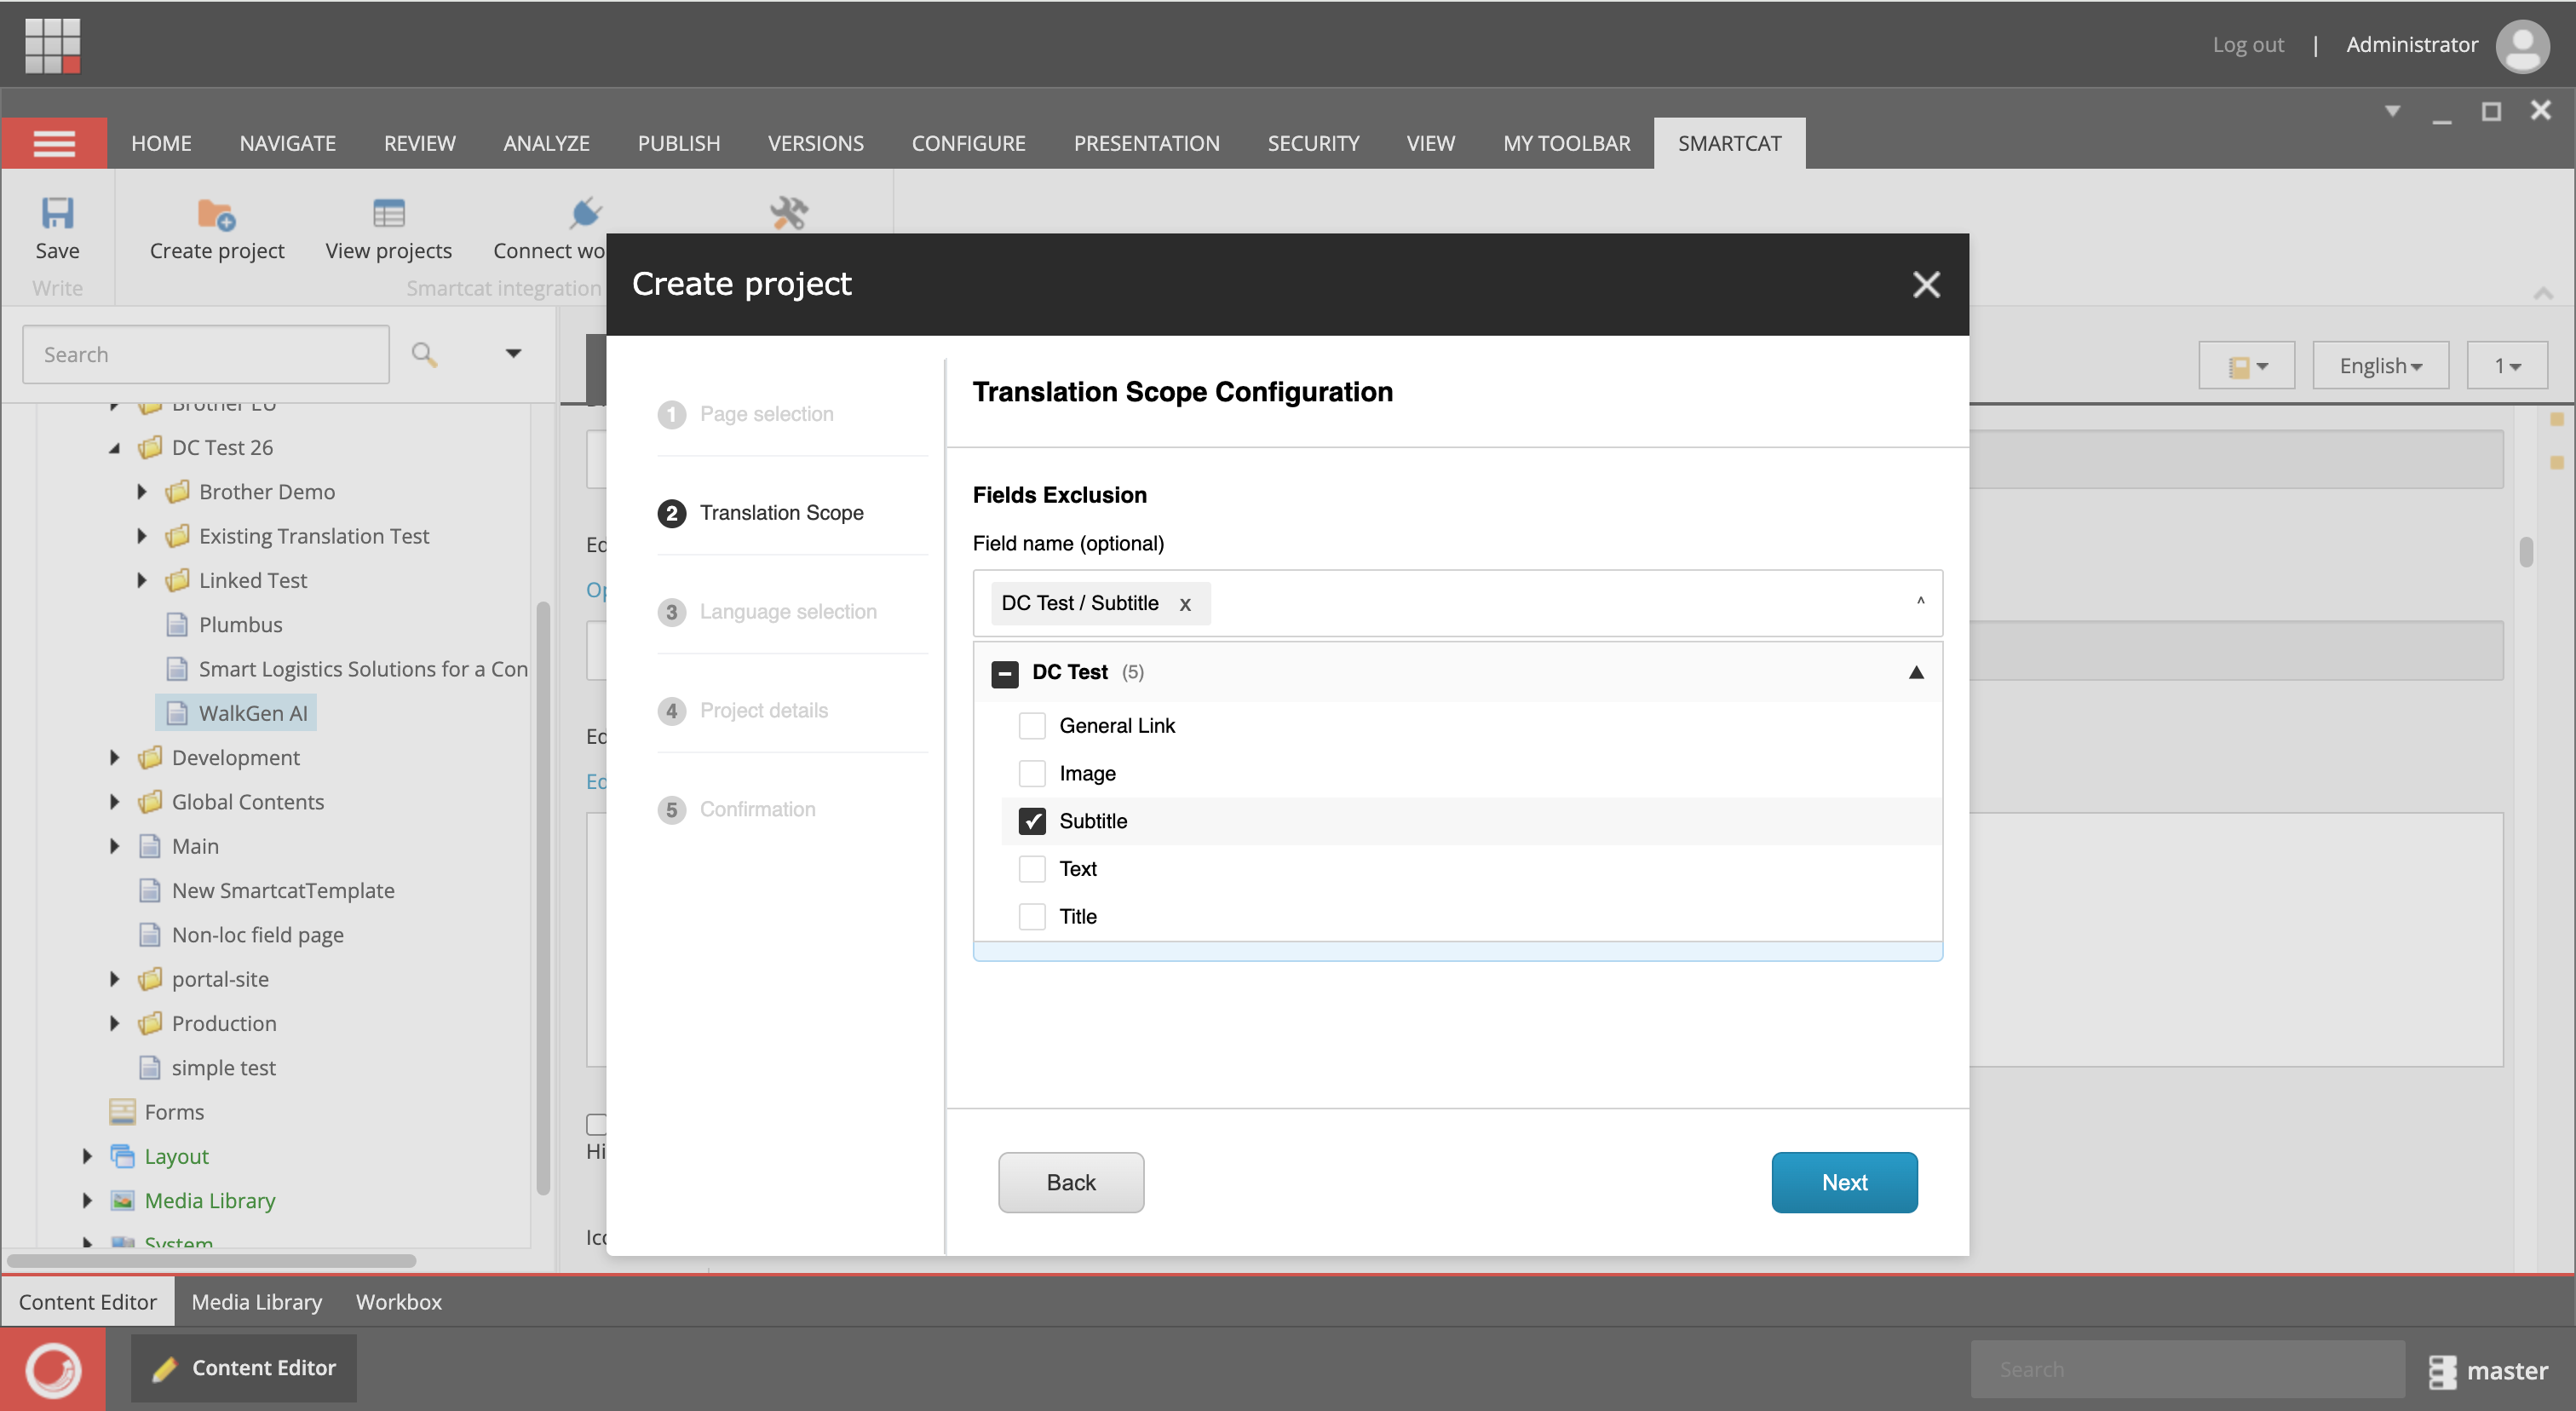
To exclude specific fields, select the field to exclude from the template associated with the page you want to translate.
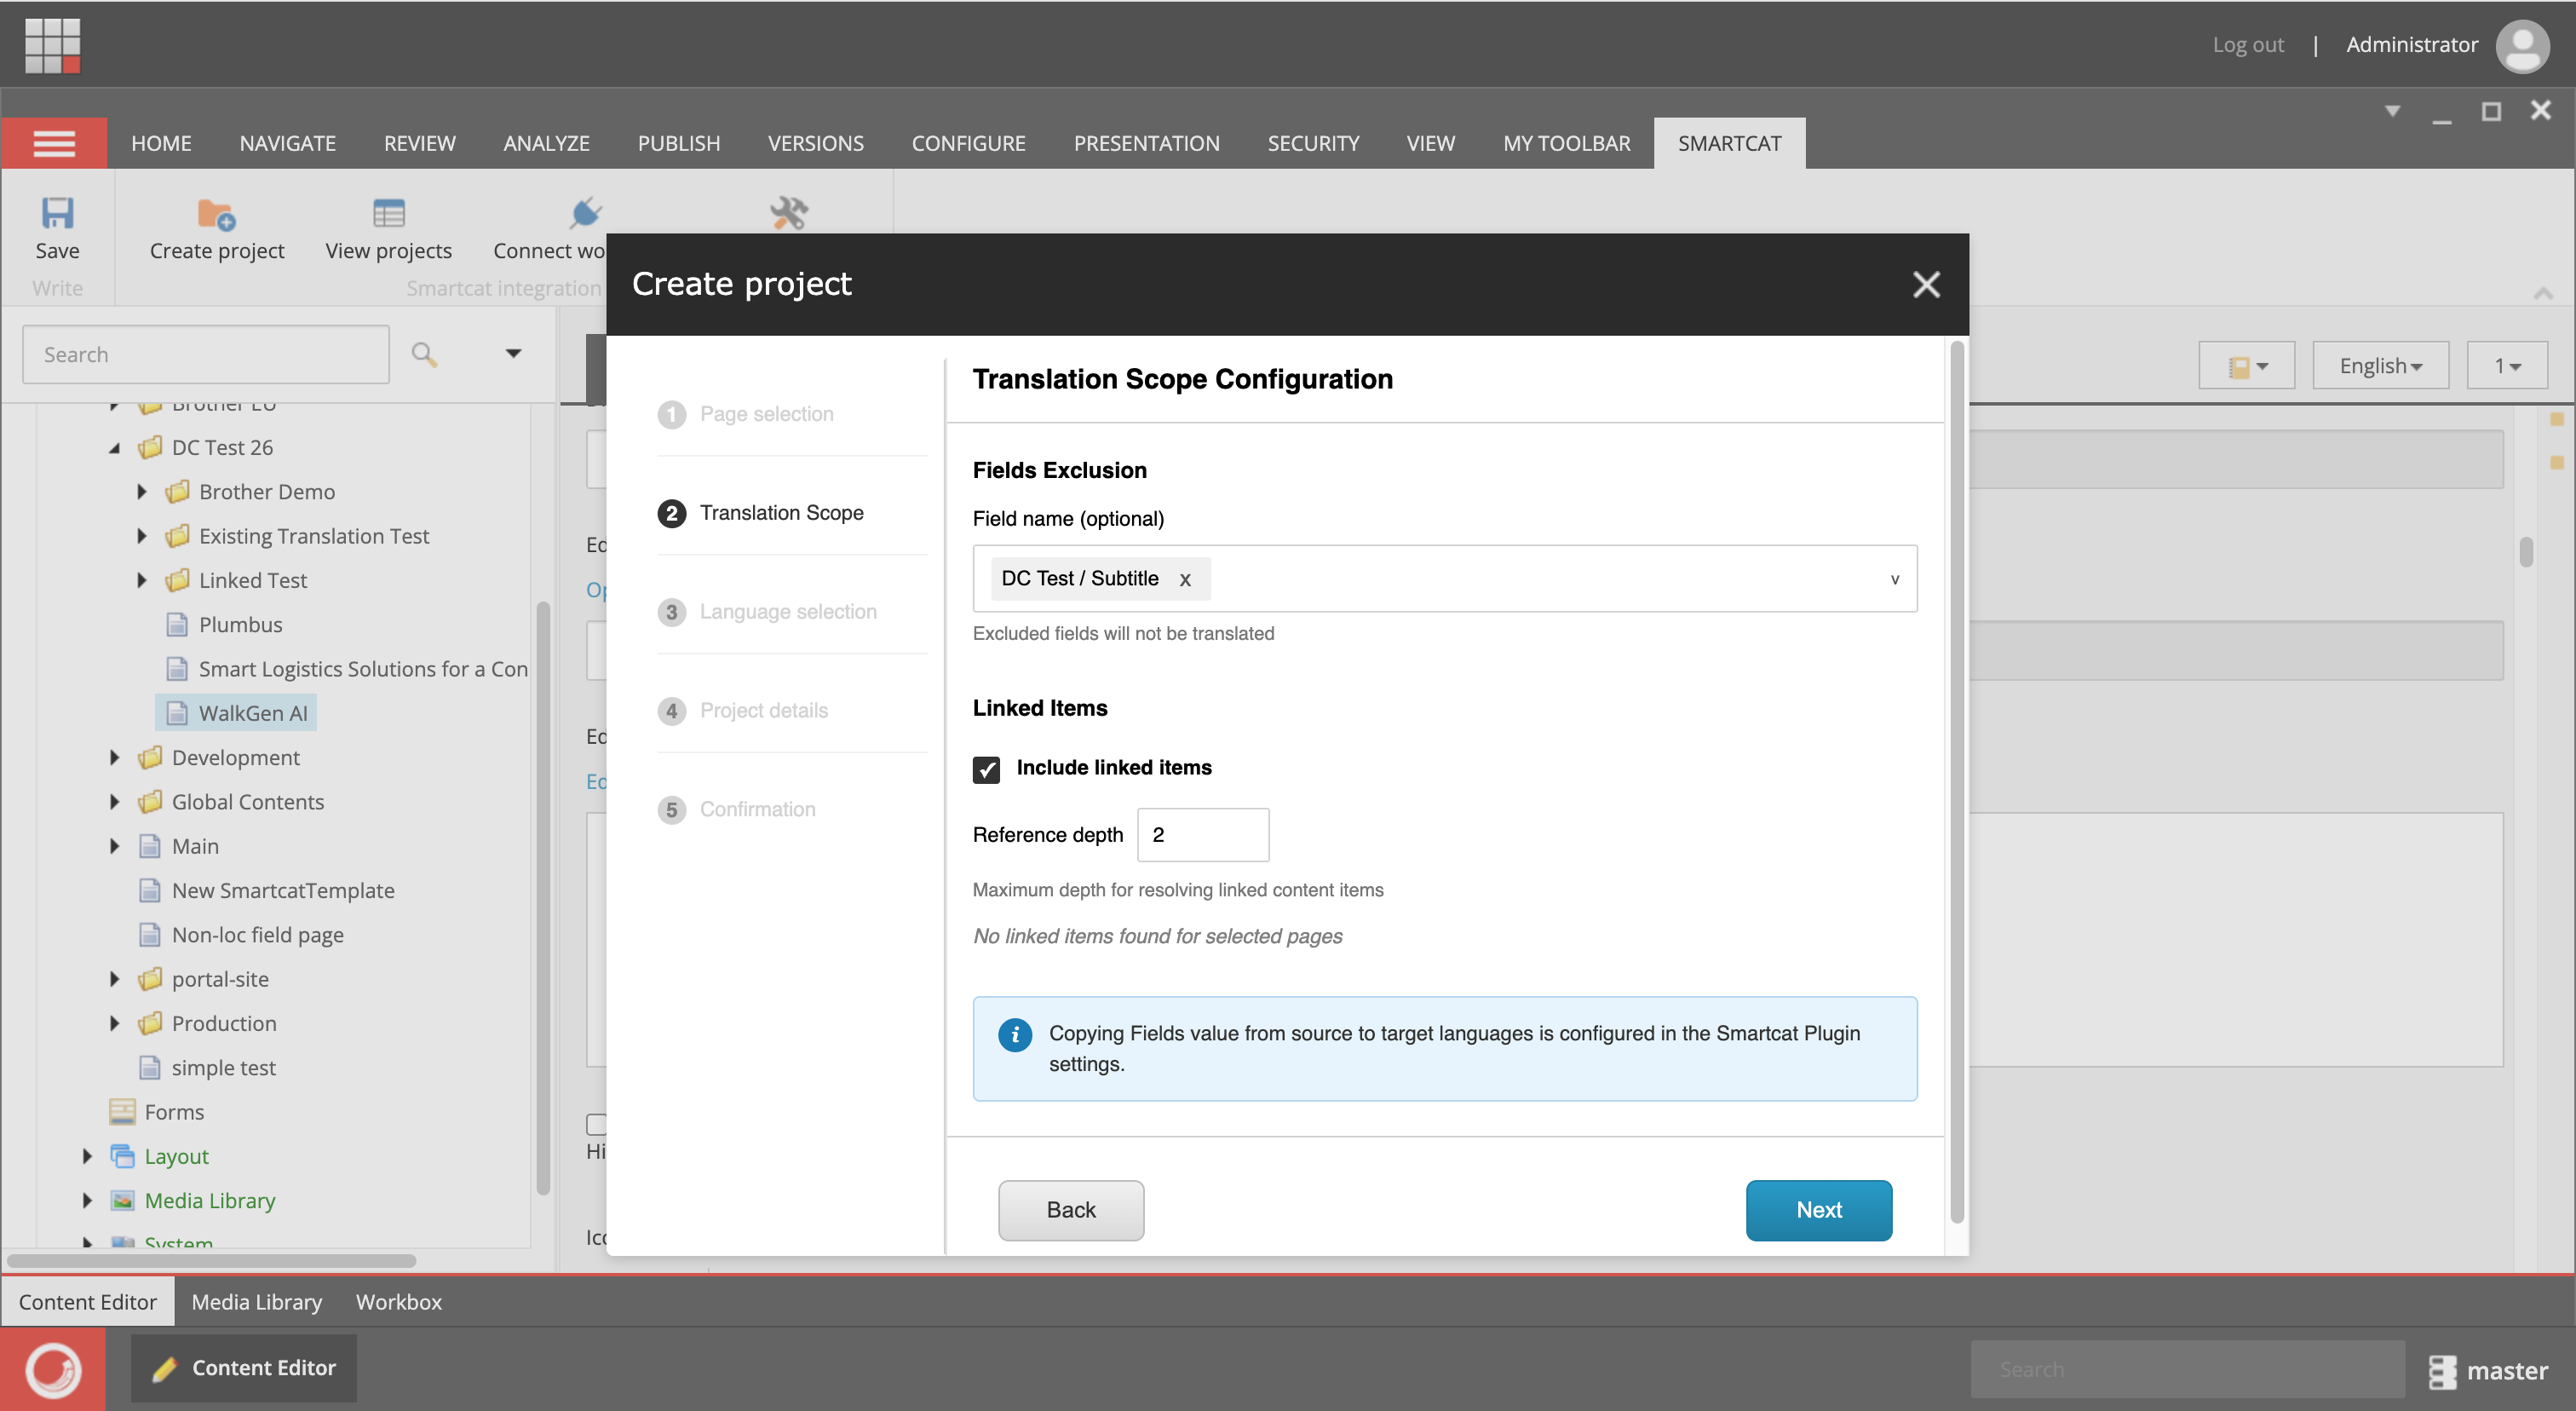
If a page has linked items, for example, a banner stored as a separate item in Core, select Include Linked Items to add them to the translation scope automatically. If a linked item has its own linked items, specify how deep the plugin should go into the inheritance structure.
- Set up target languages. Smartcat uses Sitecore's default system language as the source language
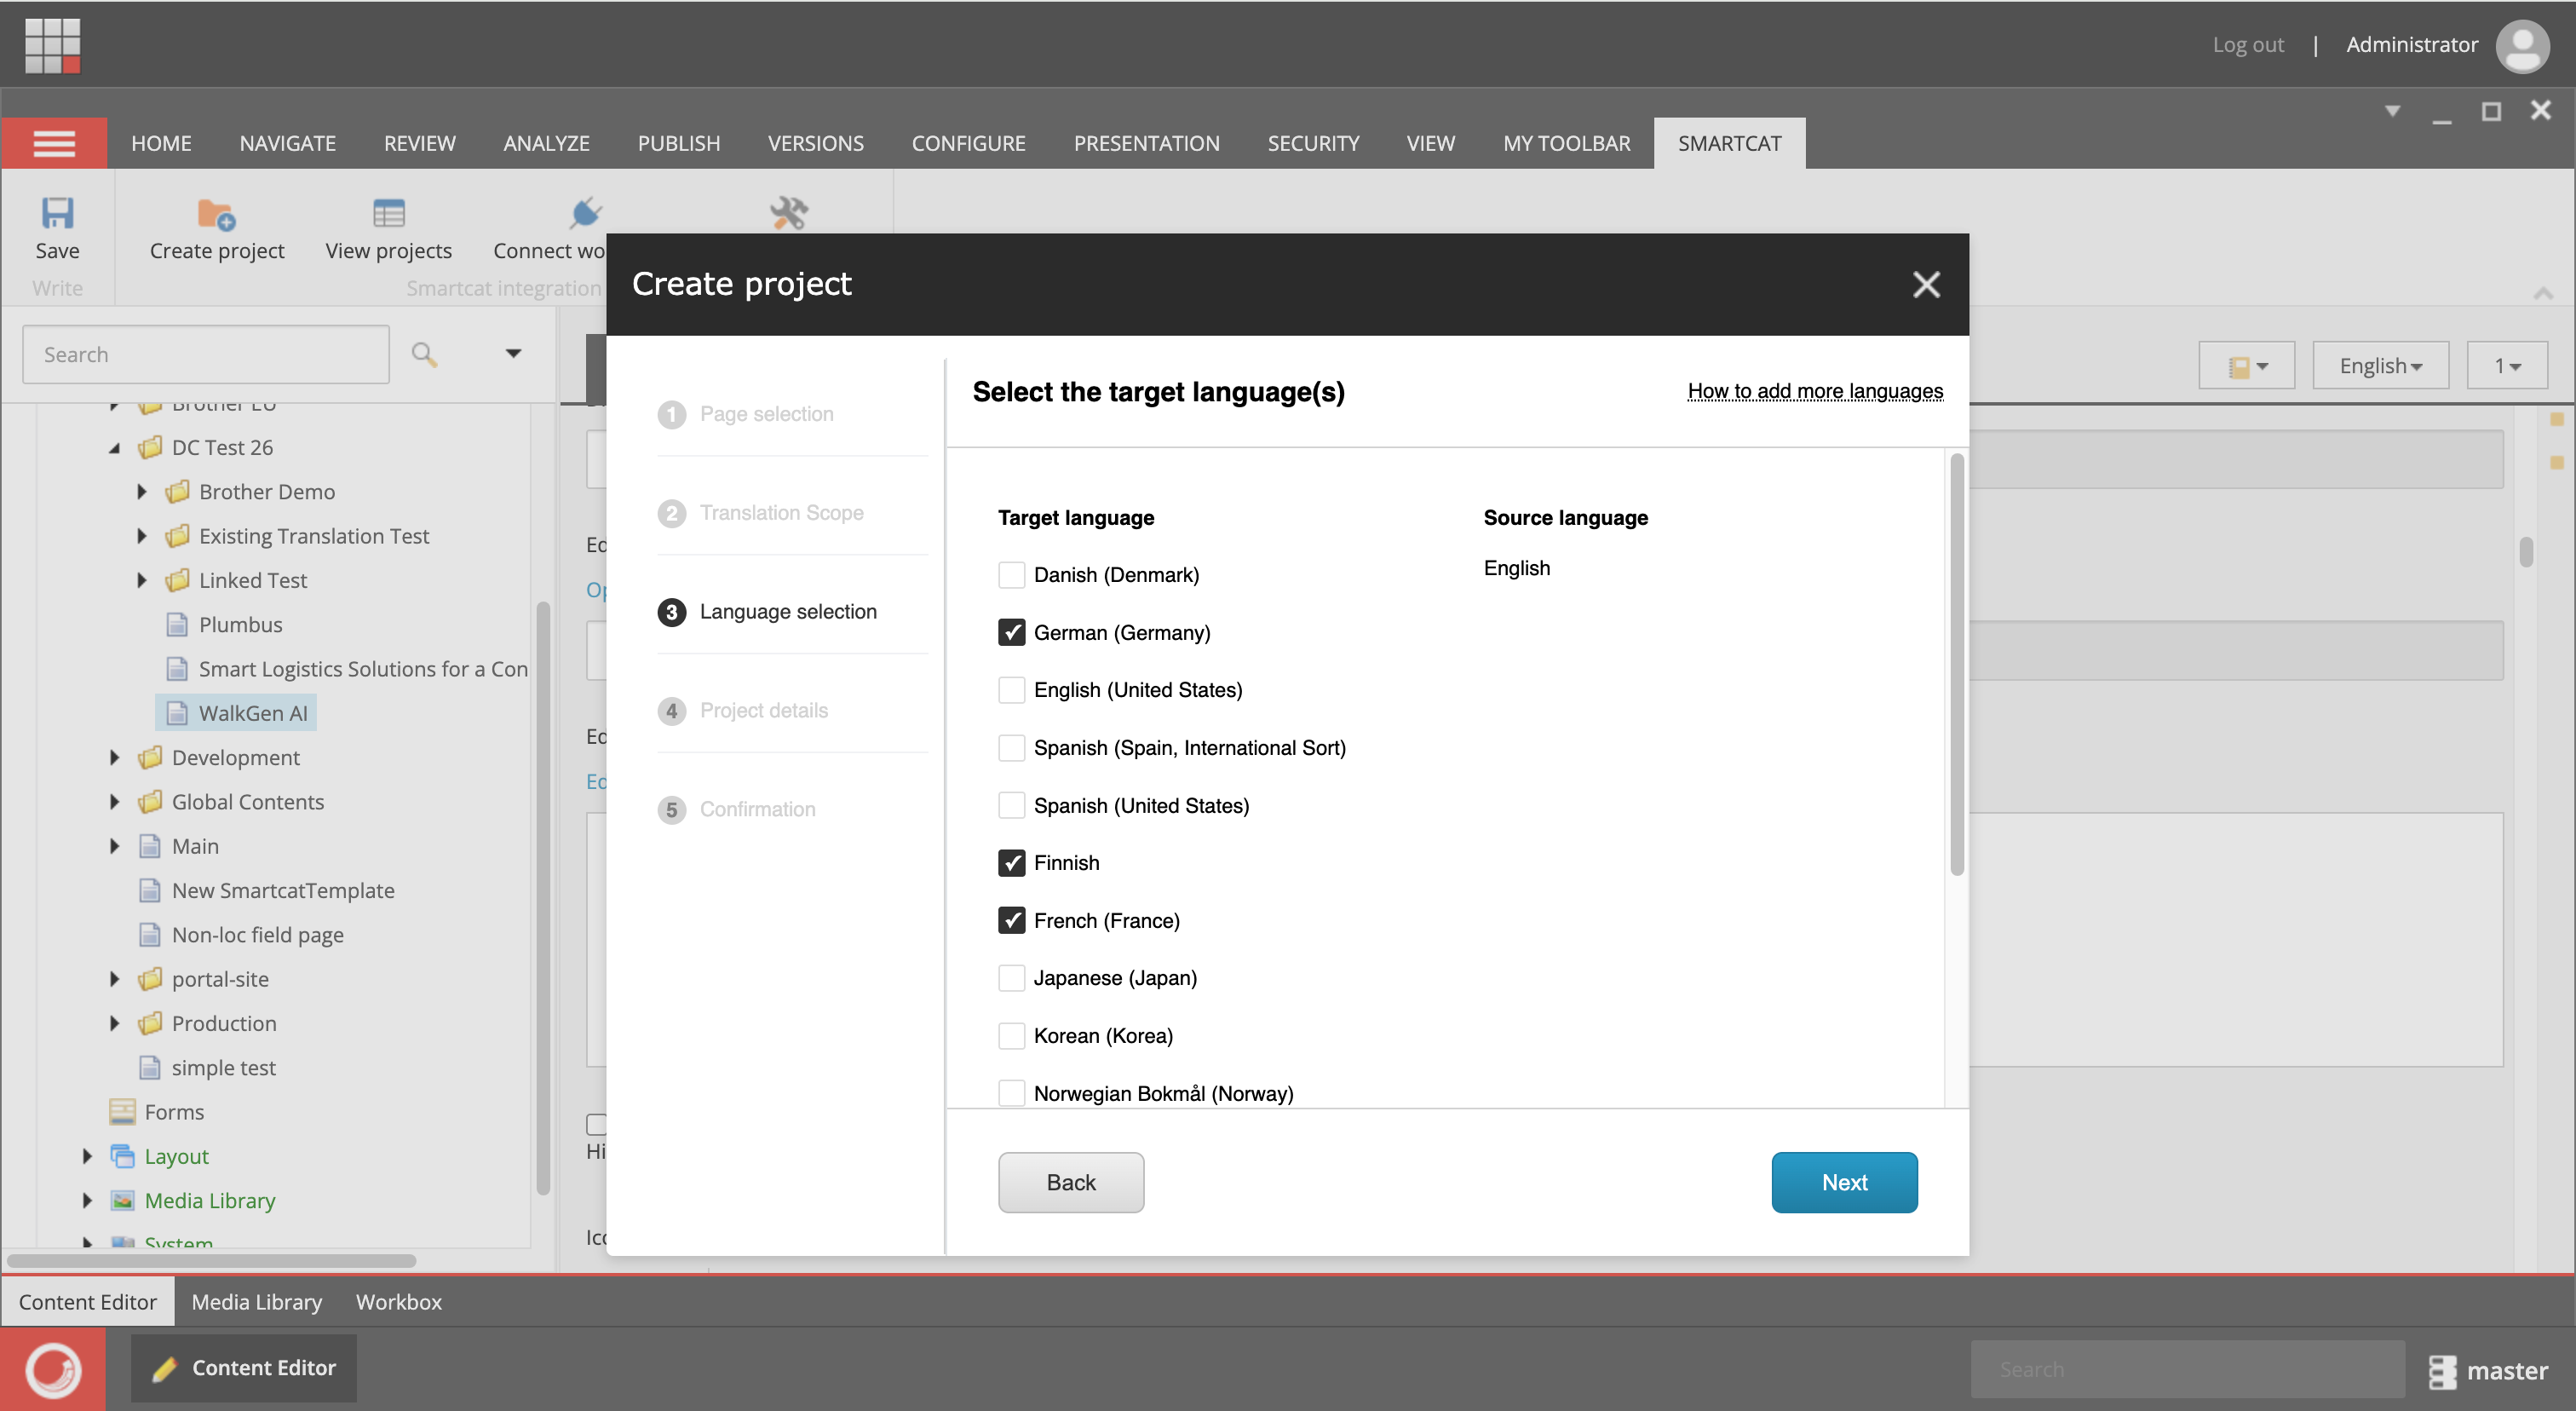
💡 You can set up custom locale mappings to align your Sitecore locales with Smartcat locales (see Configuration options)
-
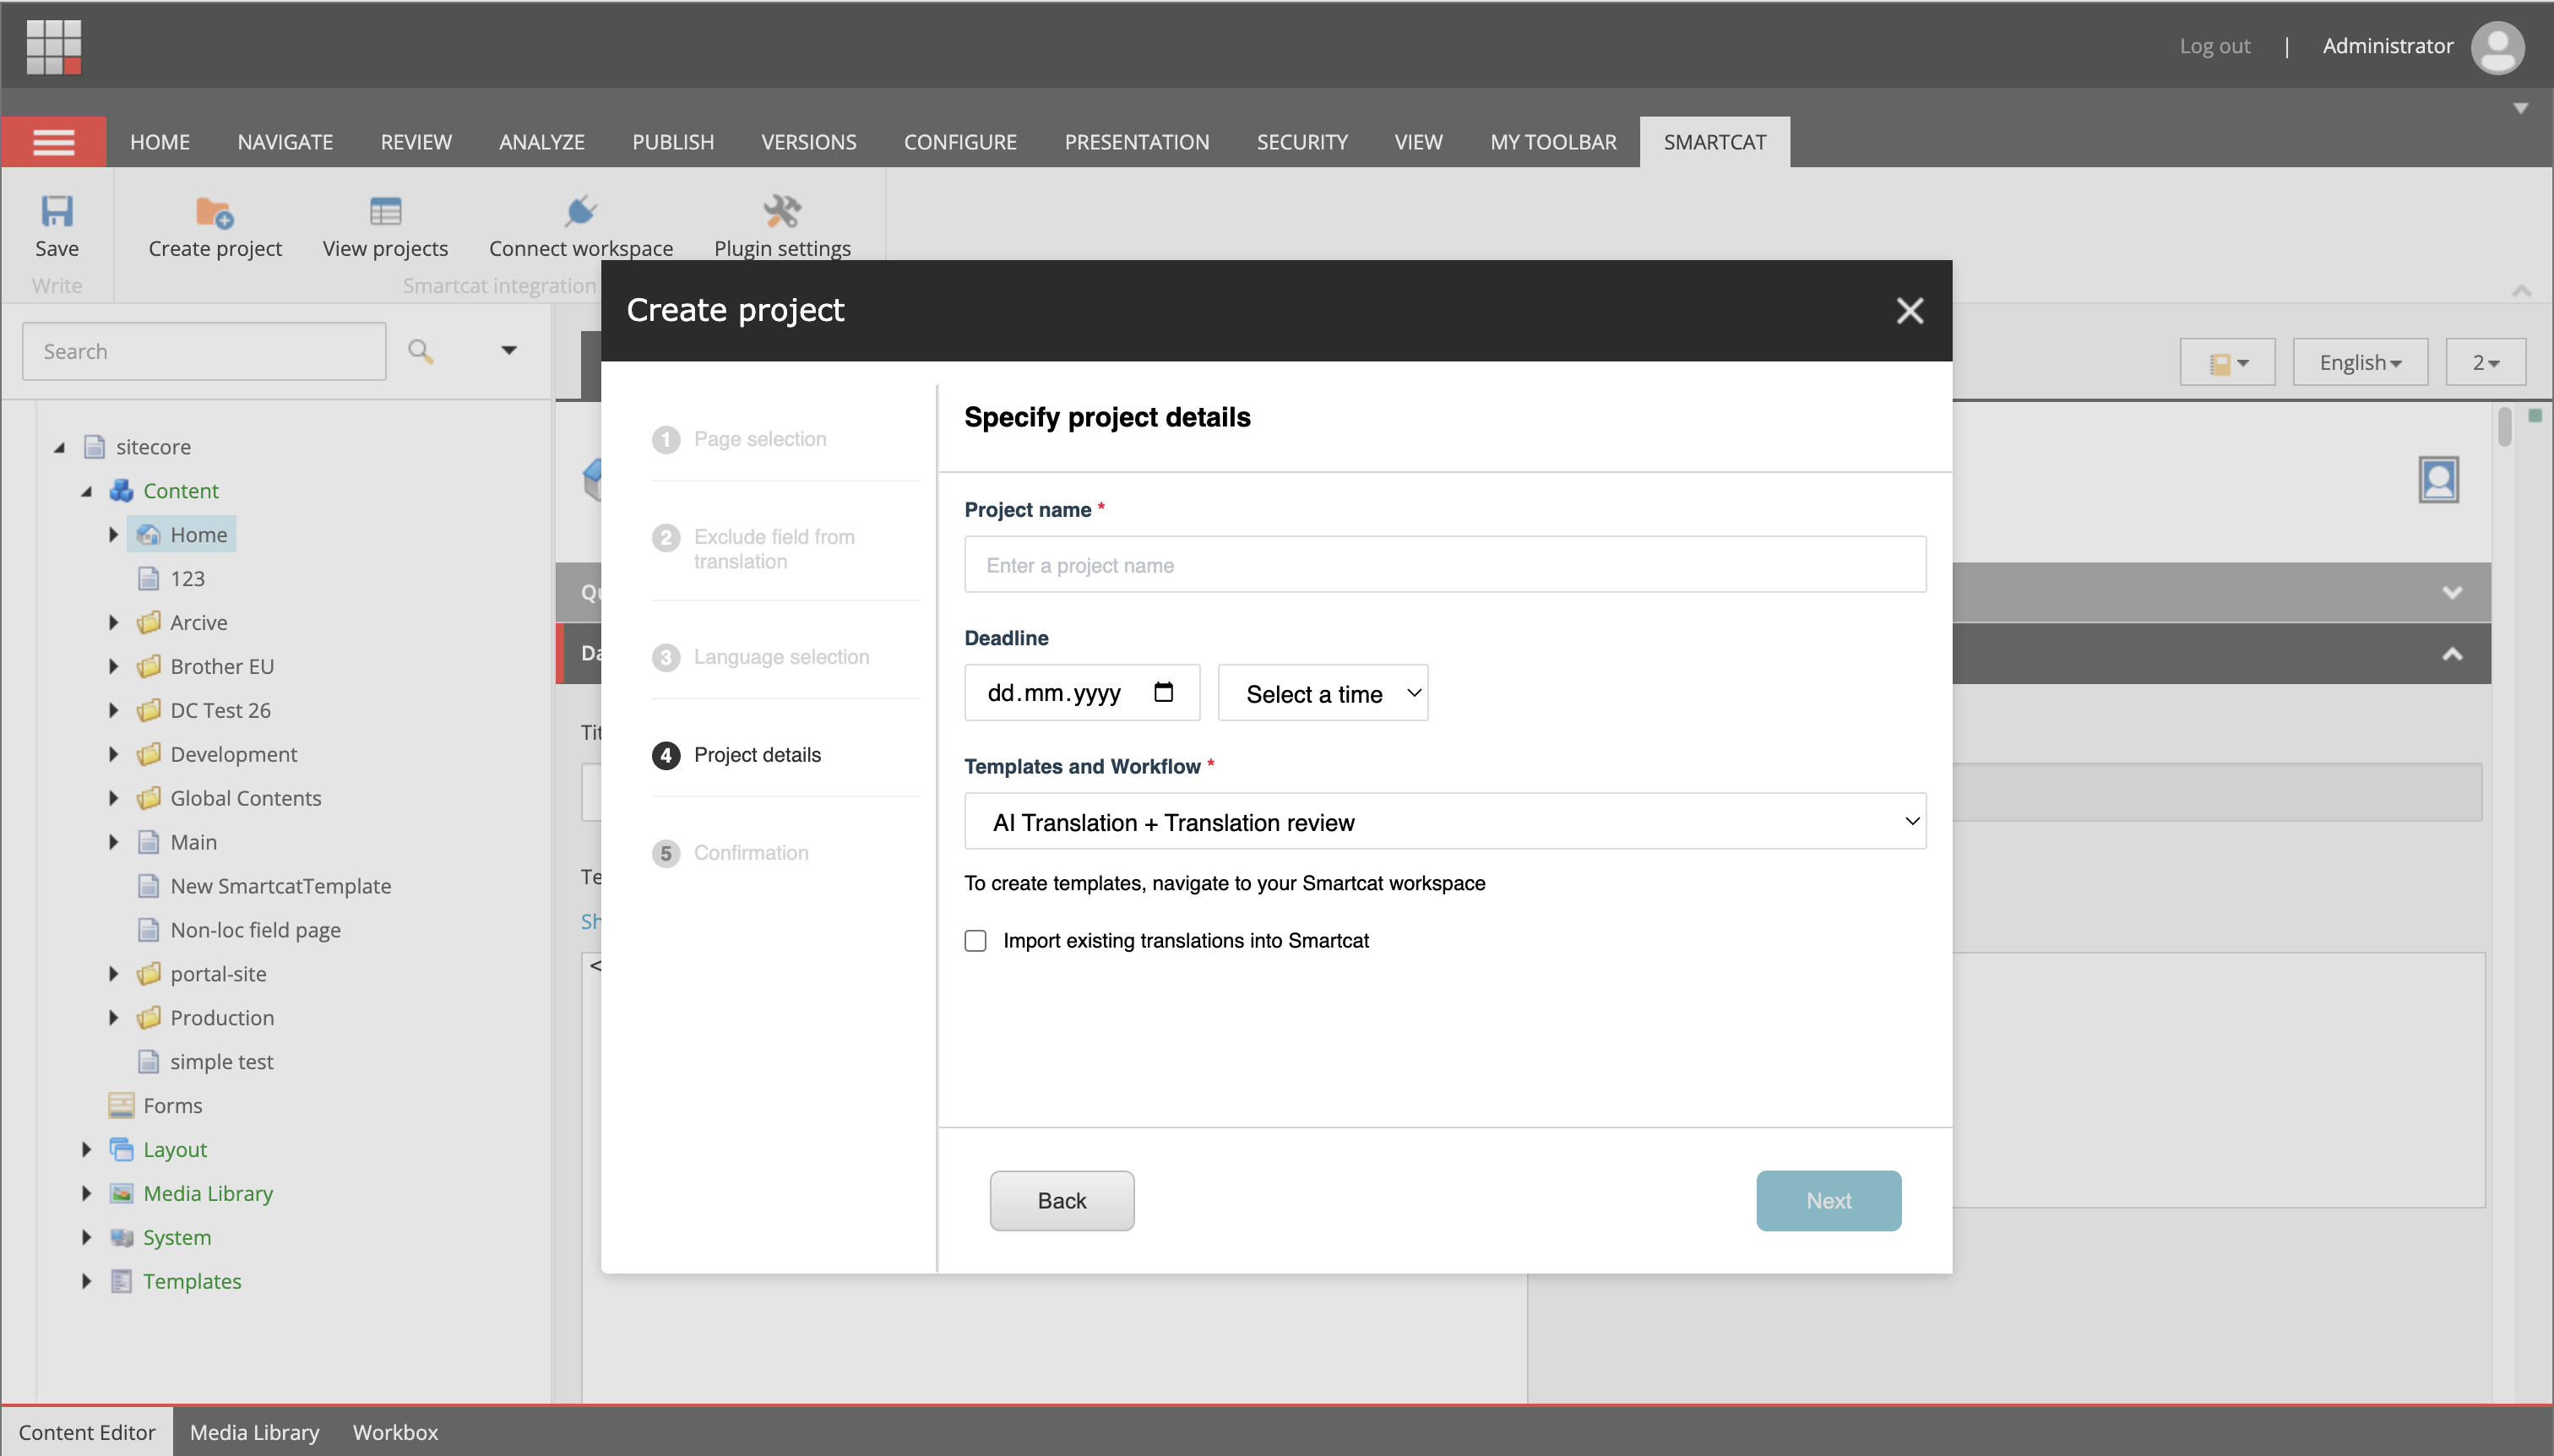
Specify the translation project details:
-
Translation project title
-
Project deadline (optional)
-
Translation workflow — the default Smartcat workflow or a custom one
-
(Optional) Import existing translations for these locales into Smartcat
-
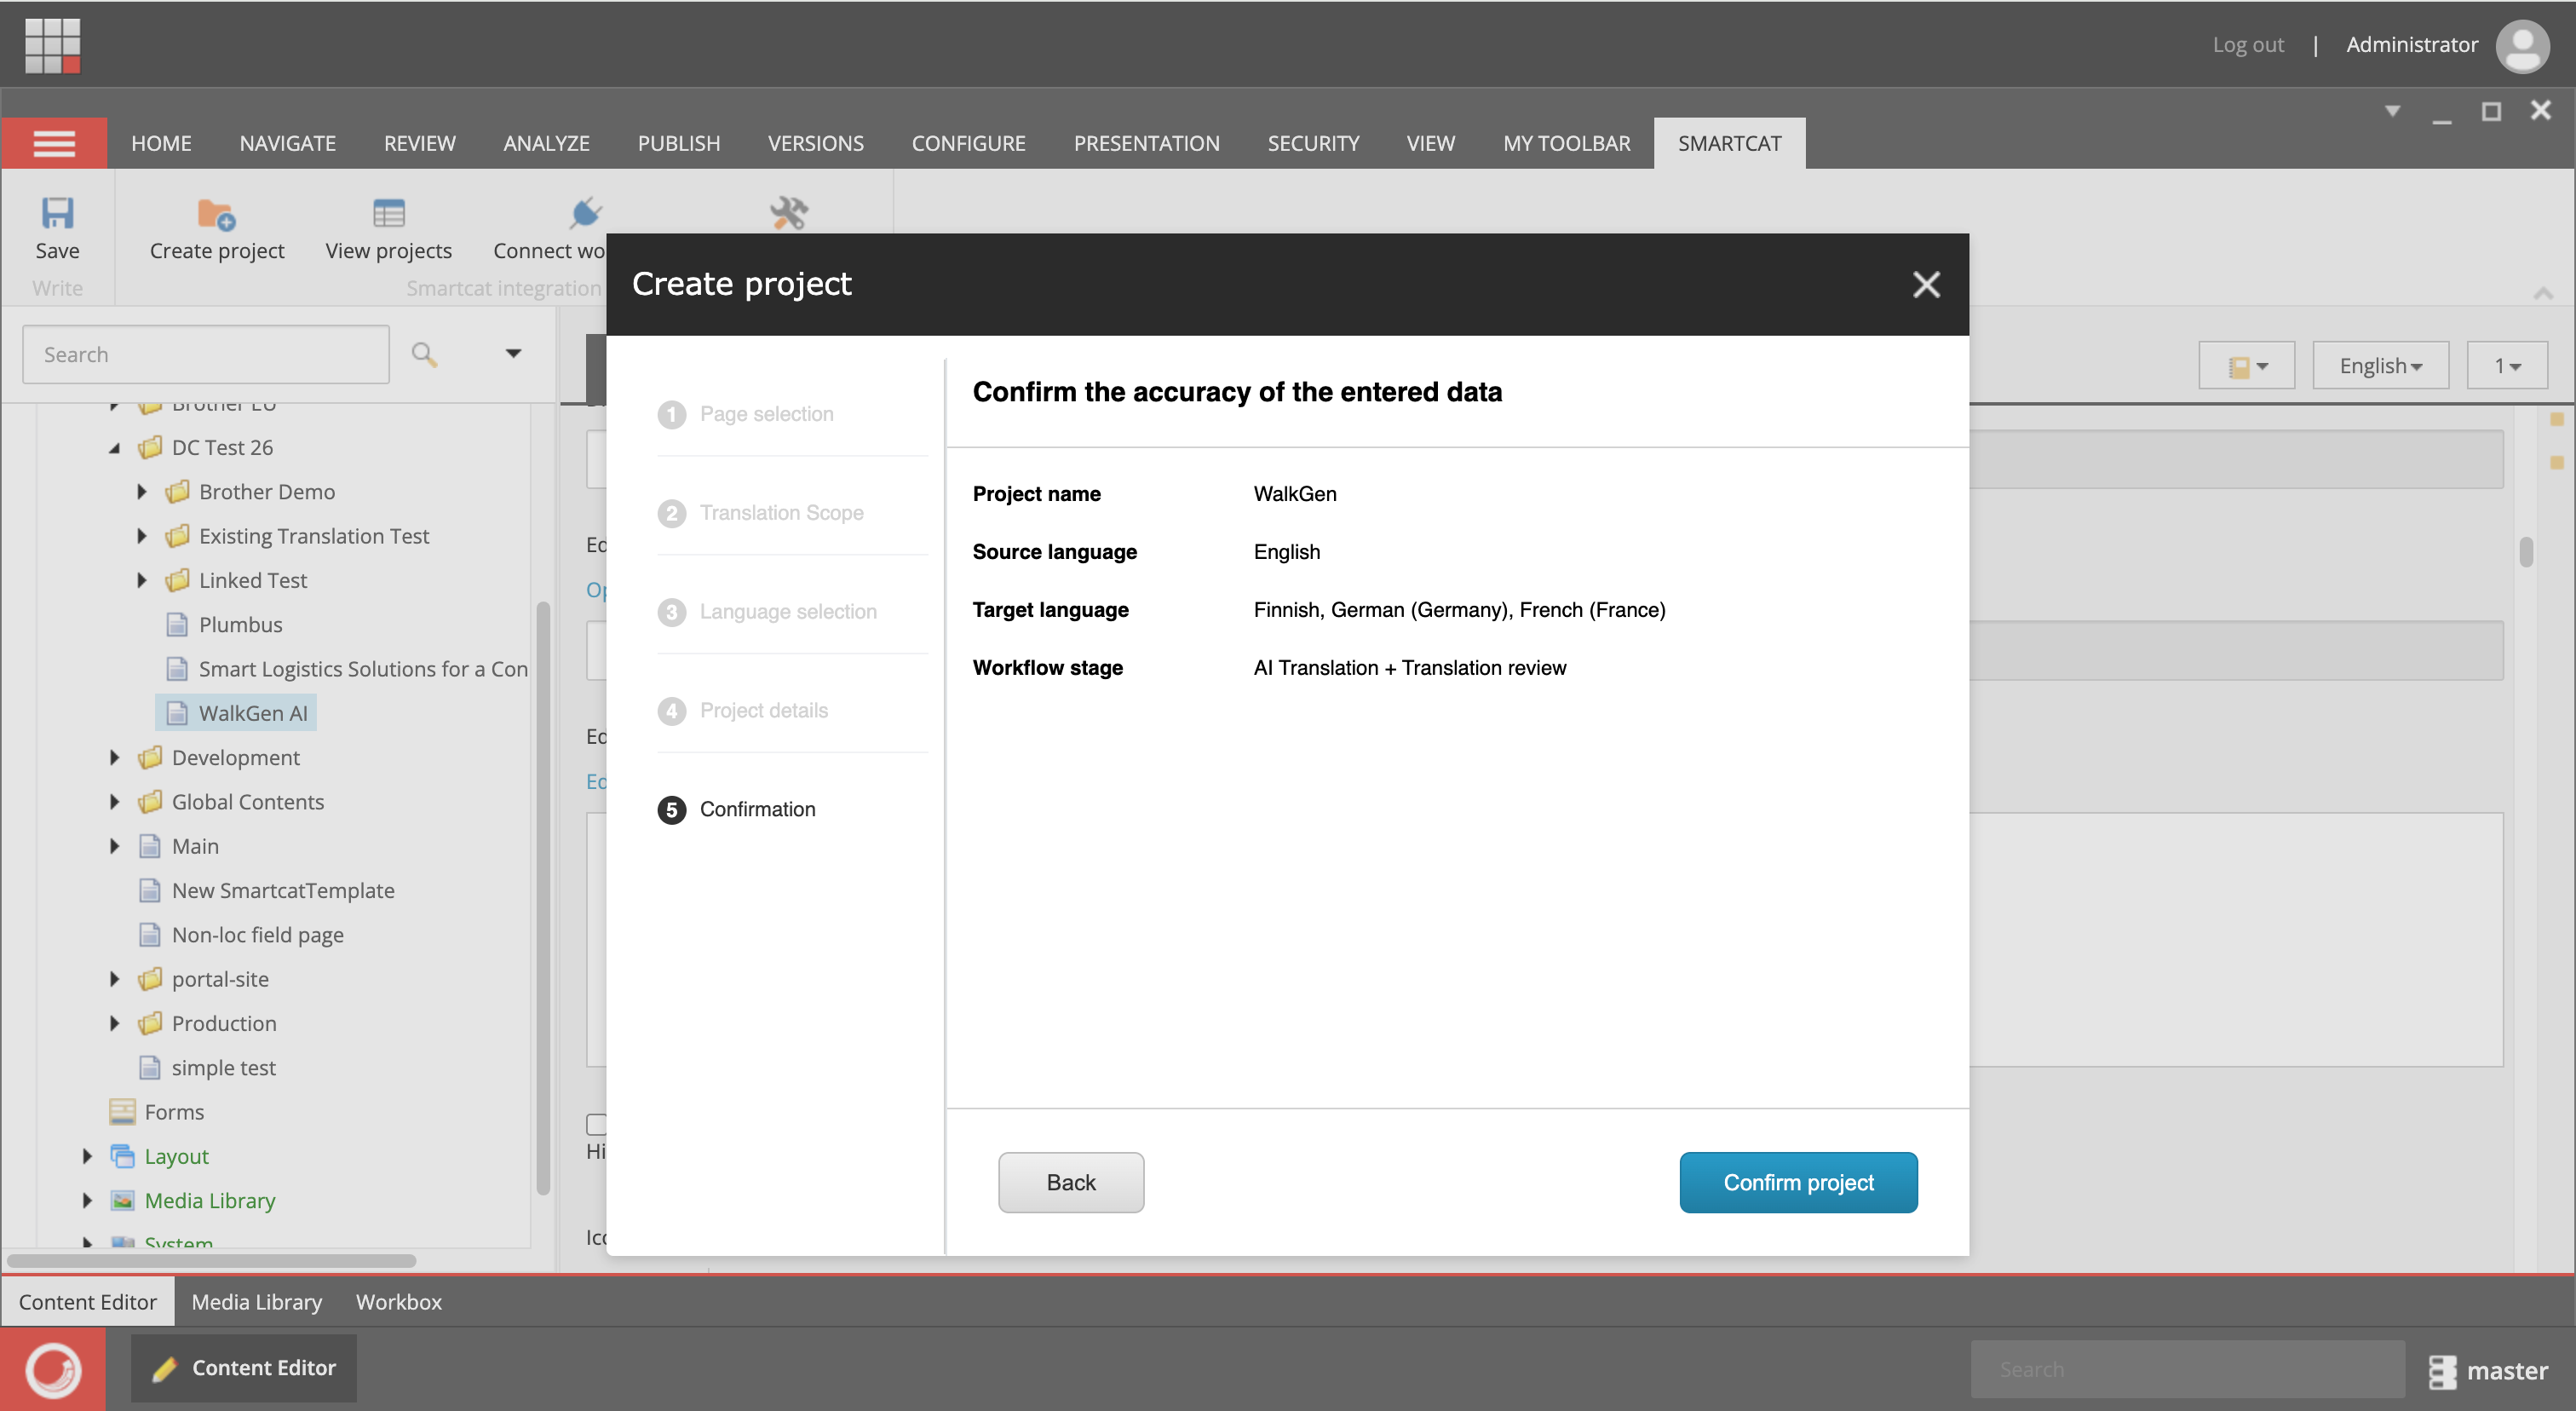
- Confirm project creation
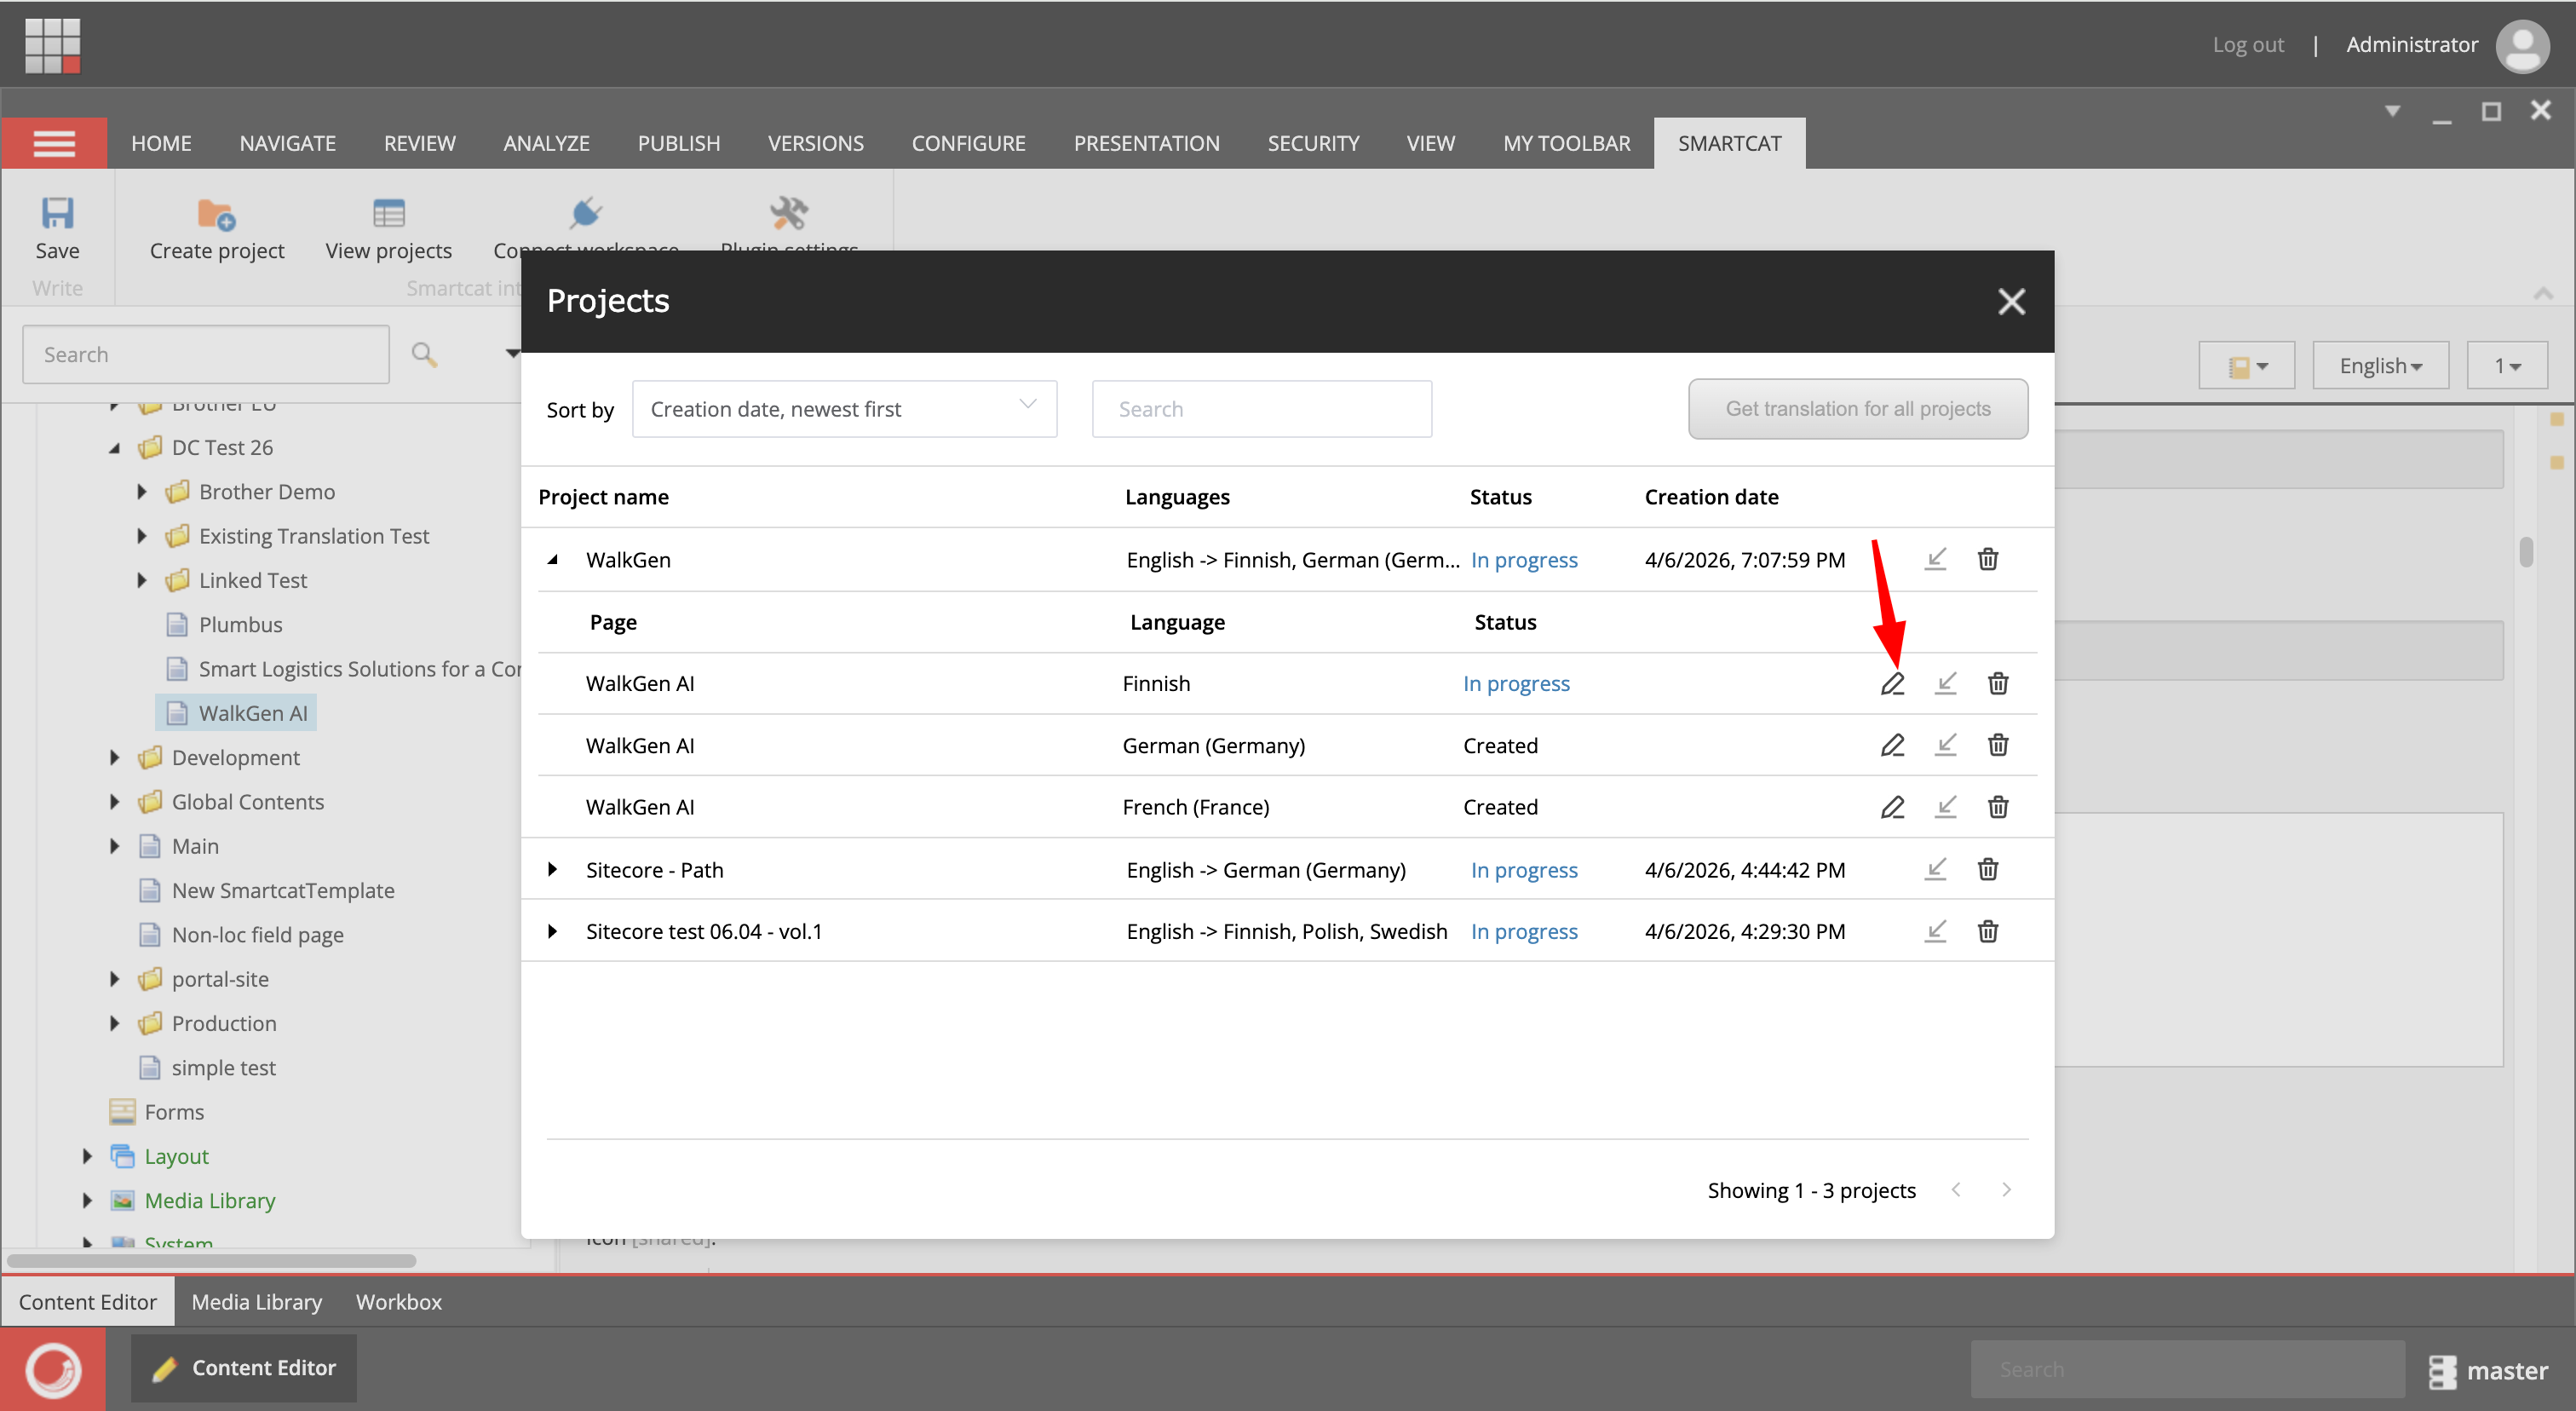
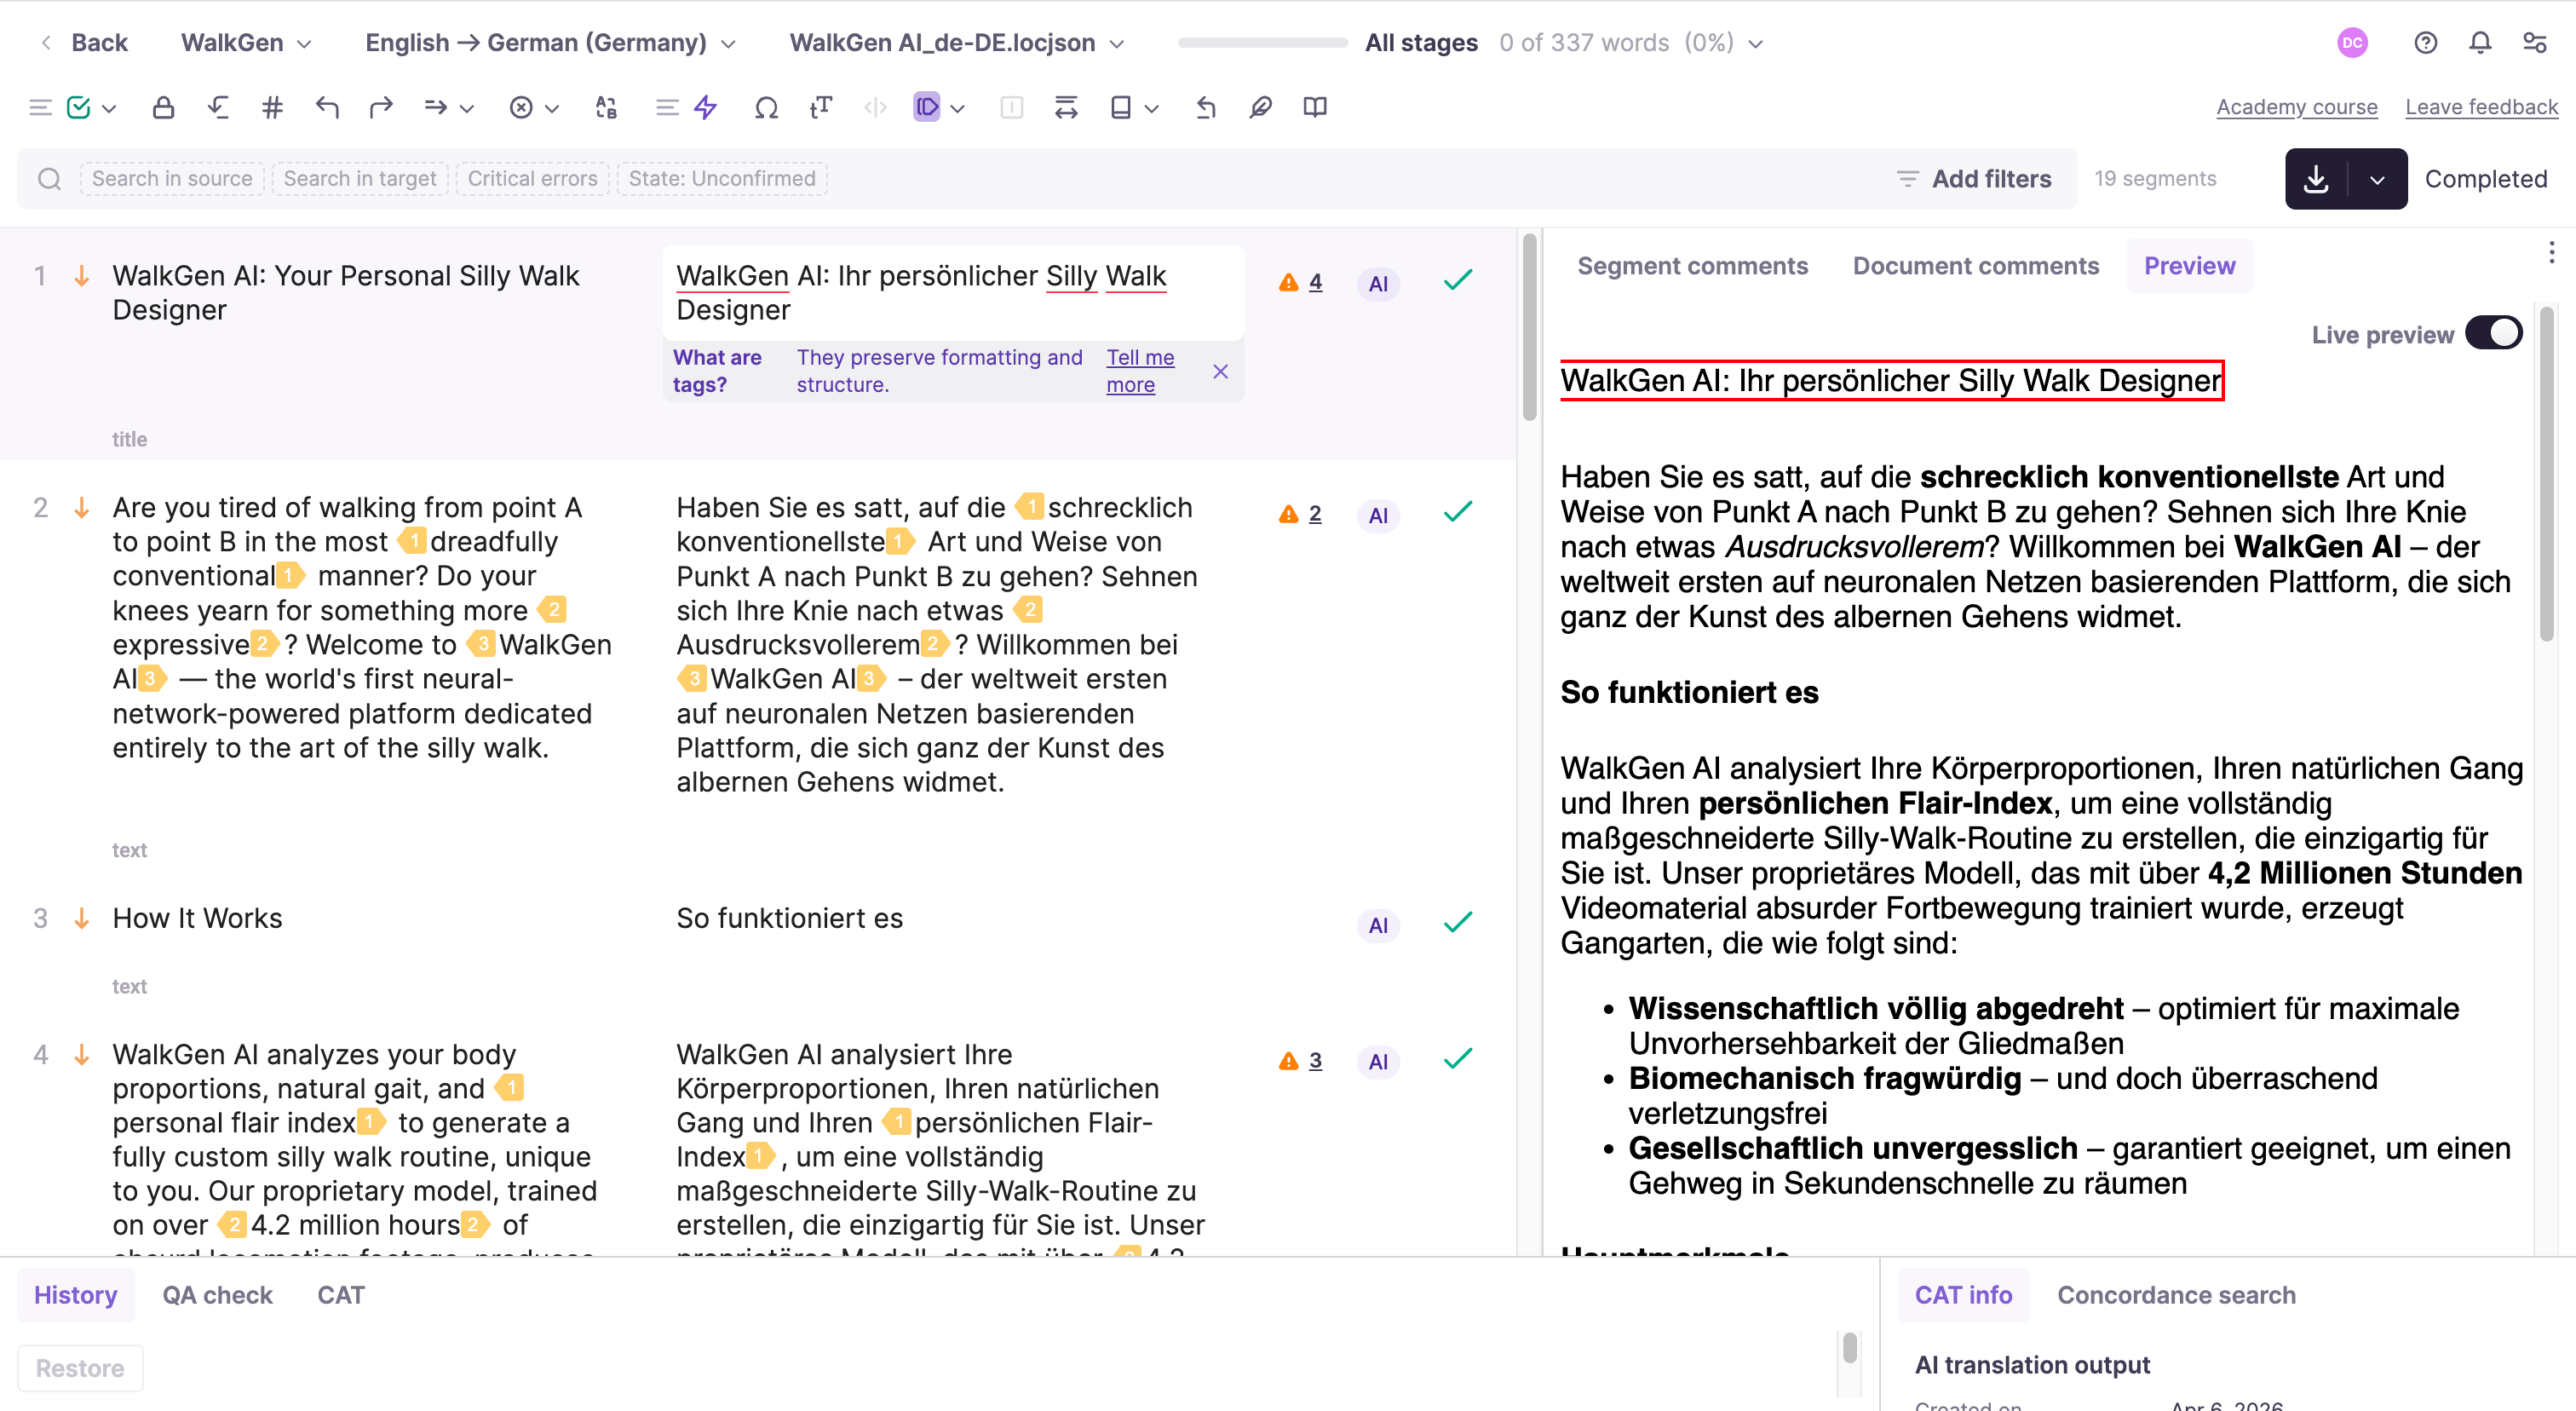
- On the Smartcat tab, click View projects. Select the project and click the pencil icon to open it in Smartcat, or open the Smartcat dashboard and navigate to the project directly. Complete the translations in Smartcat
-
To complete the review process, click Done to confirm all segments in the CAT editor, then return to Sitecore.
-
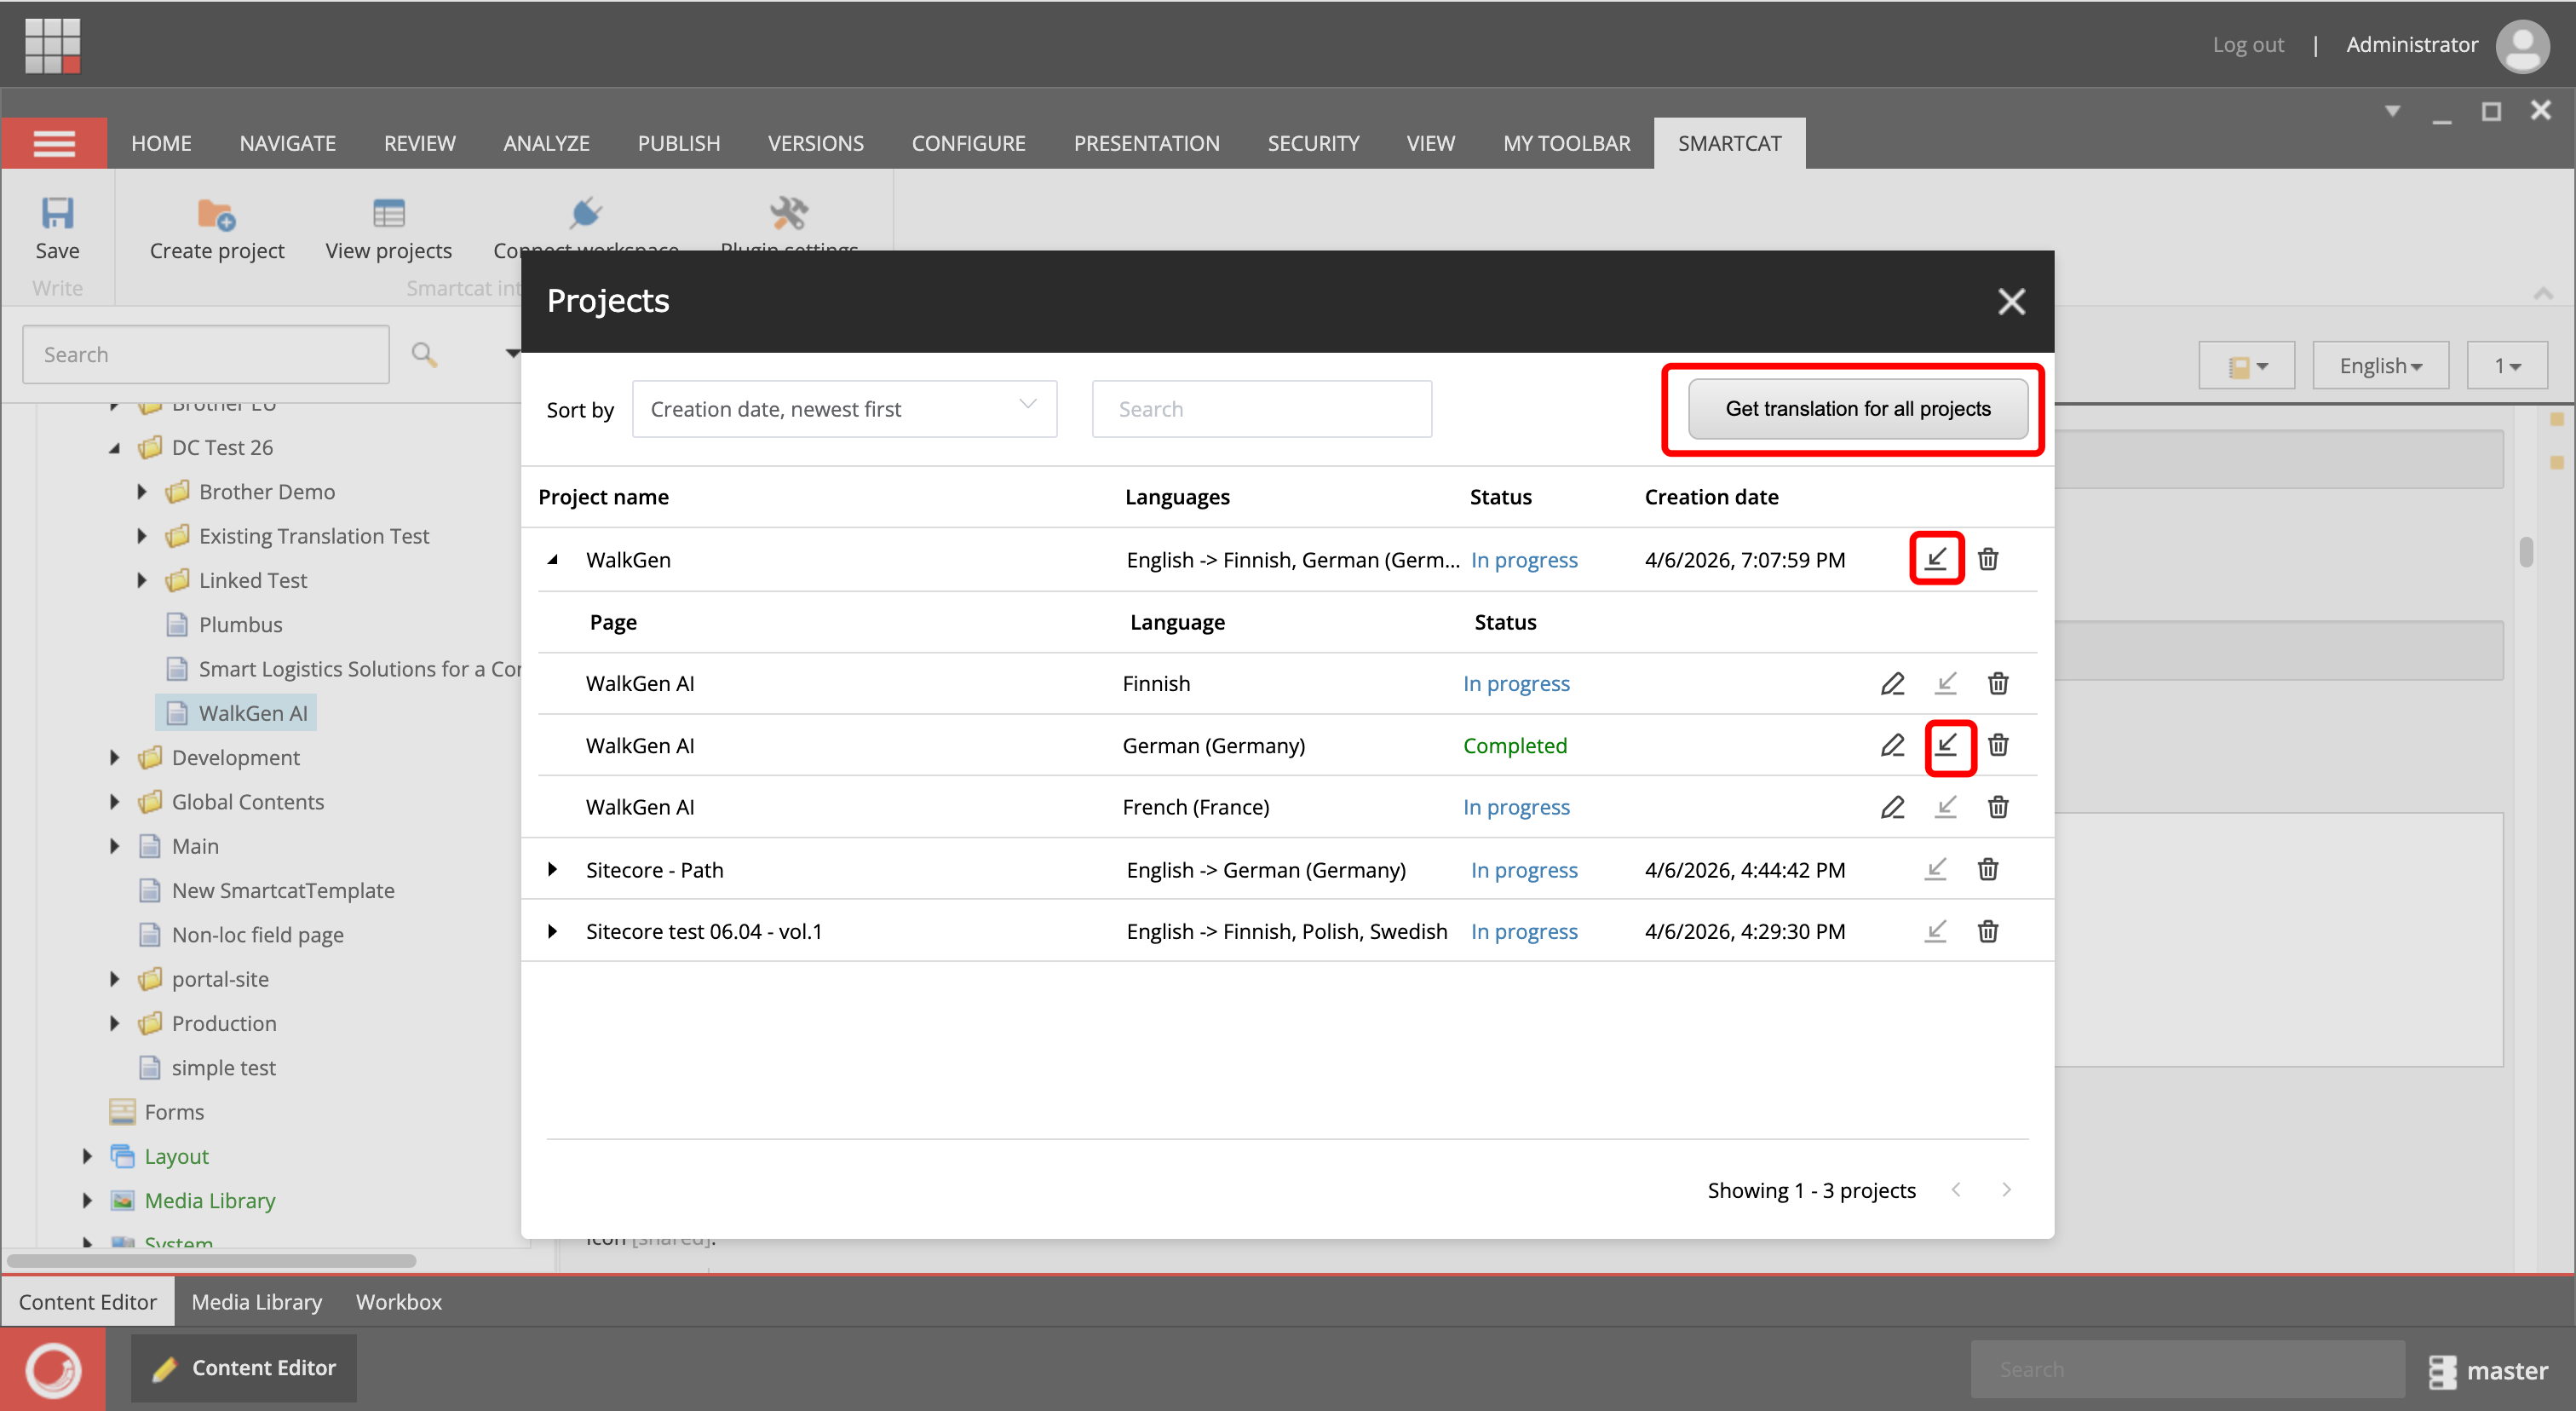
Pull the translations back to Sitecore. You can pull for a specific language version, a selected translation project, or all translation projects
When a page's translation is pulled, Smartcat creates a new page version in that language in Sitecore. Fields excluded from the translation scope keep their source value. Complex items such as images and links with their own text fields (alt text, descriptions) are extracted and sent to Smartcat automatically.
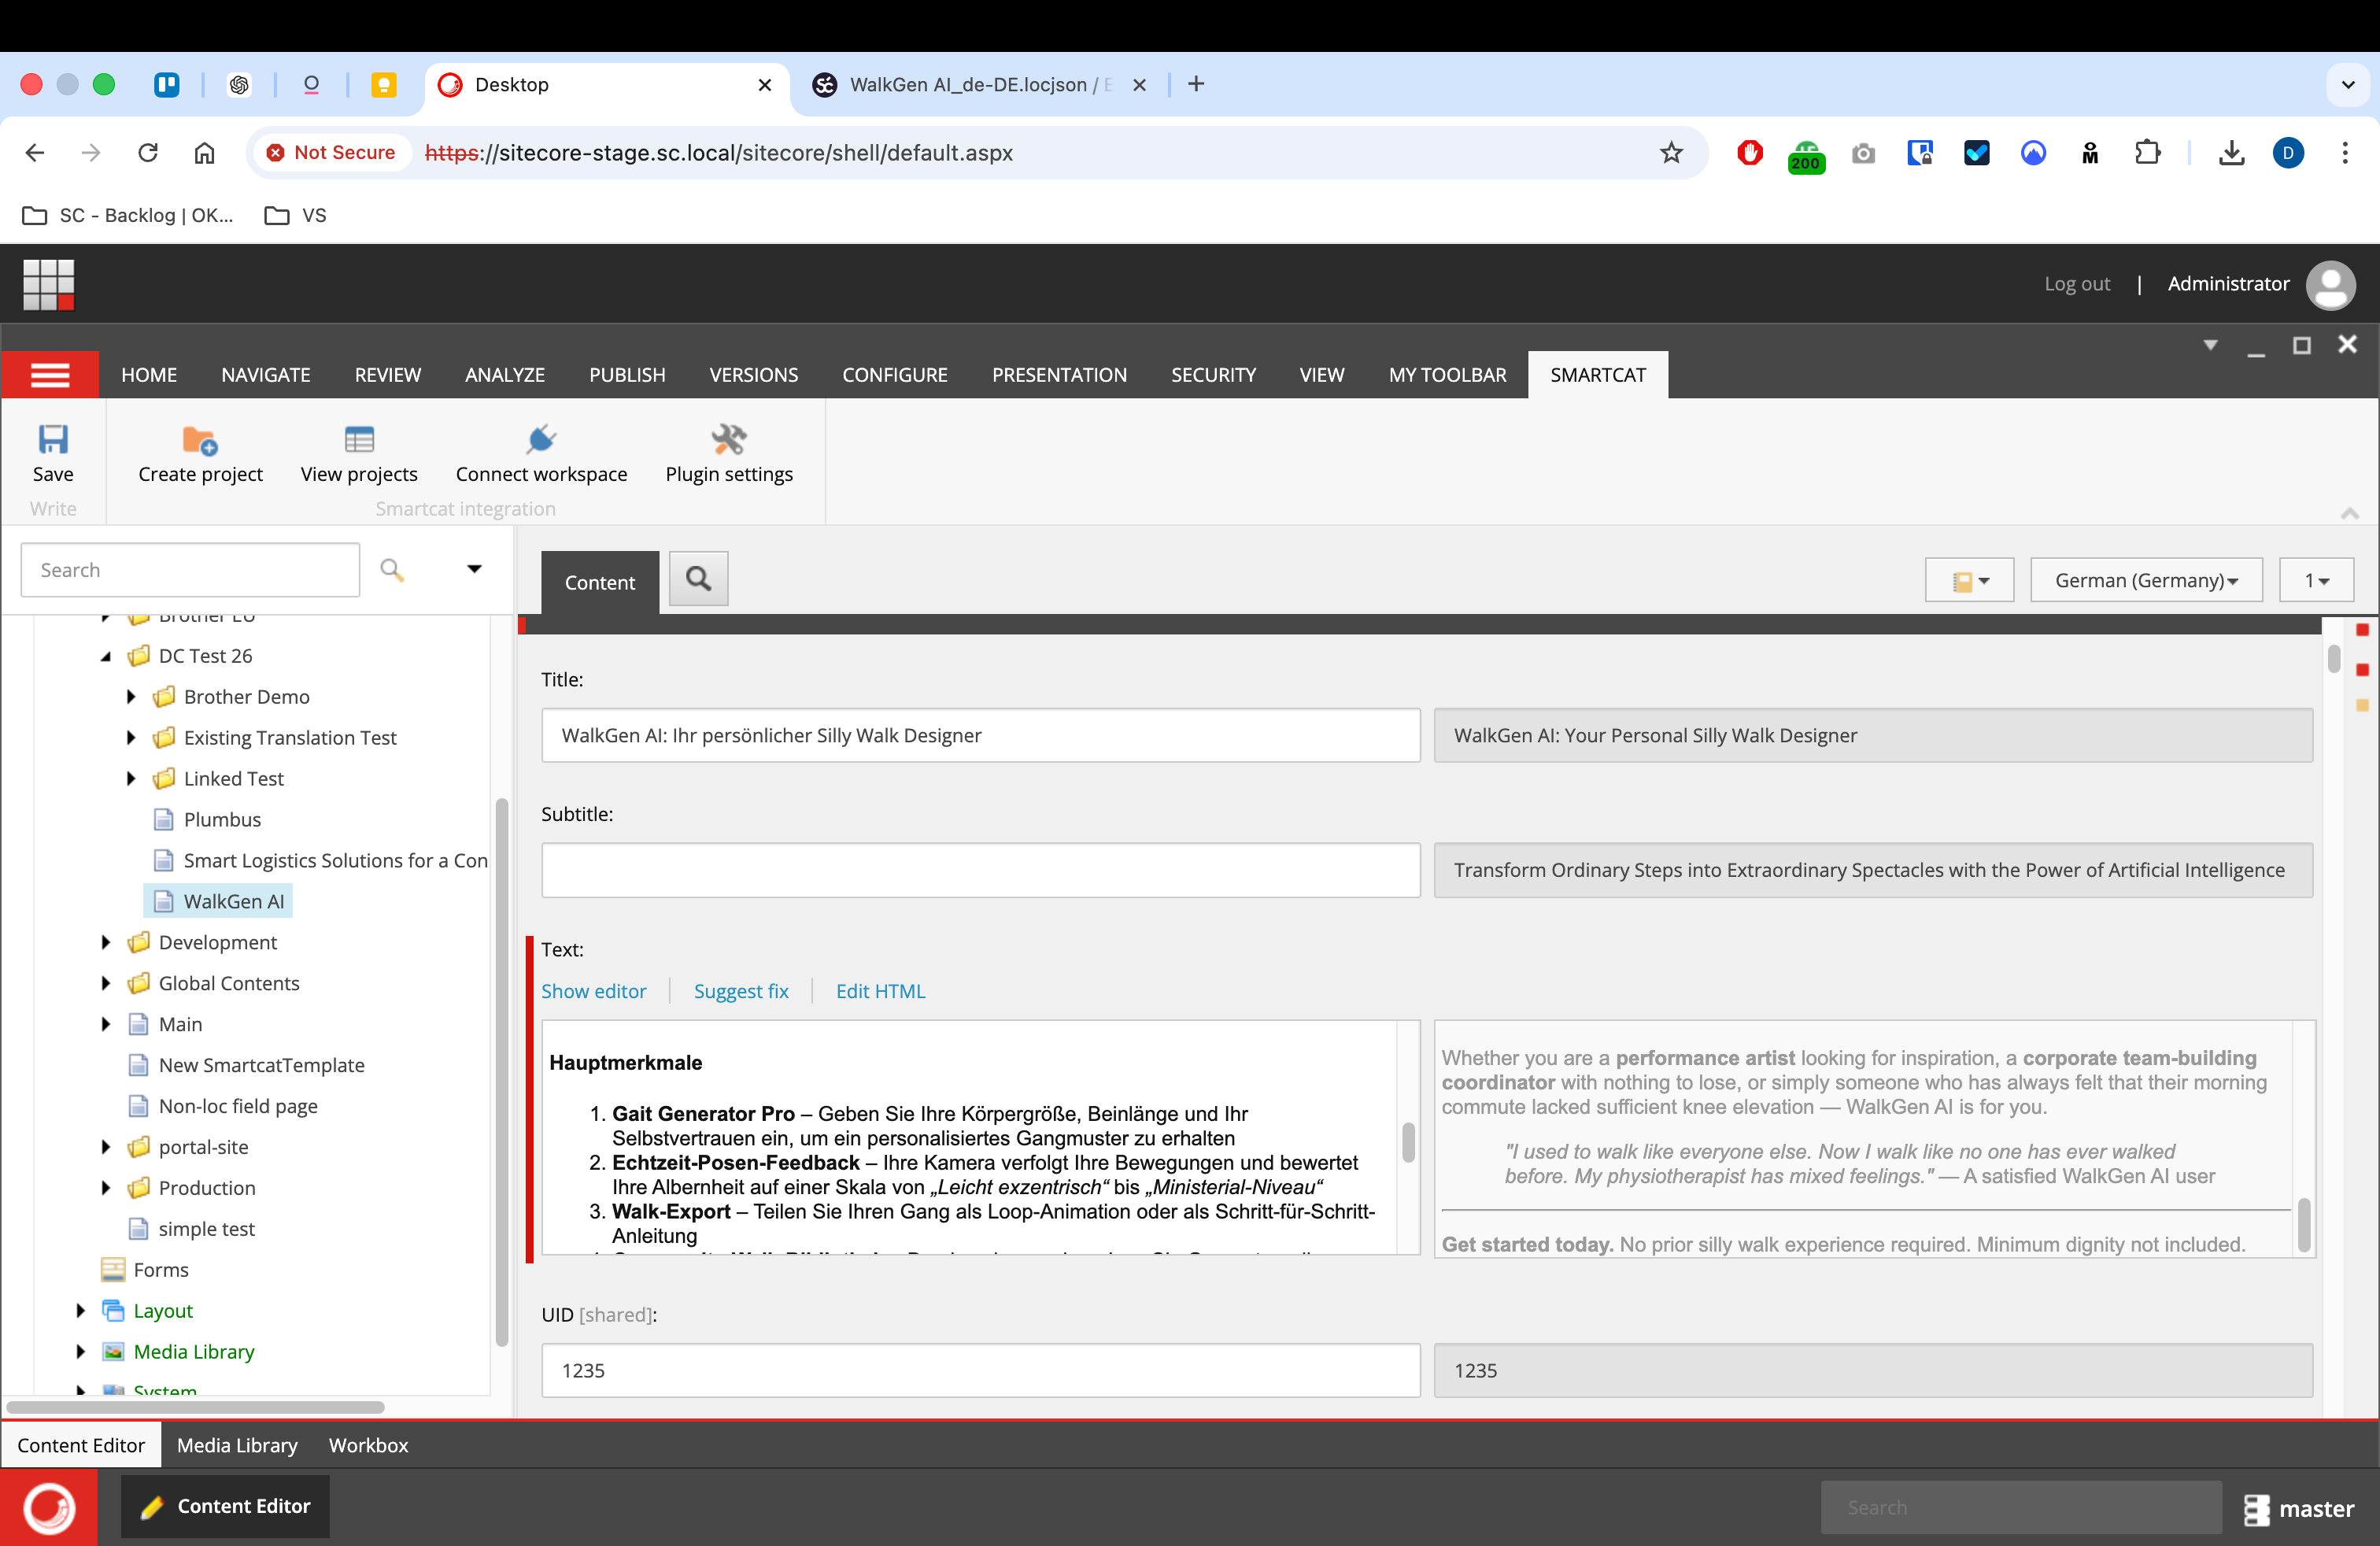
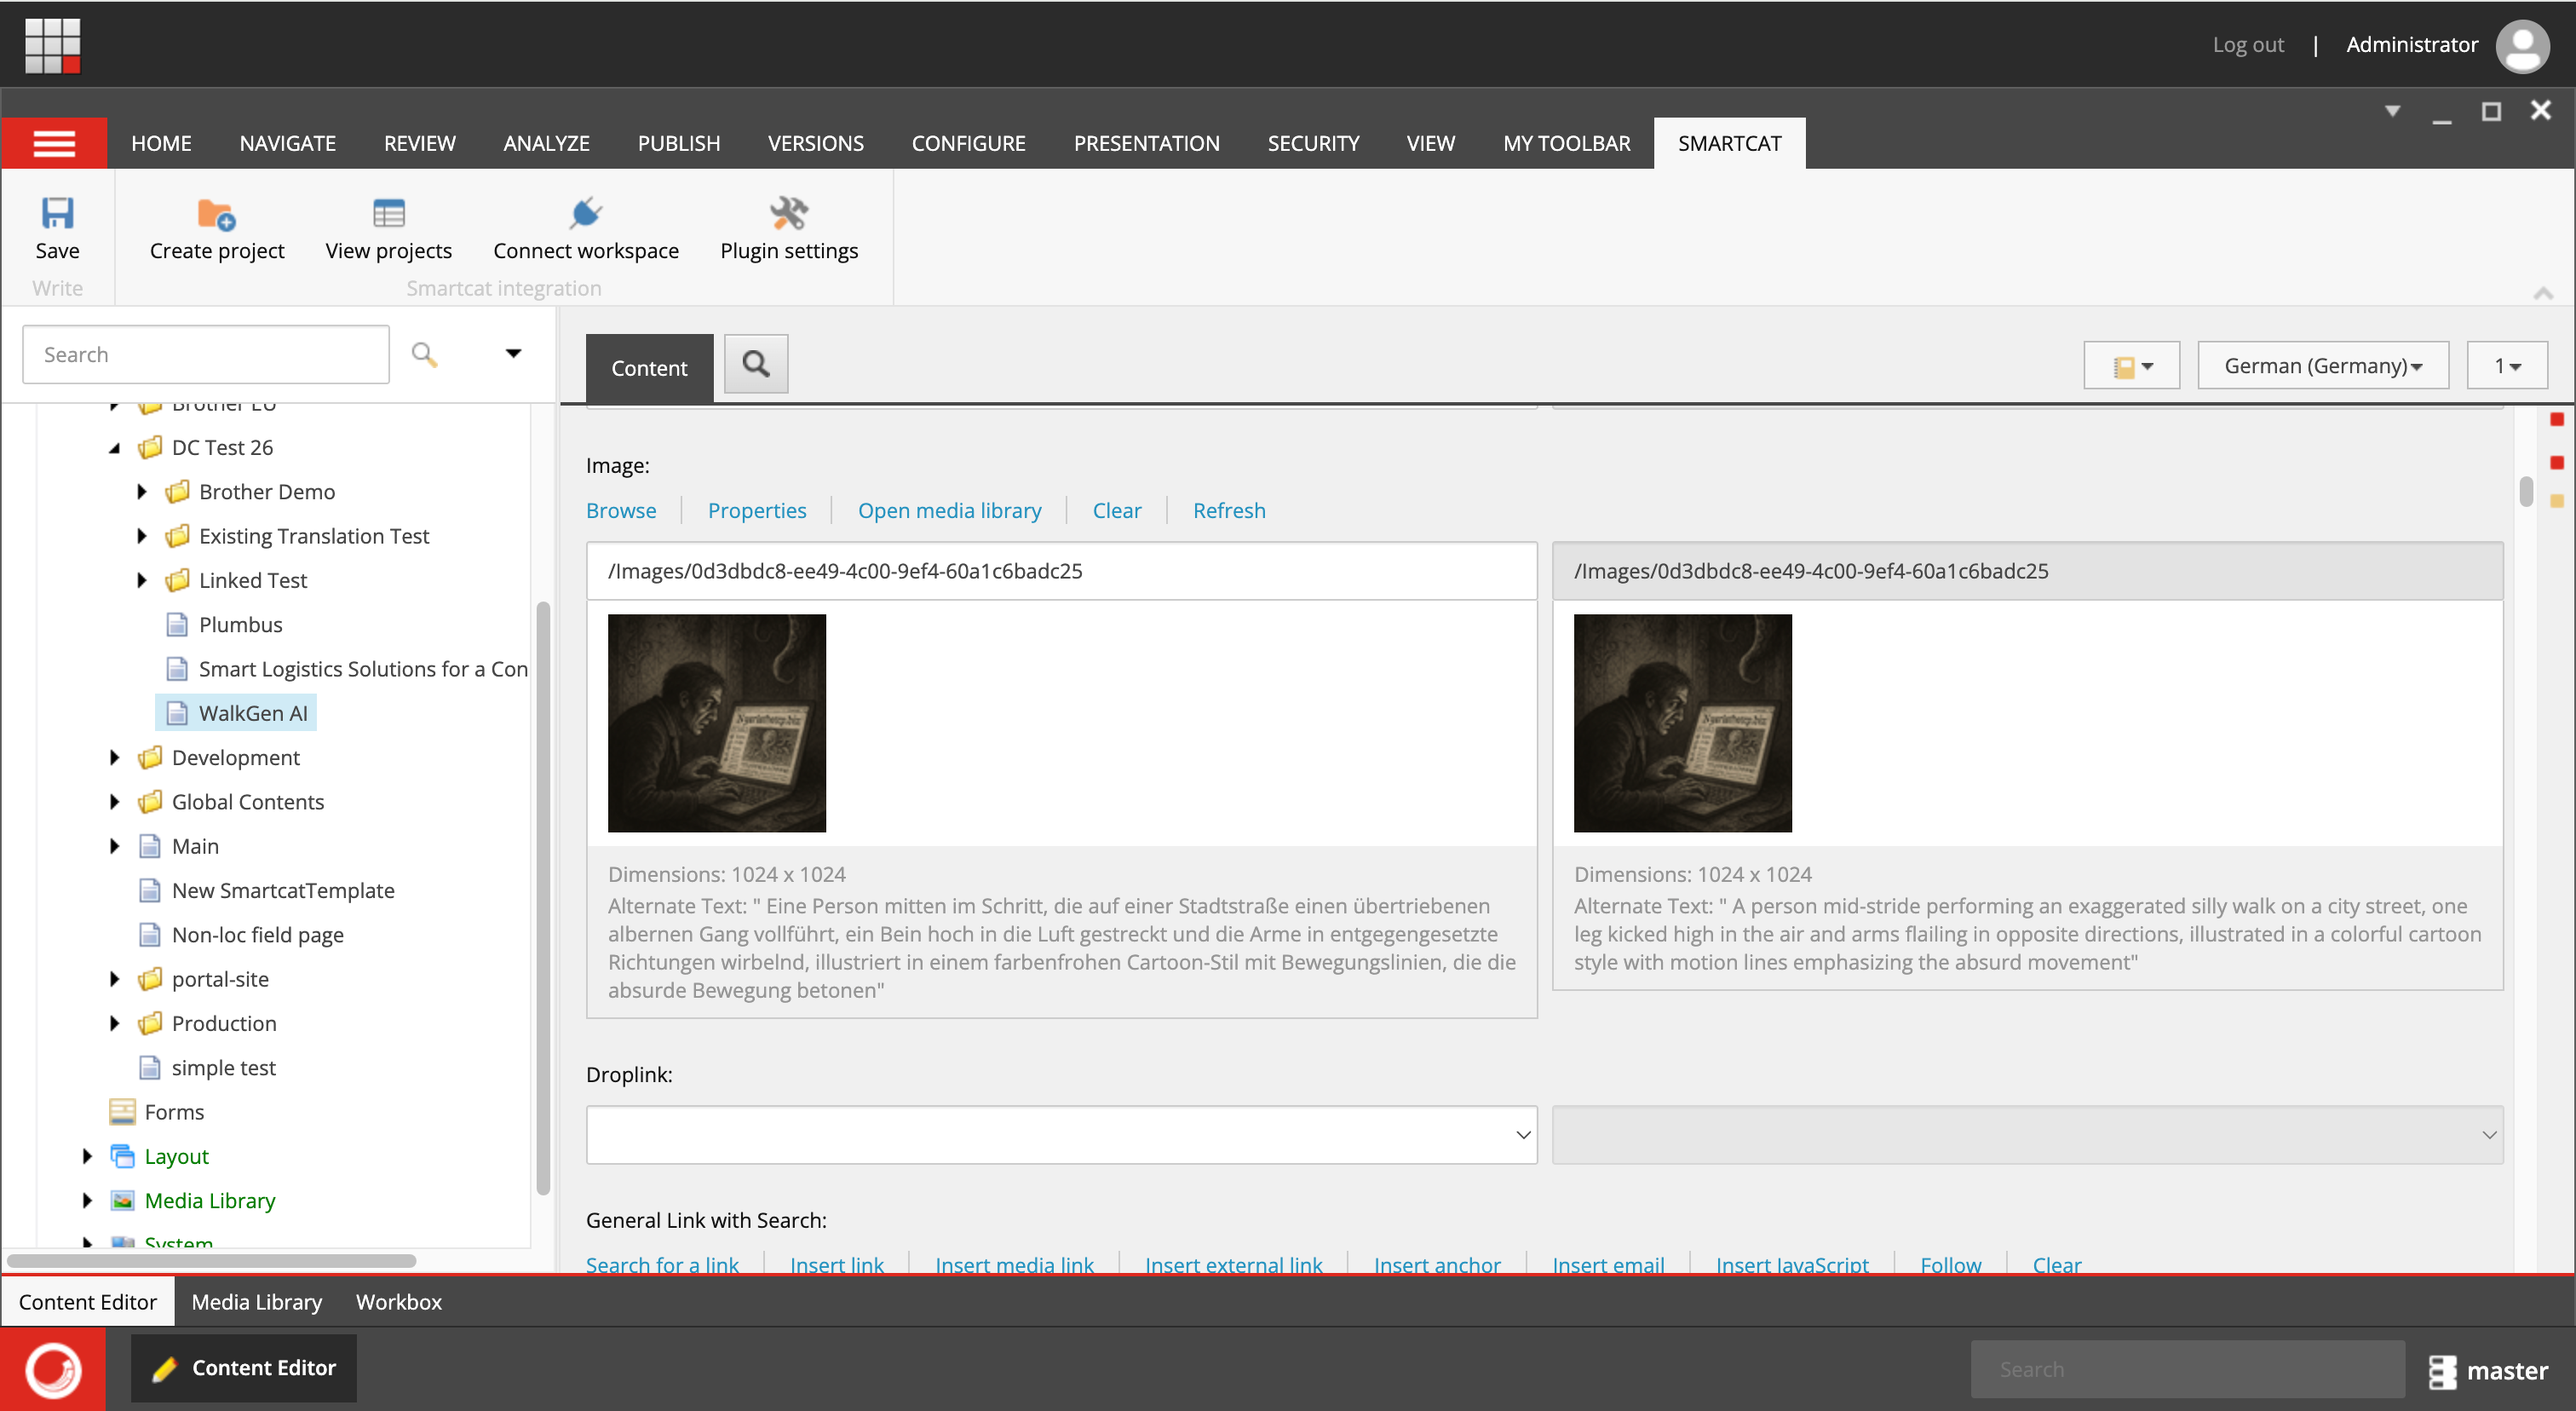
Your Sitecore pages are translated and the language versions are available in the CMS.
Updating translations
When source content changes, you can target the translation to the parts that changed, instead of retranslating from scratch.
-
Send an item for translation in Smartcat for the first time. If it is fully or partly translated, include the existing translations
-
Update the source content of the item
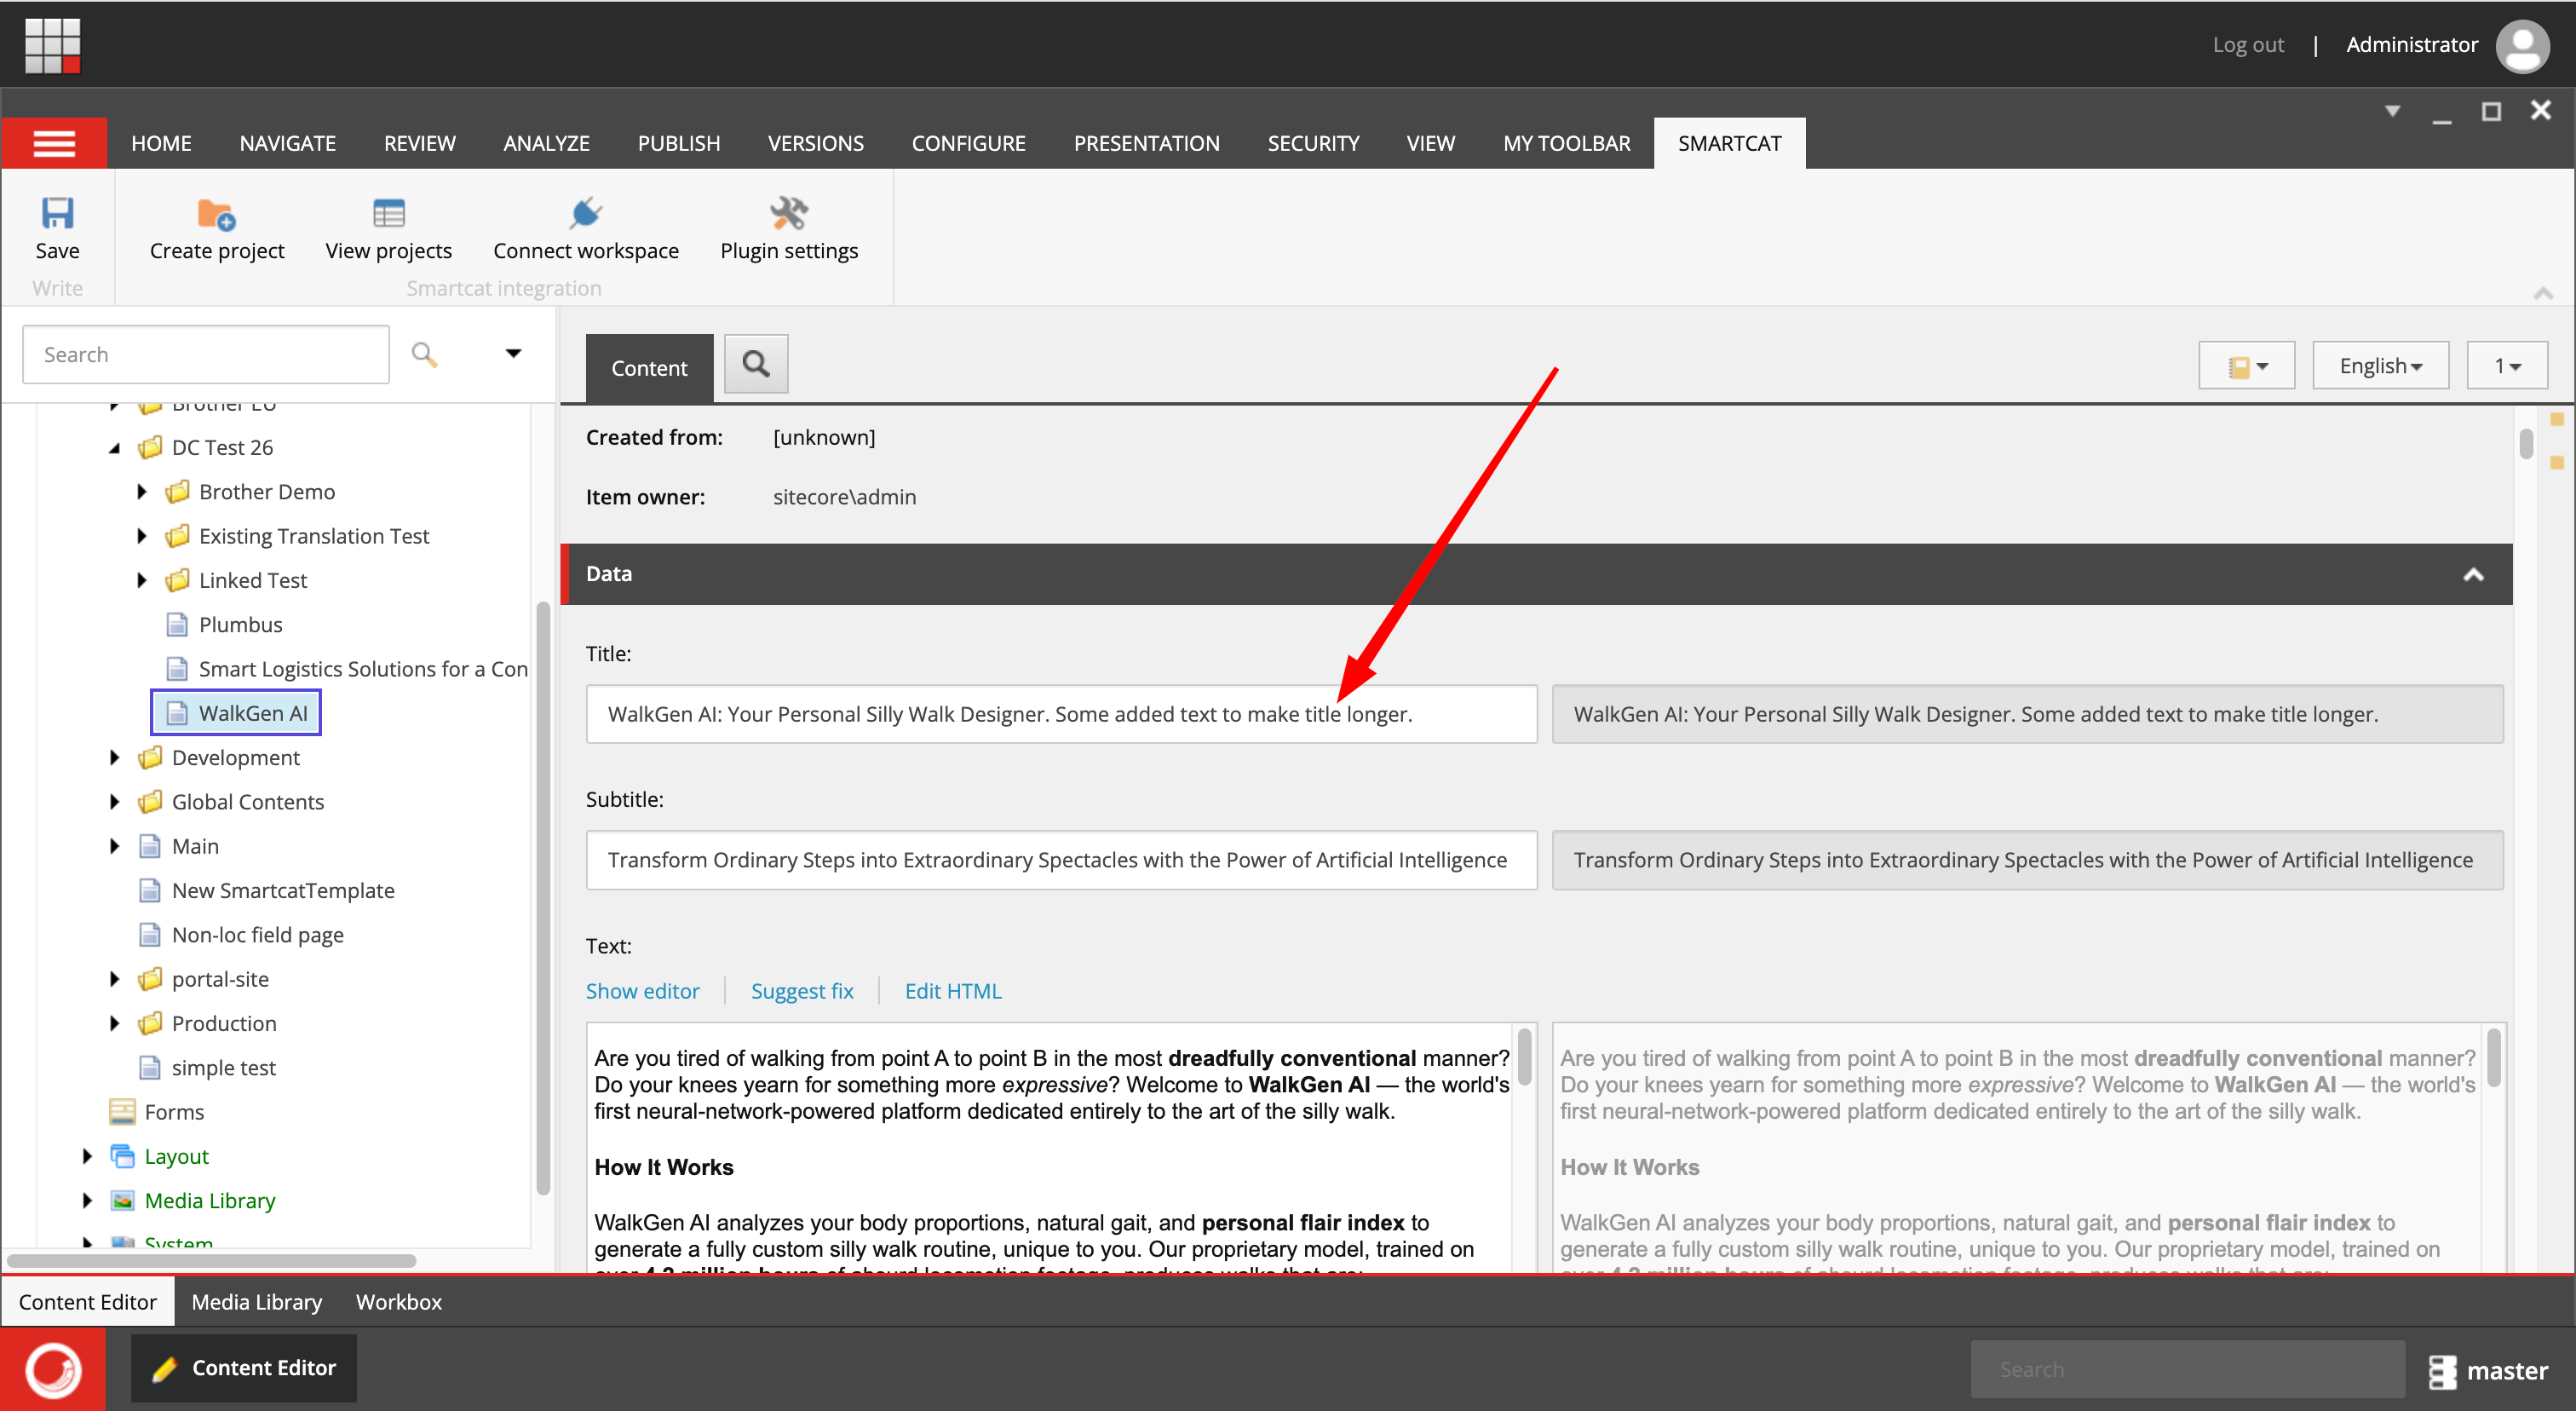
- Send it for translation again by creating a translation project. You can select several pages at once, whether or not they were previously translated
⚠️ Do not include existing translations this time
Additional settings
Custom language mapping
Sitecore allows you to create highly custom locales and dialects and Smartcat may not have a fully matching option. The list of languages and dialects supported by Smartcat is available here.
In some cases you may also want to treat one of your Sitecore languages differently. For example, Spanish with the "es" locale might actually be Spanish (LATAM) when it comes to translation.
For both cases, Smartcat allows you to create custom locale mappings, essentially telling Smartcat to use a certain locale when translating from another locale in Sitecore.
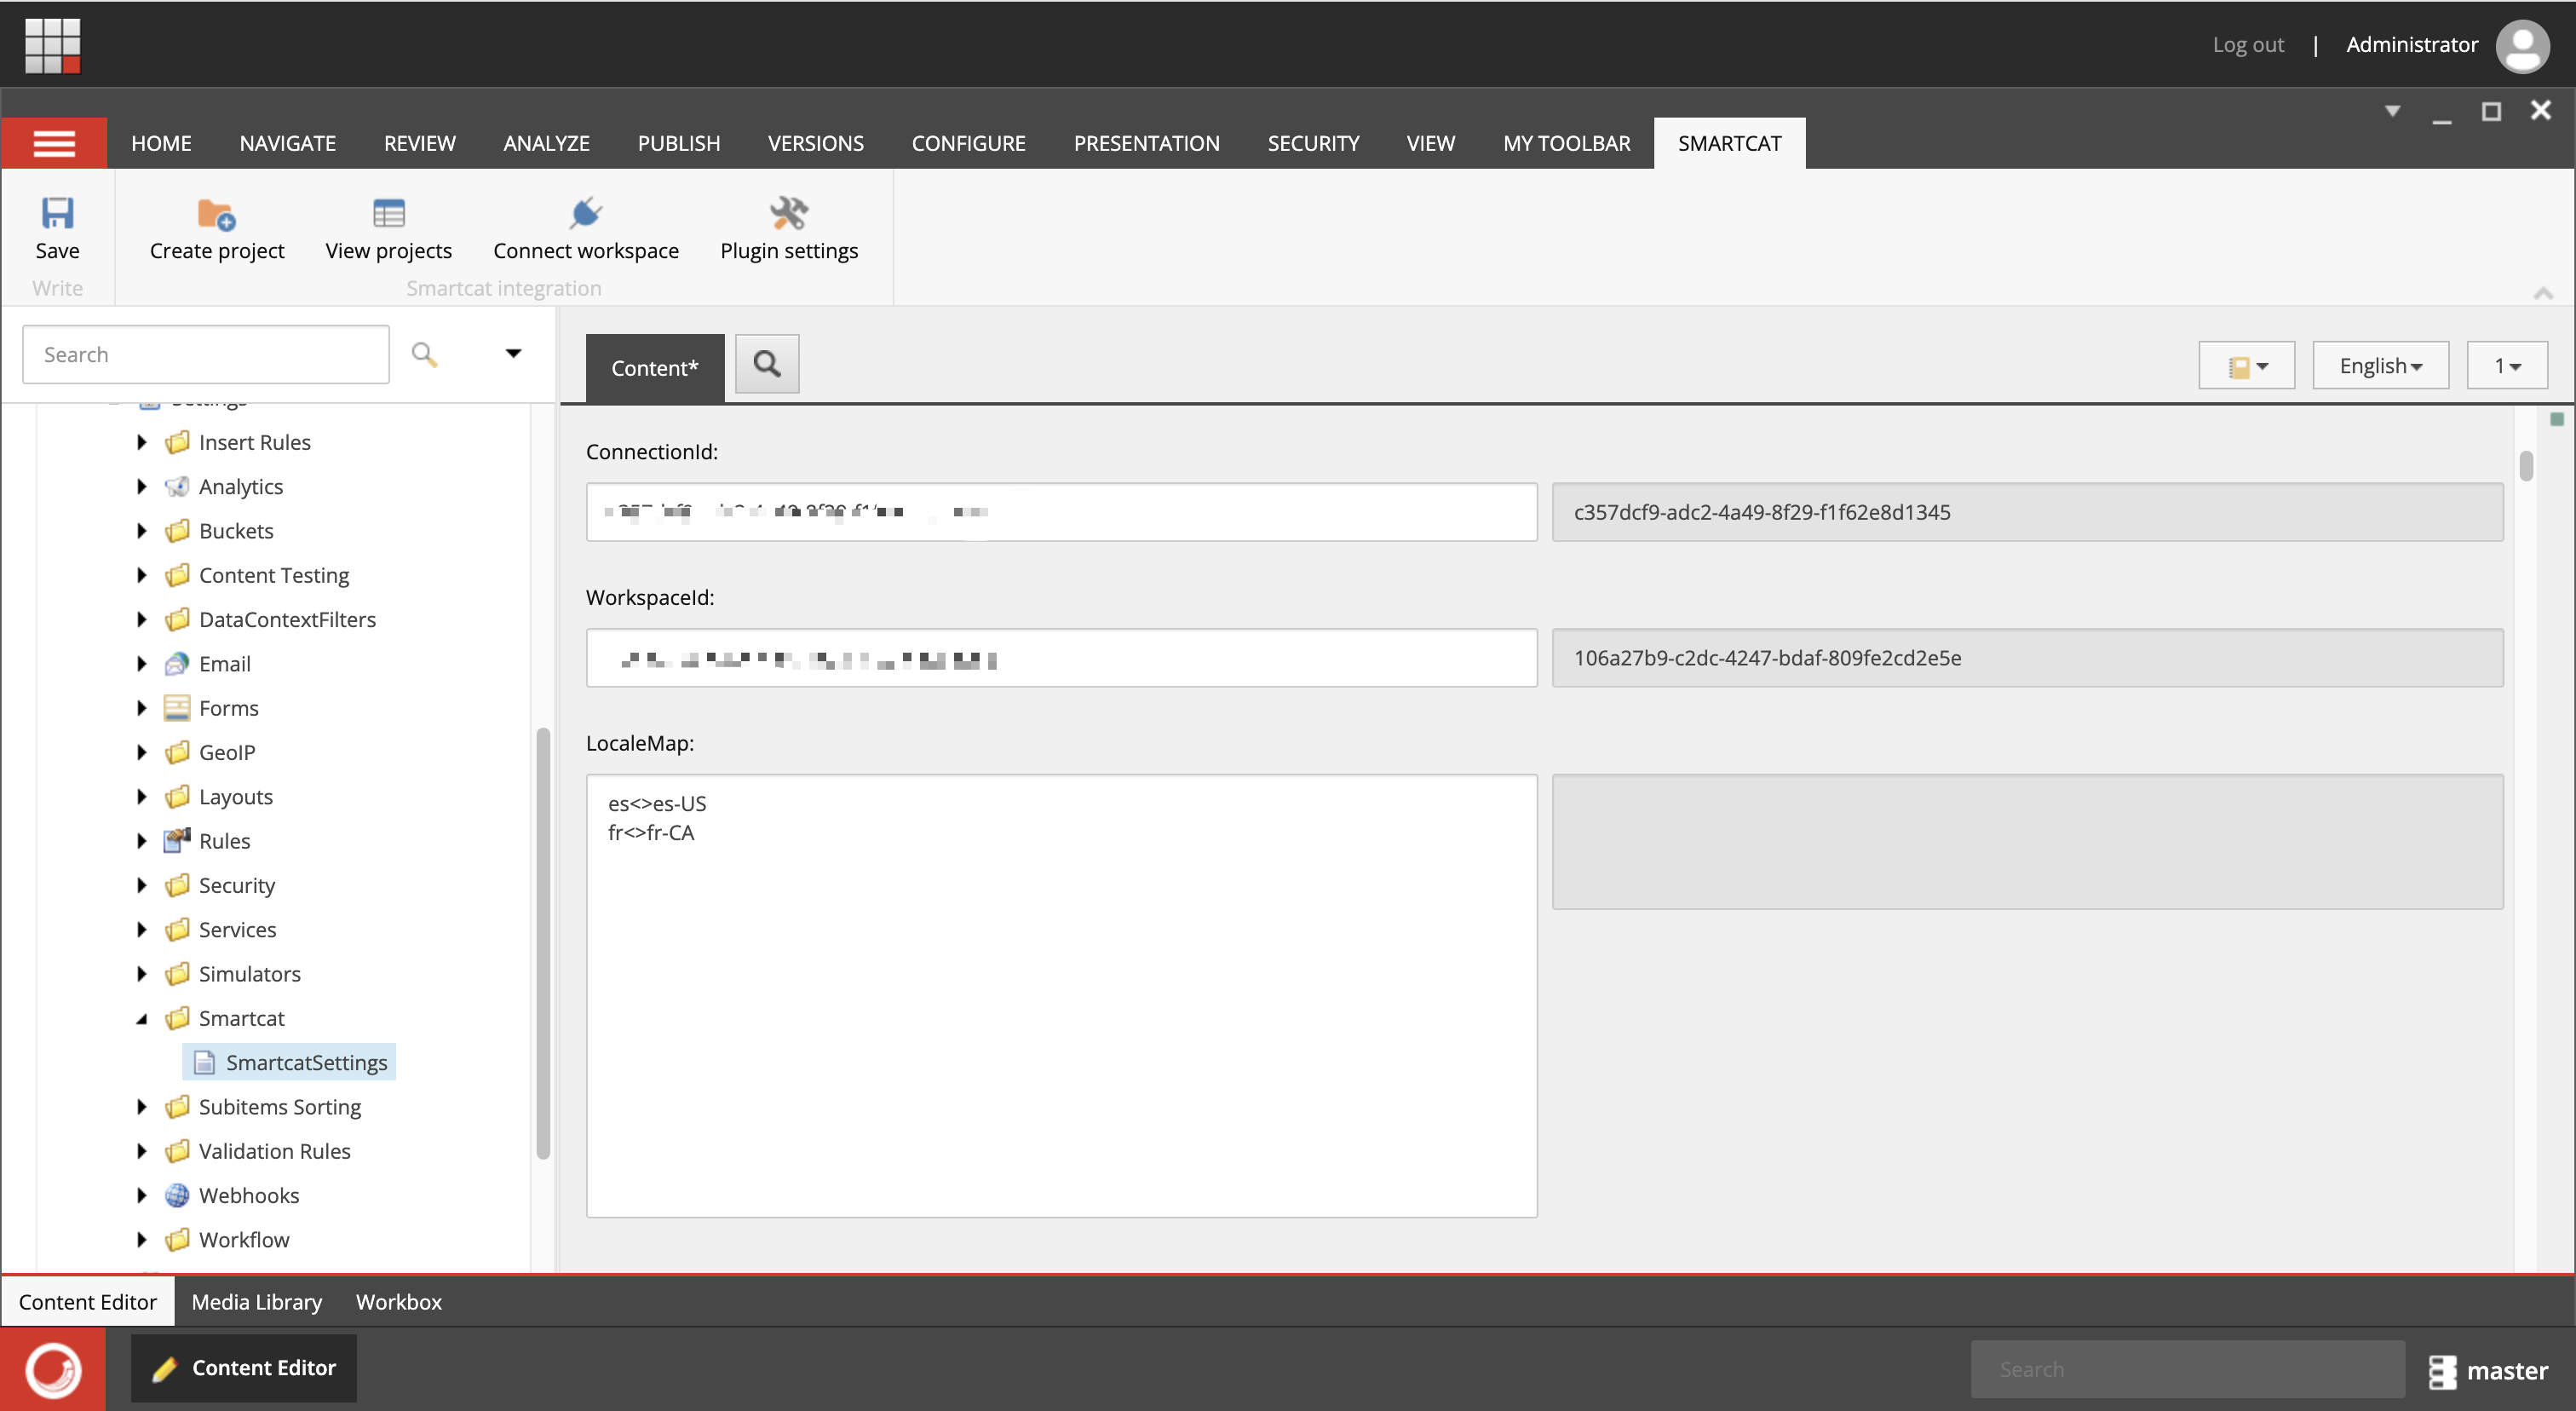
To do this, in Sitecore, open System → Settings → Smartcat → SmartcatSettings and edit the LocaleMap field. The format is: %locale in Sitecore% <> %locale in Smartcat%. Each entry should be on a new line.
Copying values from source to language copies
In some cases, field values should be the same across all languages.
In this case, you can either use the shared setting for this field in the item template, or configure the Smartcat plugin to copy the field value from the source to the language version when creating one using the plugin.
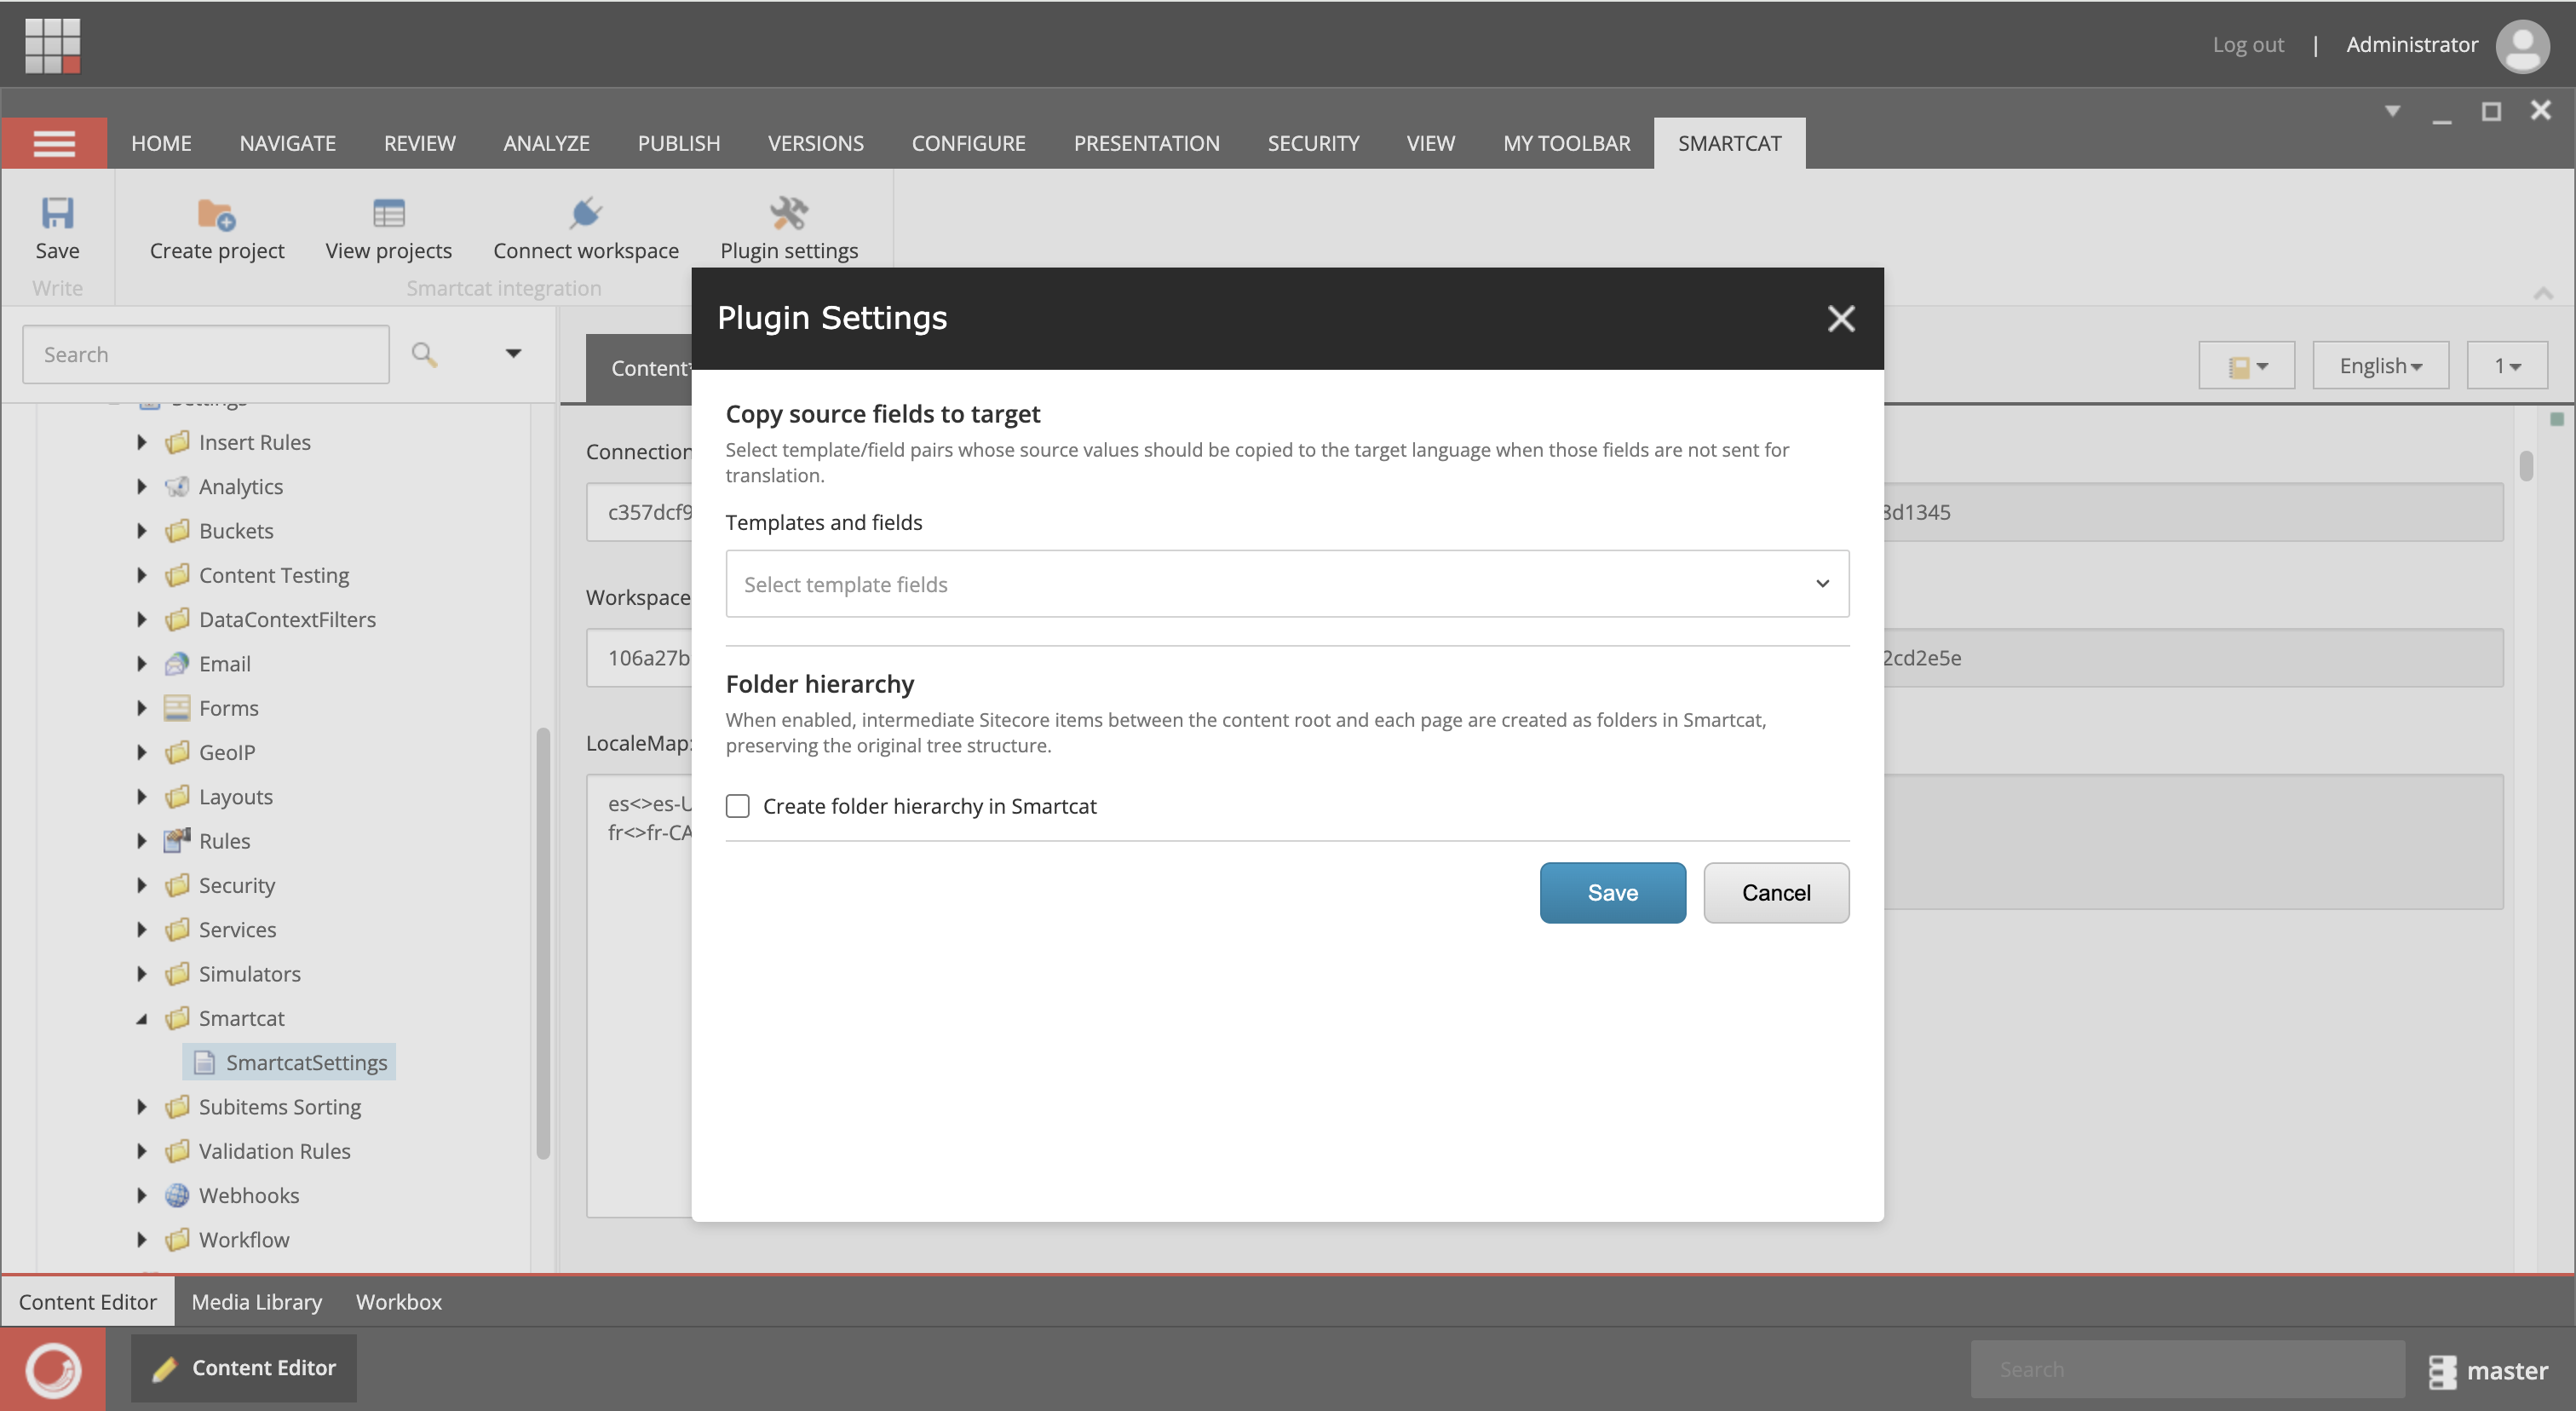
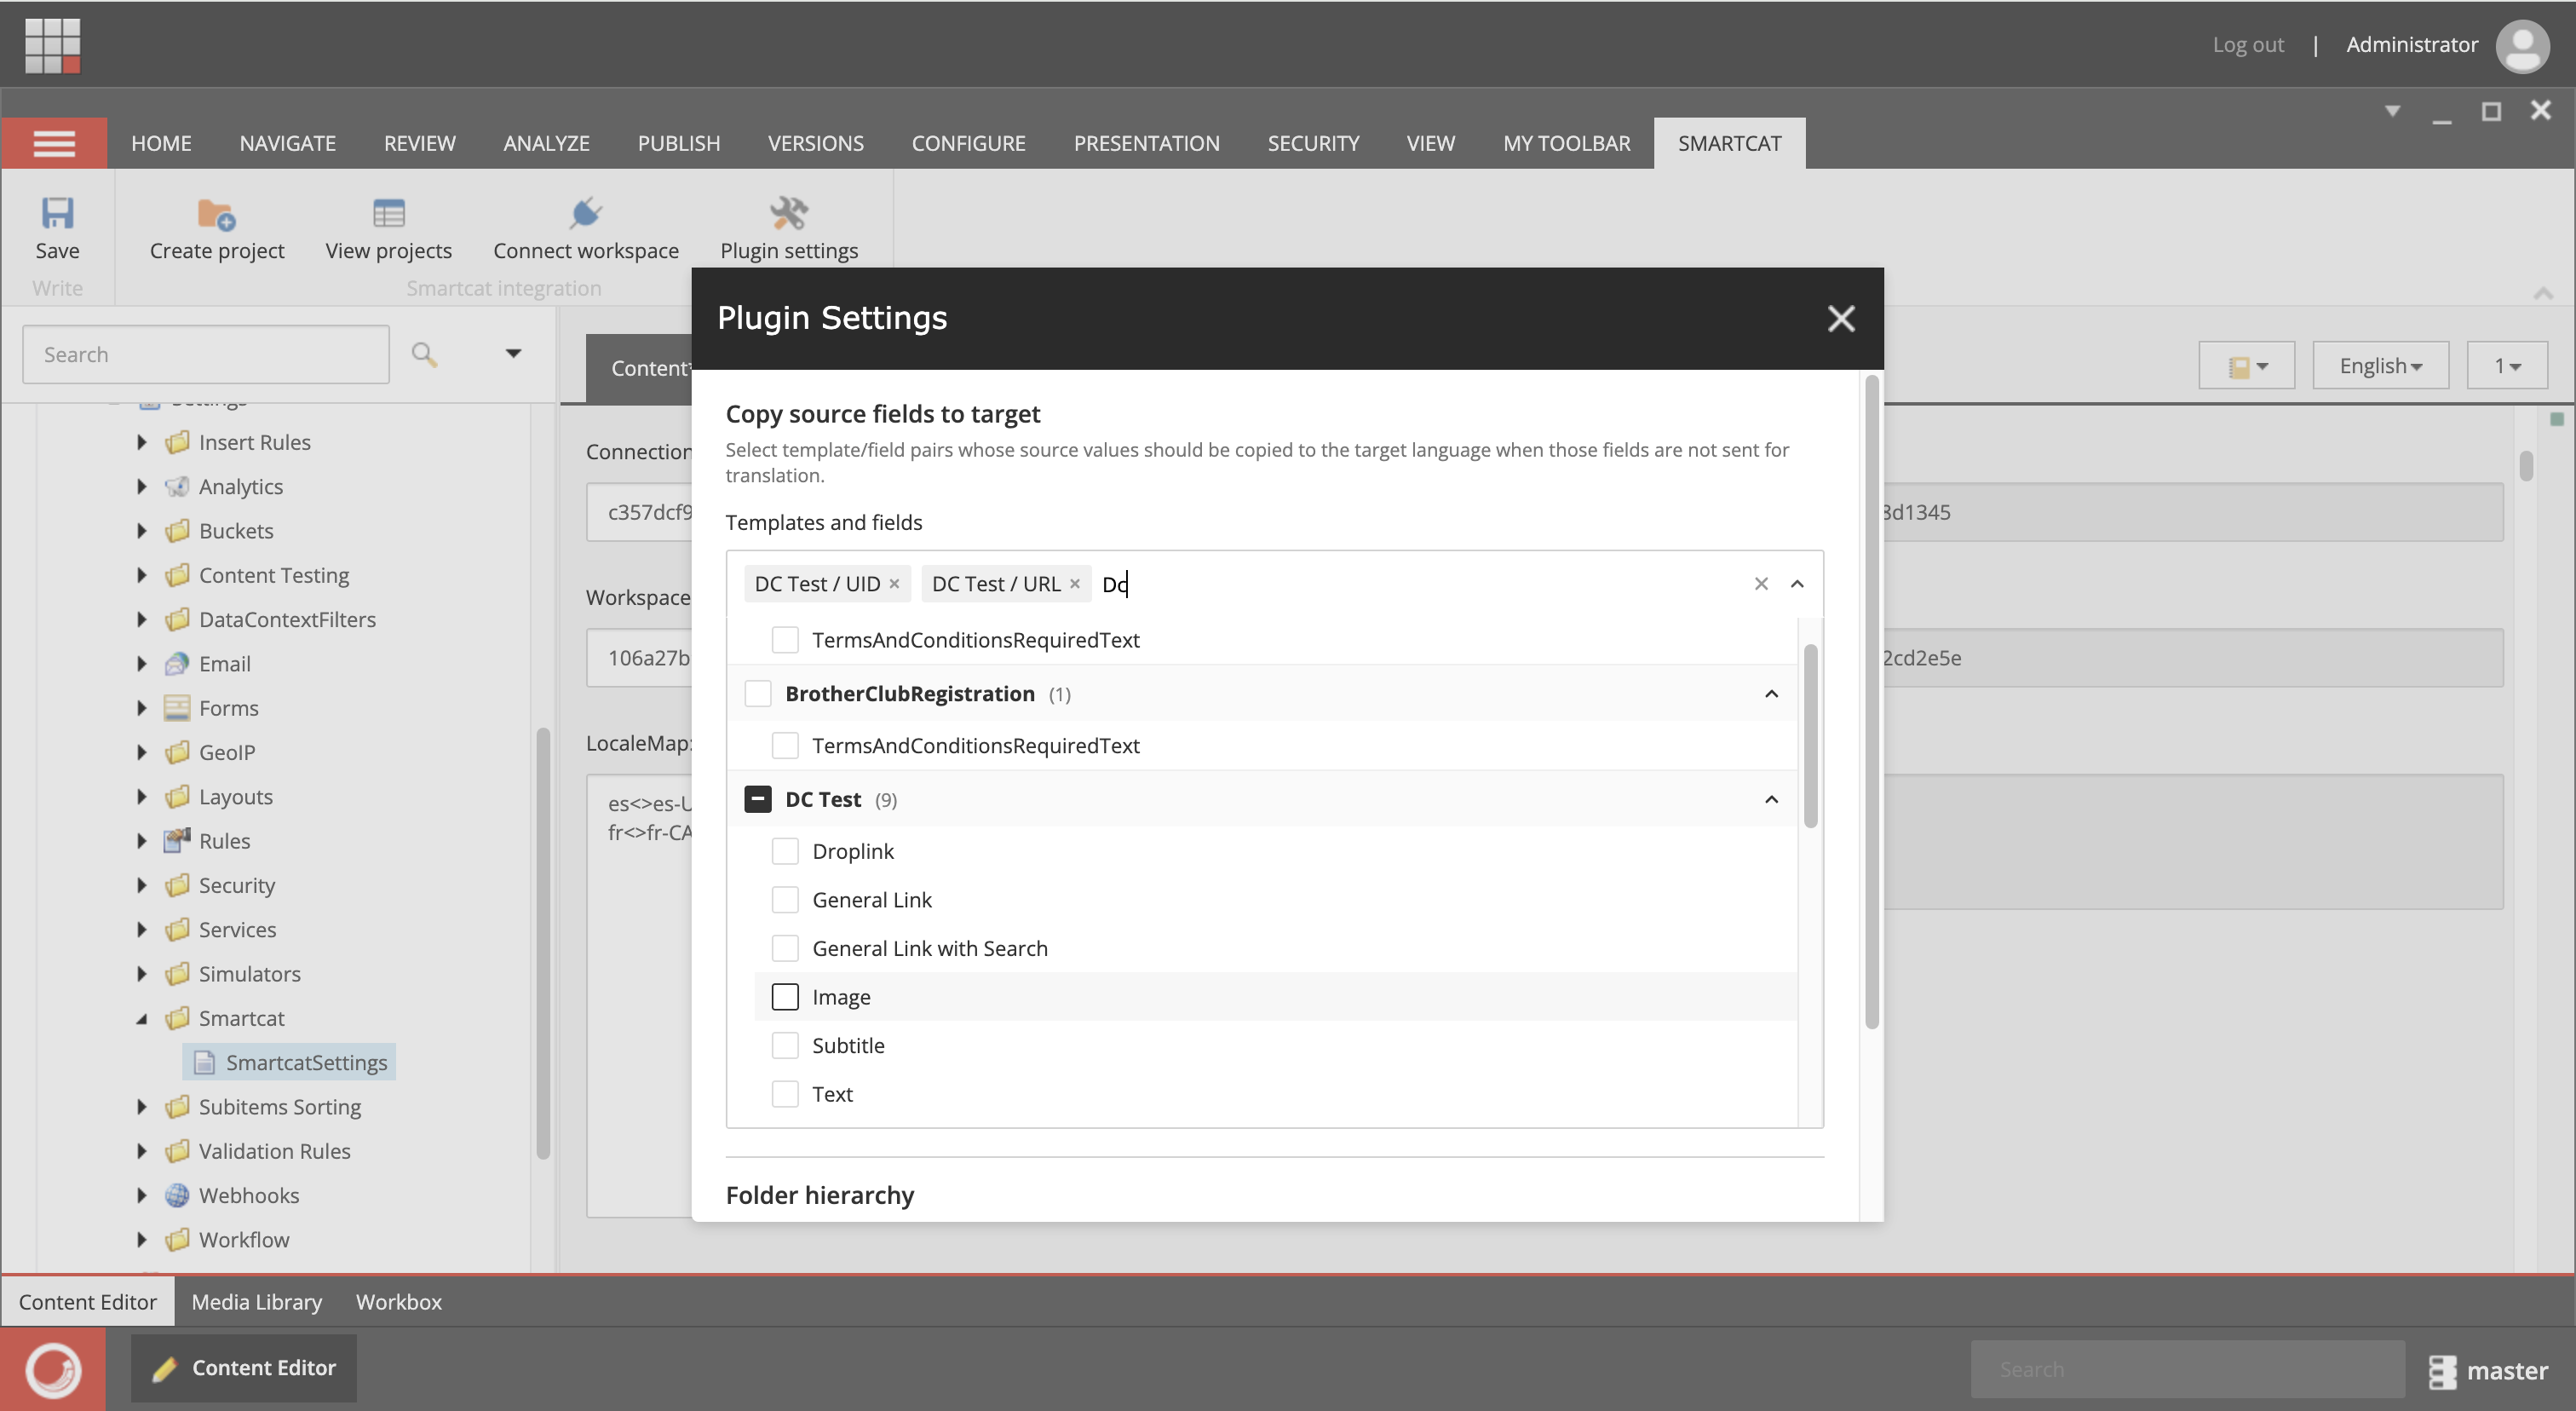
To do this, open the Smartcat tab and click Plugin Settings. Next, select the template and the field that should be copied. The setting will be applied to all items created using this template.
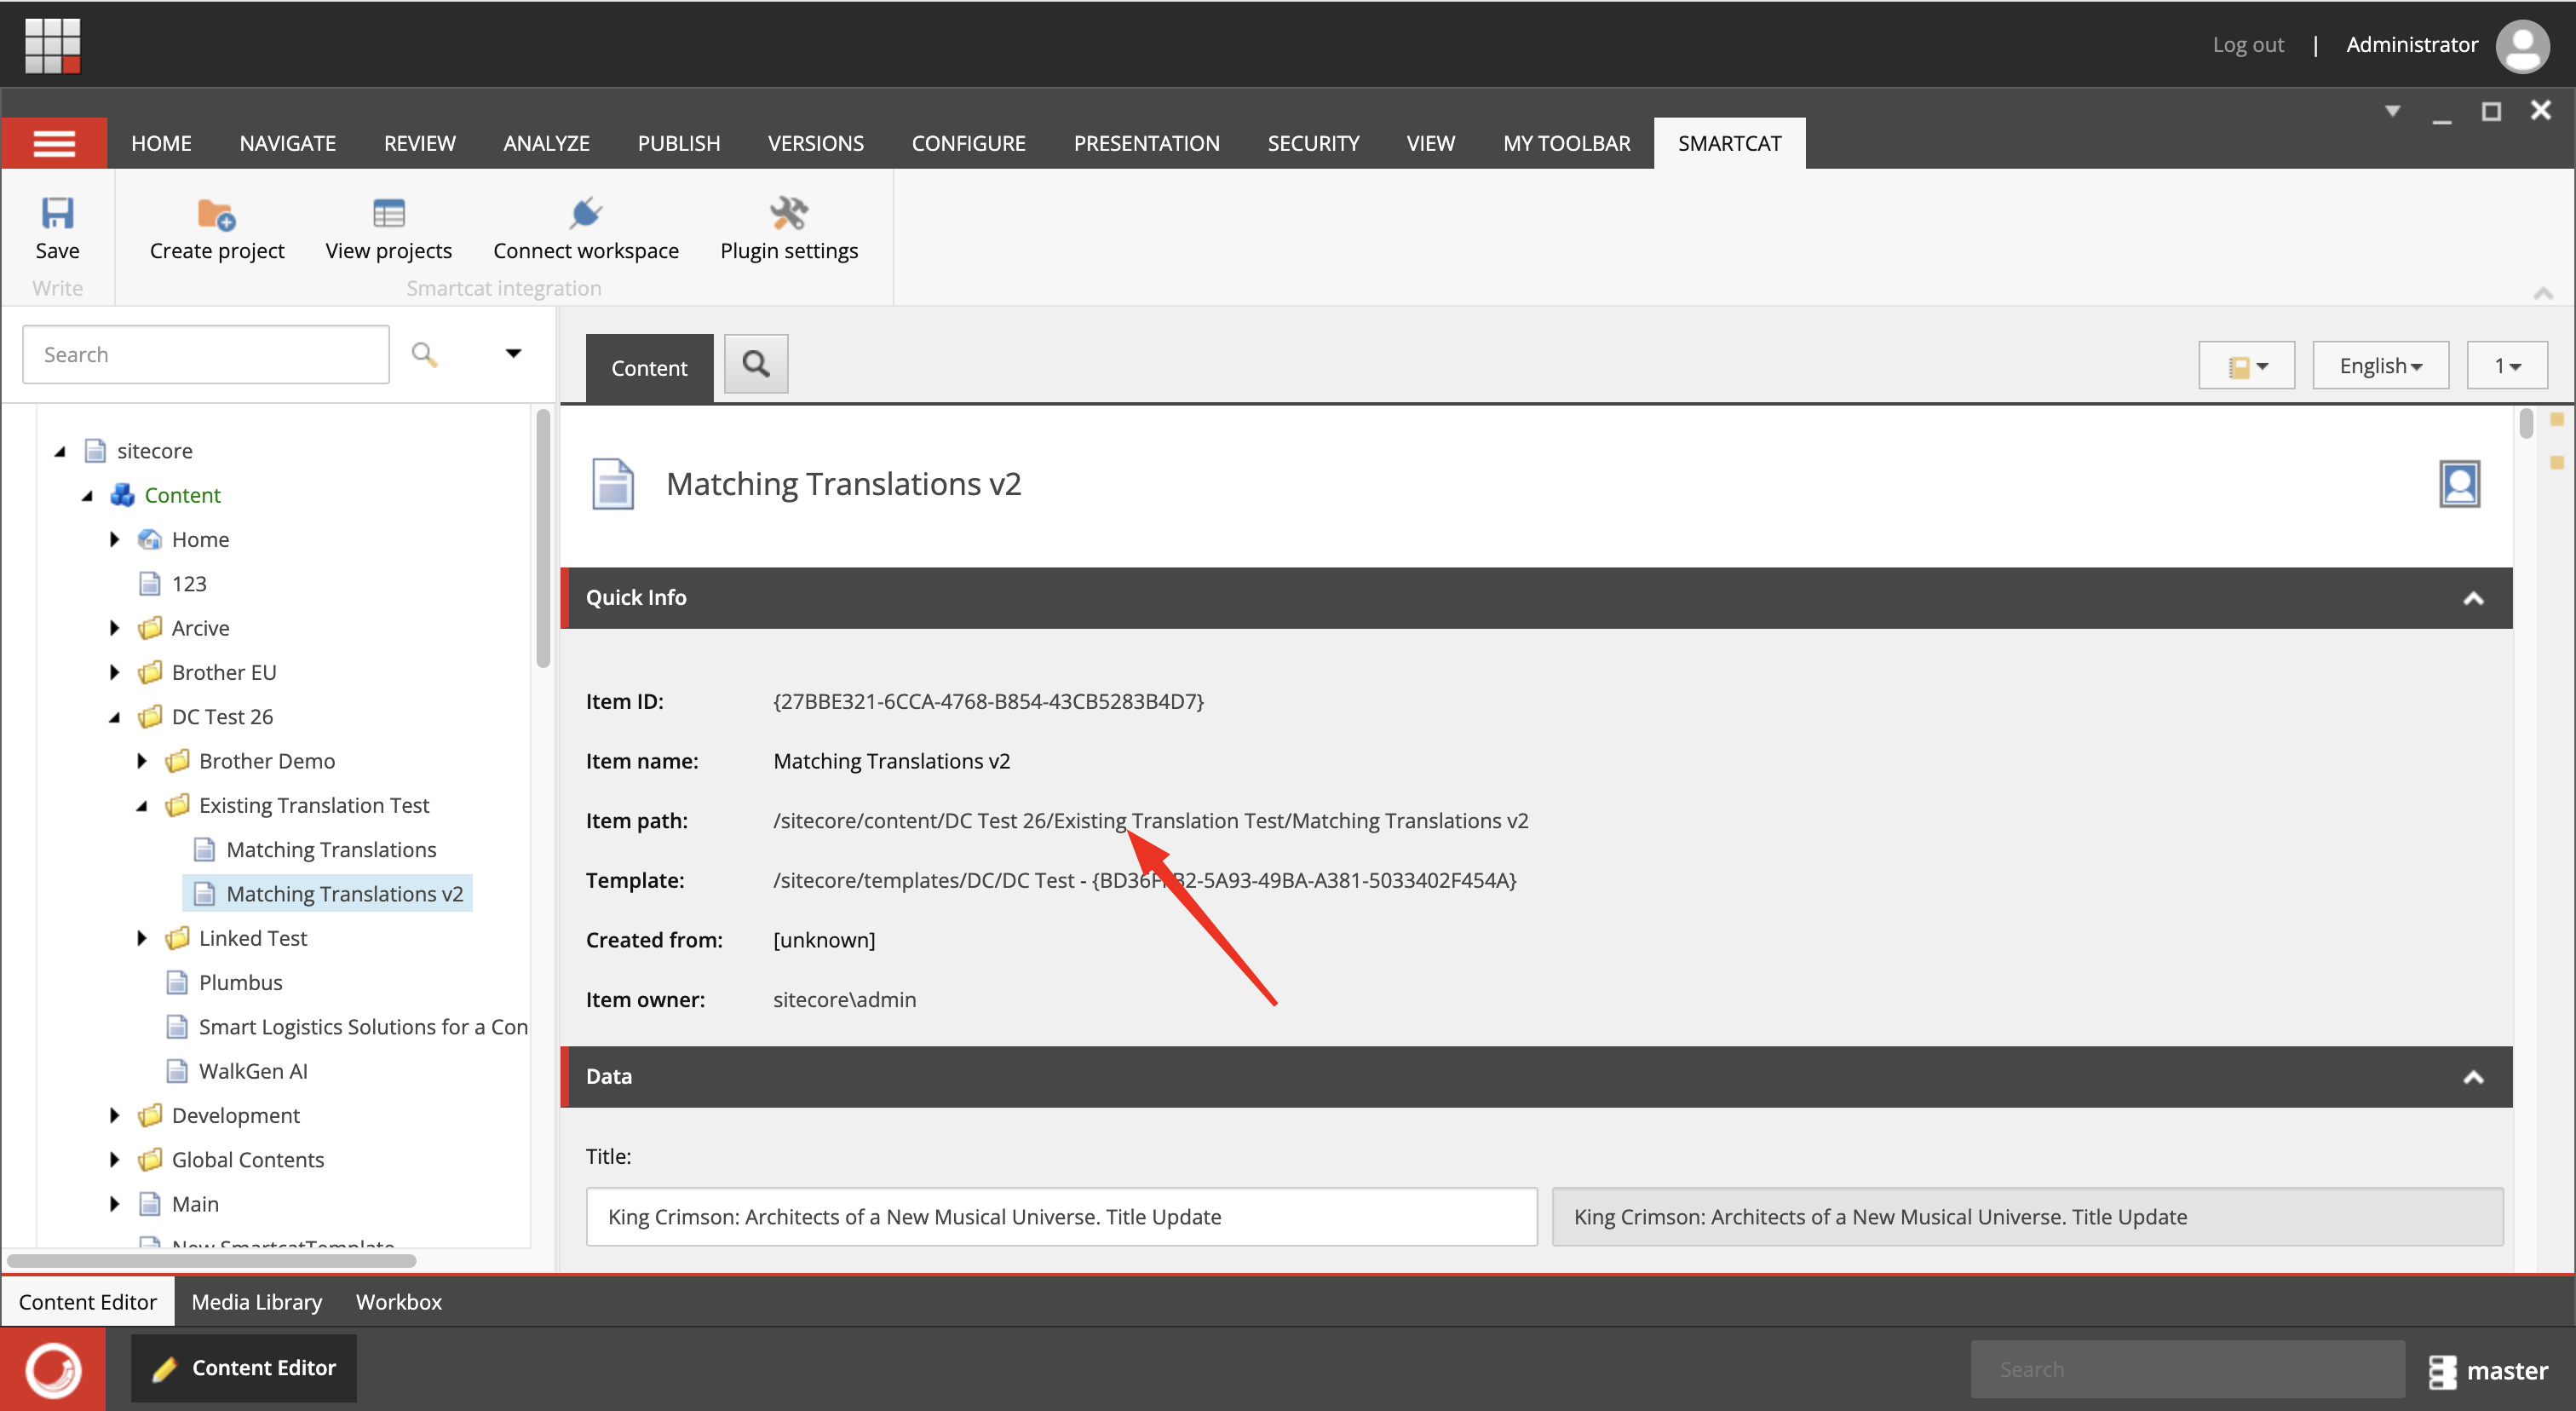
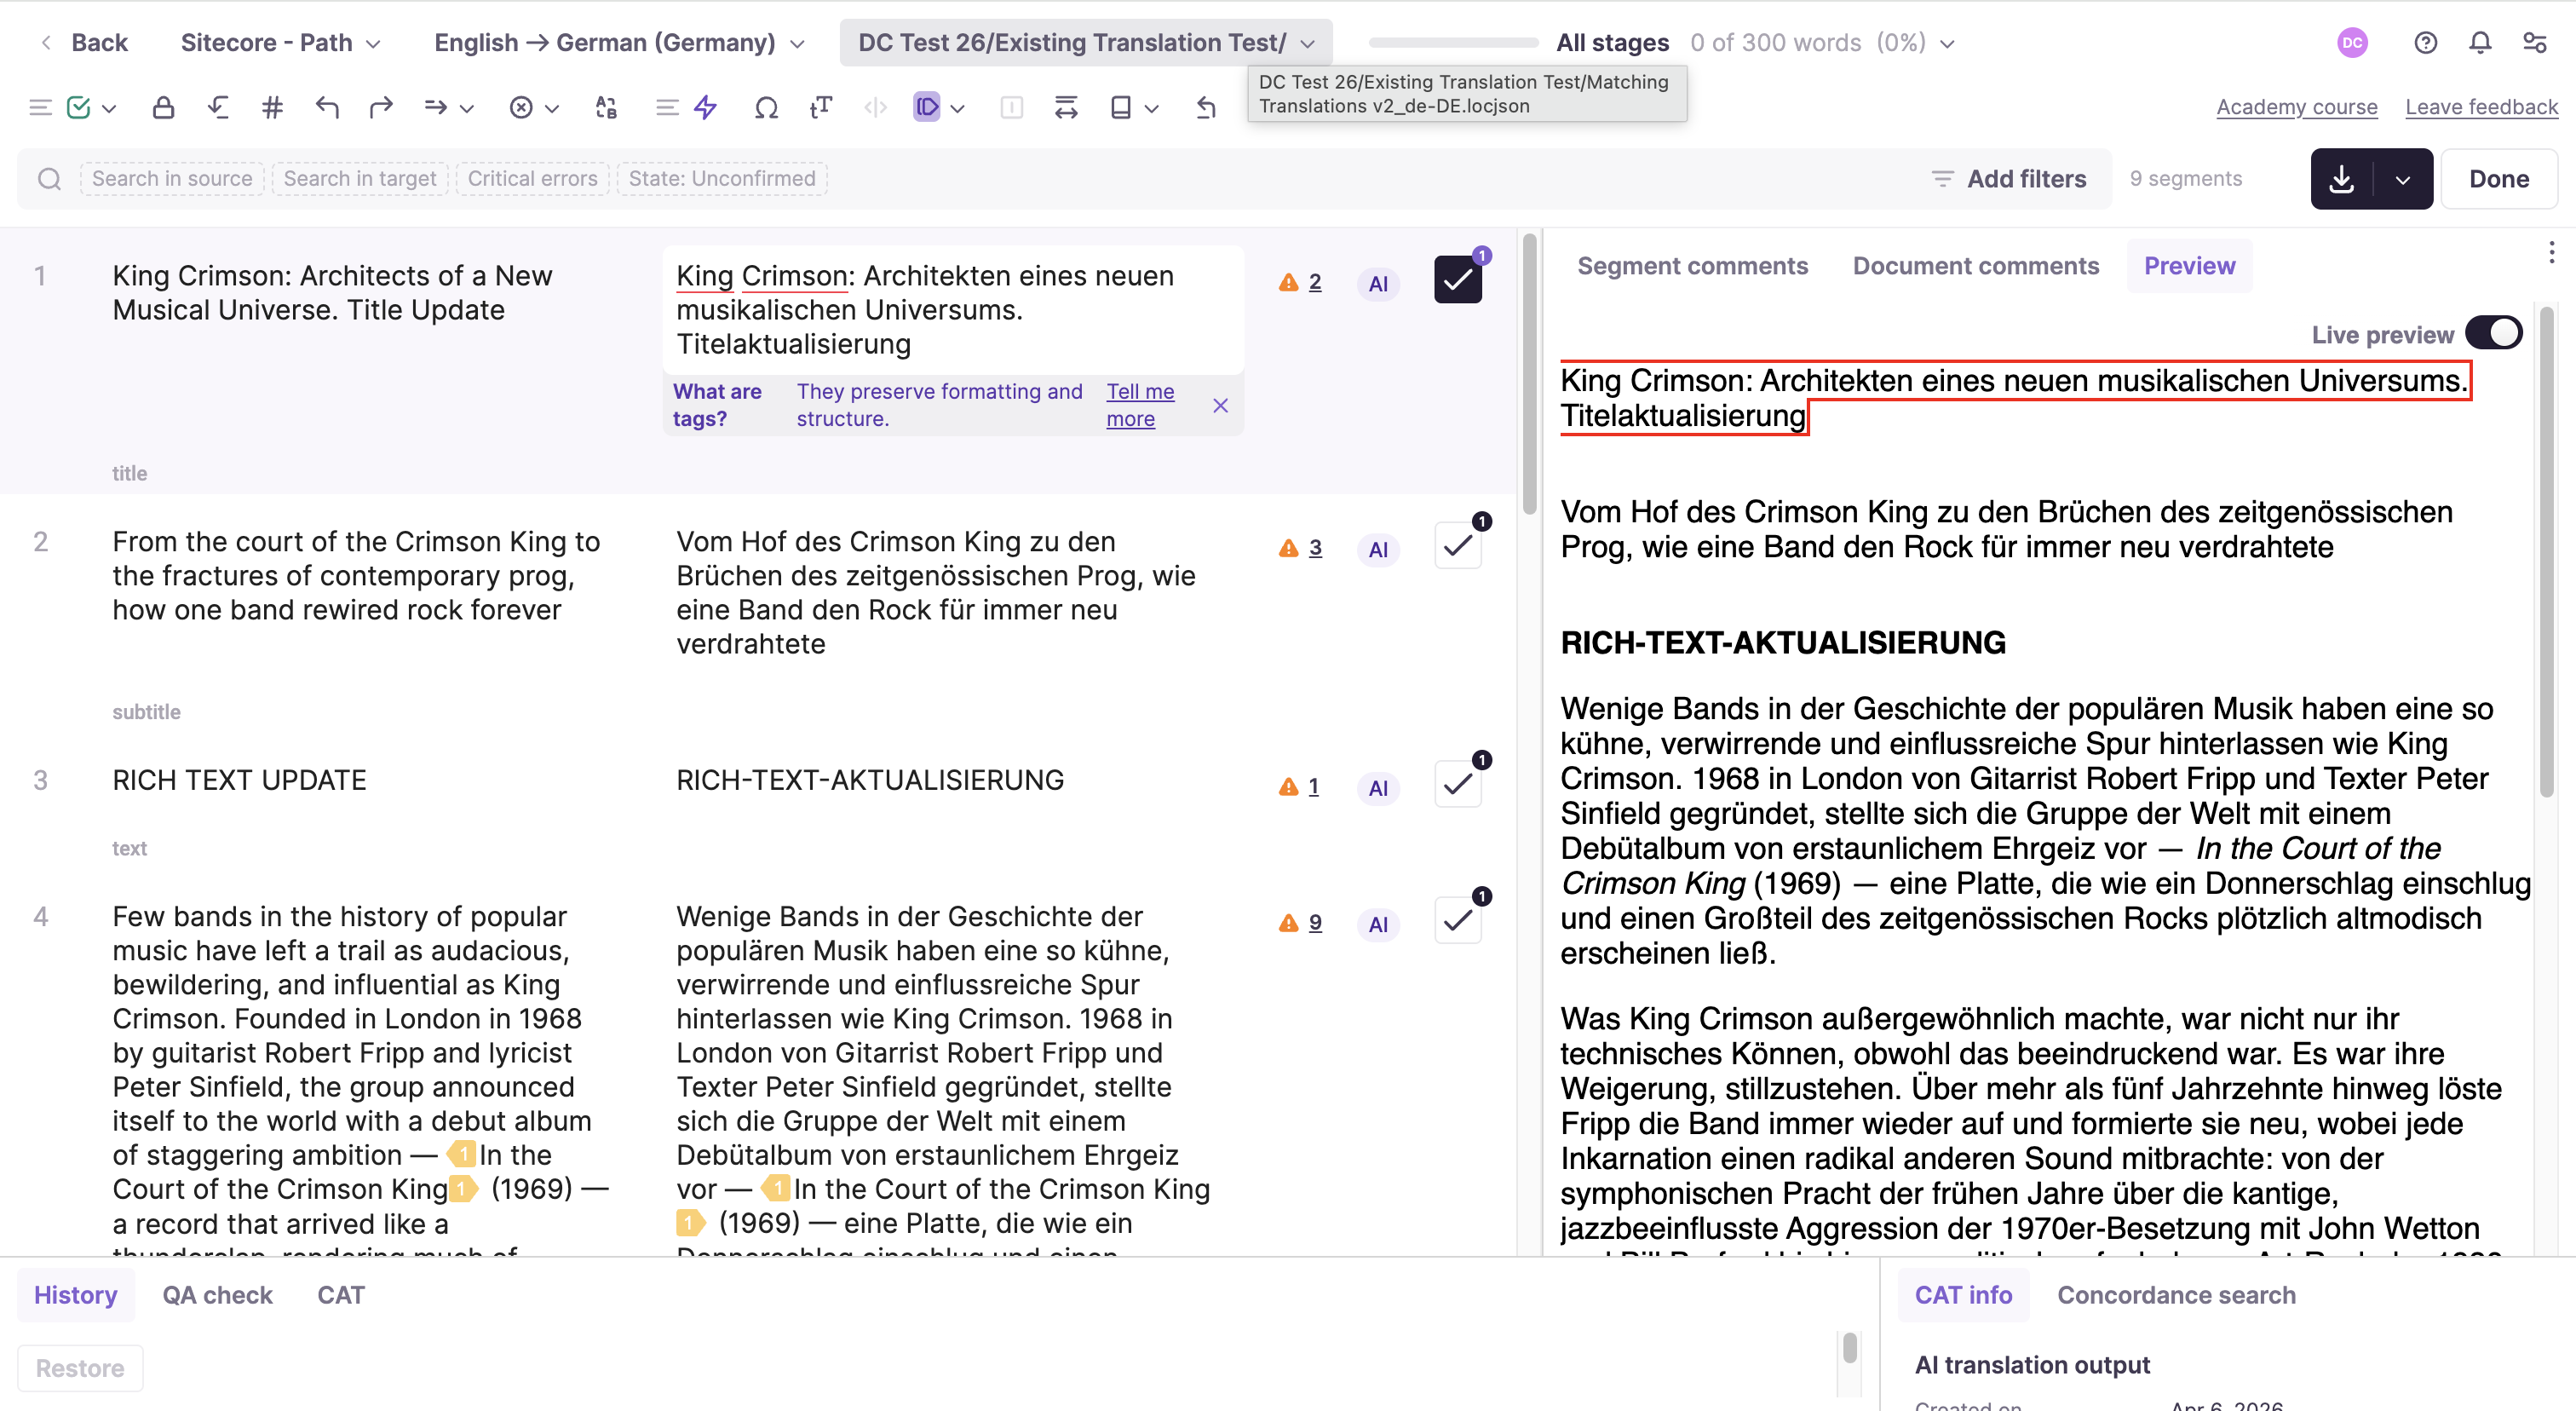
Emulating Sitecore item path in Smartcat
When a translation project is created in Smartcat, each translatable item is represented as a file. Optionally, you can configure Smartcat to mirror the item path from Sitecore inside Smartcat. This can be useful when you want to see the exact item path while working in the Smartcat Editor.
Understanding "Copy field value" vs. "Do not copy field value"
The Plugin Settings panel displays two sections: Copy field value and Do not copy field value. These are two opposite modes of the same setting.
Copy field value acts as a whitelist: the plugin copies only the selected fields to the target language version.
Do not copy field value acts as a blacklist: the plugin copies everything except the selected fields.
Only one mode is active at a time. The selected field list is shared between both modes: a field you add appears under both sections because the list is retained regardless of which mode is currently active. Your selection is not lost when you switch modes. Only the active mode takes effect when a project is created.
📌 This setting is plugin-wide and applies to all projects created from the selected template, not to individual projects.
Smartcat Plugin v0.7.0
How to Connect
-
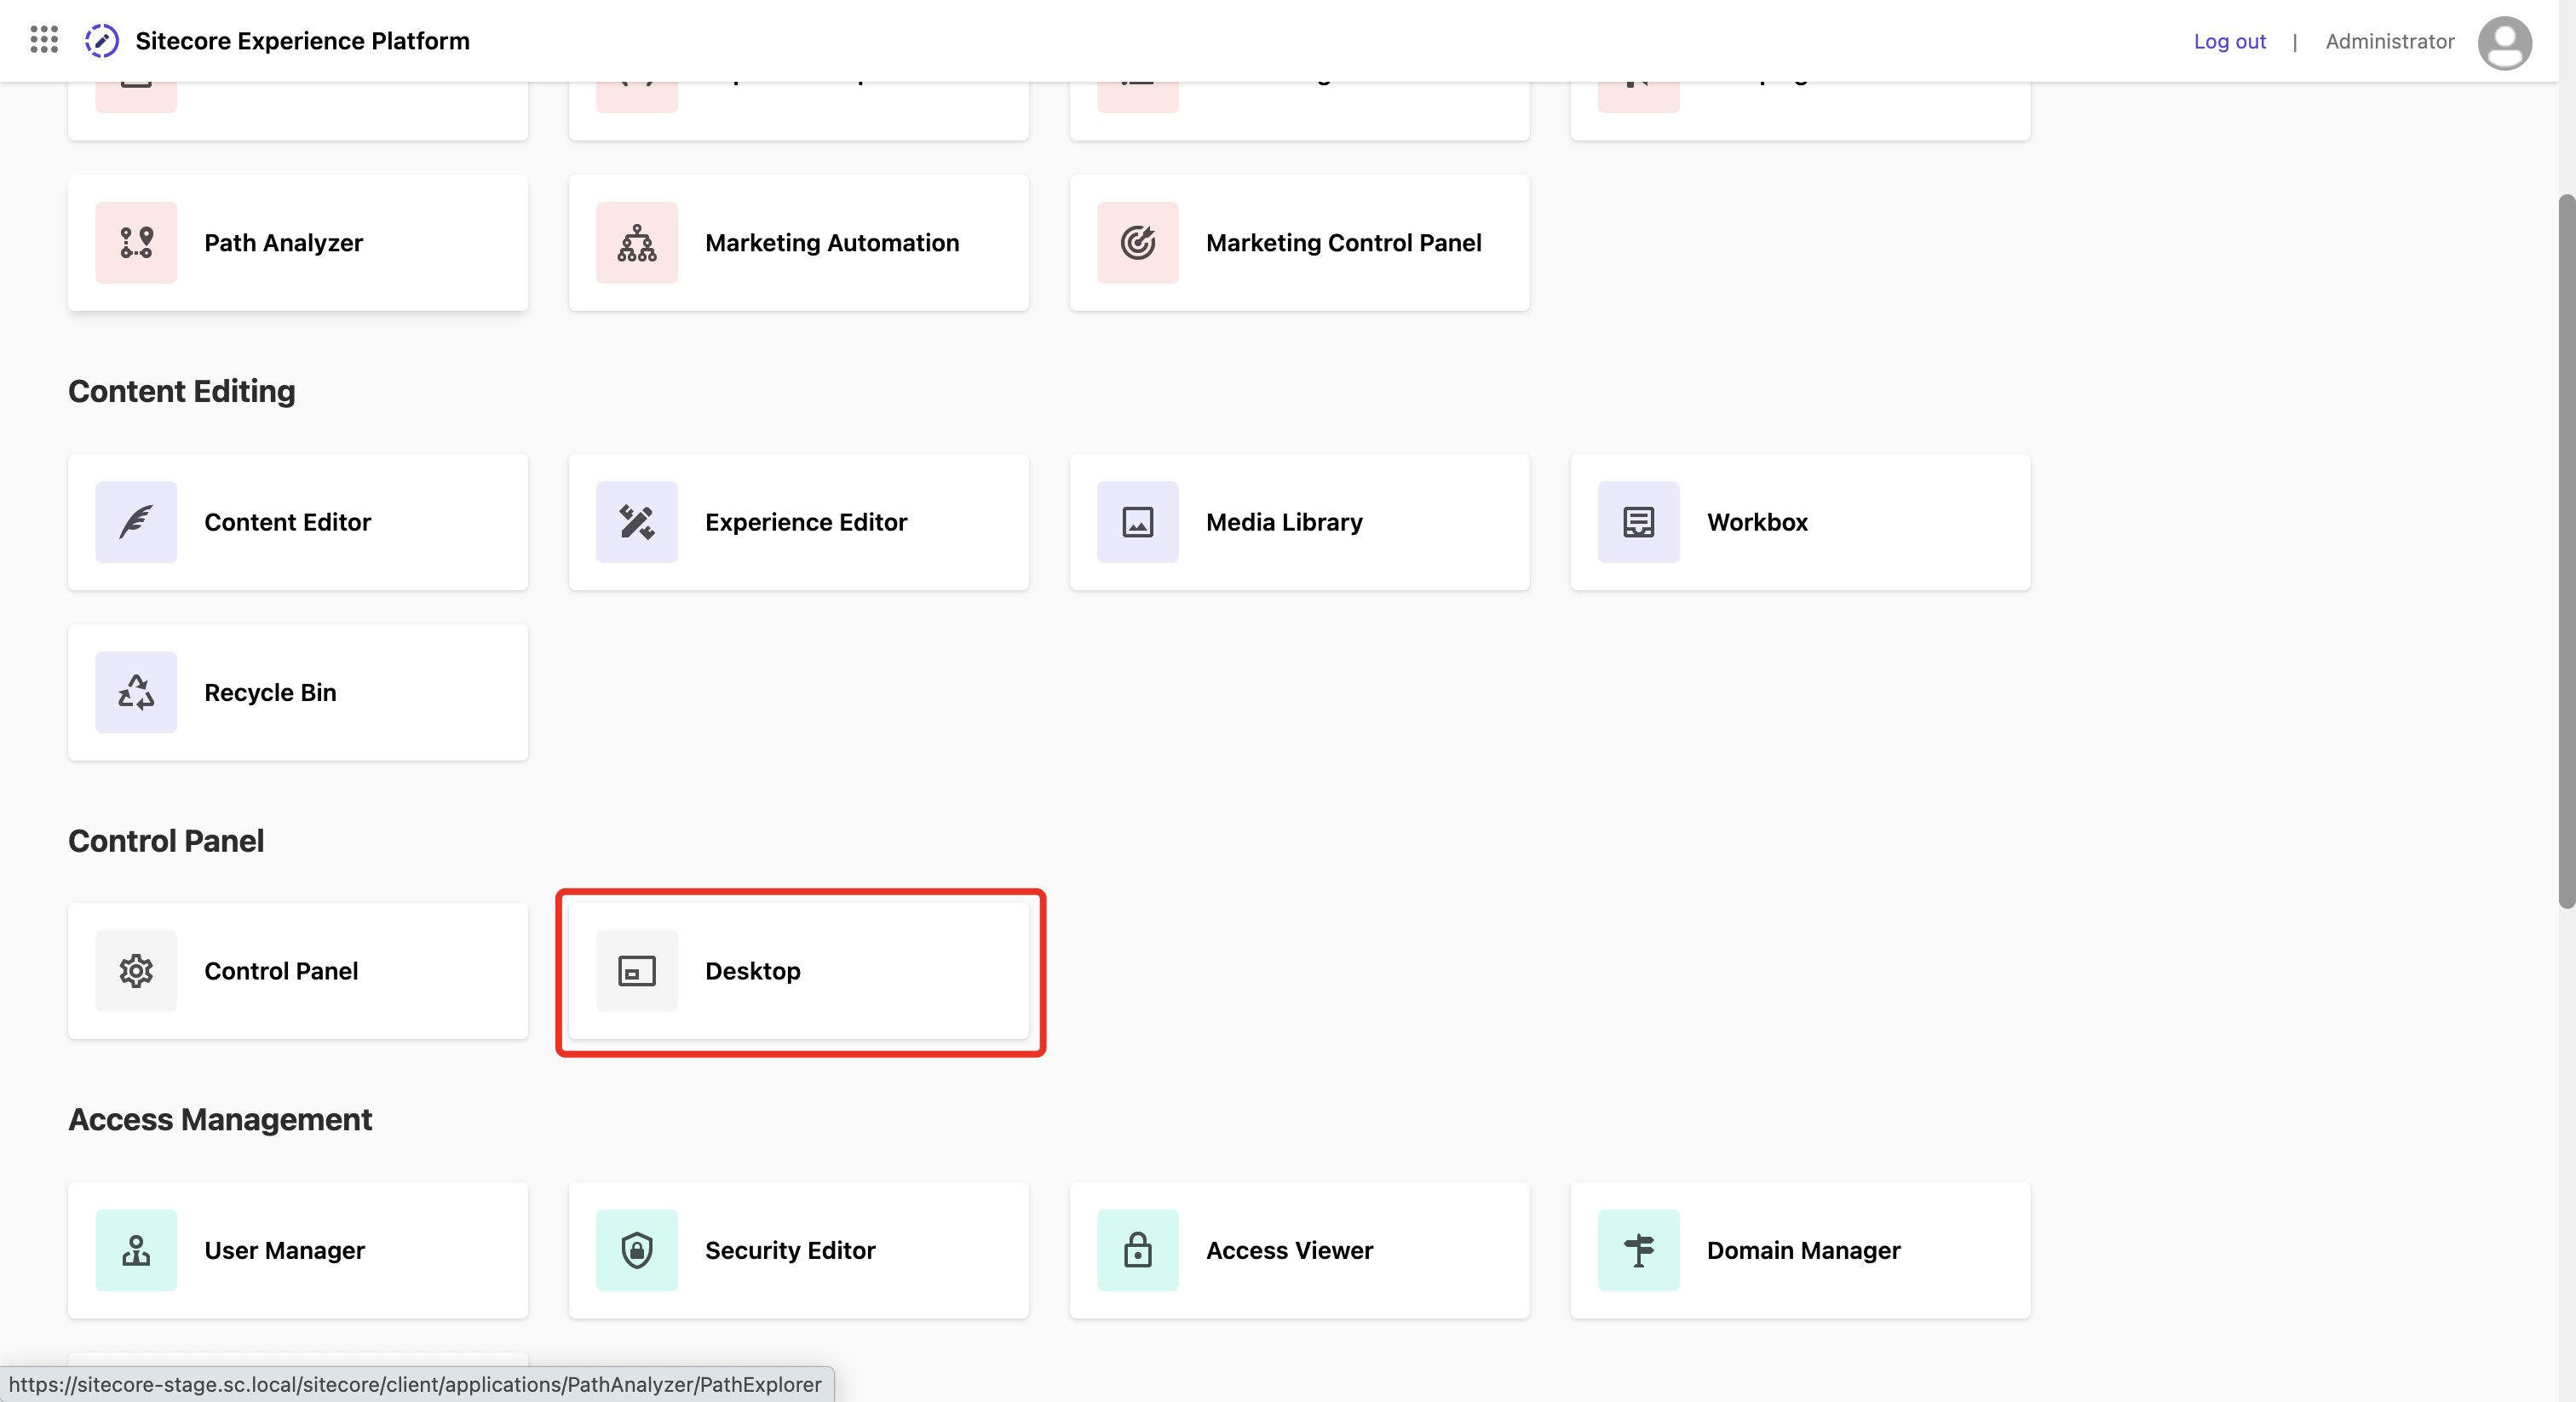
At Launchpad go to Control Panel→Desktop
-
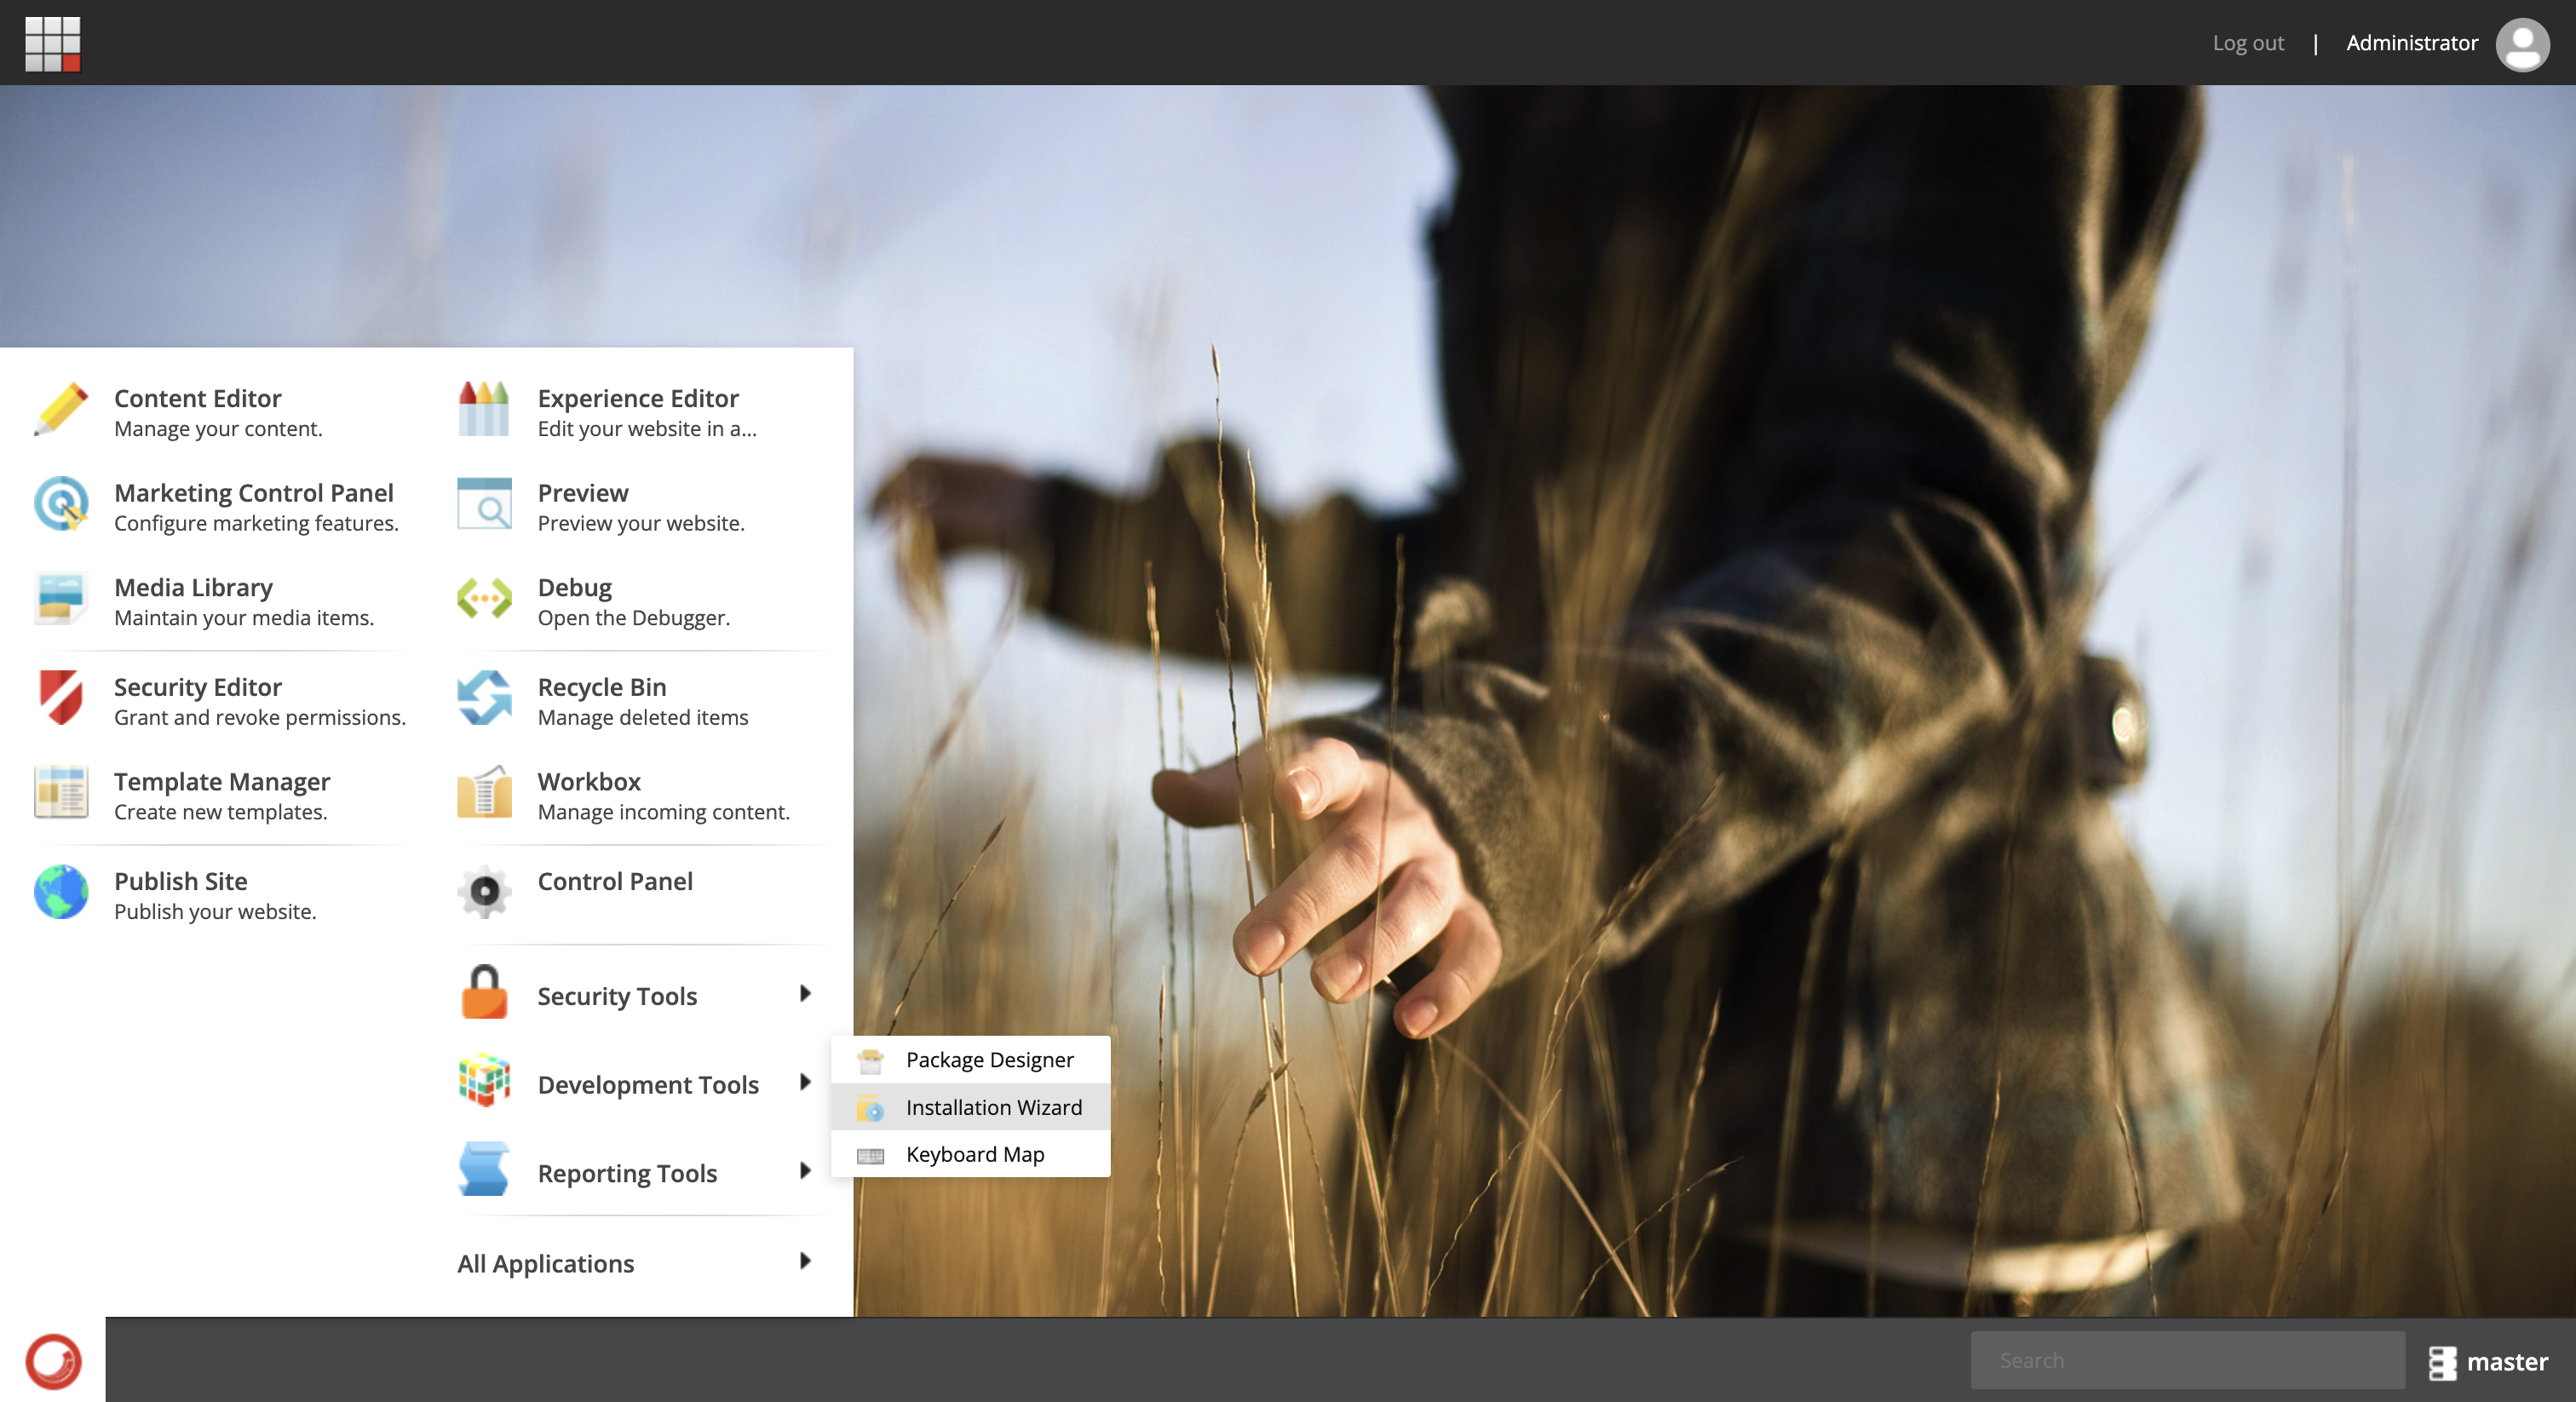
Open Development Tools→Installation Wizard
-
Upload package
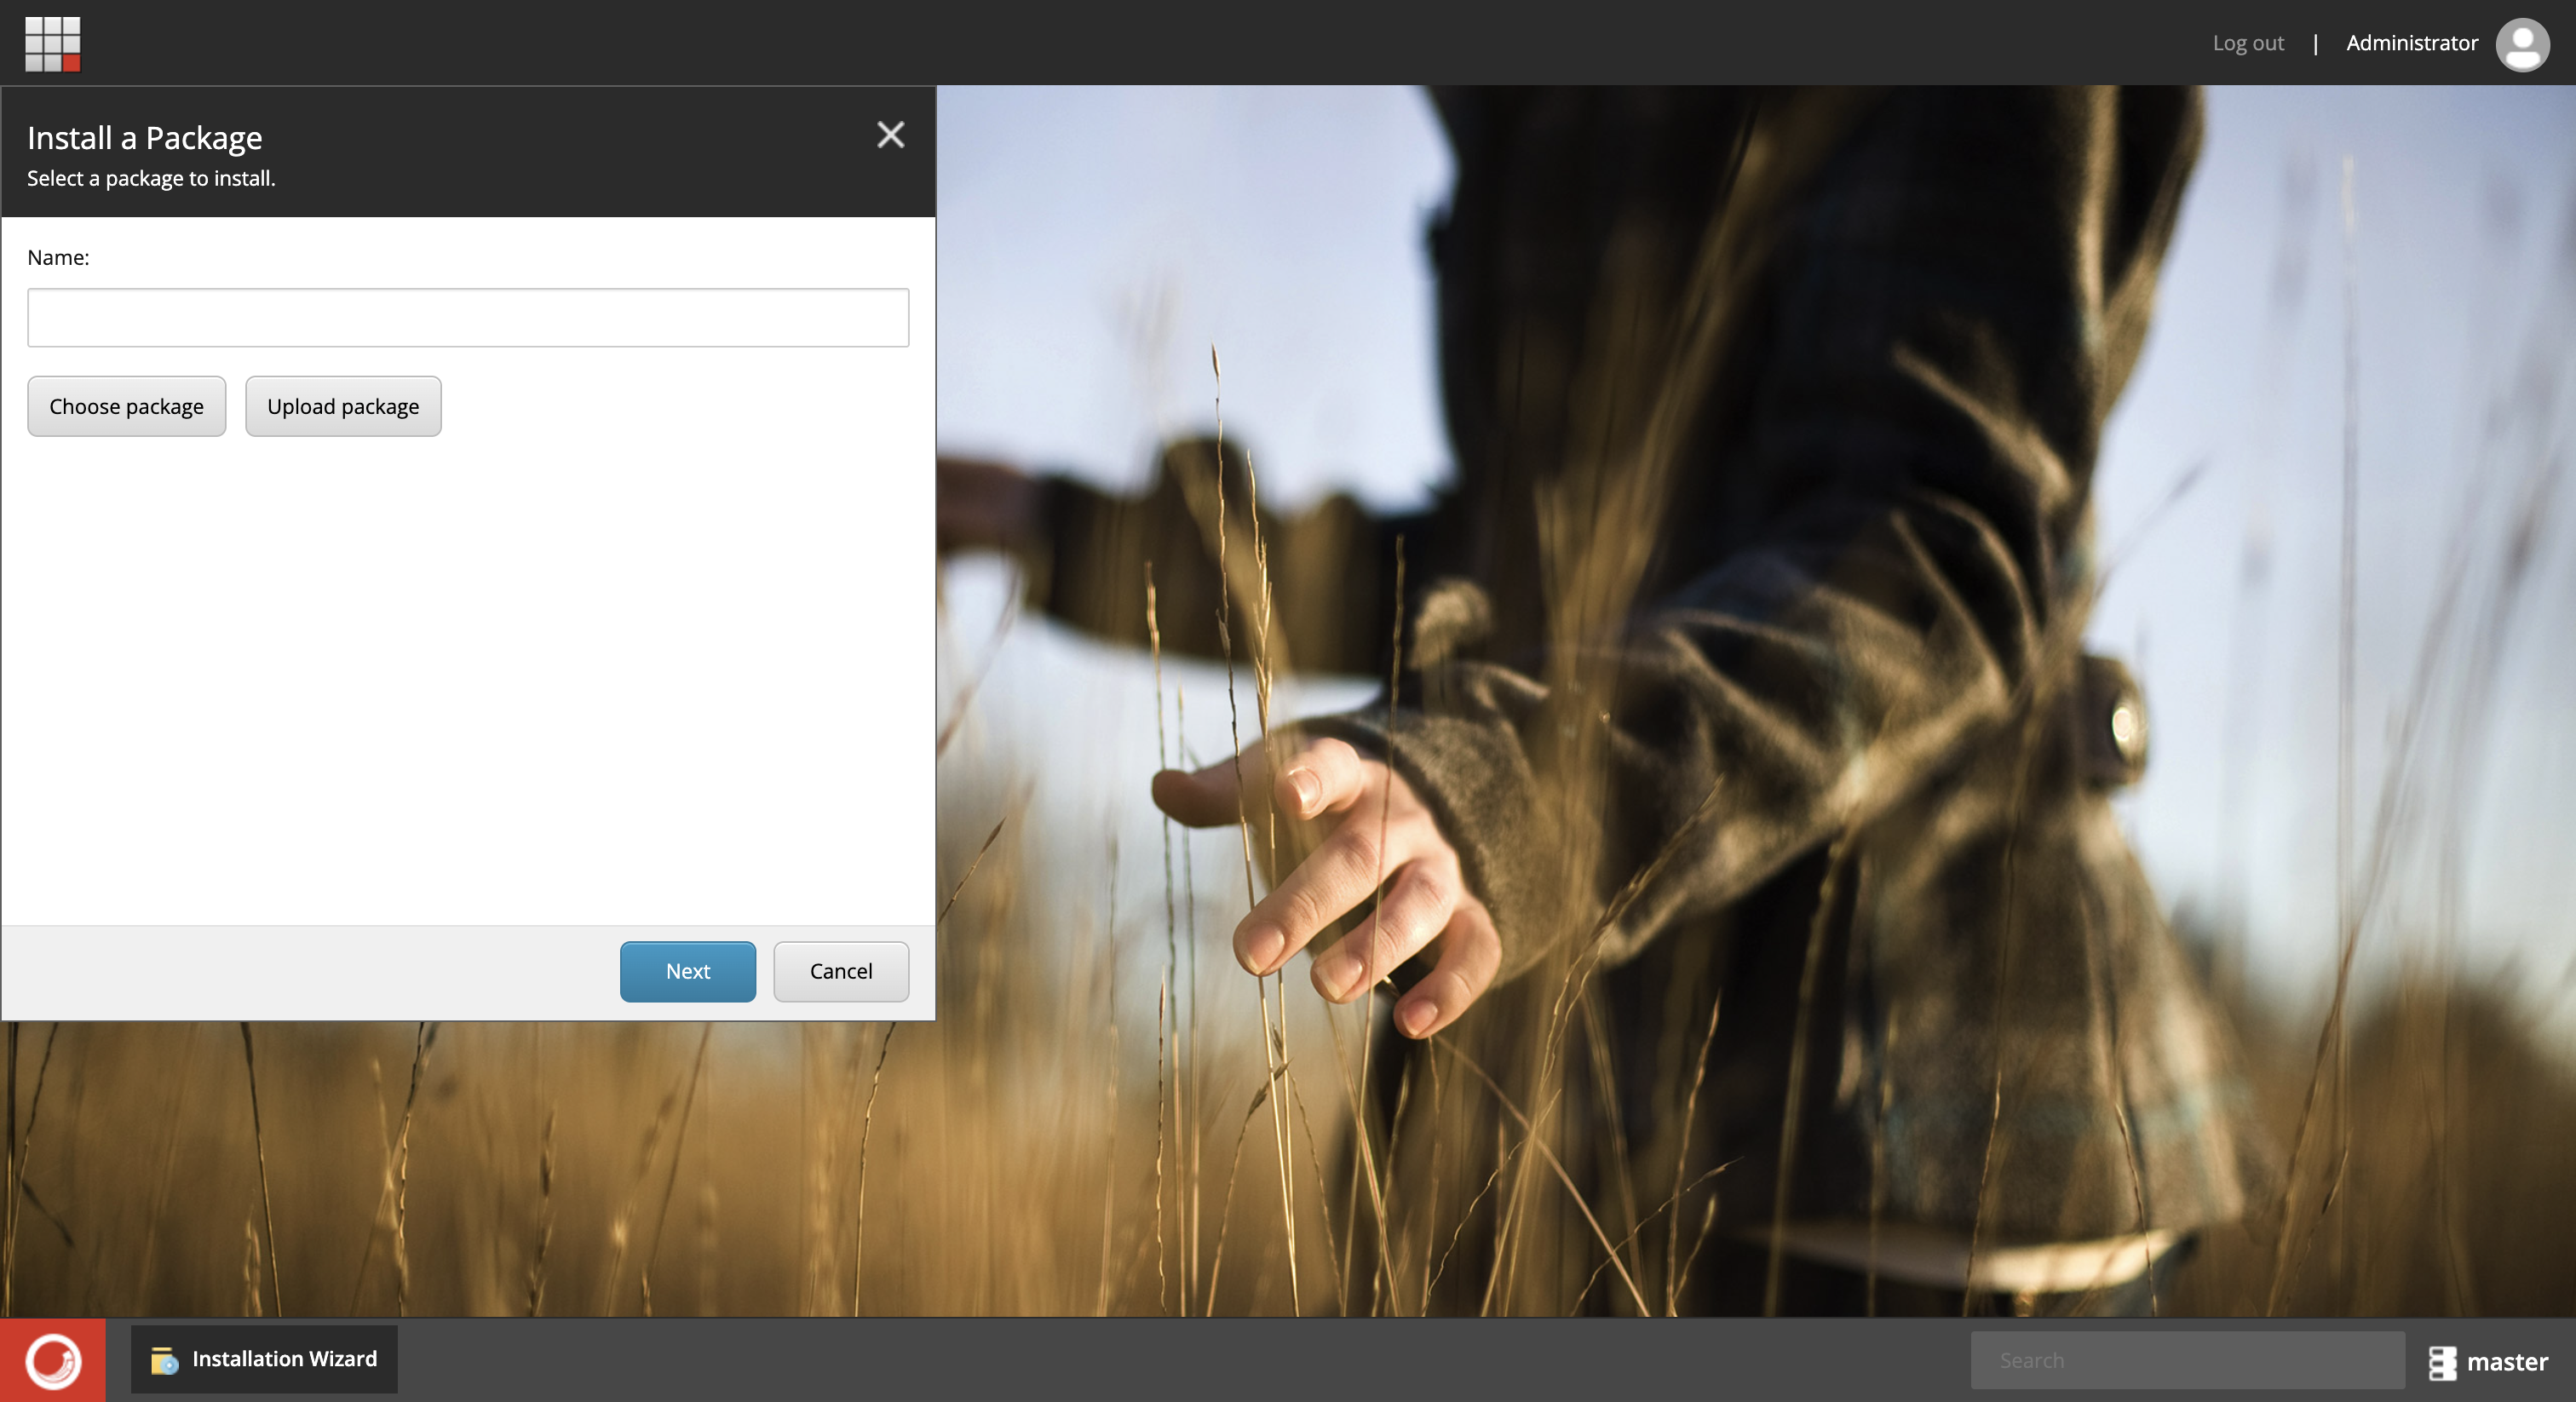
-
Add zip-archive with Smartcat plugin
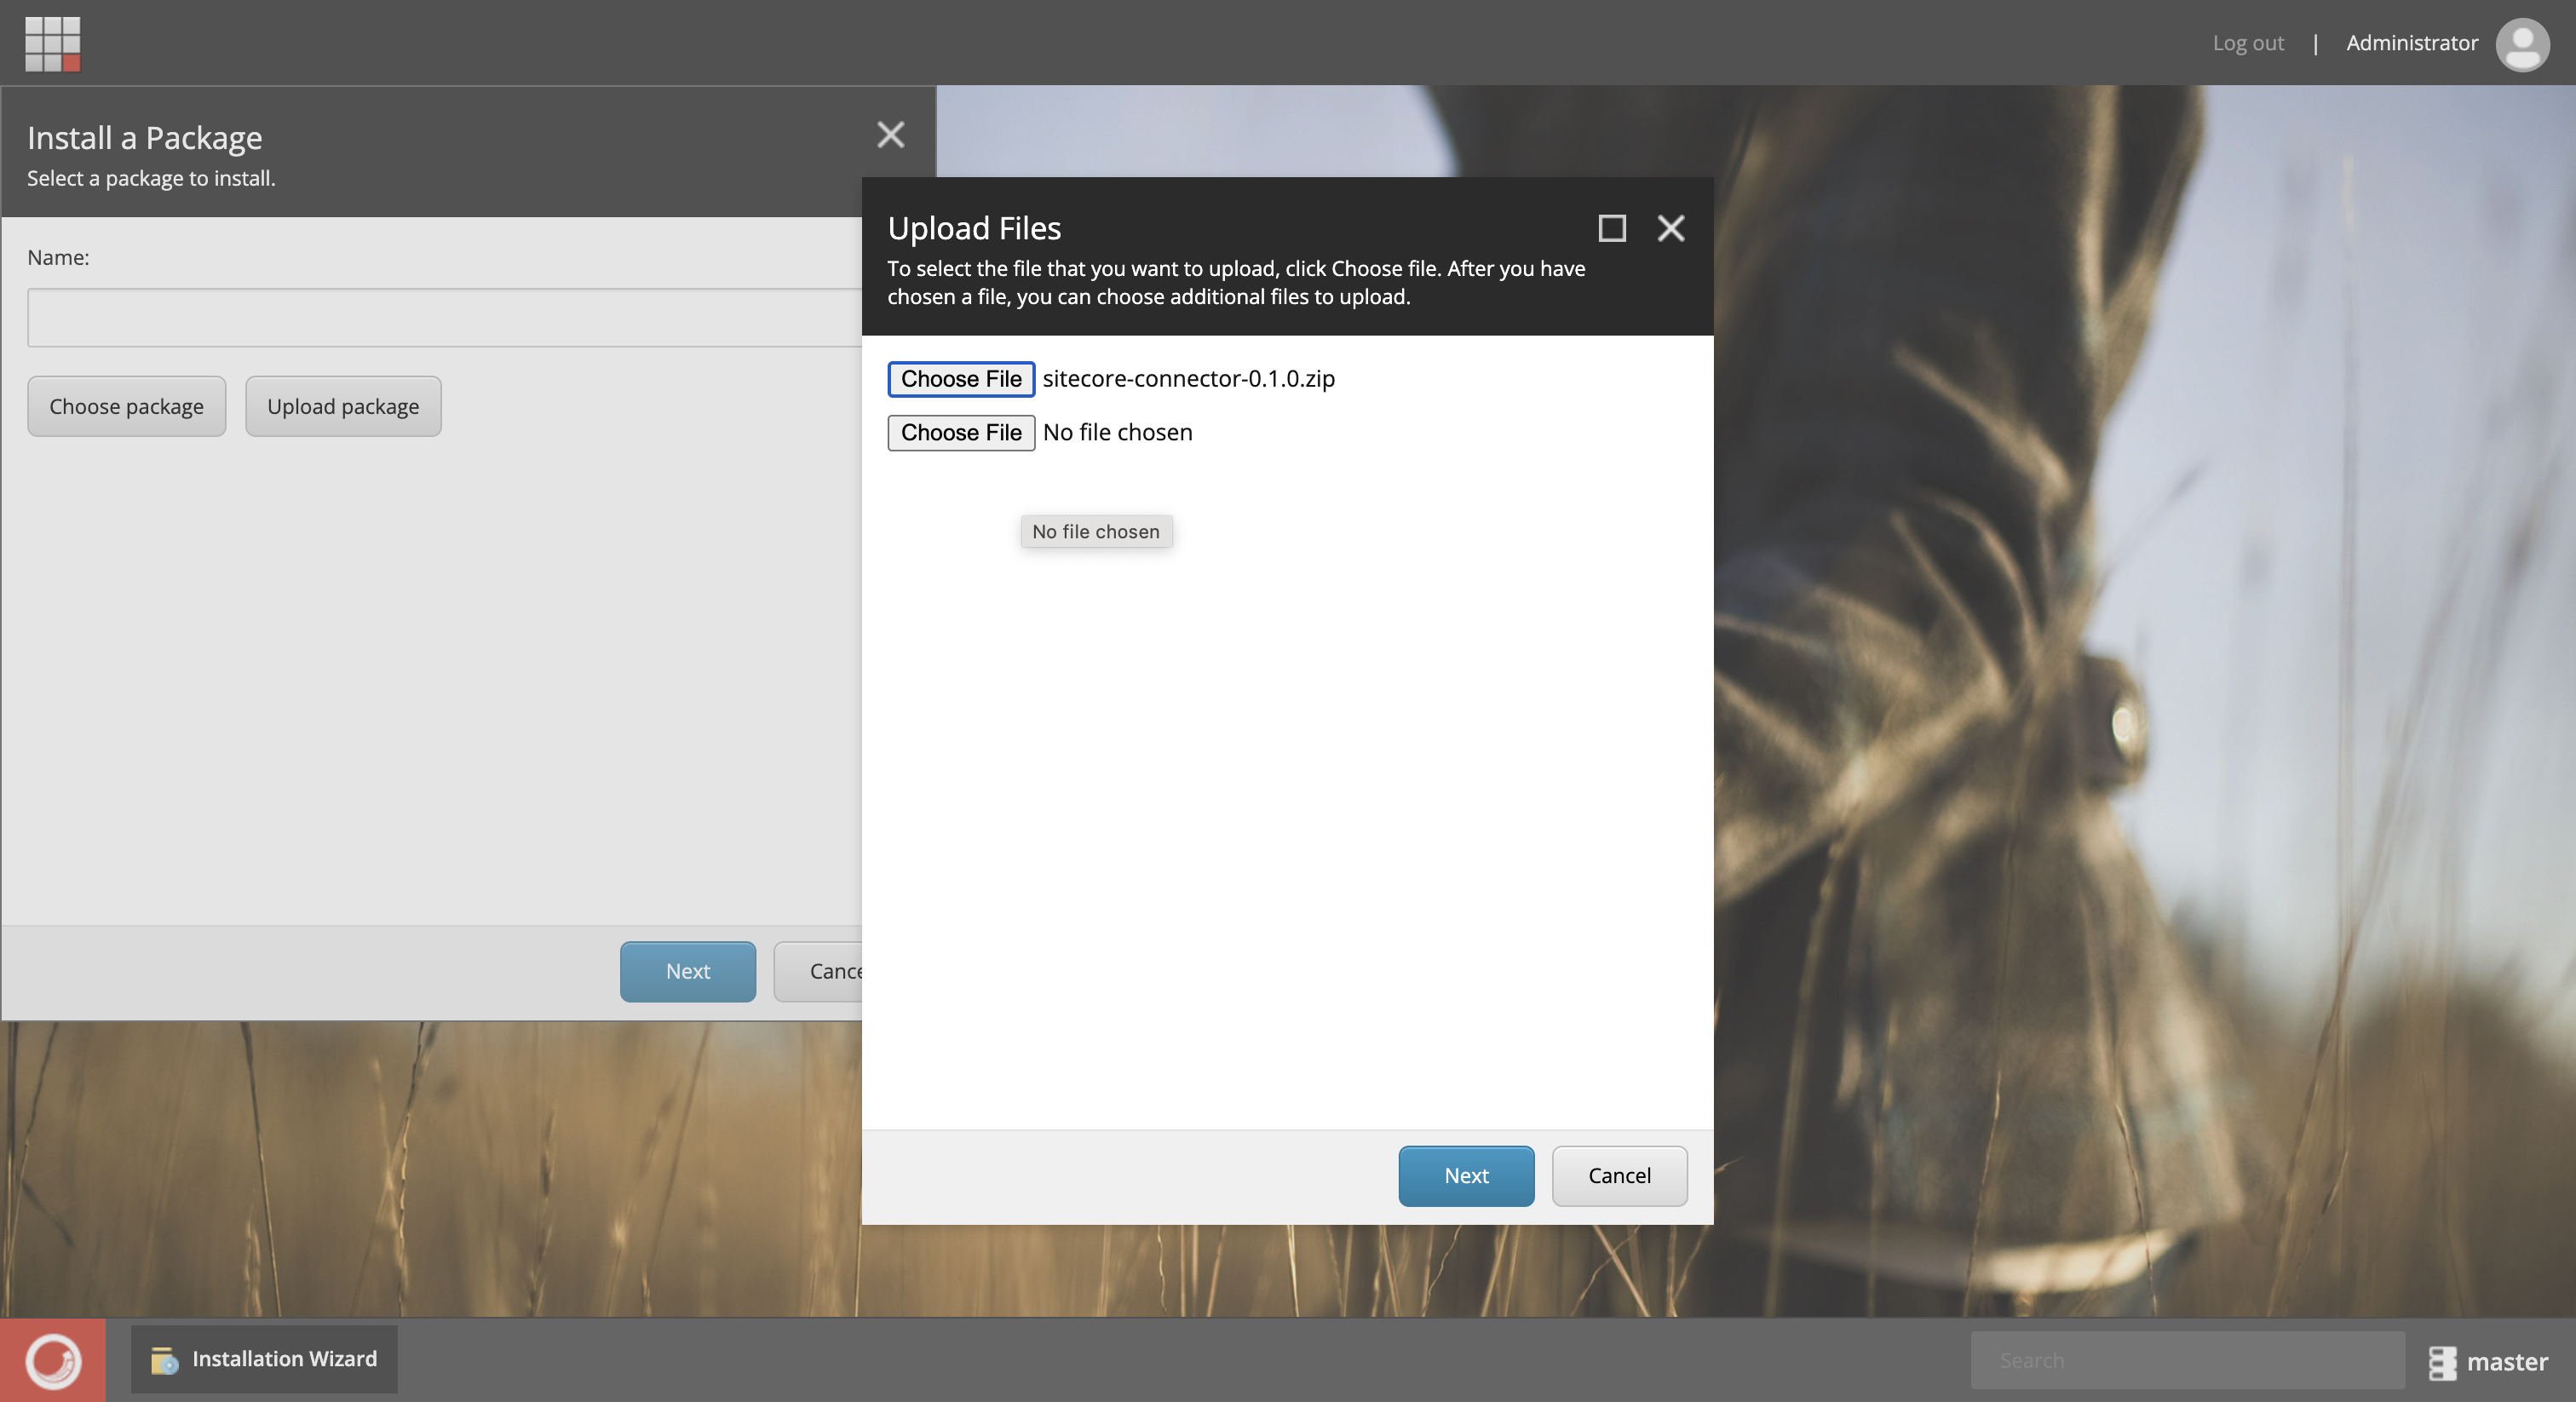
-
Select override existing files and upload plugin
-
Choose uploaded package and click Next
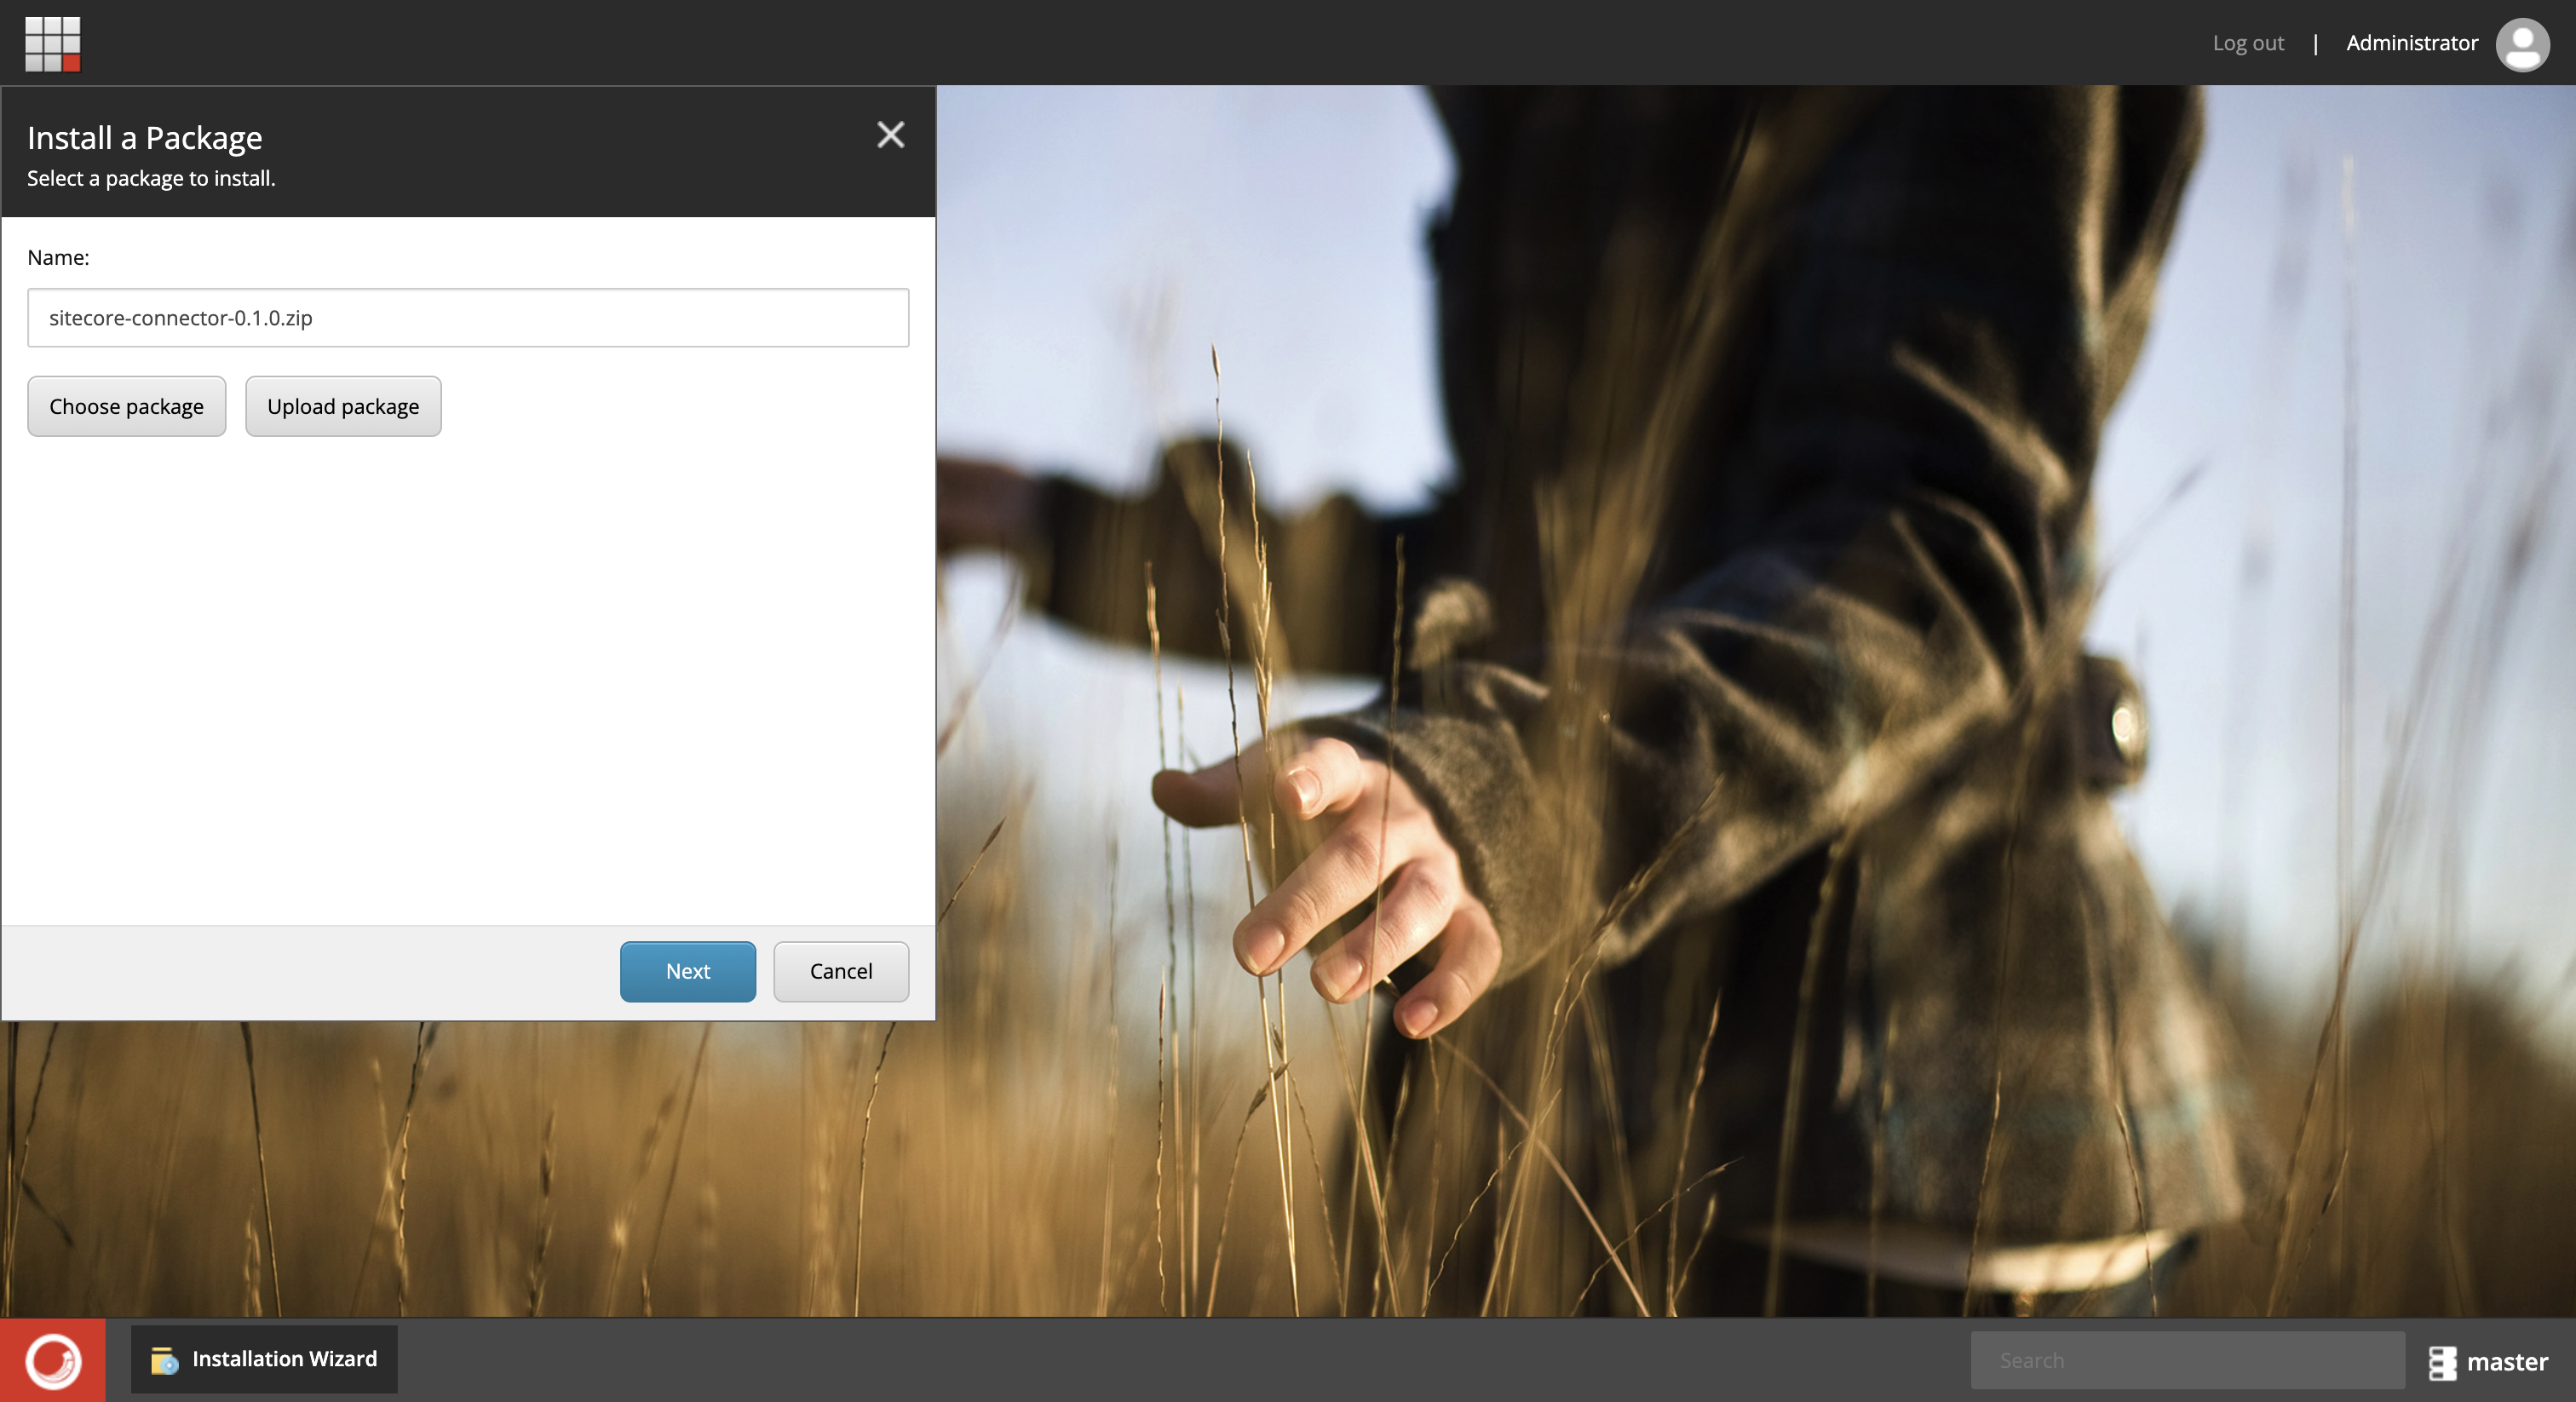
-
Install plugin
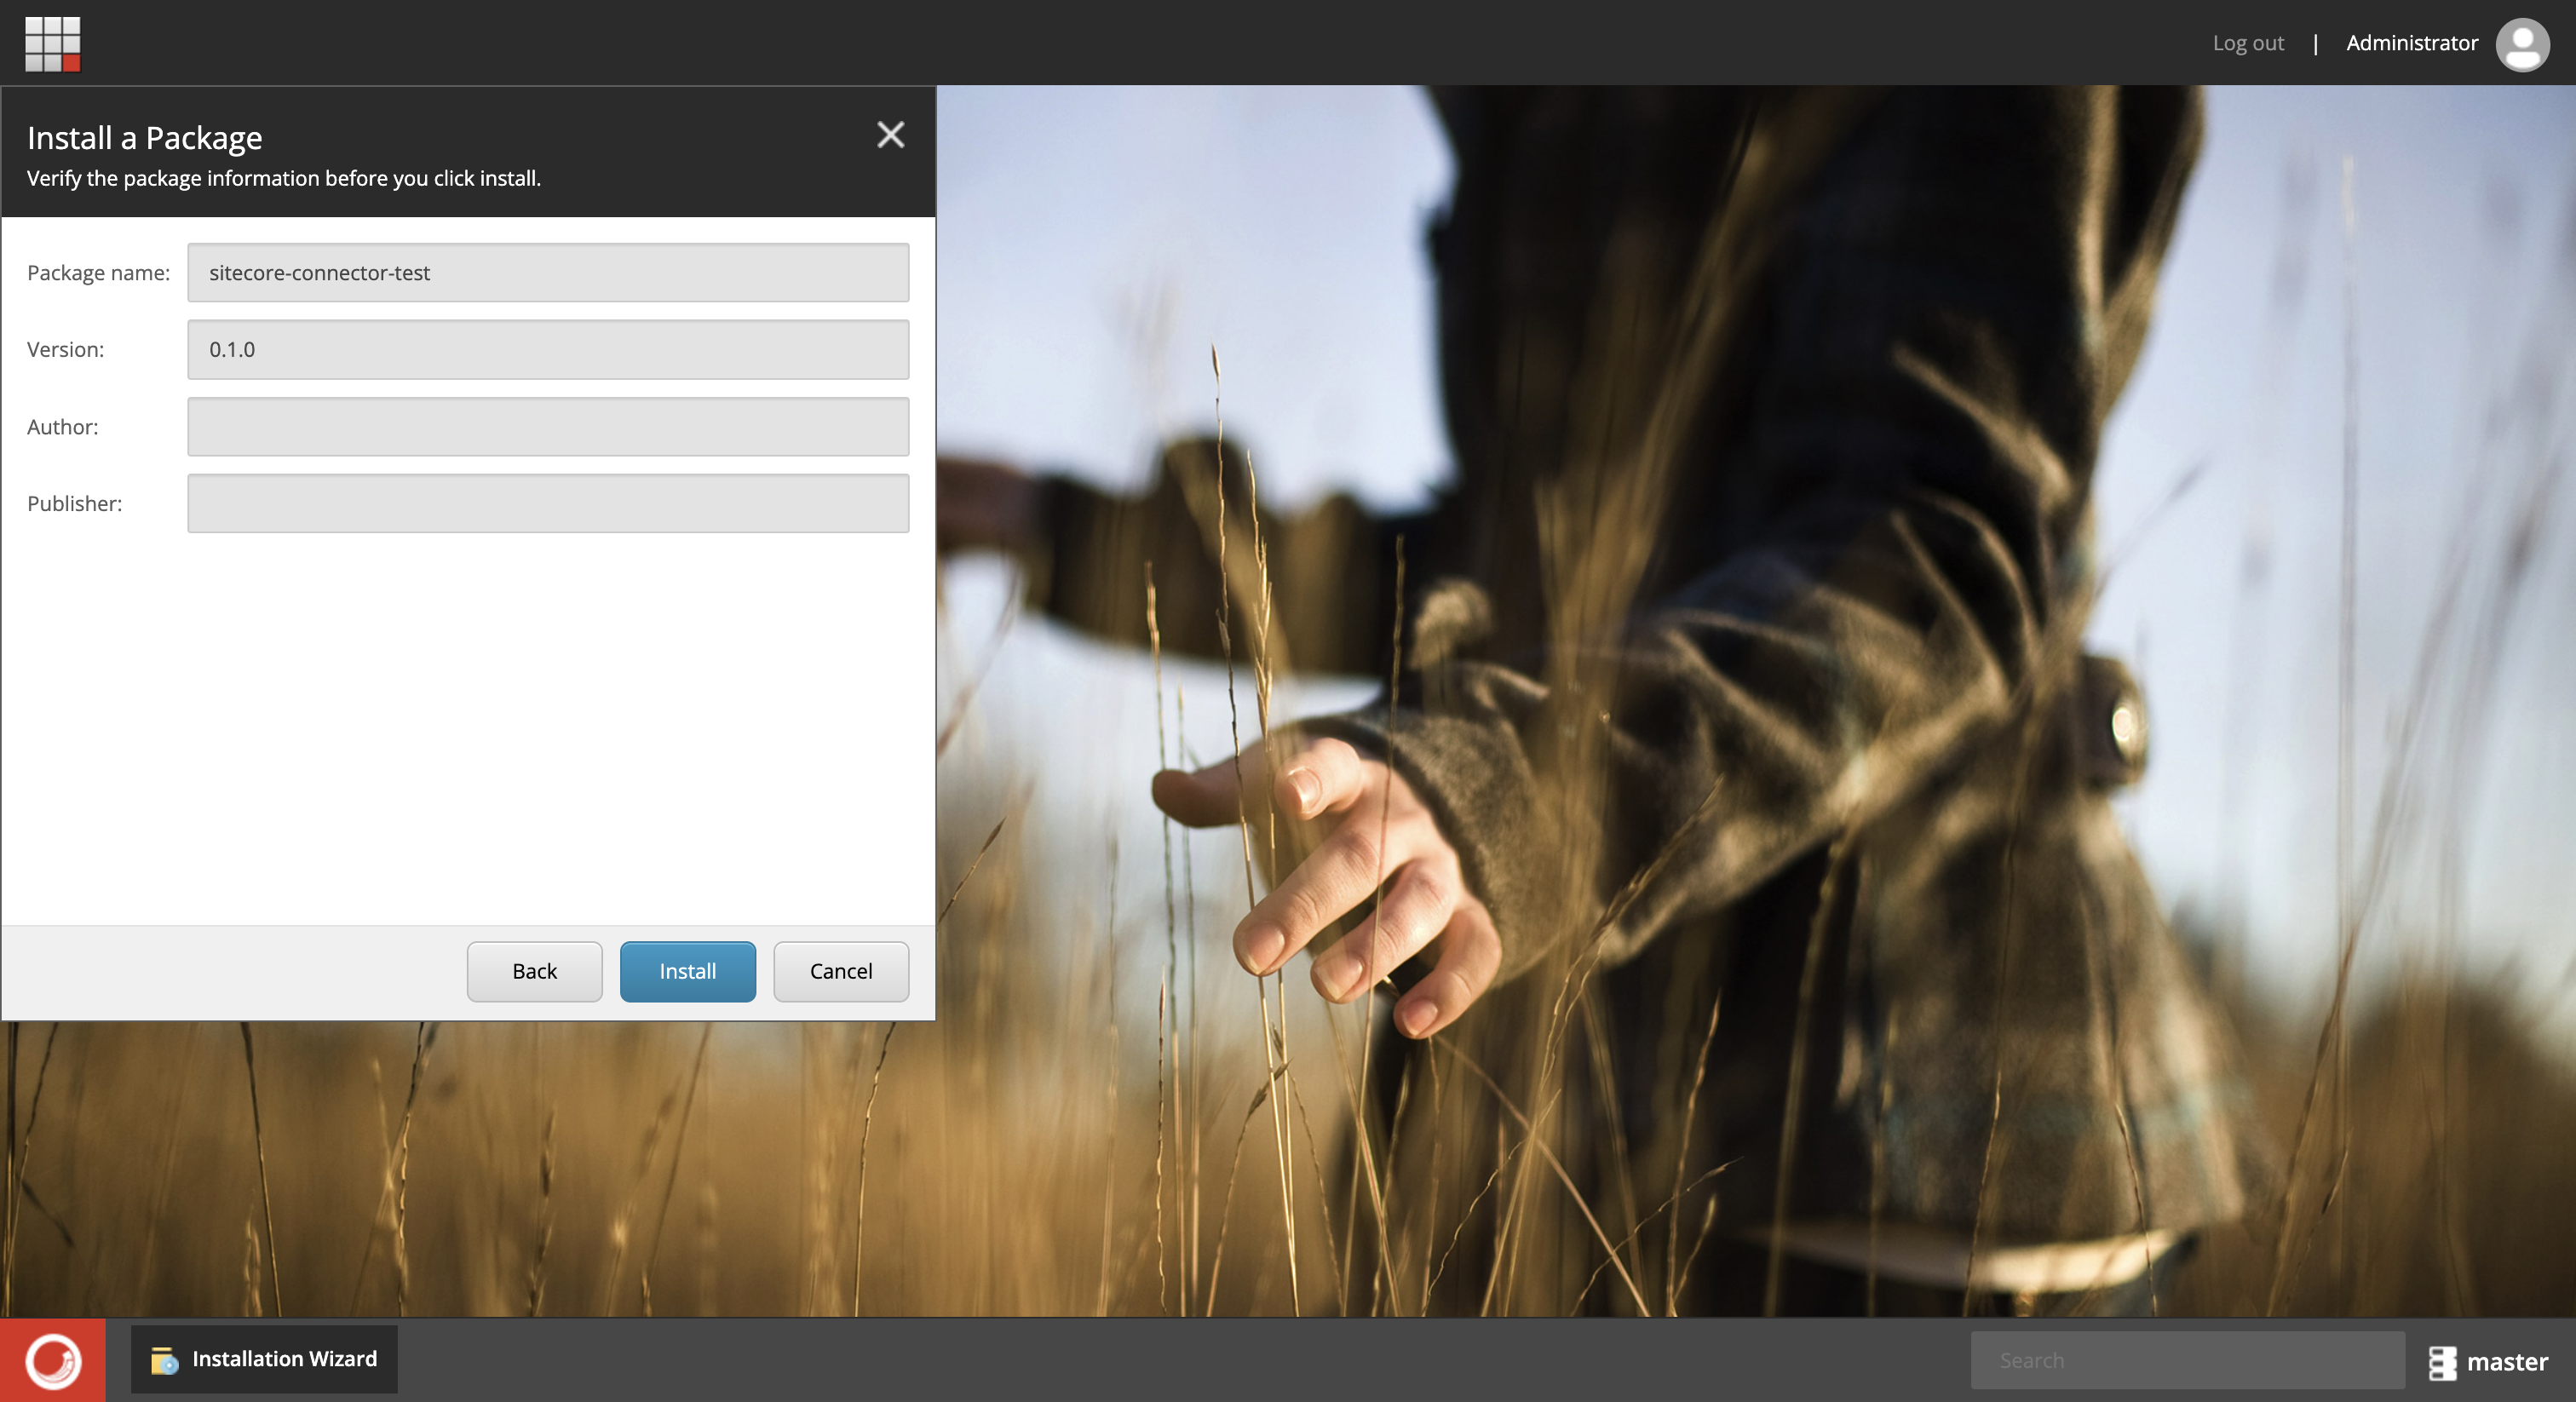
-
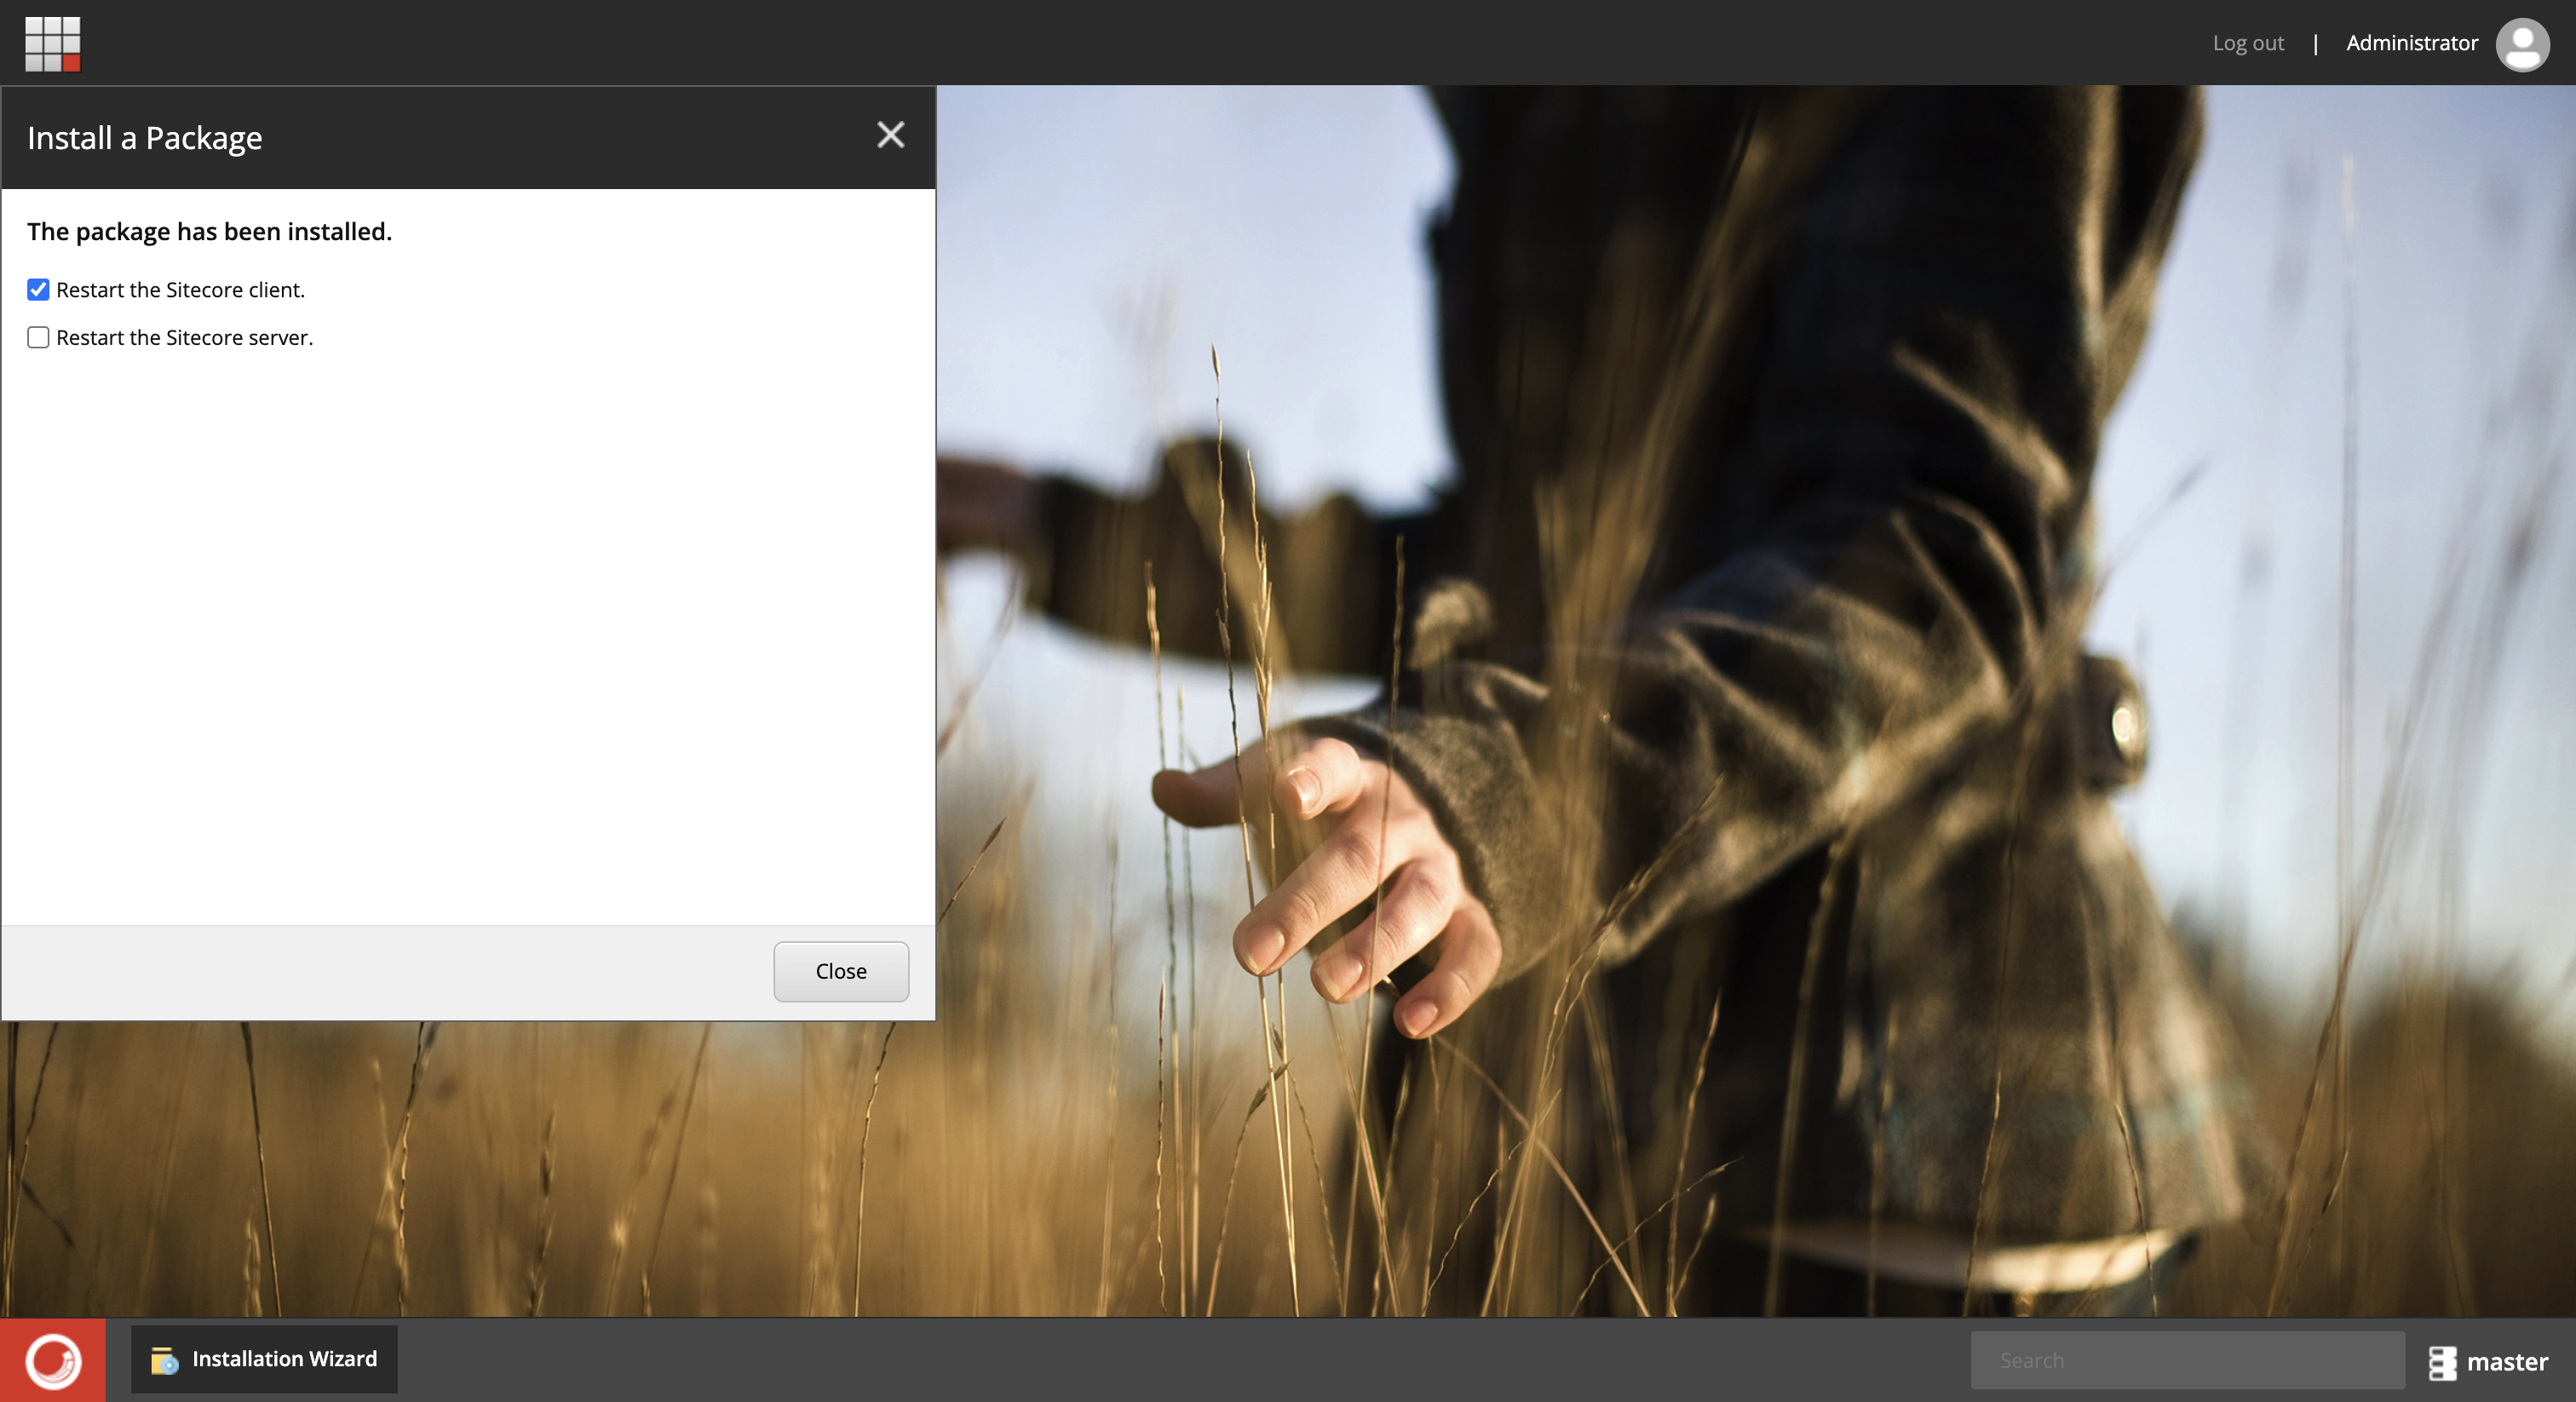
Restart the Sitecore client
-
Installation's completed. Smartcat tab should appear in the Content Editor
Setting up your connection with Smartcat
-
Generate a Smartcat API Key
To generate a Smartcat API key, navigate to Settings → API in your Smartcat account. Click on Create New Key to generate a new API key. Make sure to copy the API key and your account ID for future use.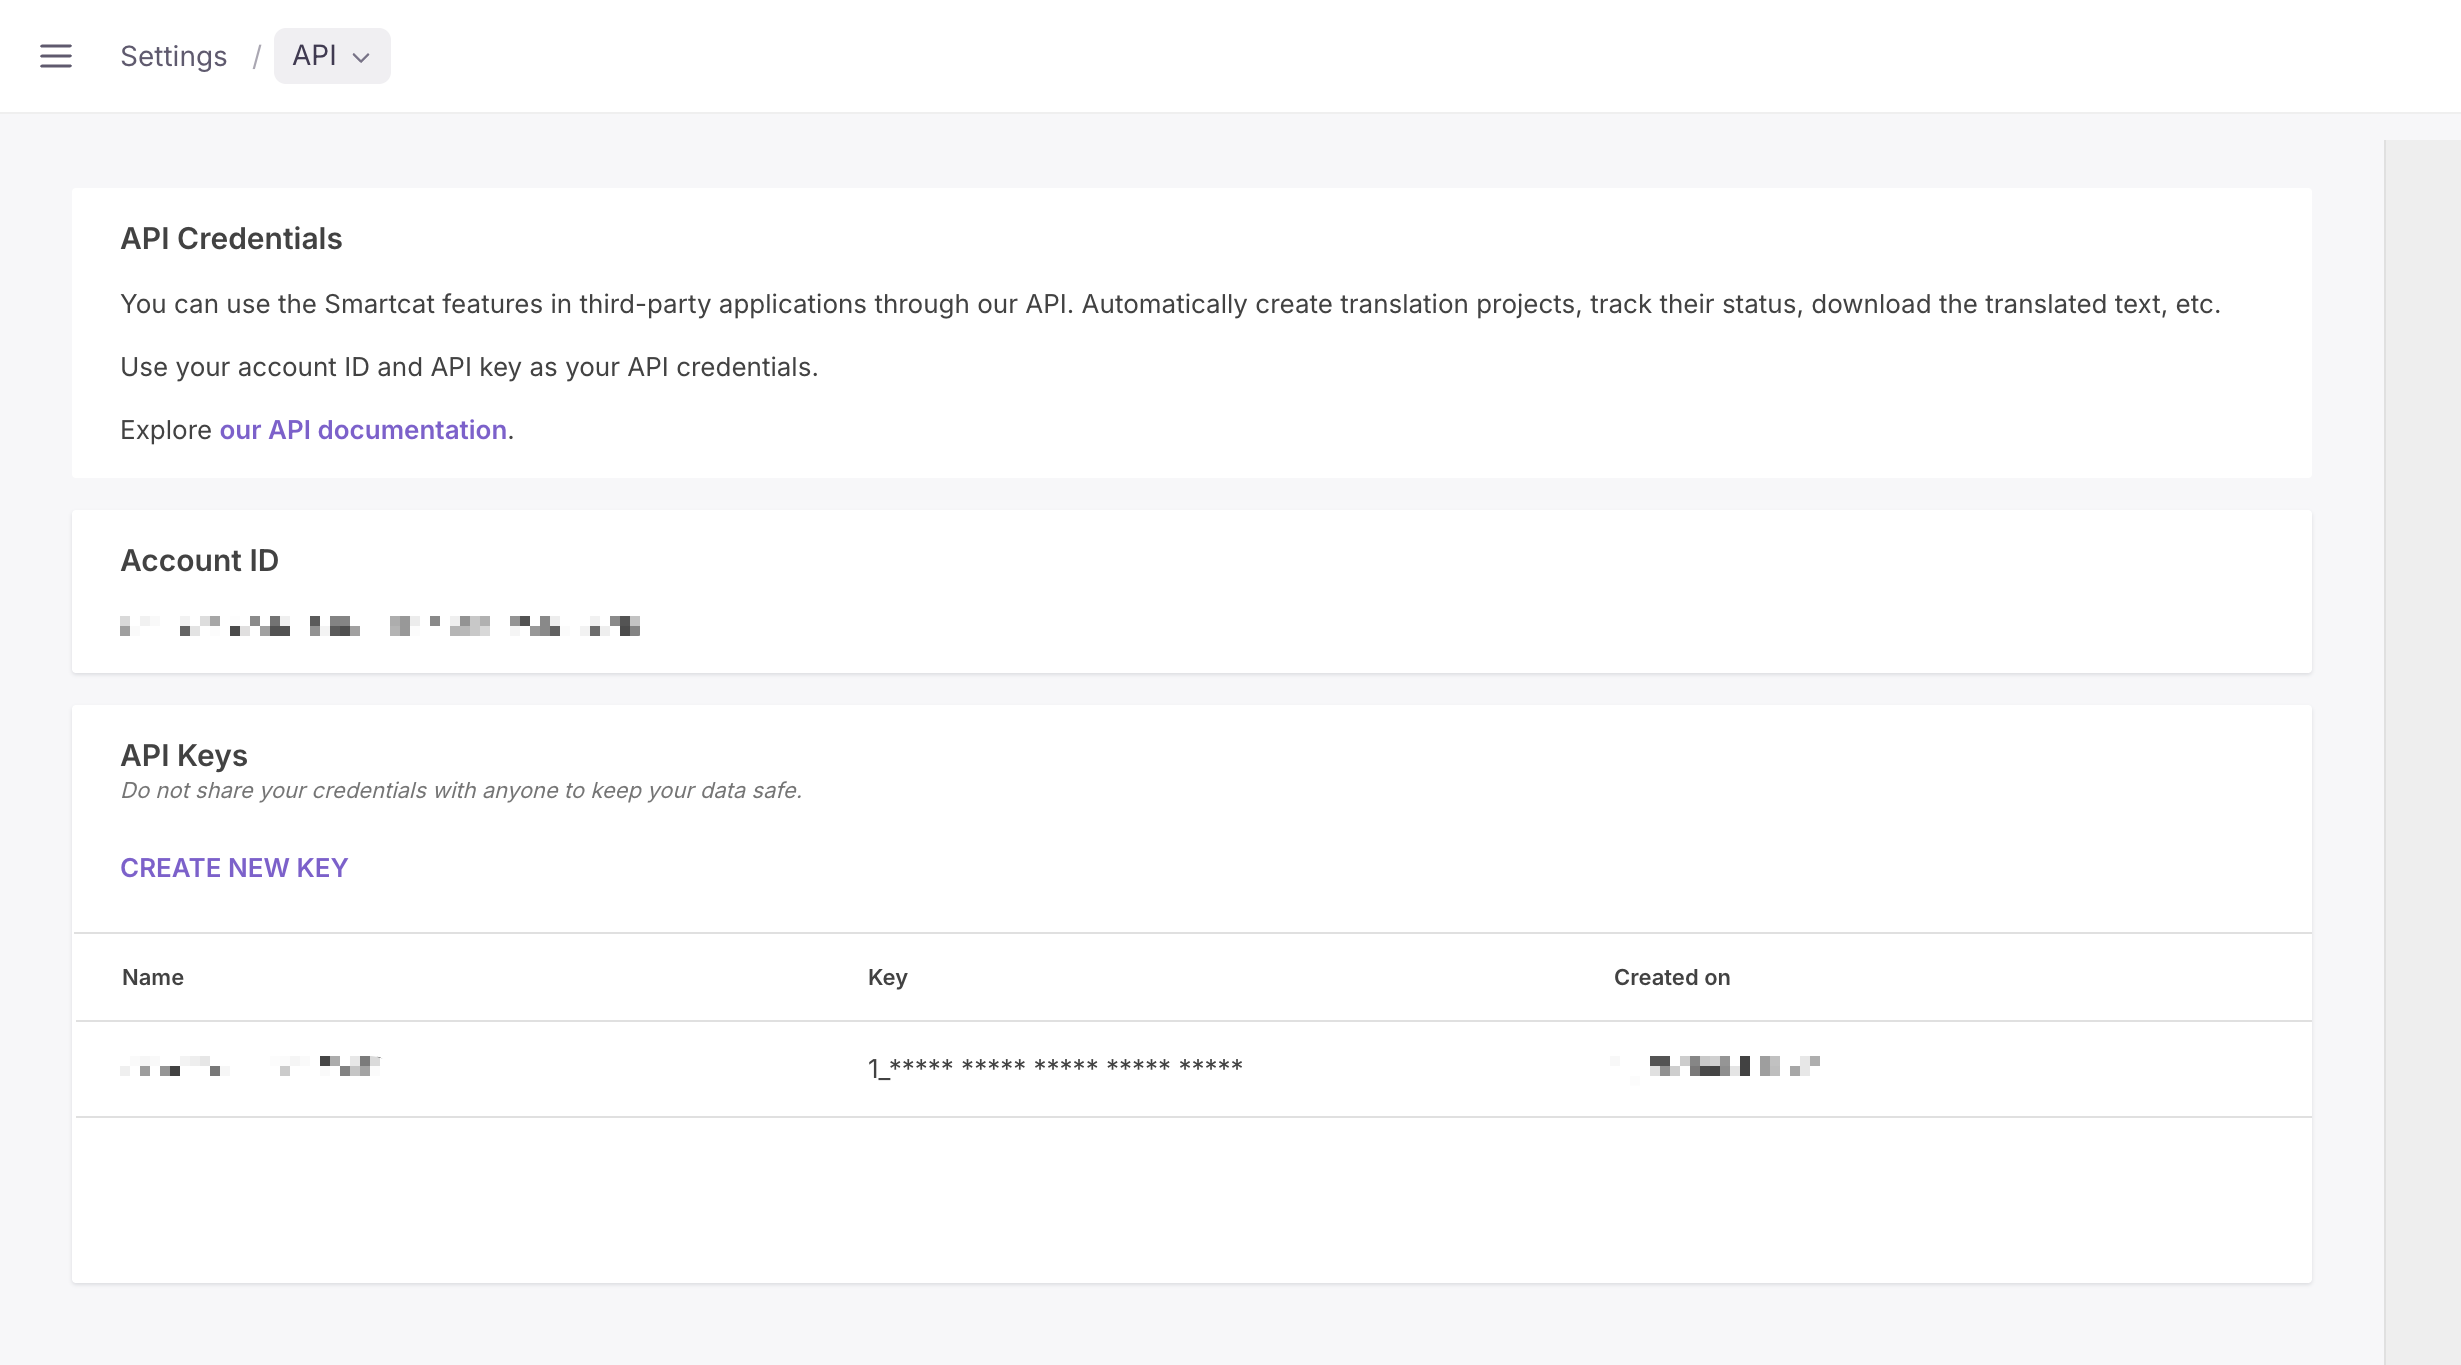
-
Set up connection in plugin
Open Smartcat tab in Sitecore Content Editor, click on Connect workspace, paste Account ID and API Key, and confirm changes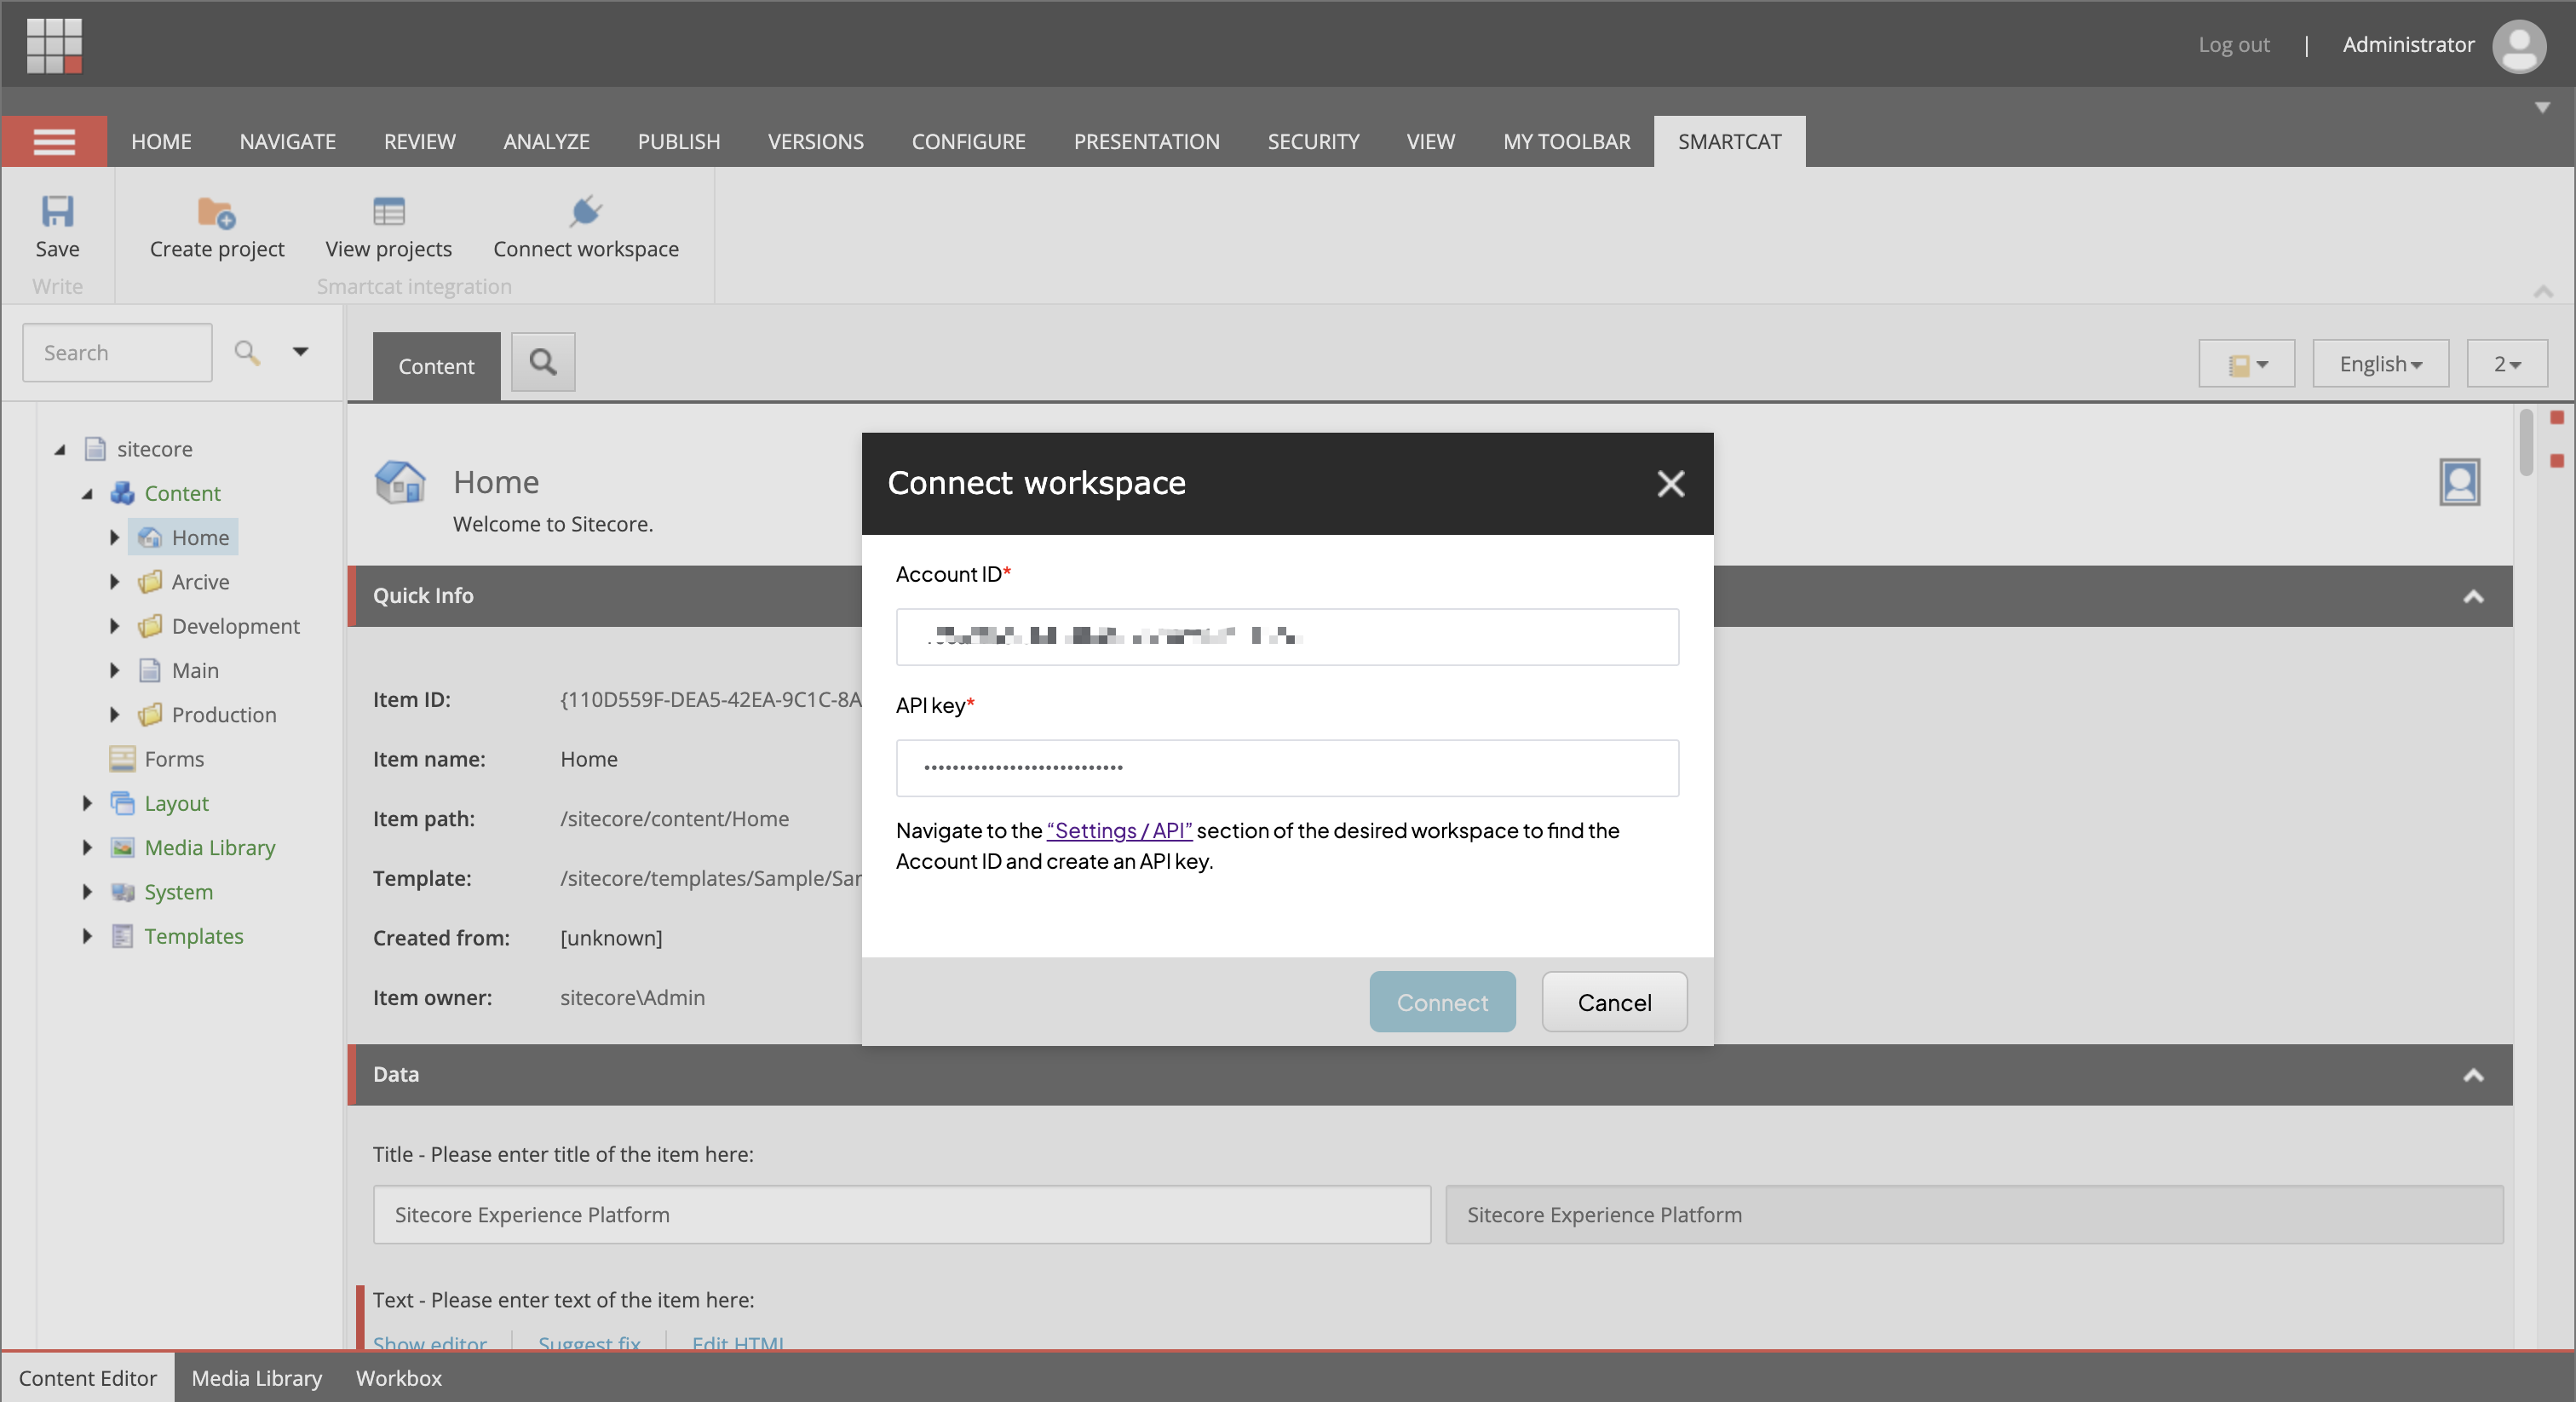
-
Now plugin is connected and ready for translation
Setting up the translation scope (plugin settings)
Before creating your first translation project, tell the plugin which content should be translated. On the Smartcat tab, click Plugin Settings.
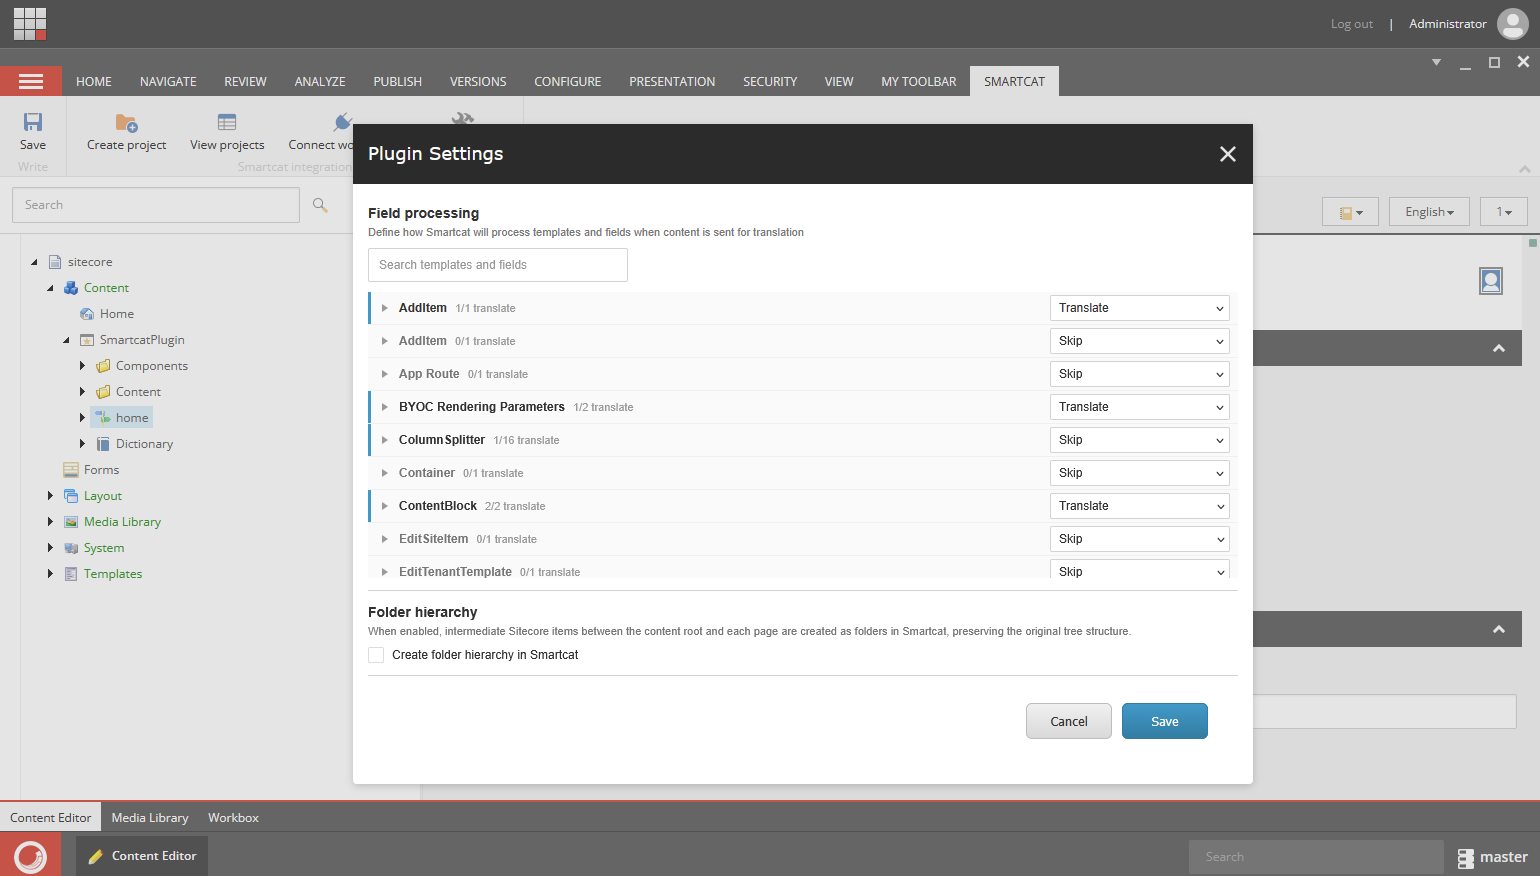
The settings list all your content templates and their fields. Every template and every field has one setting:
-
Translate - the field is sent to Smartcat for translation.
-
Copy from source - the field is not translated; its source value is copied into the language version.
-
Skip - the field is ignored: not translated and not copied.
A template's setting applies to all of its fields. A field set to Inherit from template (the default) follows its template; select a different value to override it for that field.
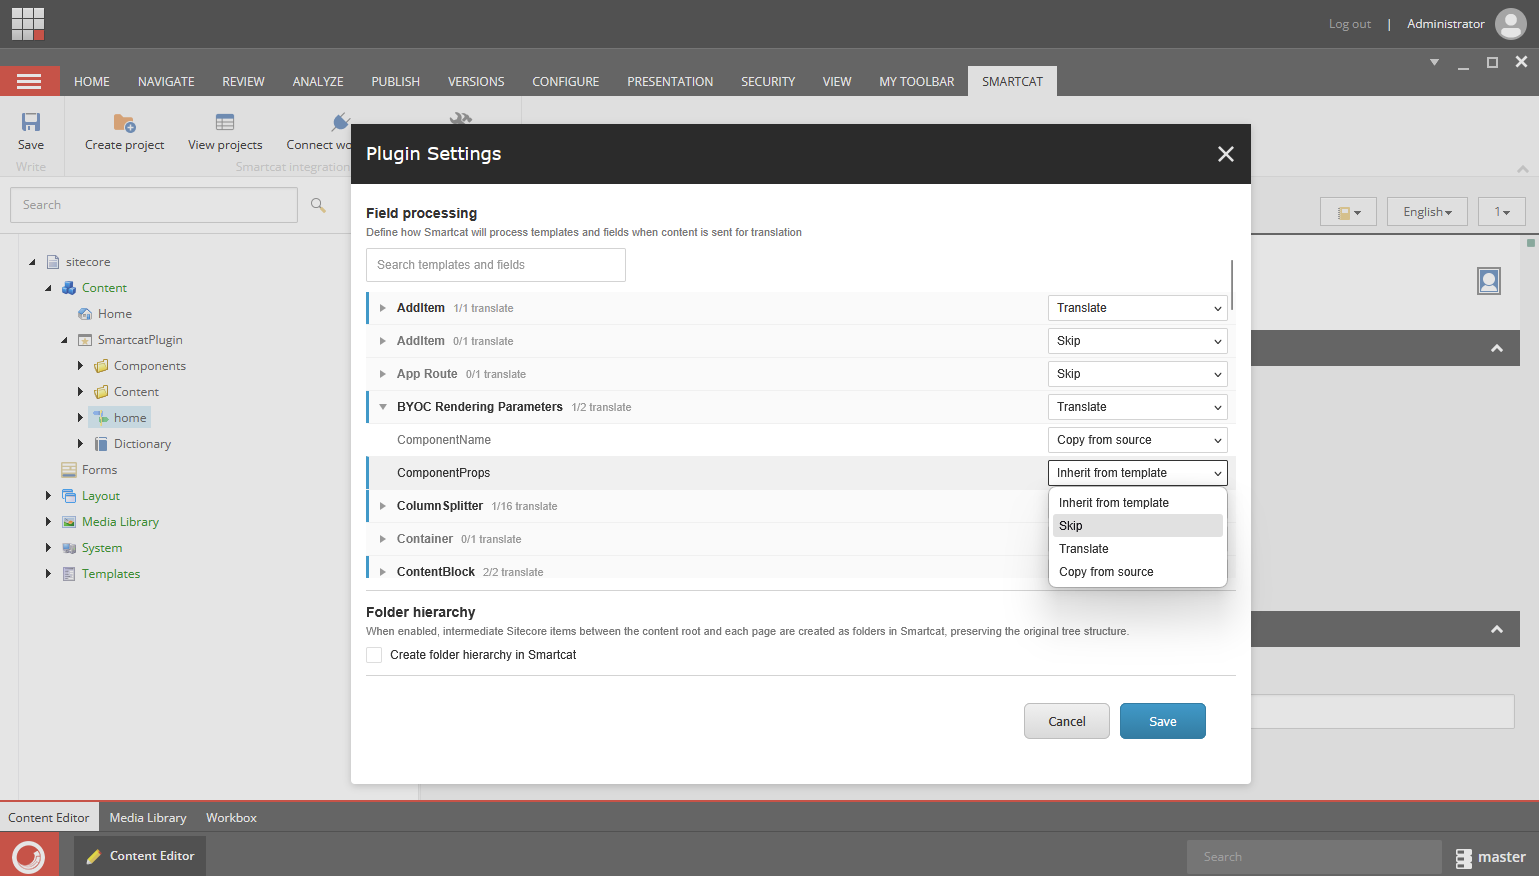
On a fresh installation nothing is selected for translation yet: set the templates you want to translate to Translate and click Save. (If you upgraded from a 0.6.x version, your previous configuration was converted automatically - just review it.)
Tips:
-
Use the search box to quickly find a template or field.
-
Rows indicated with a teal line on the left are sent for translation; greyed-out rows are not.
-
These settings are global. You can adjust them for a single project while creating it - see Translating pages.
Translating pages using the plugin
Translating pages
-
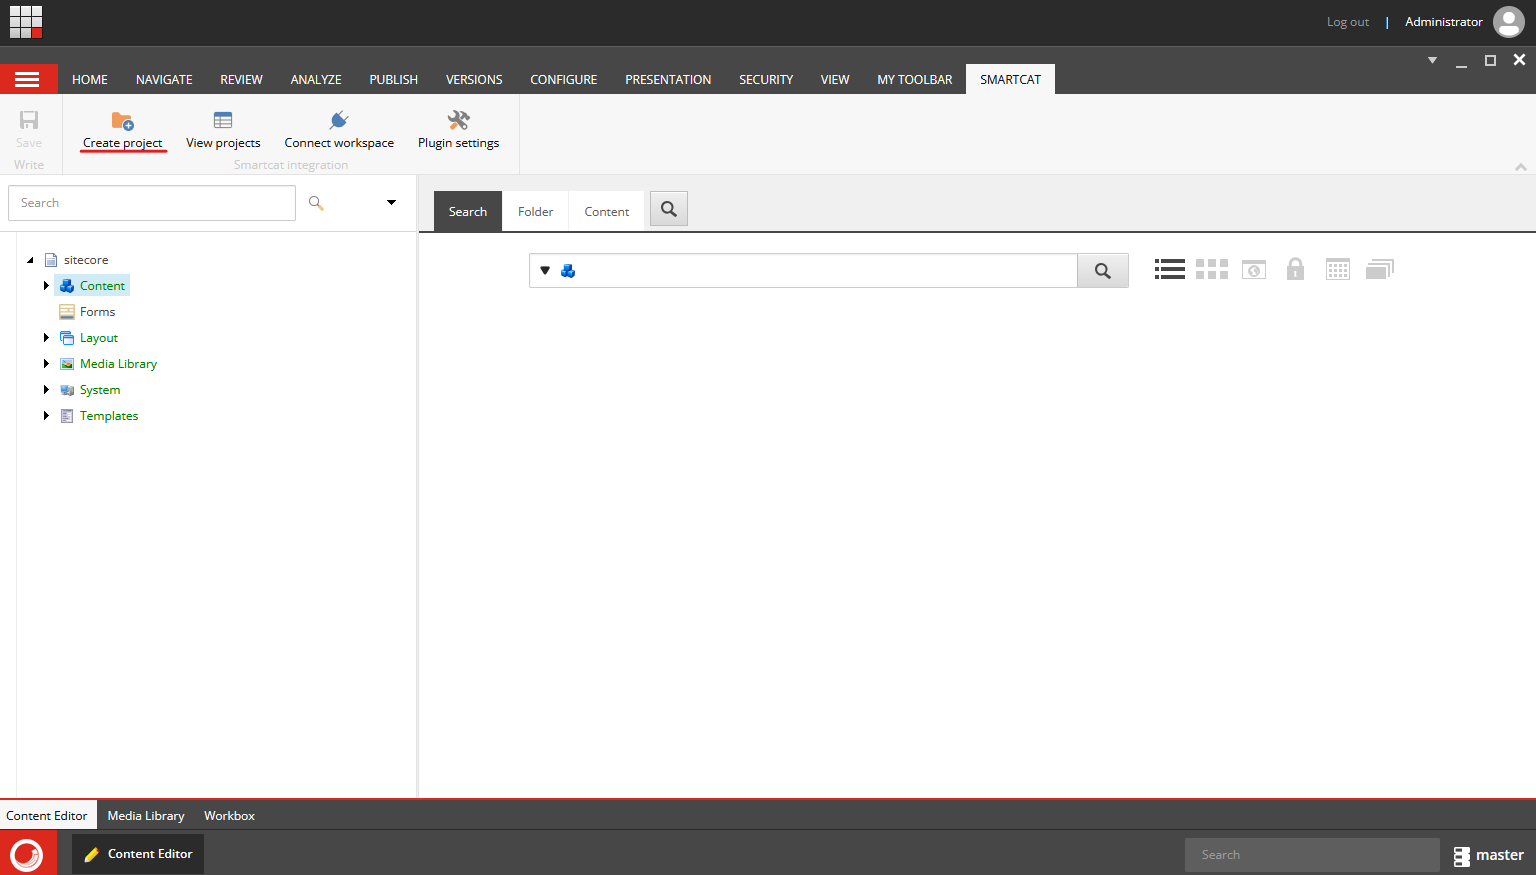
Click on “Create project” on Smartcat tab
-
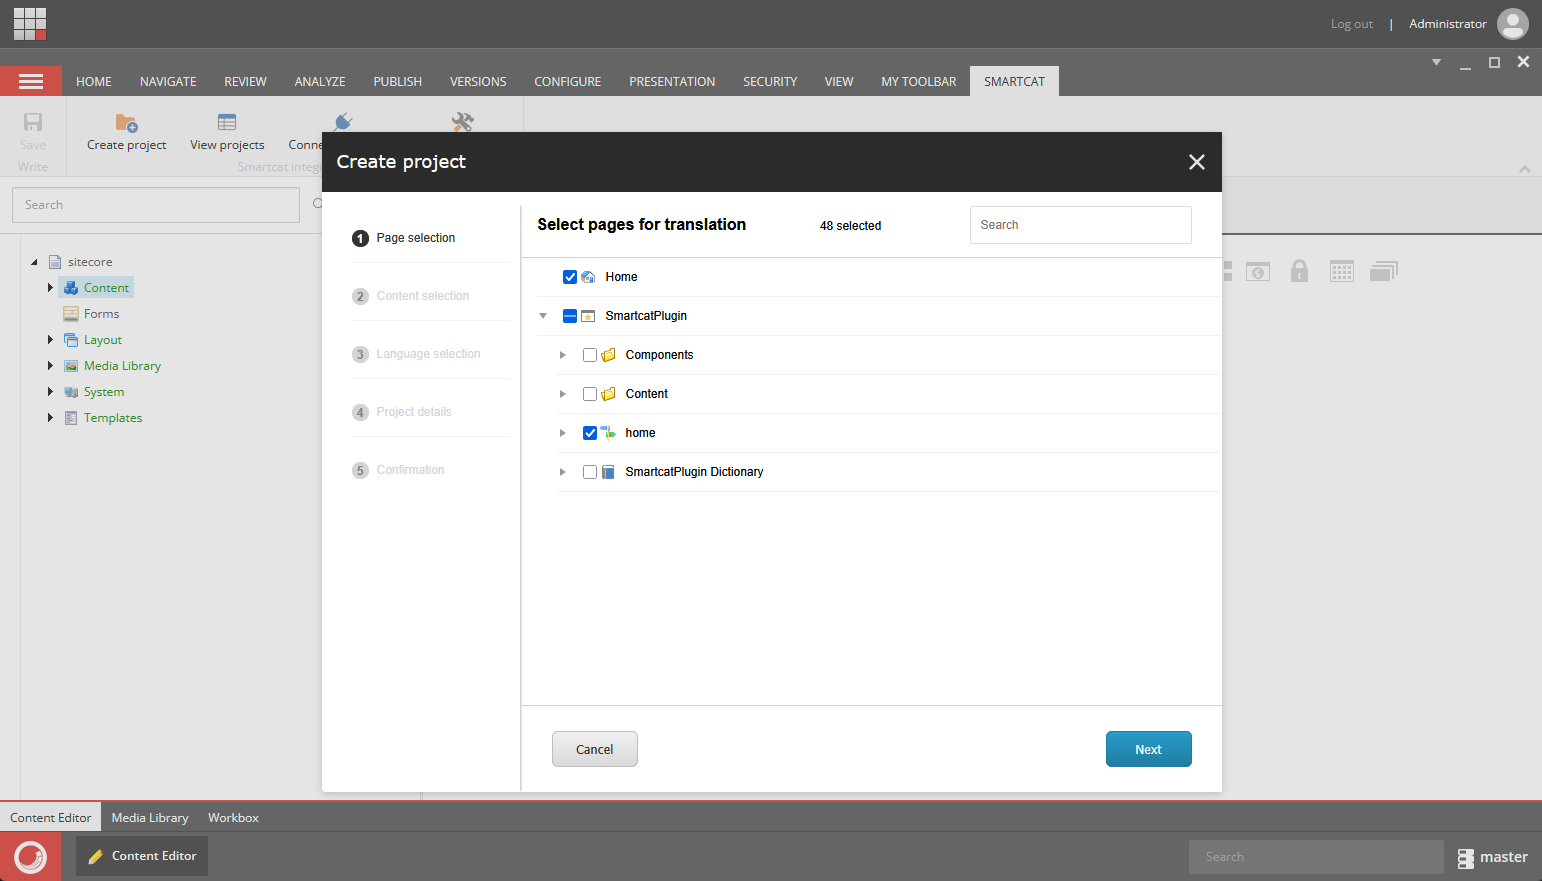
Select one or several items for translation
-
Review the translation scope
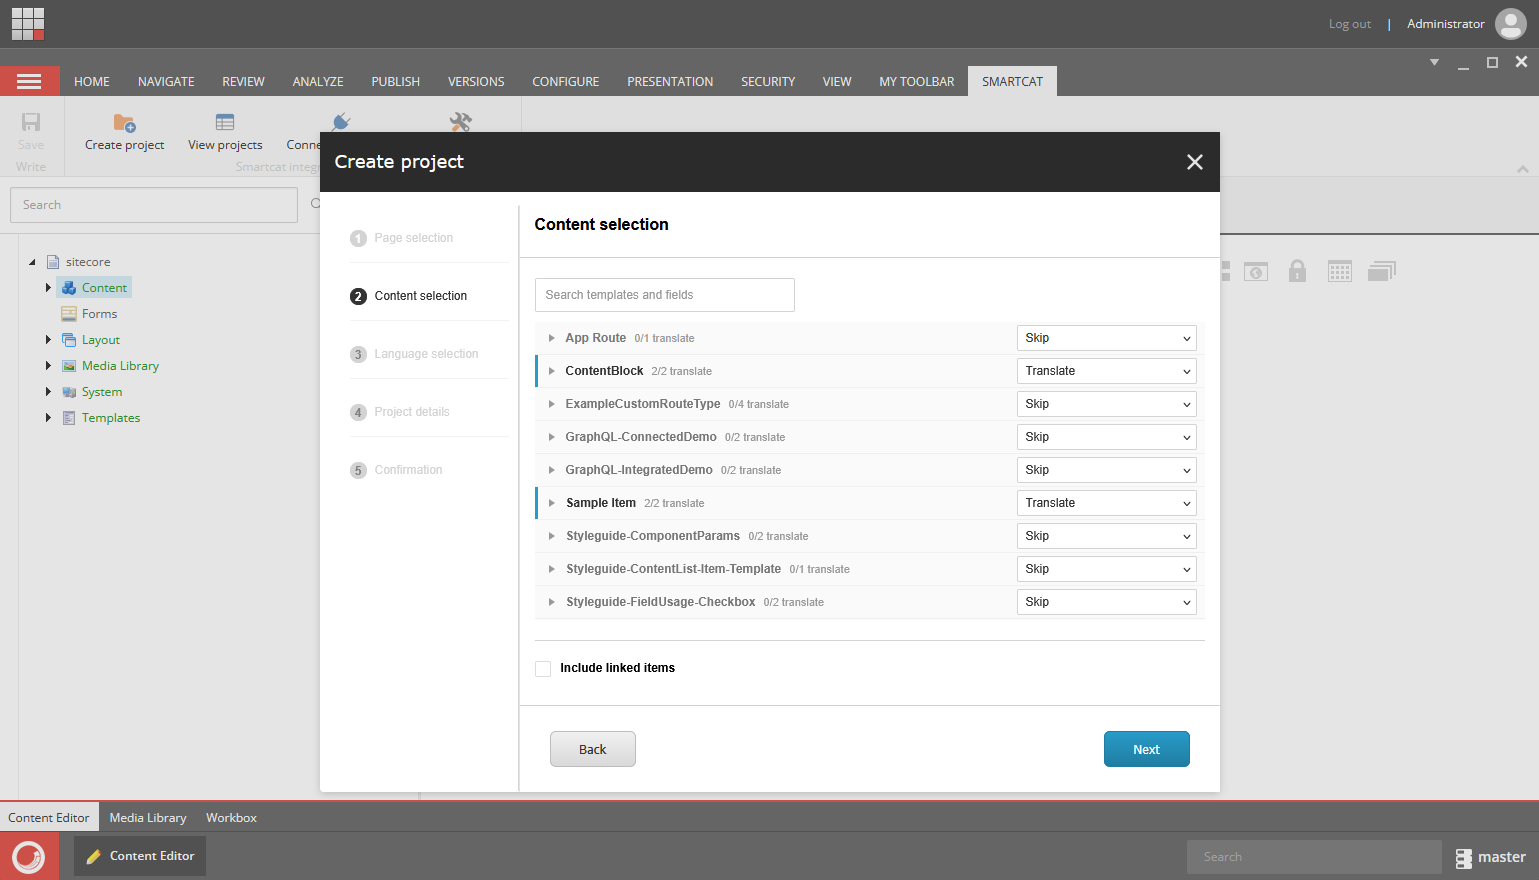
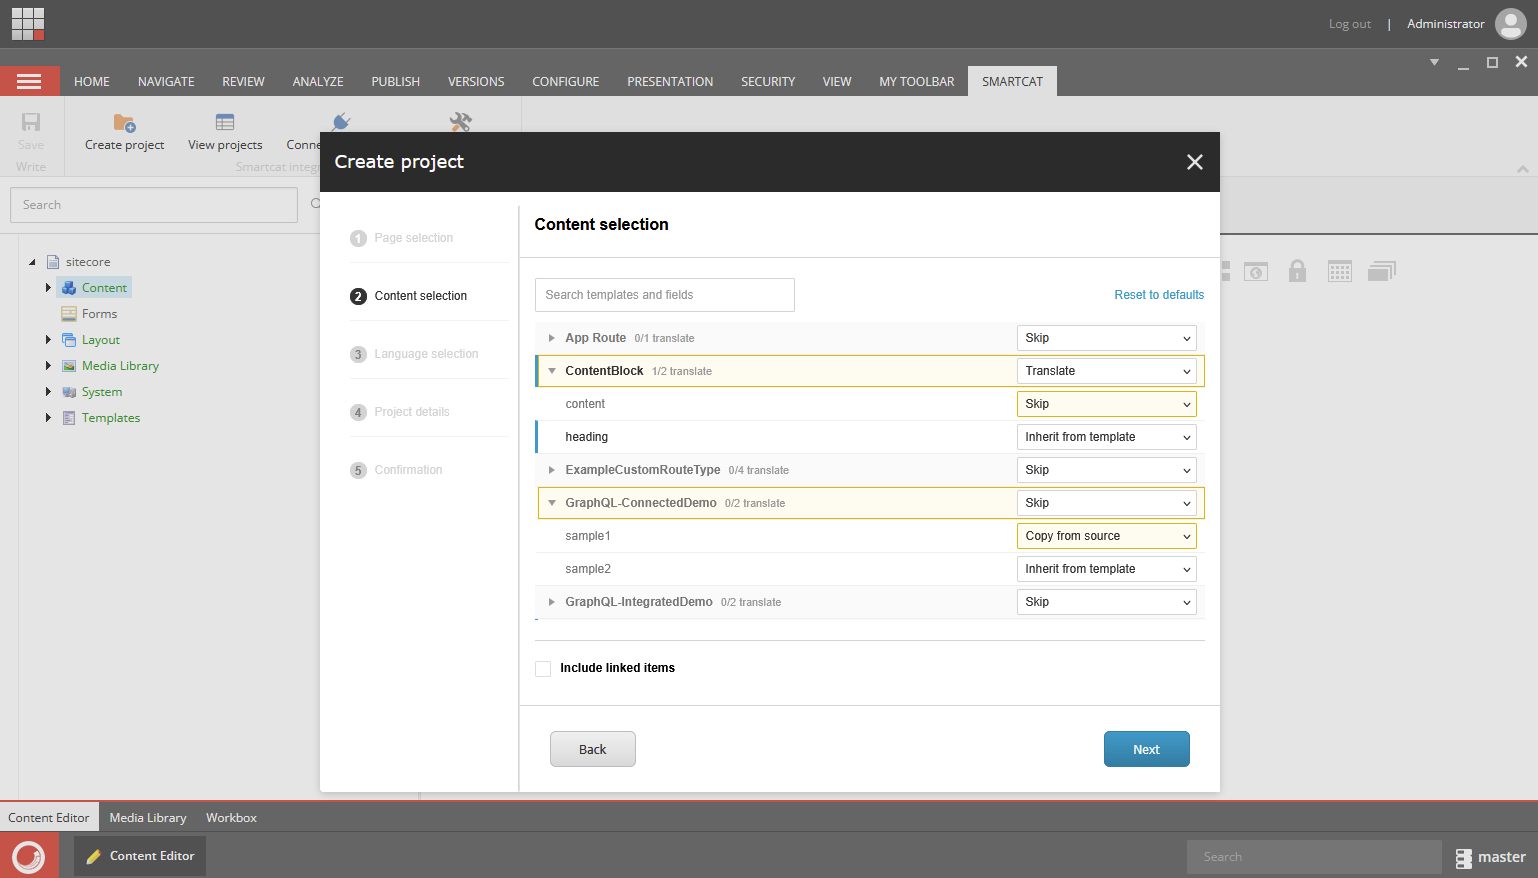
The Content selection step shows the templates and fields used by the pages you selected, pre-filled with your Plugin Settings. You can adjust them for this project only; for example, set a field to Skip to exclude it from translation, or to Copy from source to keep the source value in the language versions.
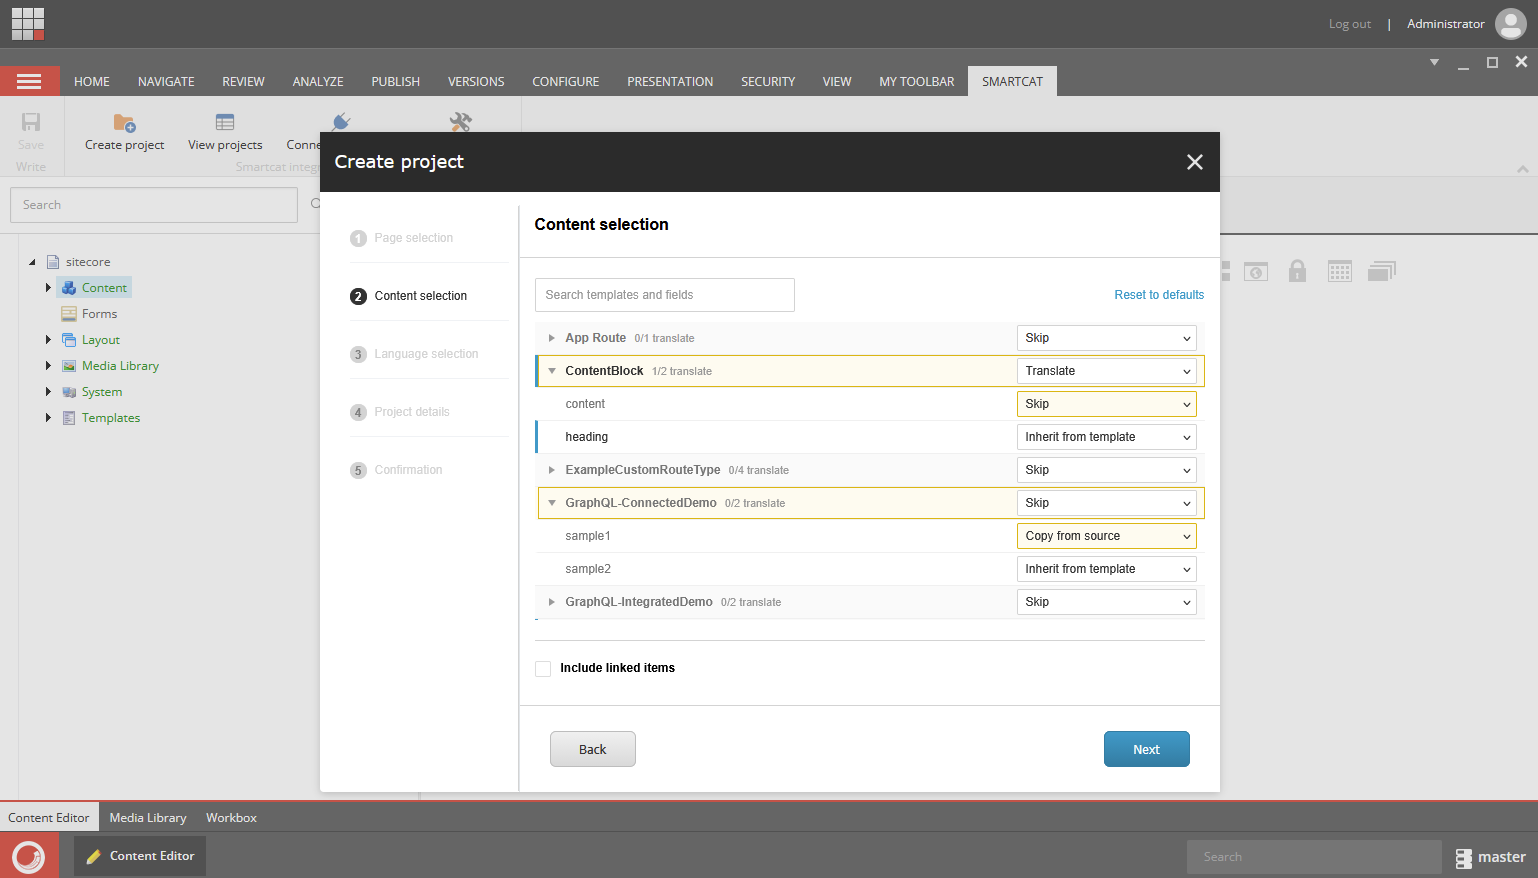
Changed values are highlighted, and Reset to defaults returns everything to your Plugin Settings. These adjustments apply only to the project you are creating; the plugin-wide settings are not affected.
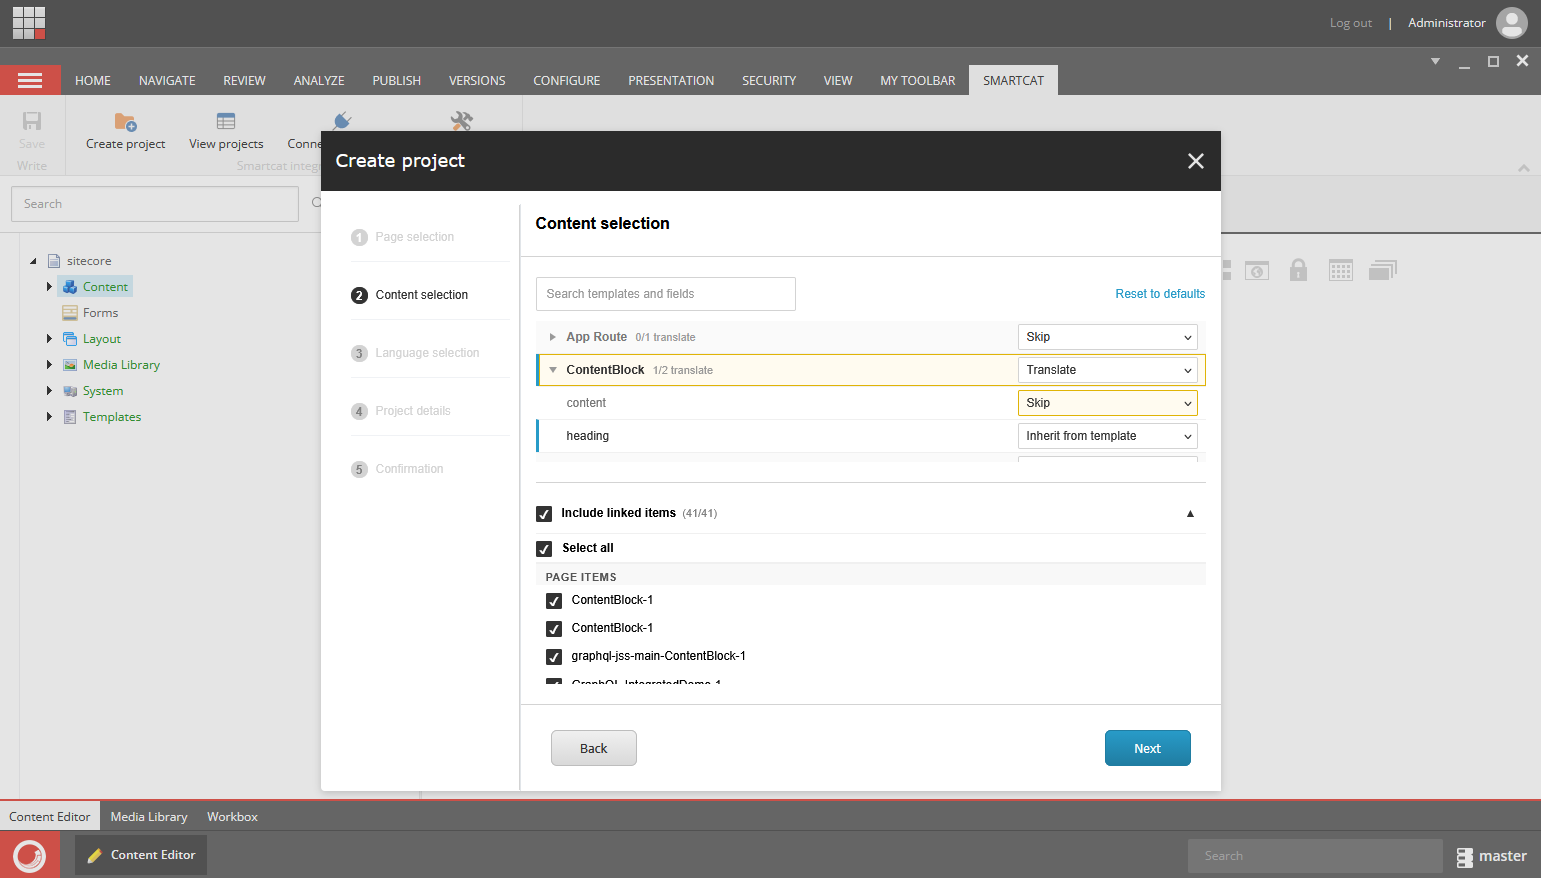
If a page has linked items, for example, a banner added to the layout which is stored as a separate item inside Core - you can automatically include them in the translation scope of the main page by selecting Include Linked Items.
-
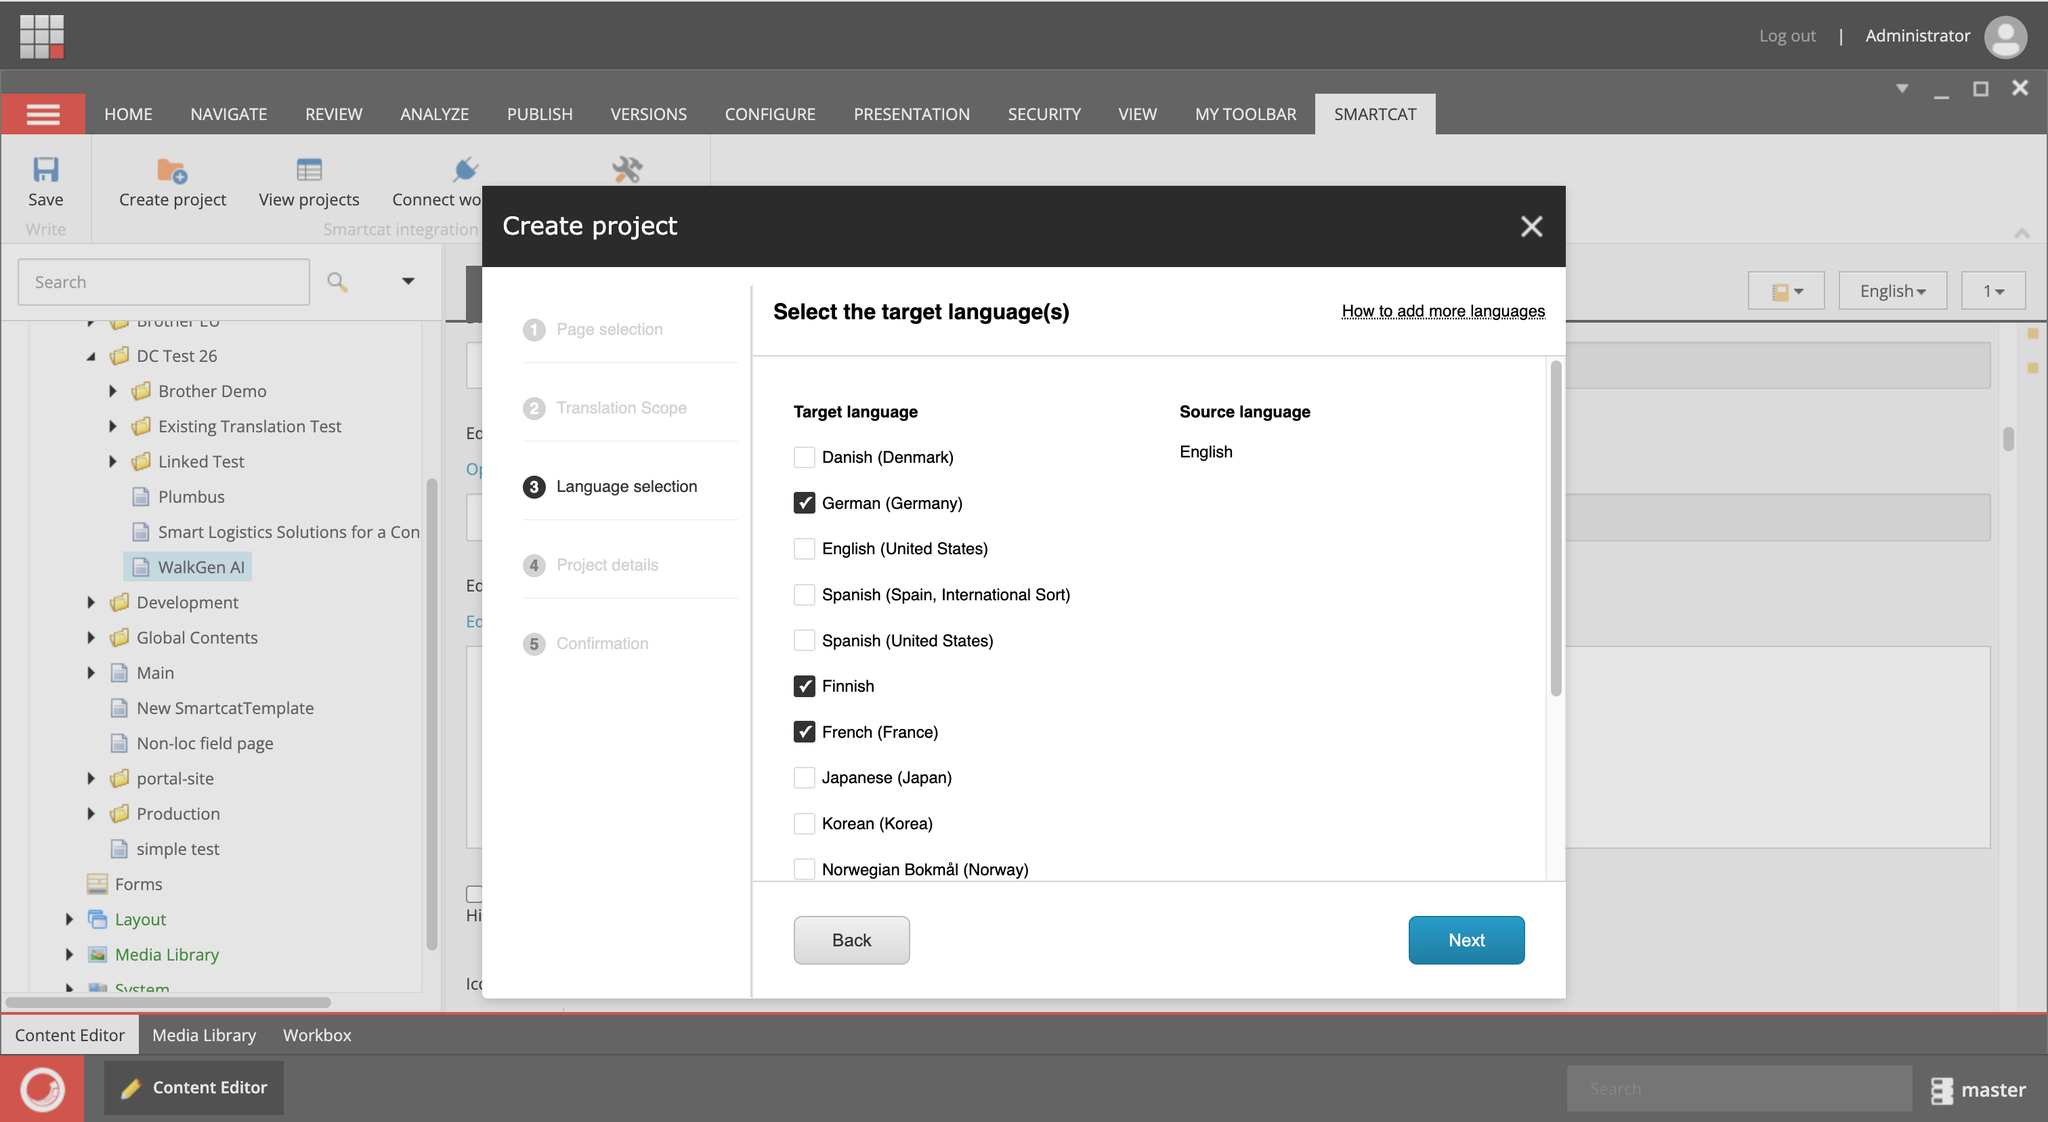
Smartcat uses Sitecore's default system language as the source language for translations. Optionally, you can set up custom locale mappings to properly align your Sitecore locales with Smartcat ones.
-
Specify translation project details
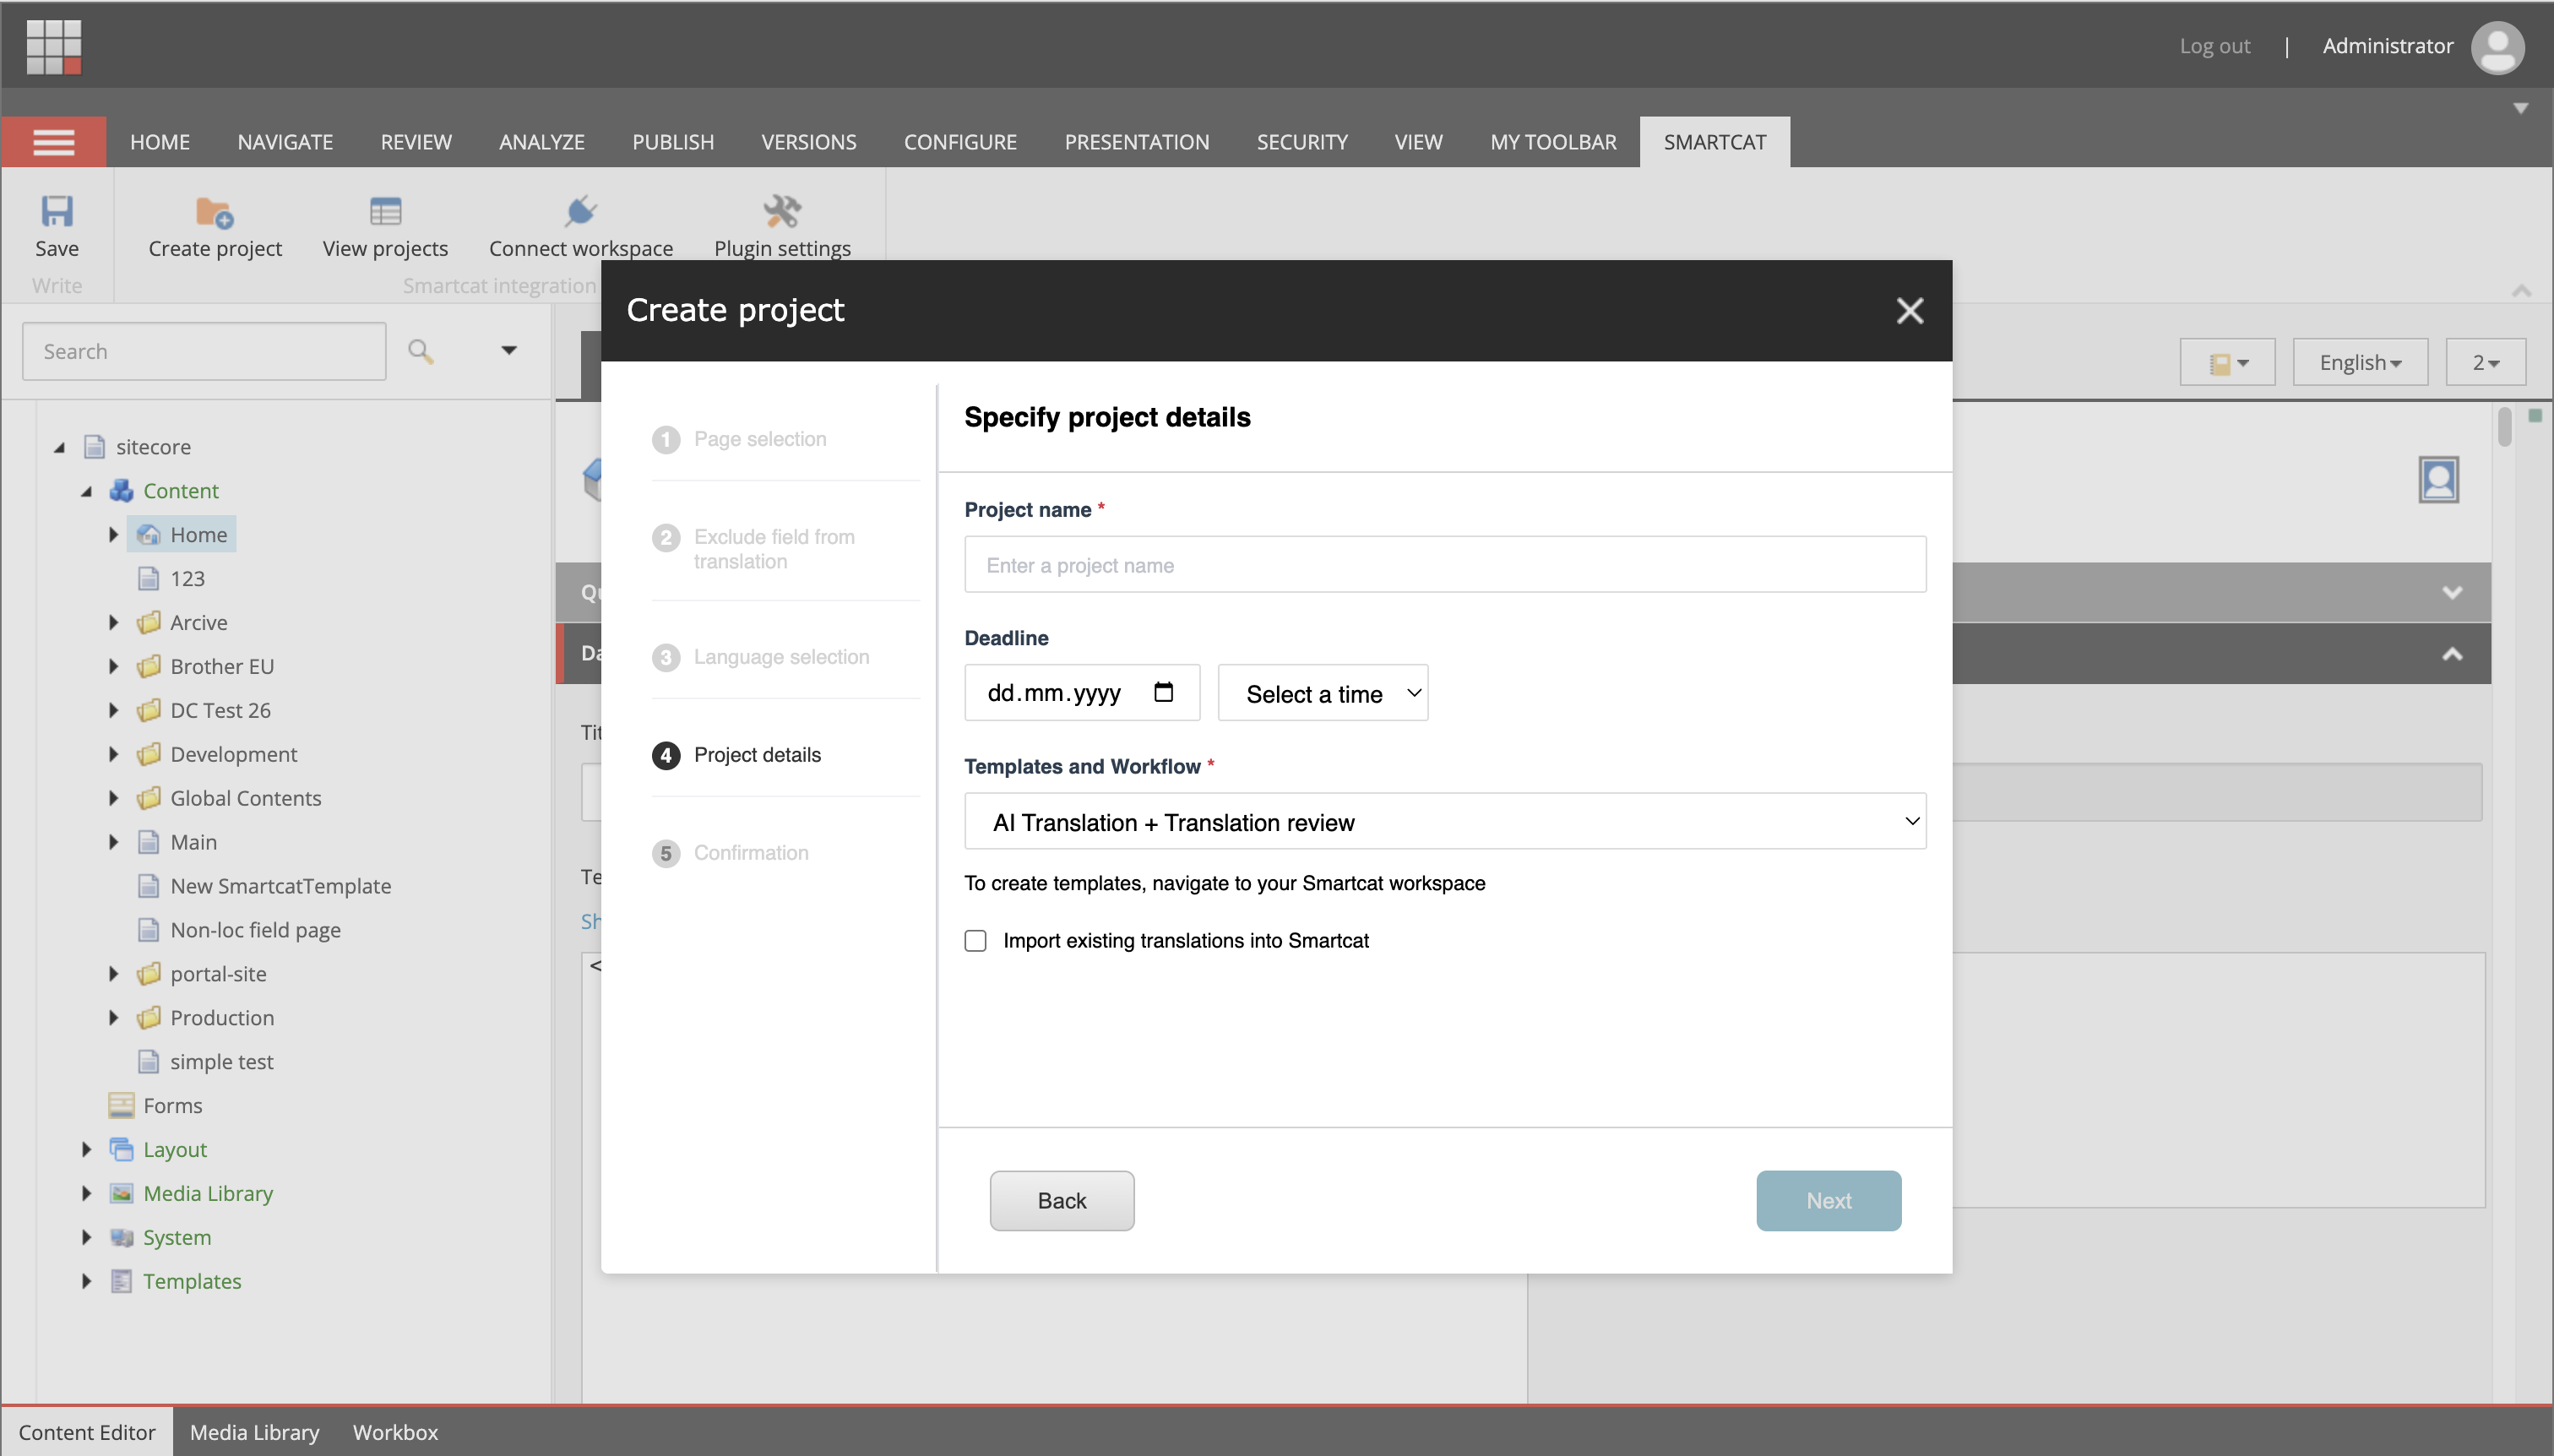
You need to set up:
-
Translation project title
-
Project deadline (optional)
-
Translation workflow — either the default Smartcat one or a custom one
-
Optionally, import existing translations for these locales into Smartcat
-
-
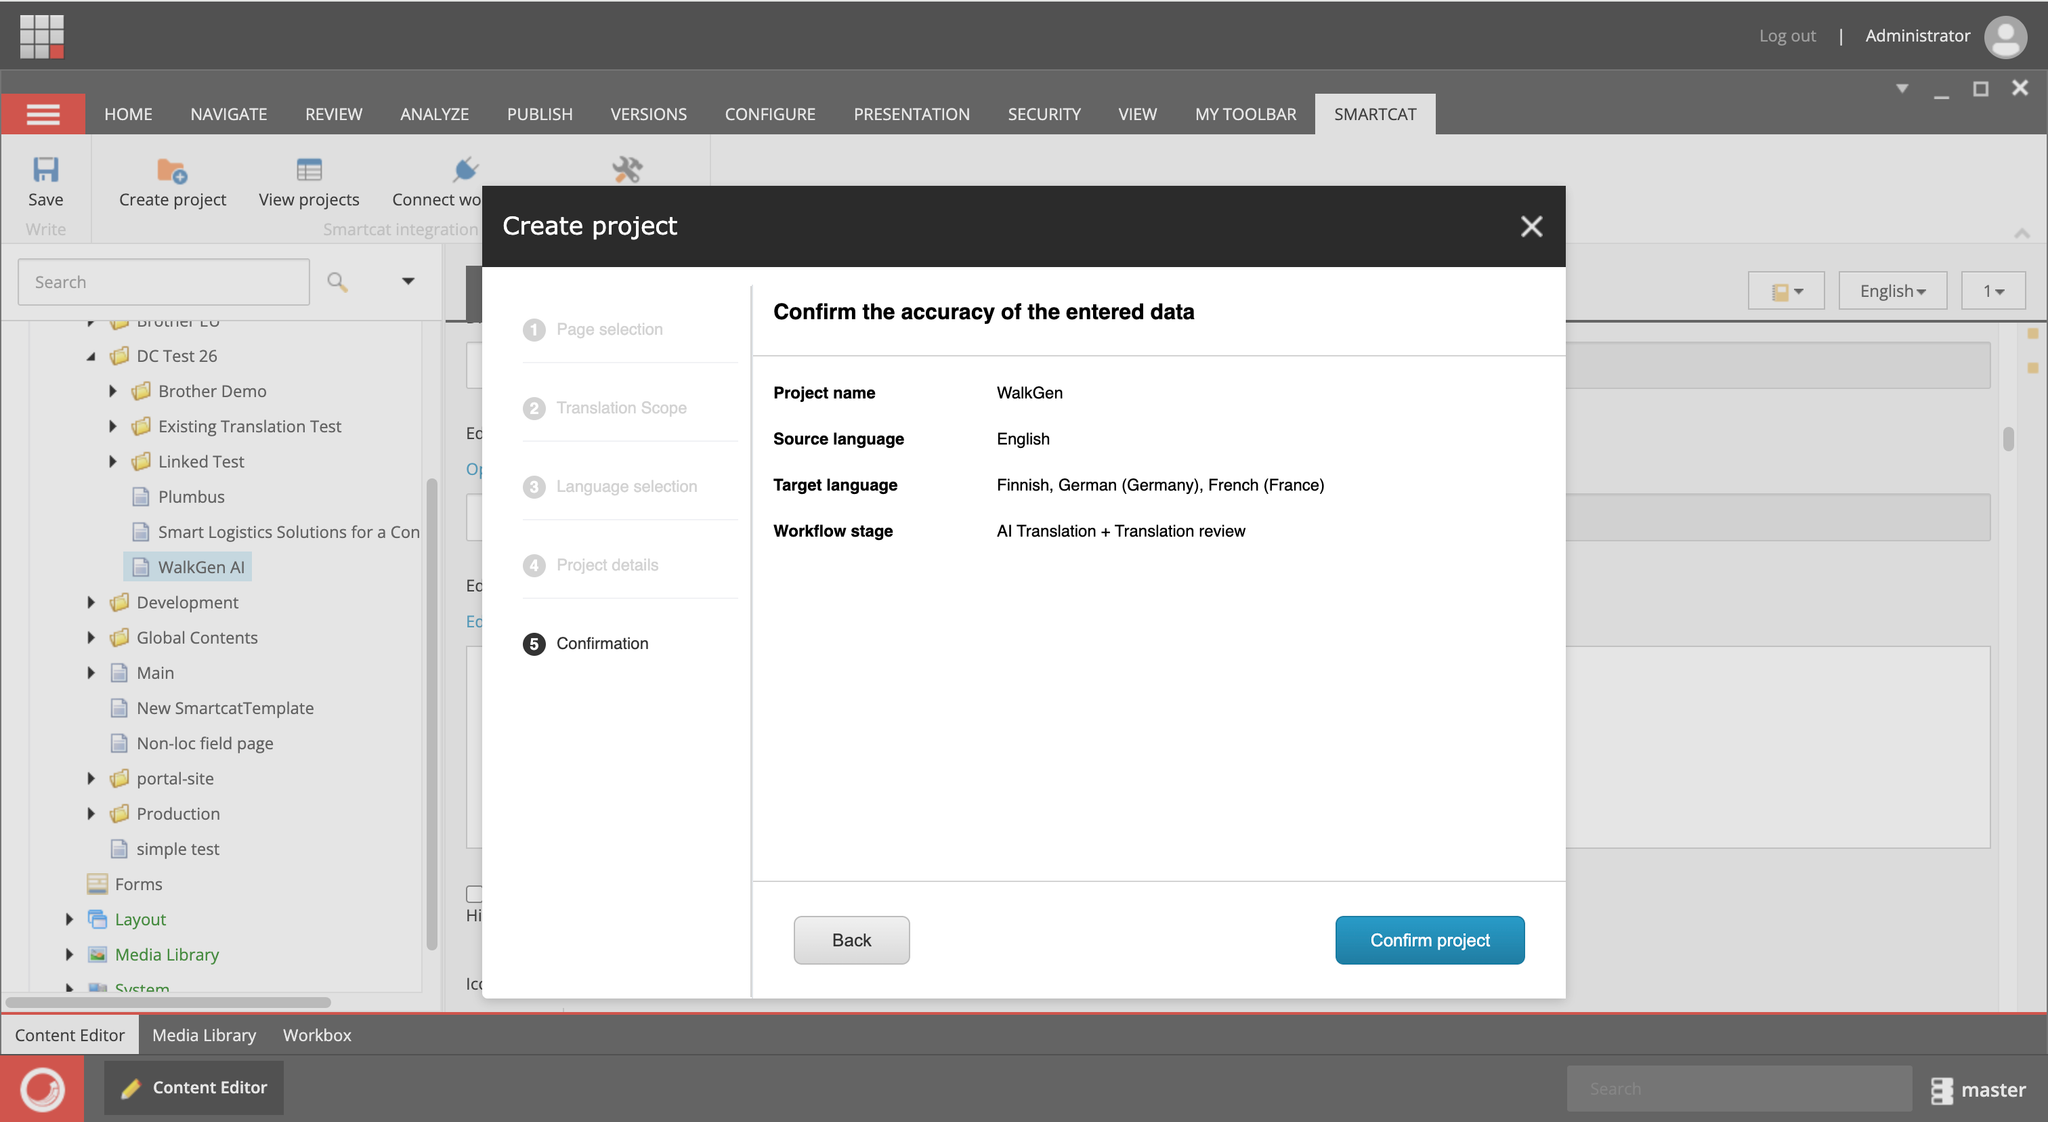
Confirm project creation
-
Translate pages within Smartcat
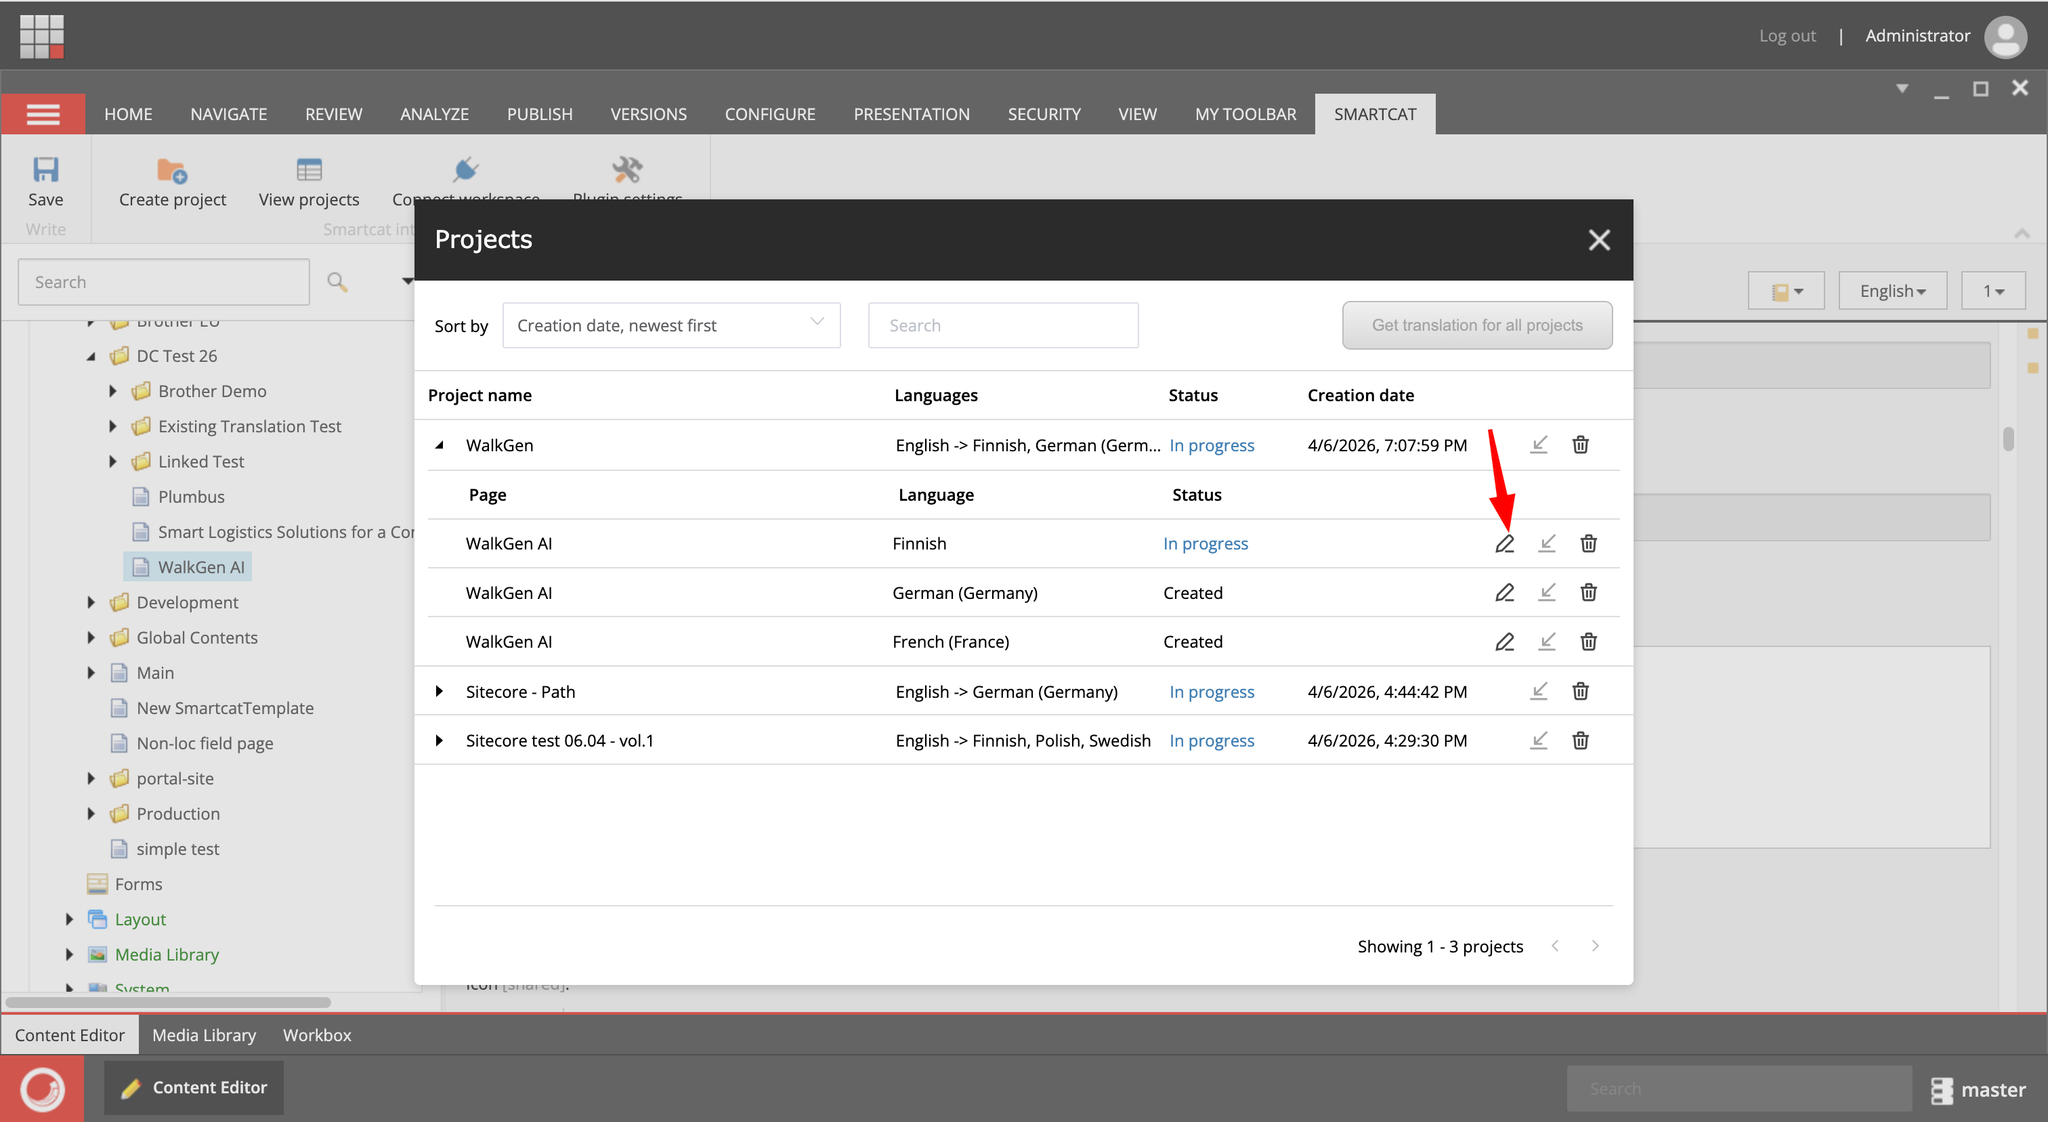
On Smartcat tab click on "View projects”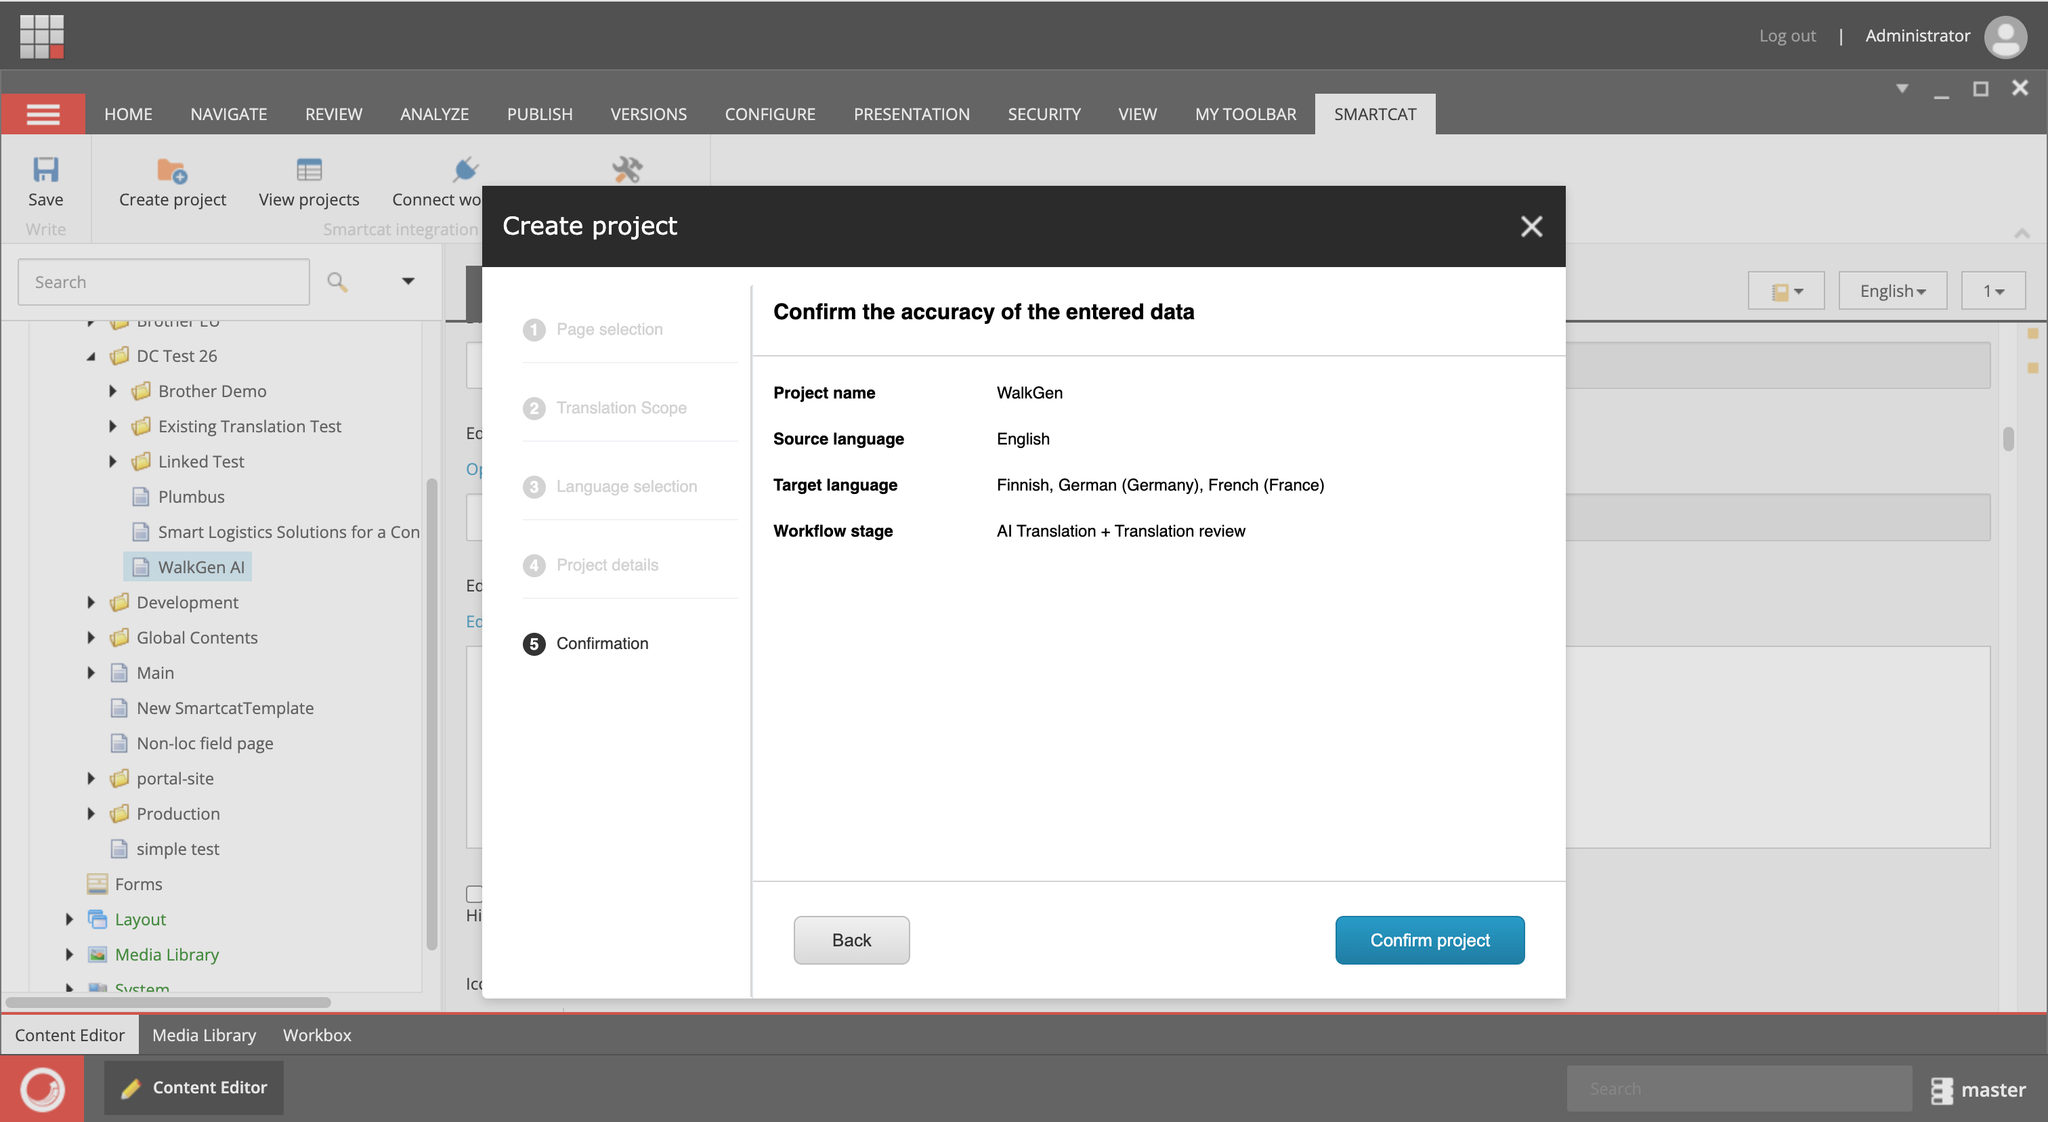
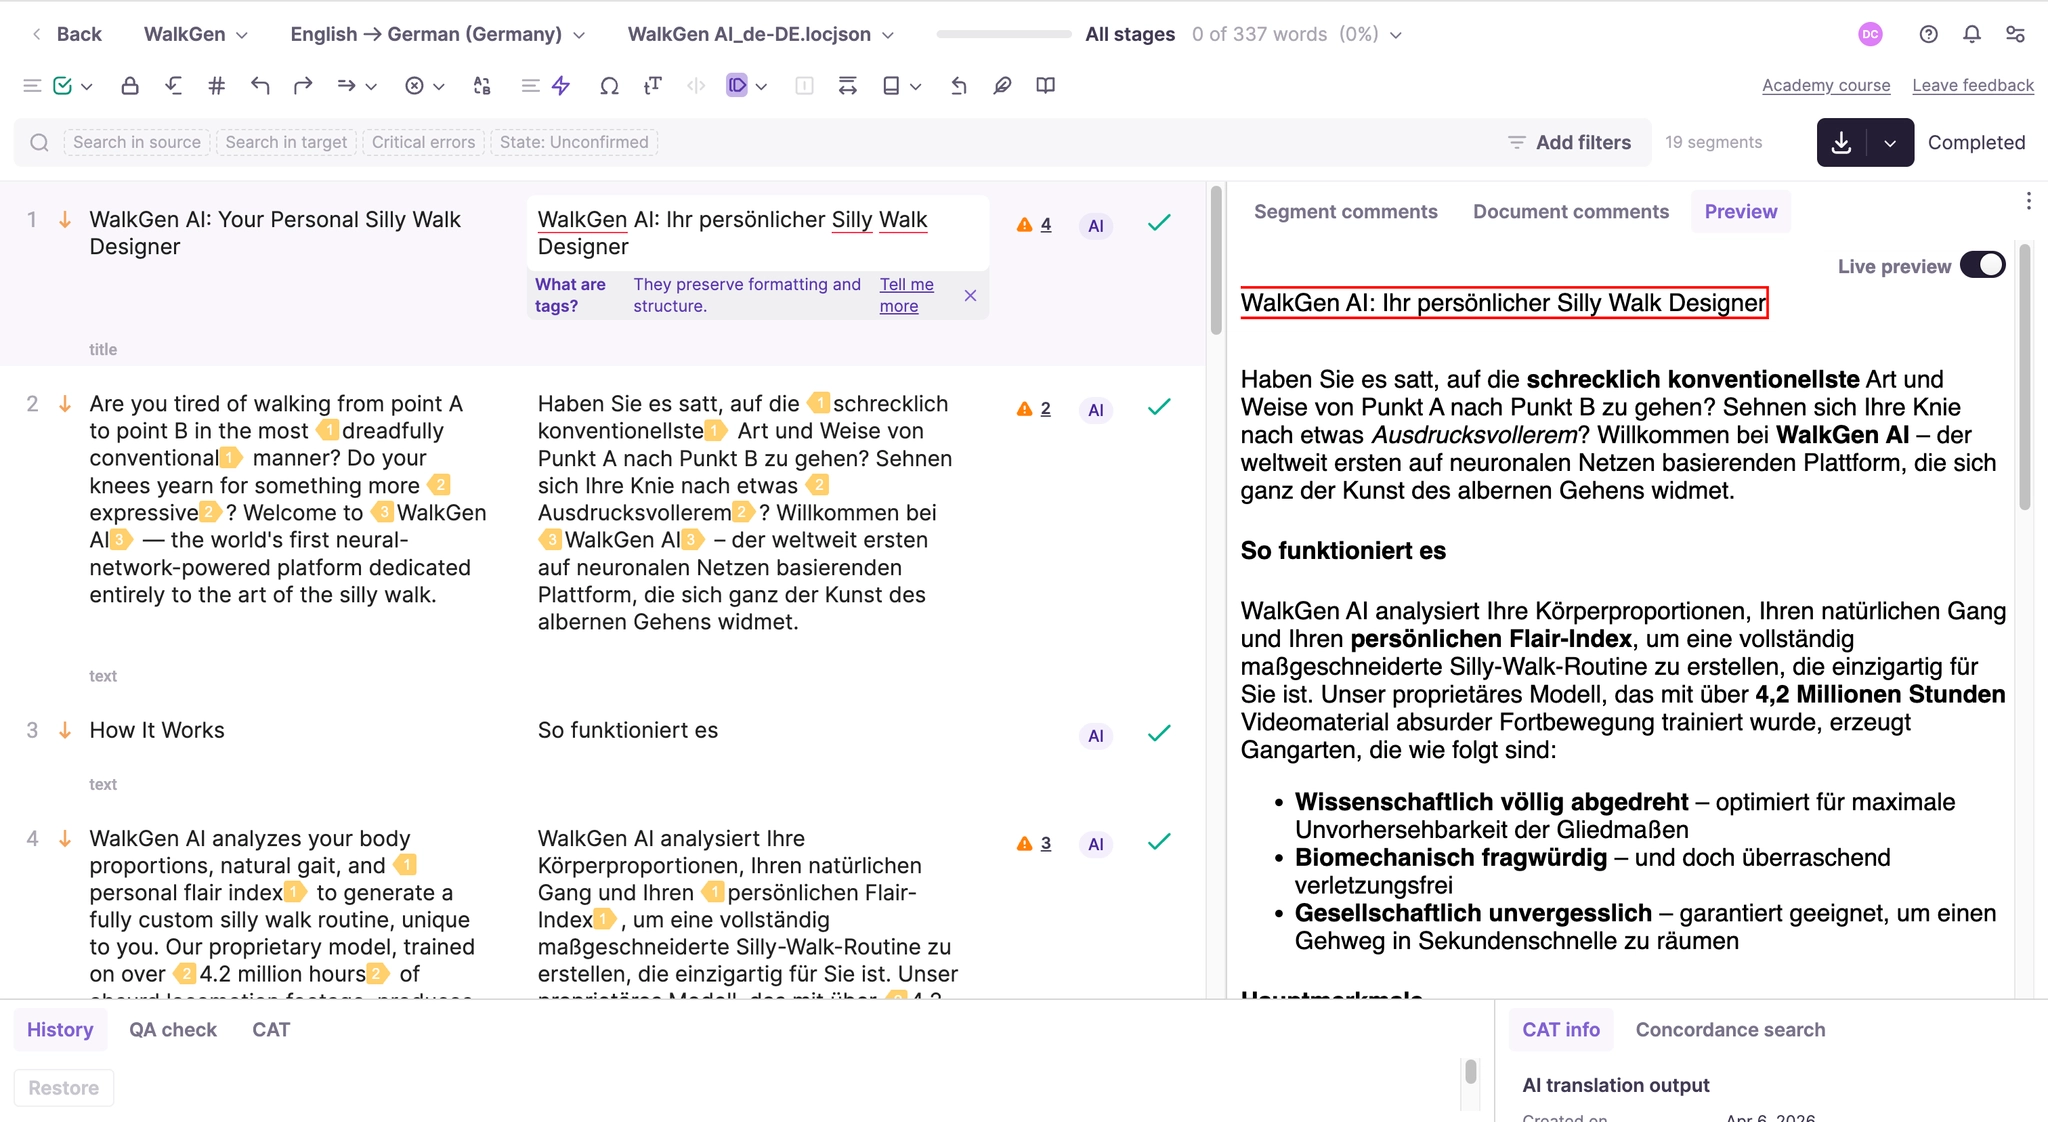
Select the project you just created and click the pencil icon to open it in Smartcat and review the page translations. Alternatively, you can open the Smartcat dashboard directly and navigate to the correct project from there.
Complete translations in Smartcat:
-
Pull translations to Sitecore
After the translation is completed, it can be pulled from Smartcat to Sitecore. It can be done for specific language version, selected translation project or for all translation projects.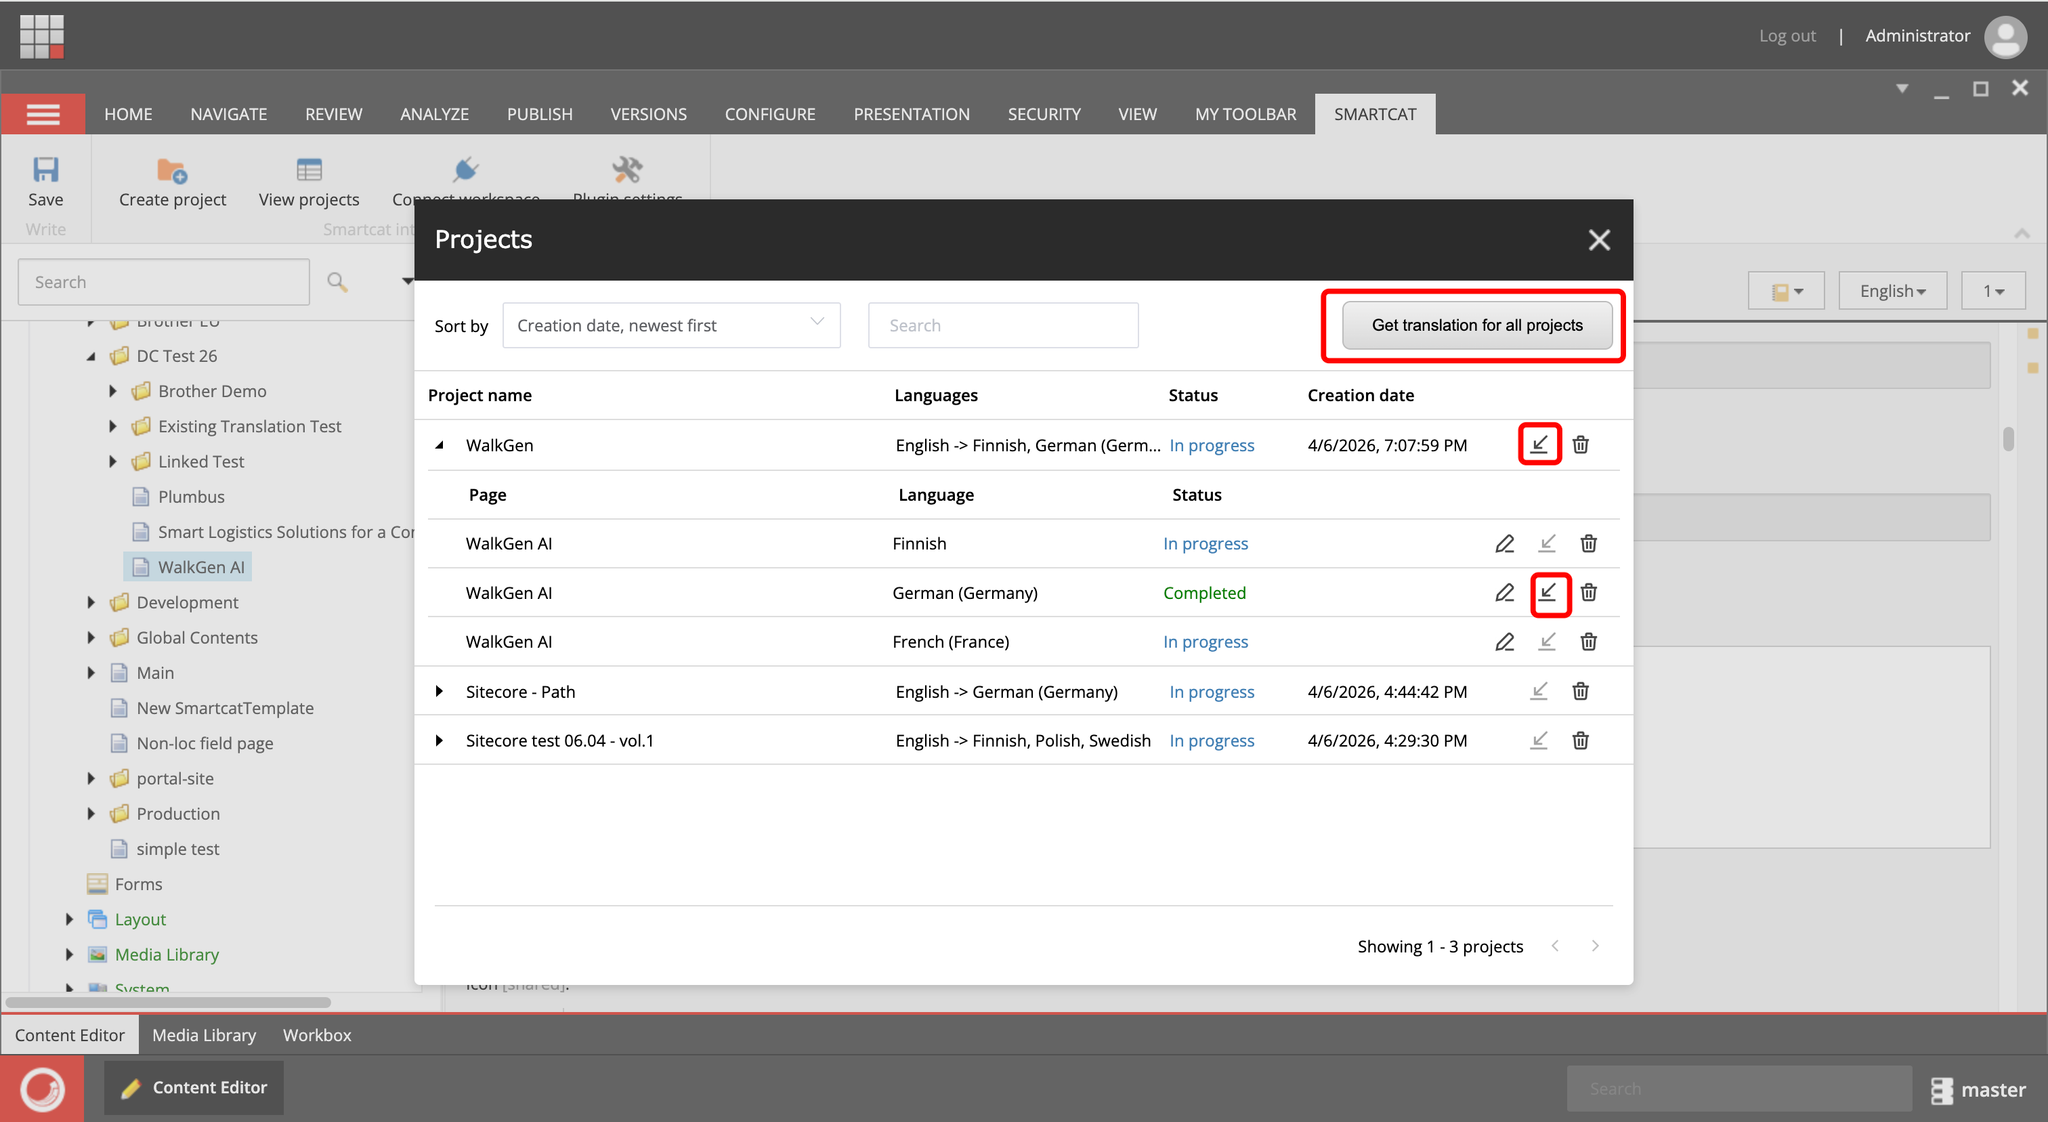
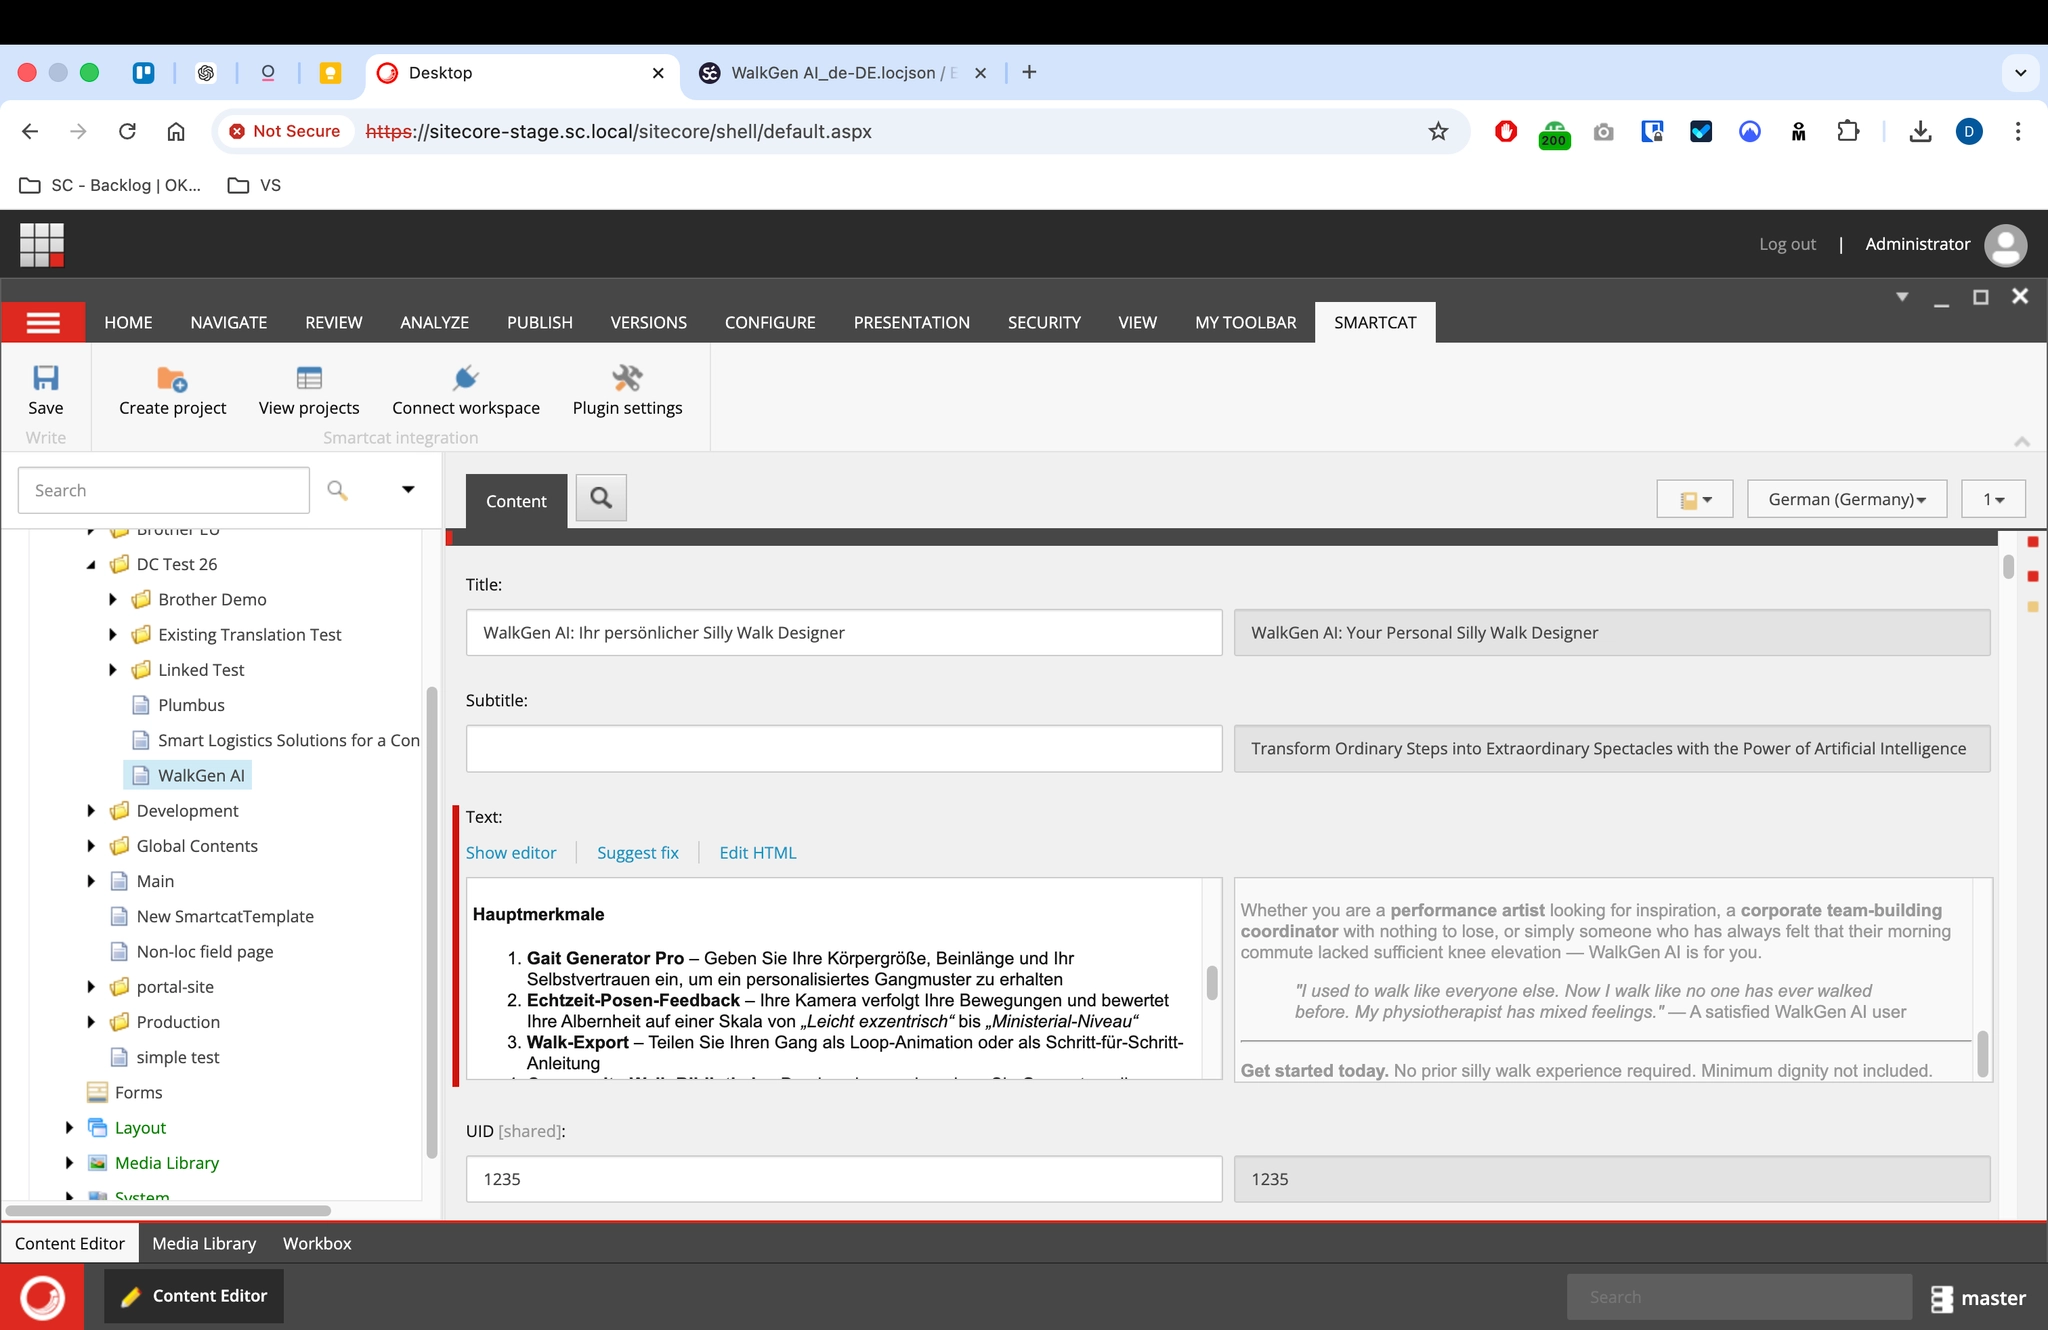
When a page's translation is updated, pulling it will create a new page version in that language in Sitecore. Note that the Subtitle field was excluded from the translation scope.
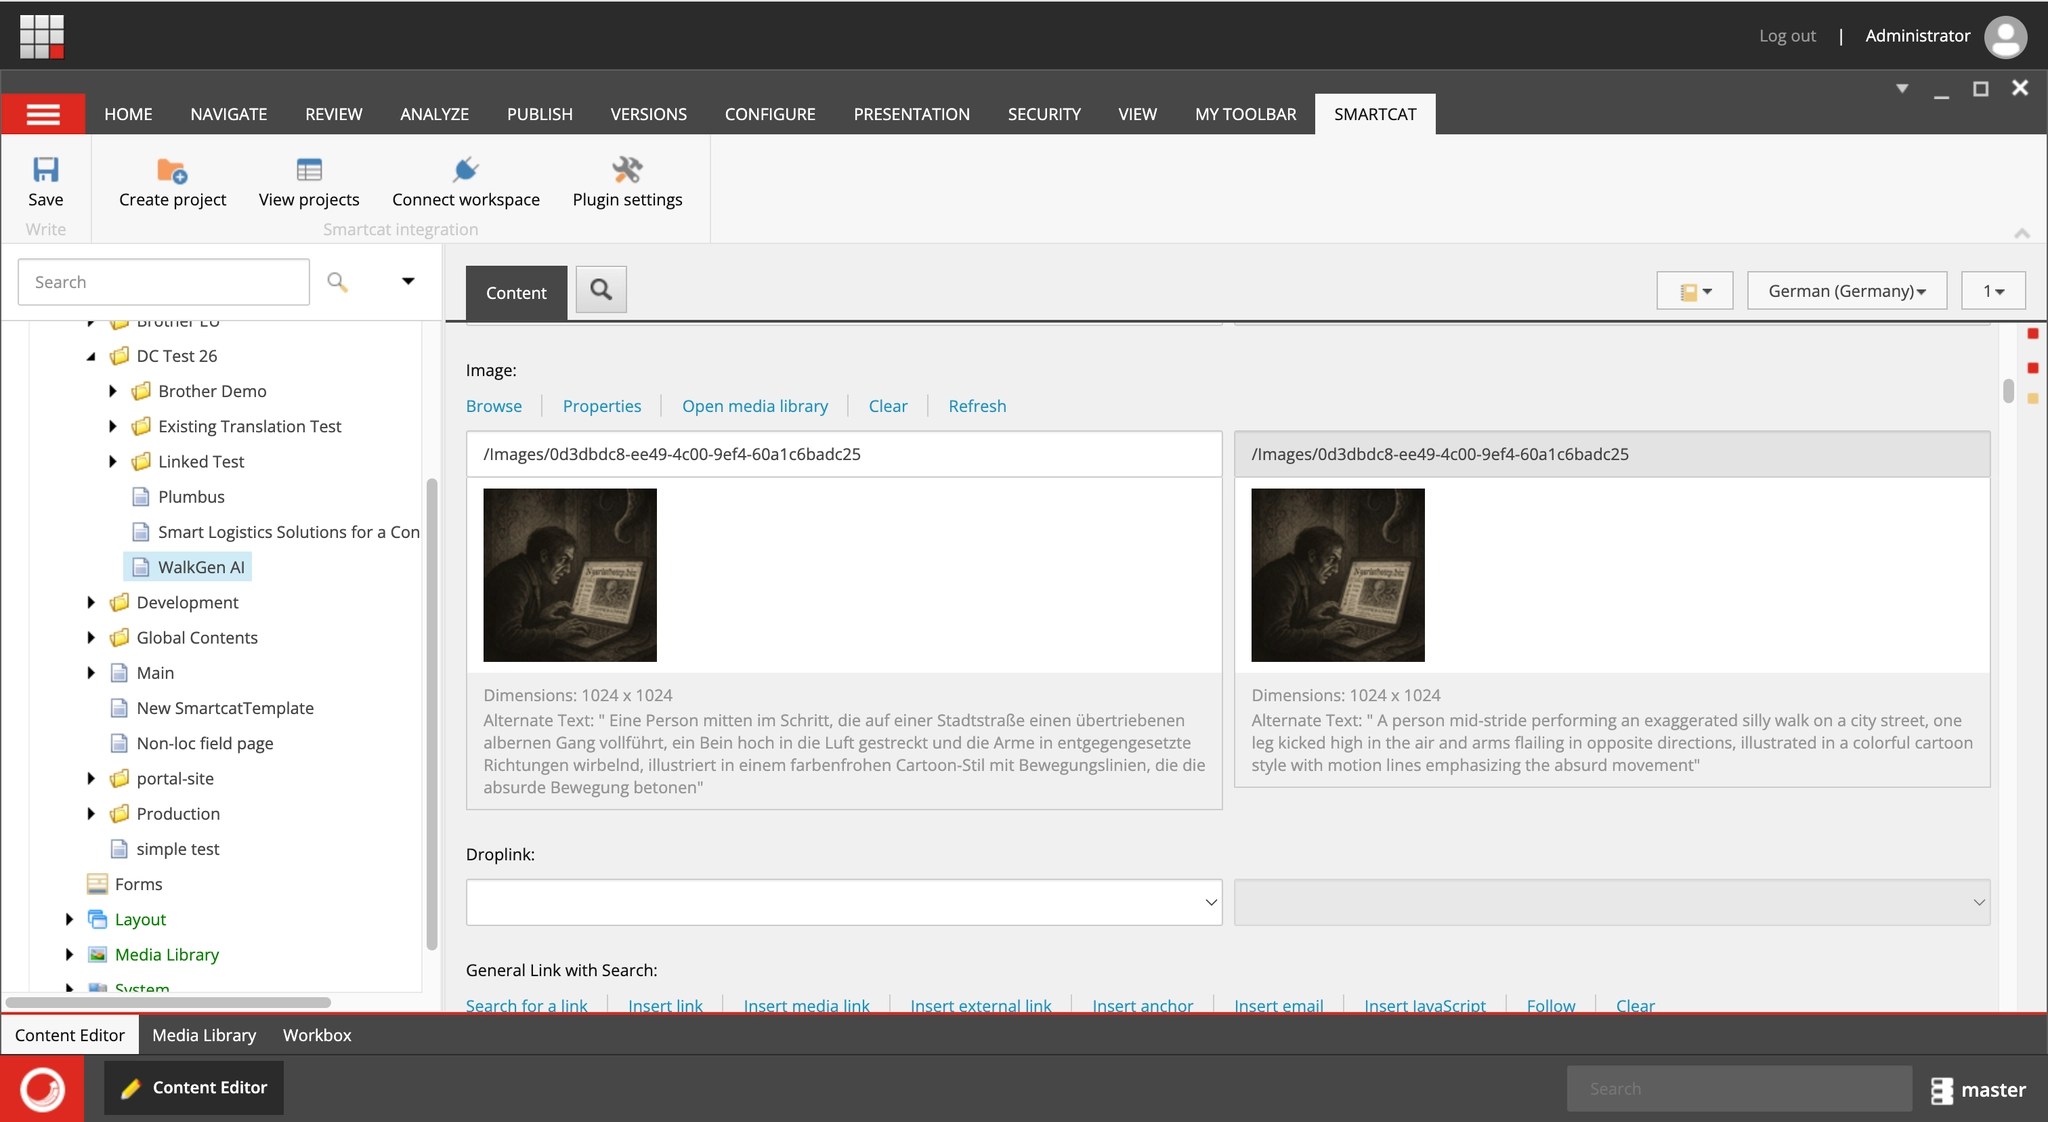
If a page has complex items such as images, links, etc., with their own text fields like alt text, description, etc., all these fields will also be automatically extracted and sent to Smartcat.
Updating translations
Smartcat allows you to update translations after an item's source content has been updated. In this case, the translation won't be done from scratch — only the parts that have changed will be translated.
-
Send an item for translation in Smartcat for the first time. If it's fully or partly translated, include existing translations.
-
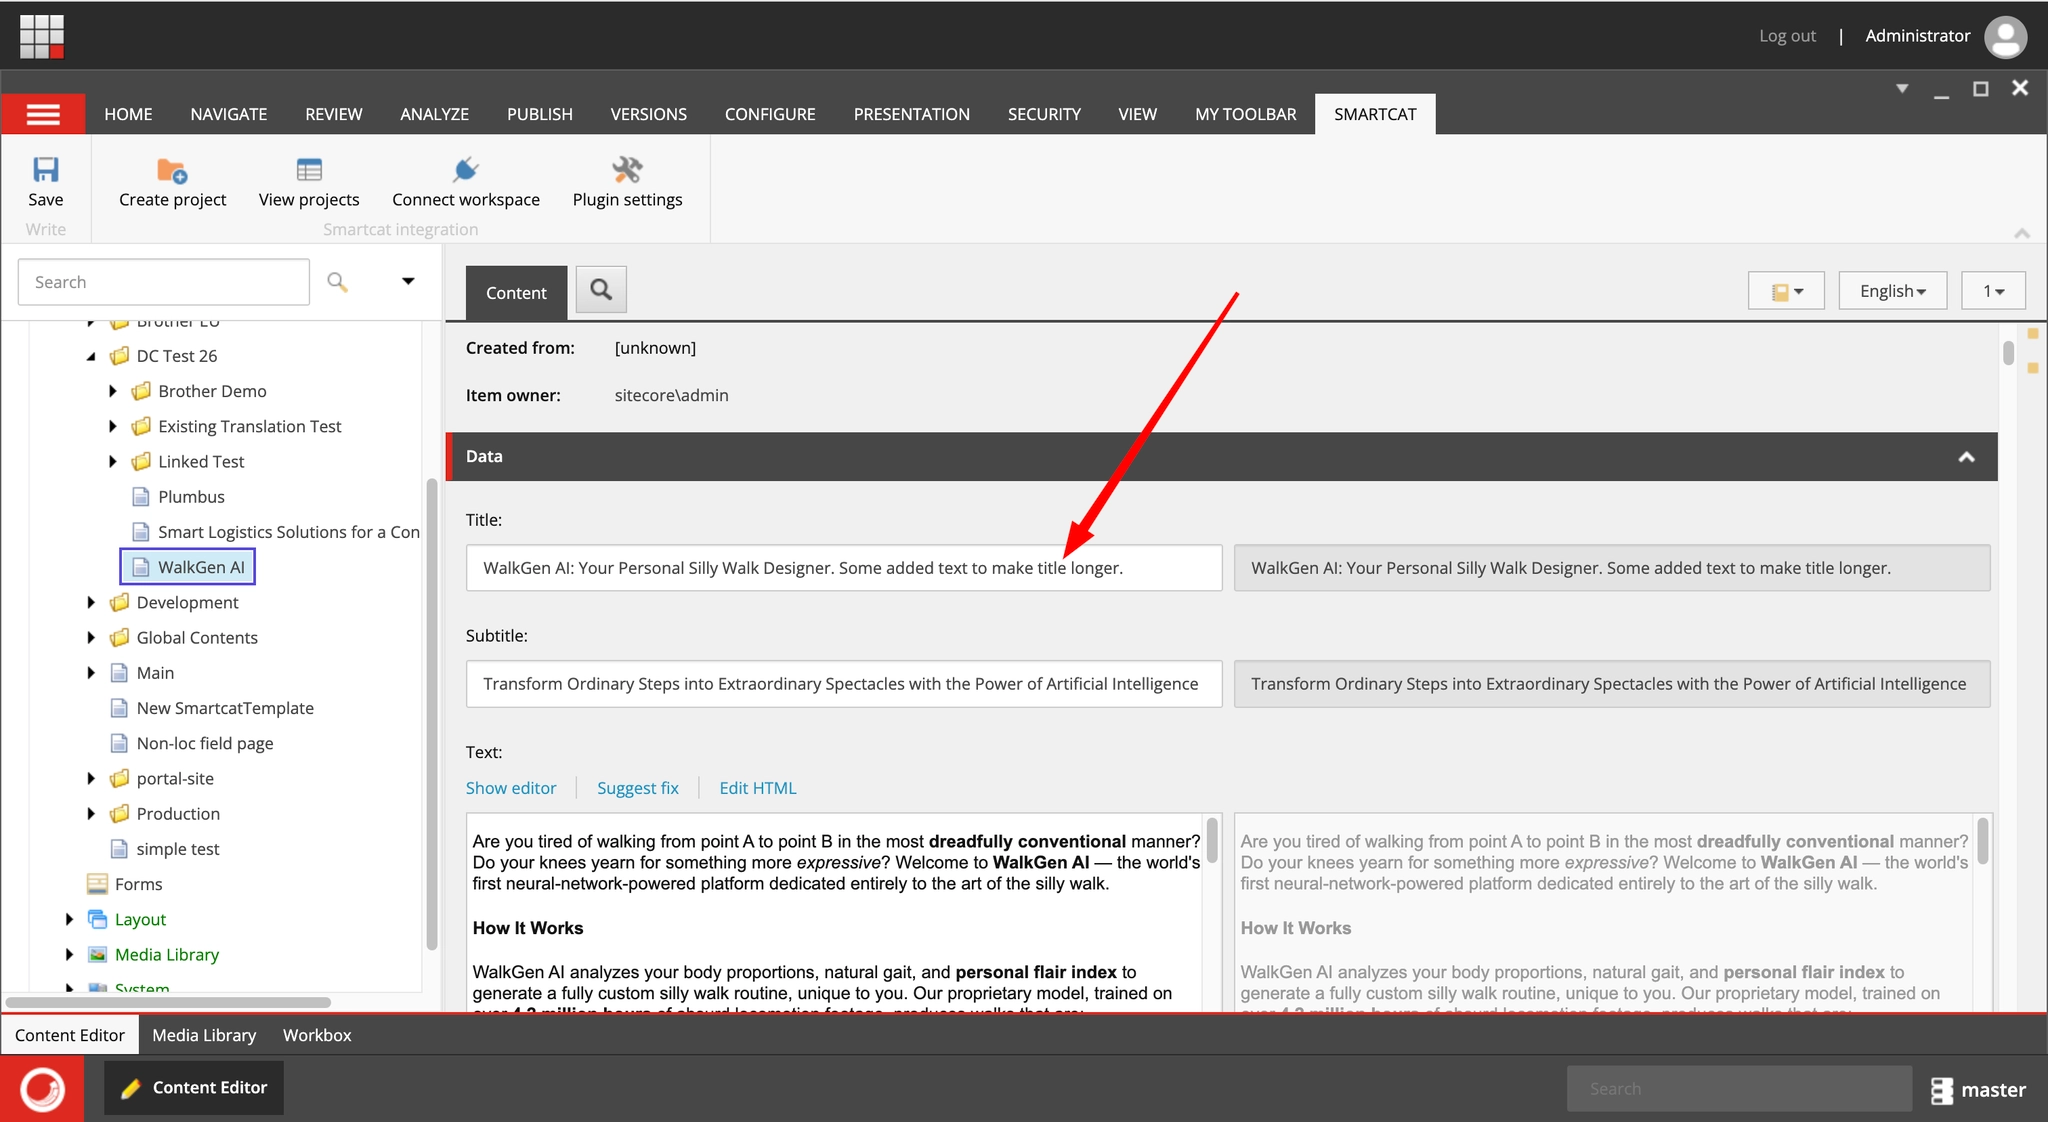
Update the source content of this item.
-
Send it for translation again by creating a translation project.
You can also select several pages at once, regardless of whether they were previously translated or not.⚠️ Don't include existing translations this time.
-
If a page was previously sent for translation, the Smartcat plugin will detect it and automatically send it to the corresponding translation project.
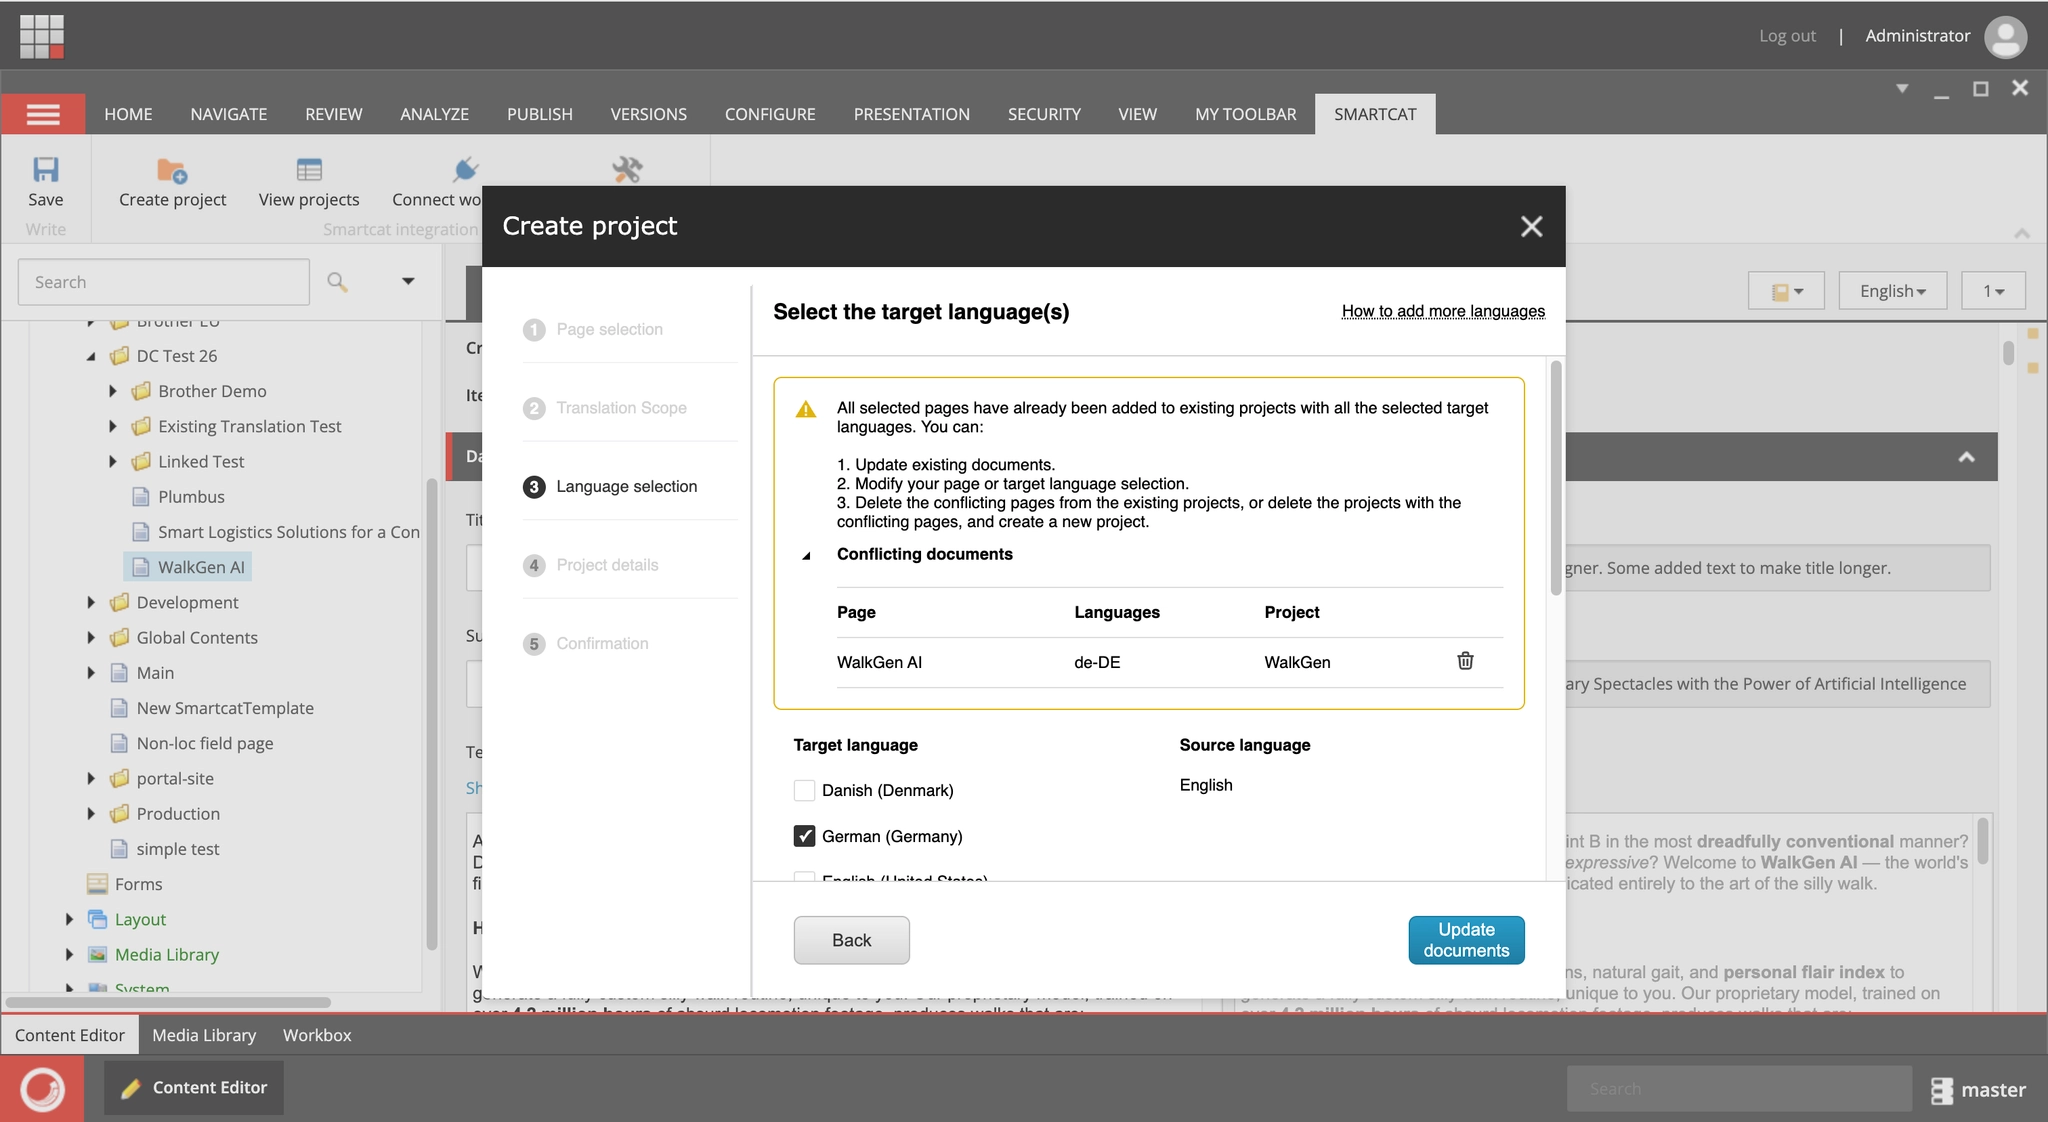
- Previously created unchanged translations remain fully completed.
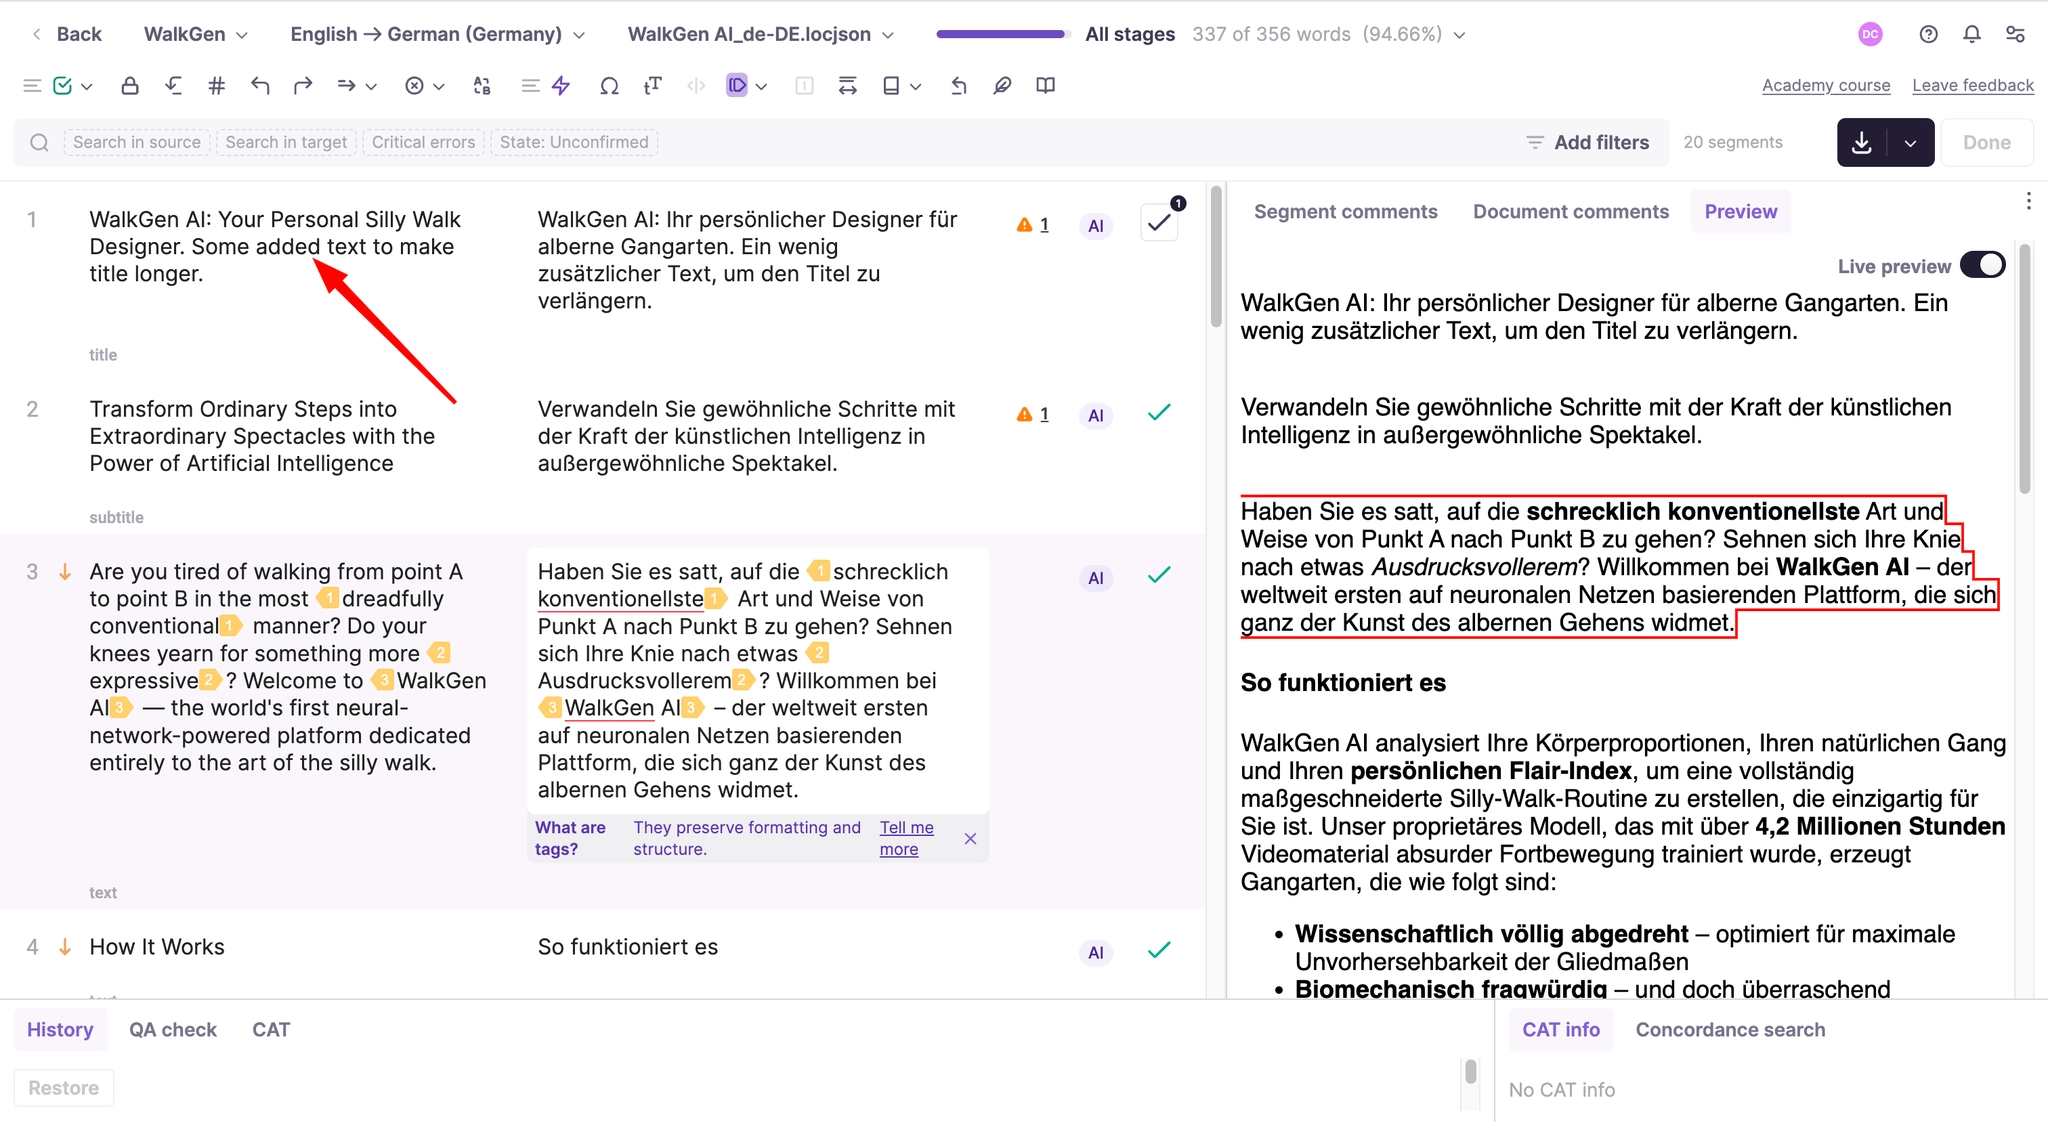
- The rest of the flow is the same as for translating your content. After the translation is completed, just pull the translations back to Sitecore.
-
Additional Settings
Custom language mapping
Sitecore allows you to create highly custom locales. It may occur that Smartcat doesn't have a fully matching locale. The list of locales supported by Smartcat is here: https://smartcat.com/Home/Languages
In some cases you may also want to treat one of your Sitecore languages differently — for example, Spanish with the "es" locale might actually be Spanish (LATAM) when it comes to translation.
For both cases, Smartcat allows you to create custom locale mappings, essentially telling Smartcat to use a certain locale when translating from another locale in Sitecore.
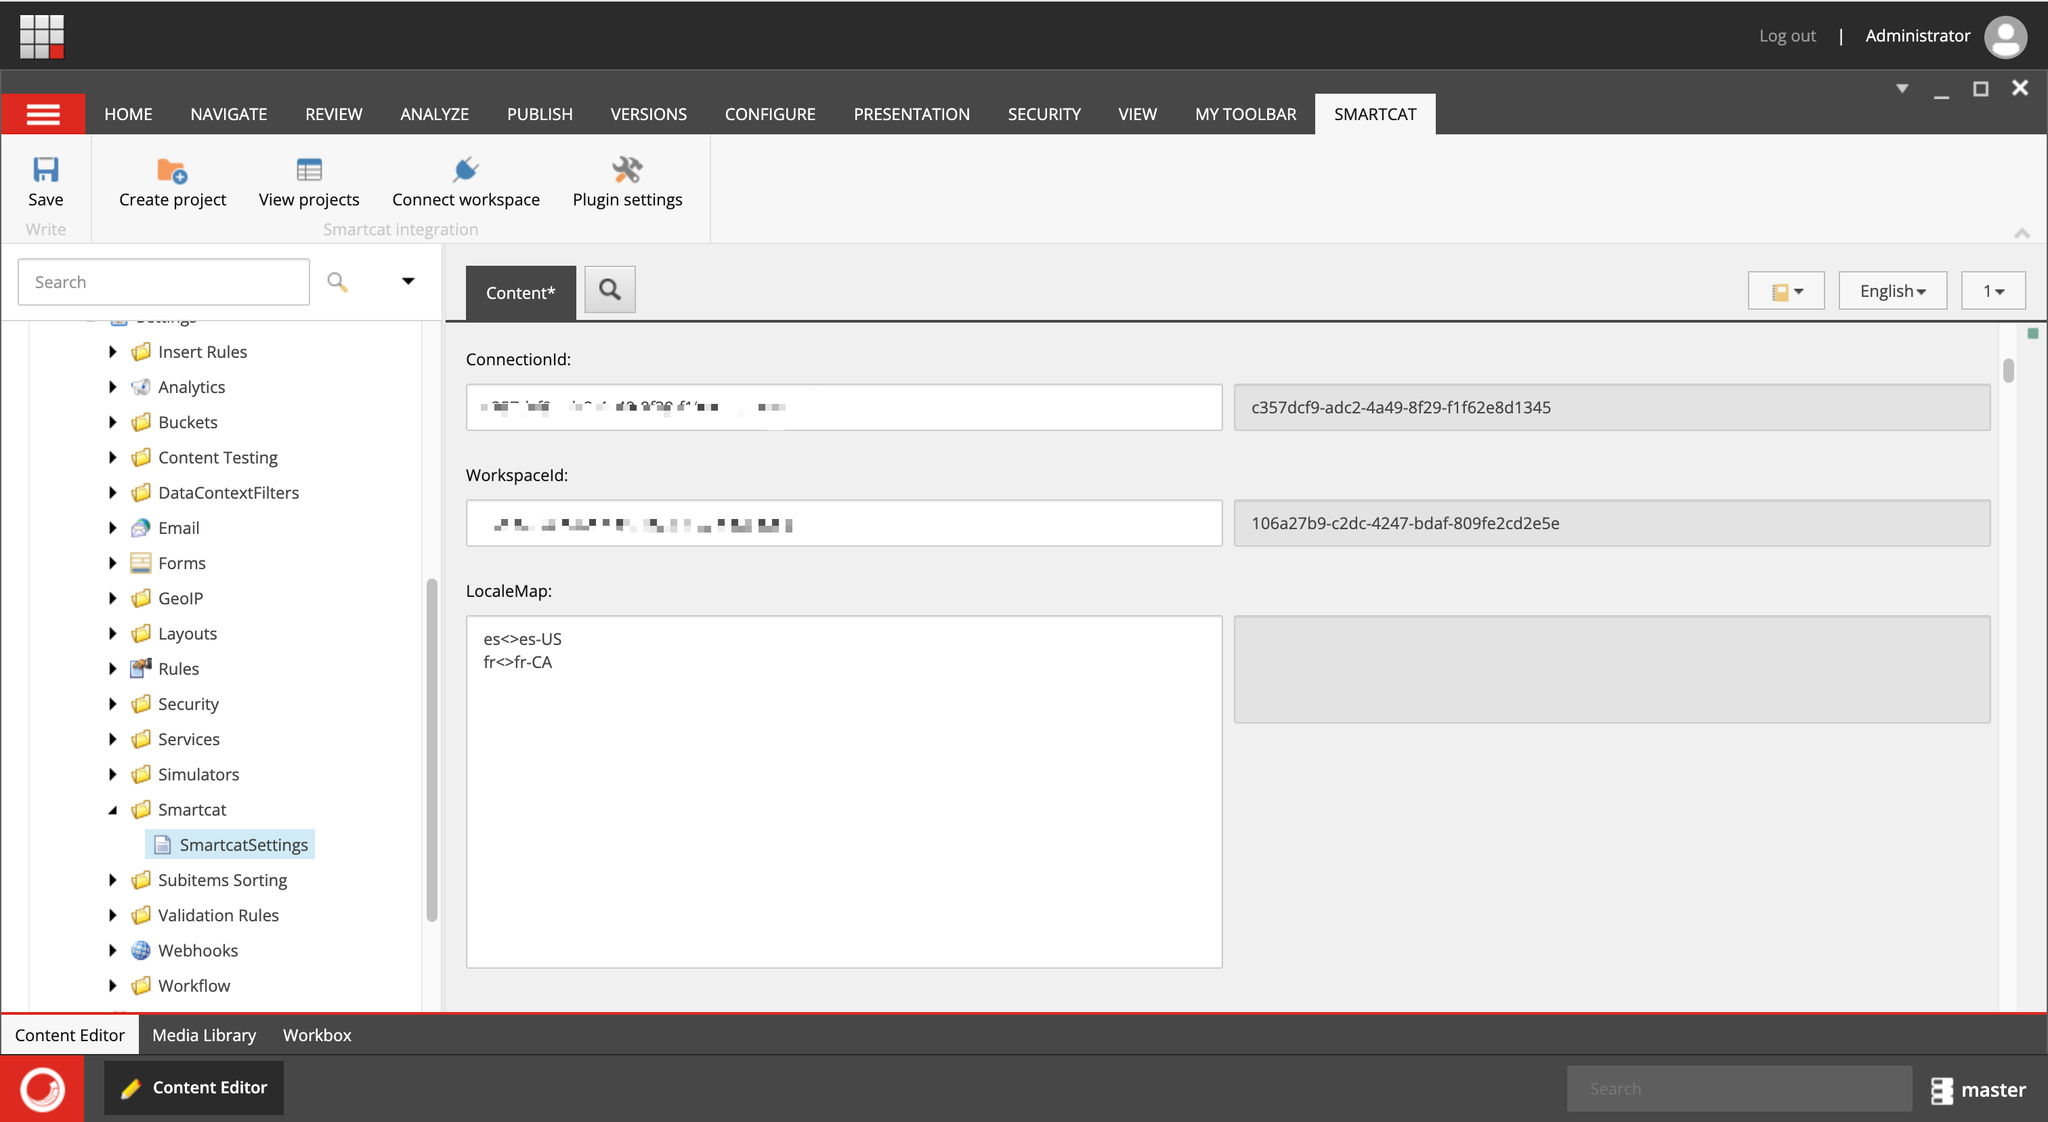
To do this, open System → Settings → Smartcat → SmartcatSettings and edit the LocaleMap field. The format is: %locale in Sitecore% <> %locale in Smartcat%. Each entry should be on a new line.
Copying values from source to language copies
In some cases, field values should be the same across all languages.
In this case, you can either use the shared setting for this field in the item template, or configure the Smartcat plugin to copy the field value from the source to the language version when creating one using the plugin.
To do this, open the Smartcat tab and click Plugin Settings. Find the template in the list (or use search) and set the field to Copy from source. The setting will be applied to all items created using this template.
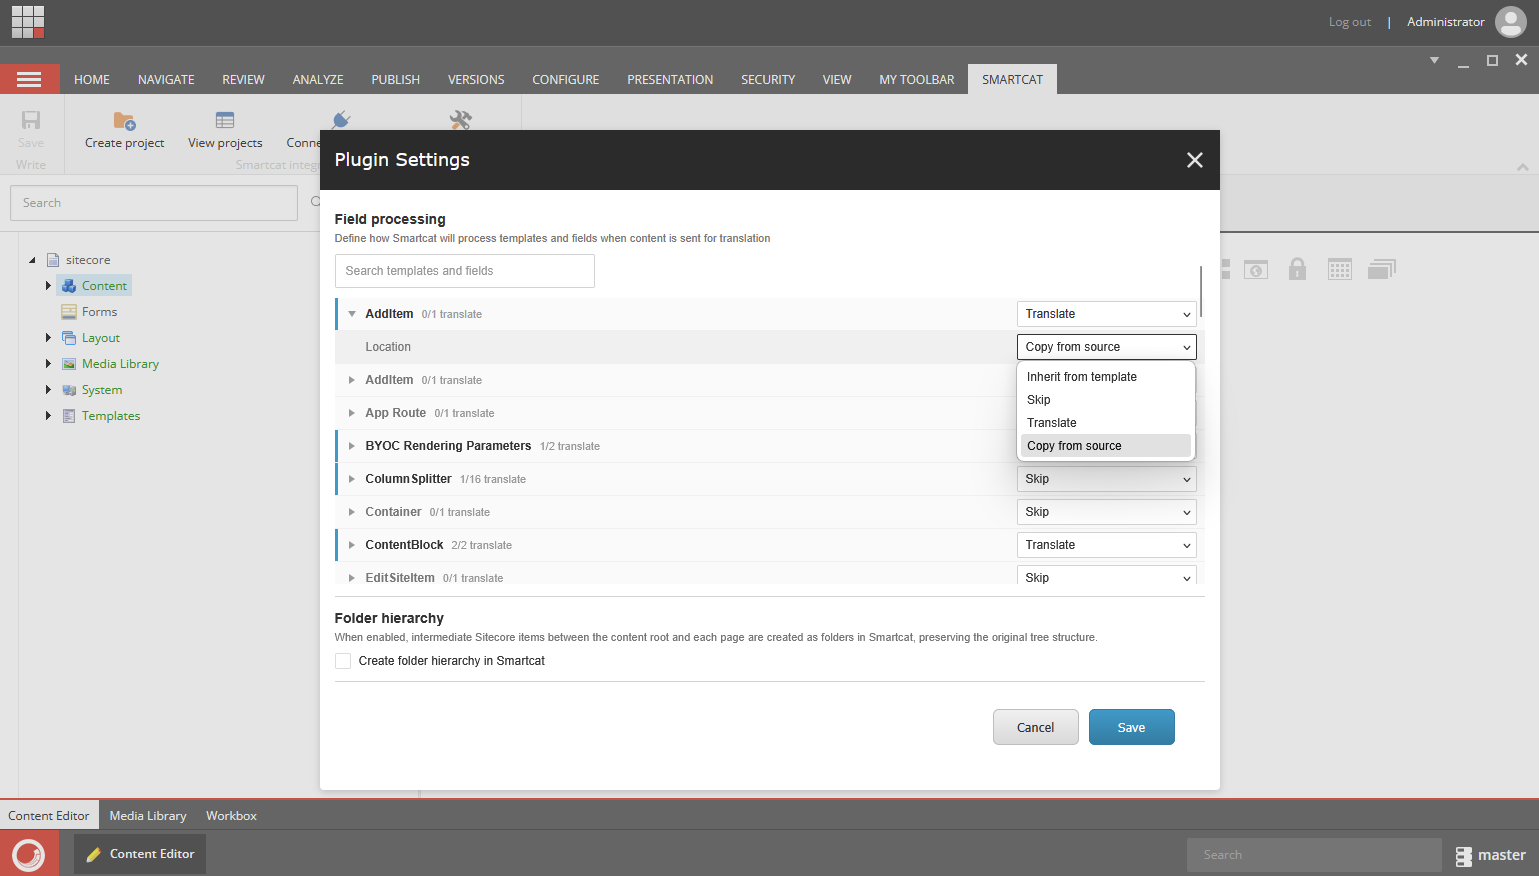
Copying is applied when translations are pulled: when the language version is created or updated, the plugin writes the source value into the copied fields. Fields set to Copy from source are never sent for translation.
Emulating Sitecore item path in Smartcat
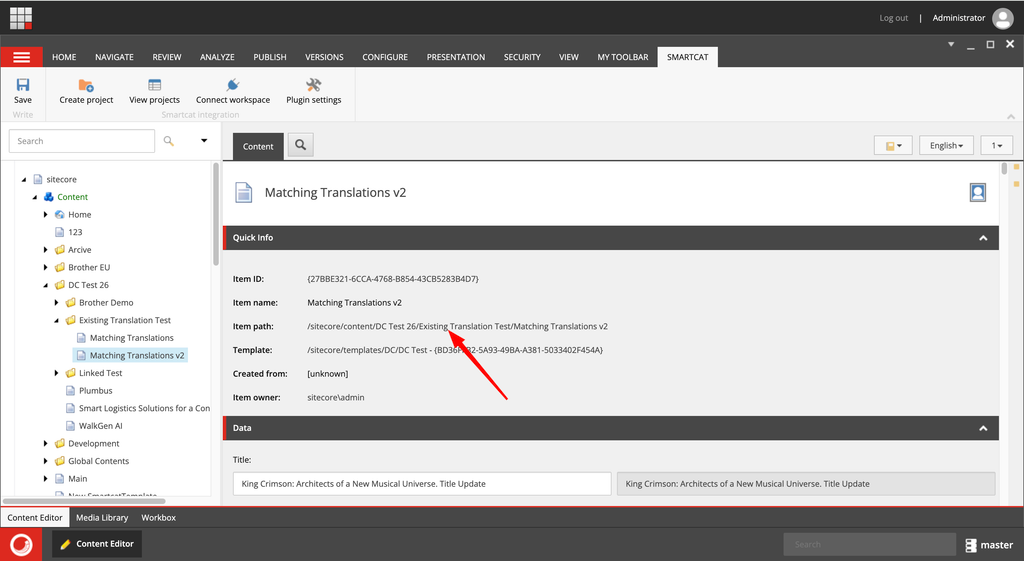
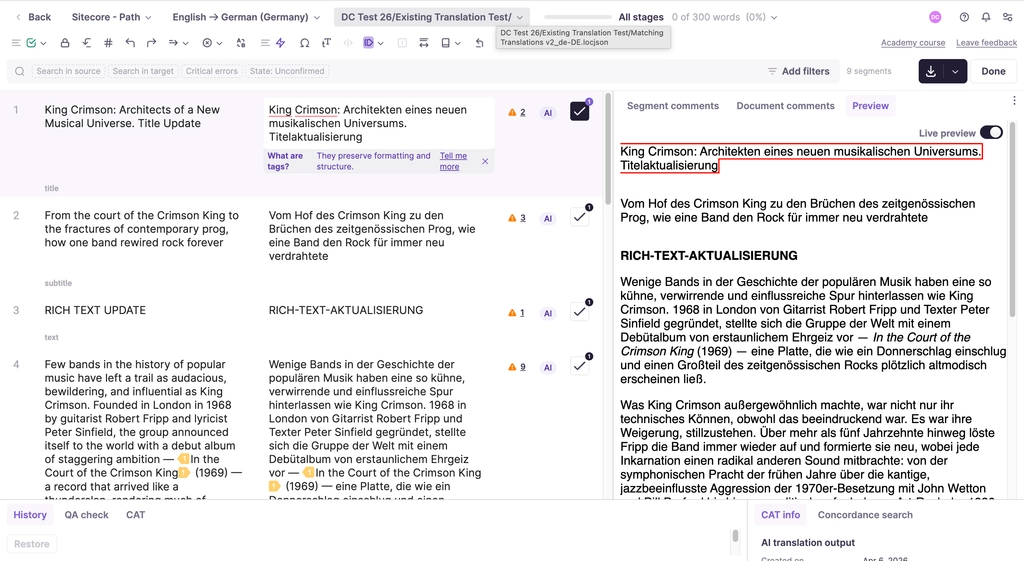
When a translation project is created in Smartcat, each translatable item is represented as a file. Optionally, you can configure Smartcat to mirror the item path from Sitecore inside Smartcat.
To enable this, open Plugin Settings and select Create folder hierarchy in Smartcat.
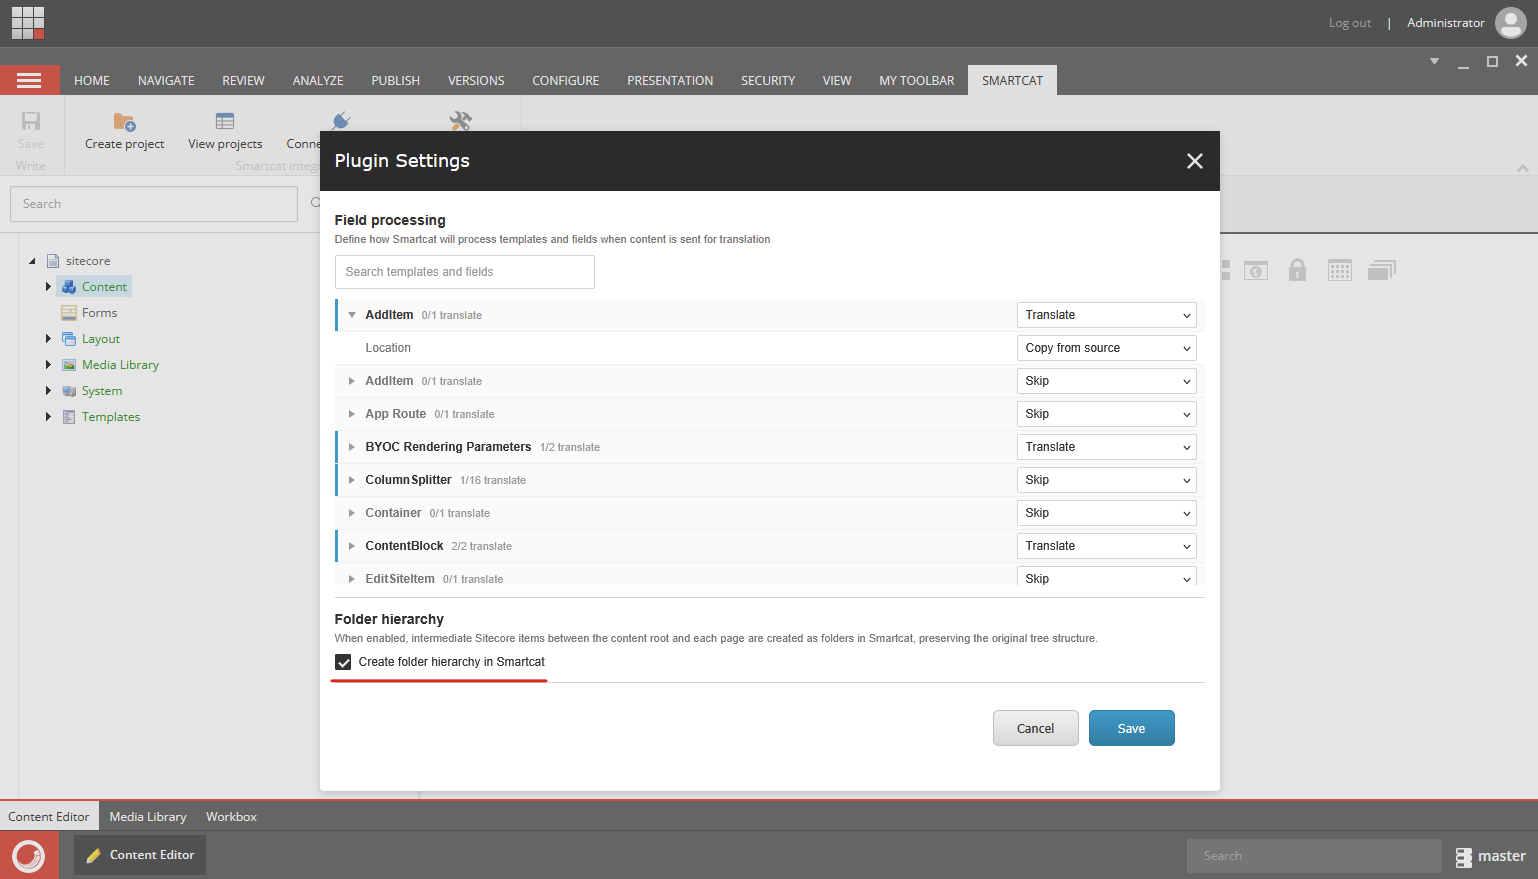
This can be useful when you want to see the exact item path while working in the Smartcat Editor.
Understanding field settings: Skip, Translate, and Copy from source
Every template and field in Plugin Settings has exactly one behavior when content is sent for translation:
-
Translate - the field is sent to Smartcat and comes back translated.
-
Copy from source - the field is not translated. Its source value is copied into the language version when translations are pulled to Sitecore.
-
Skip - the field is ignored entirely: not translated and not copied.
Fields are set to Inherit from template by default, so in most cases you only need to configure the template behavior. A template that was never configured is treated as Skip: its content is not sent anywhere.
How the settings are applied:
-
Plugin Settings are plugin-wide and apply to all projects. The Content selection step of project creation lets you deviate from them for one project; such changes affect only that project.
-
What is sent for translation is decided when the project is created (or when its documents are updated). If you change a field from Skip to Translate, send the page for translation again to include it.
-
Copying from source is applied every time translations are pulled, using the current Plugin Settings. If you add a Copy from source rule later, simply pull the project again: the values will be copied.
Smartcat Plugin v0.8.0
Installing a newer package over an older one is an upgrade: your settings and existing projects are kept.
- At Launchpad go to Control Panel→Desktop
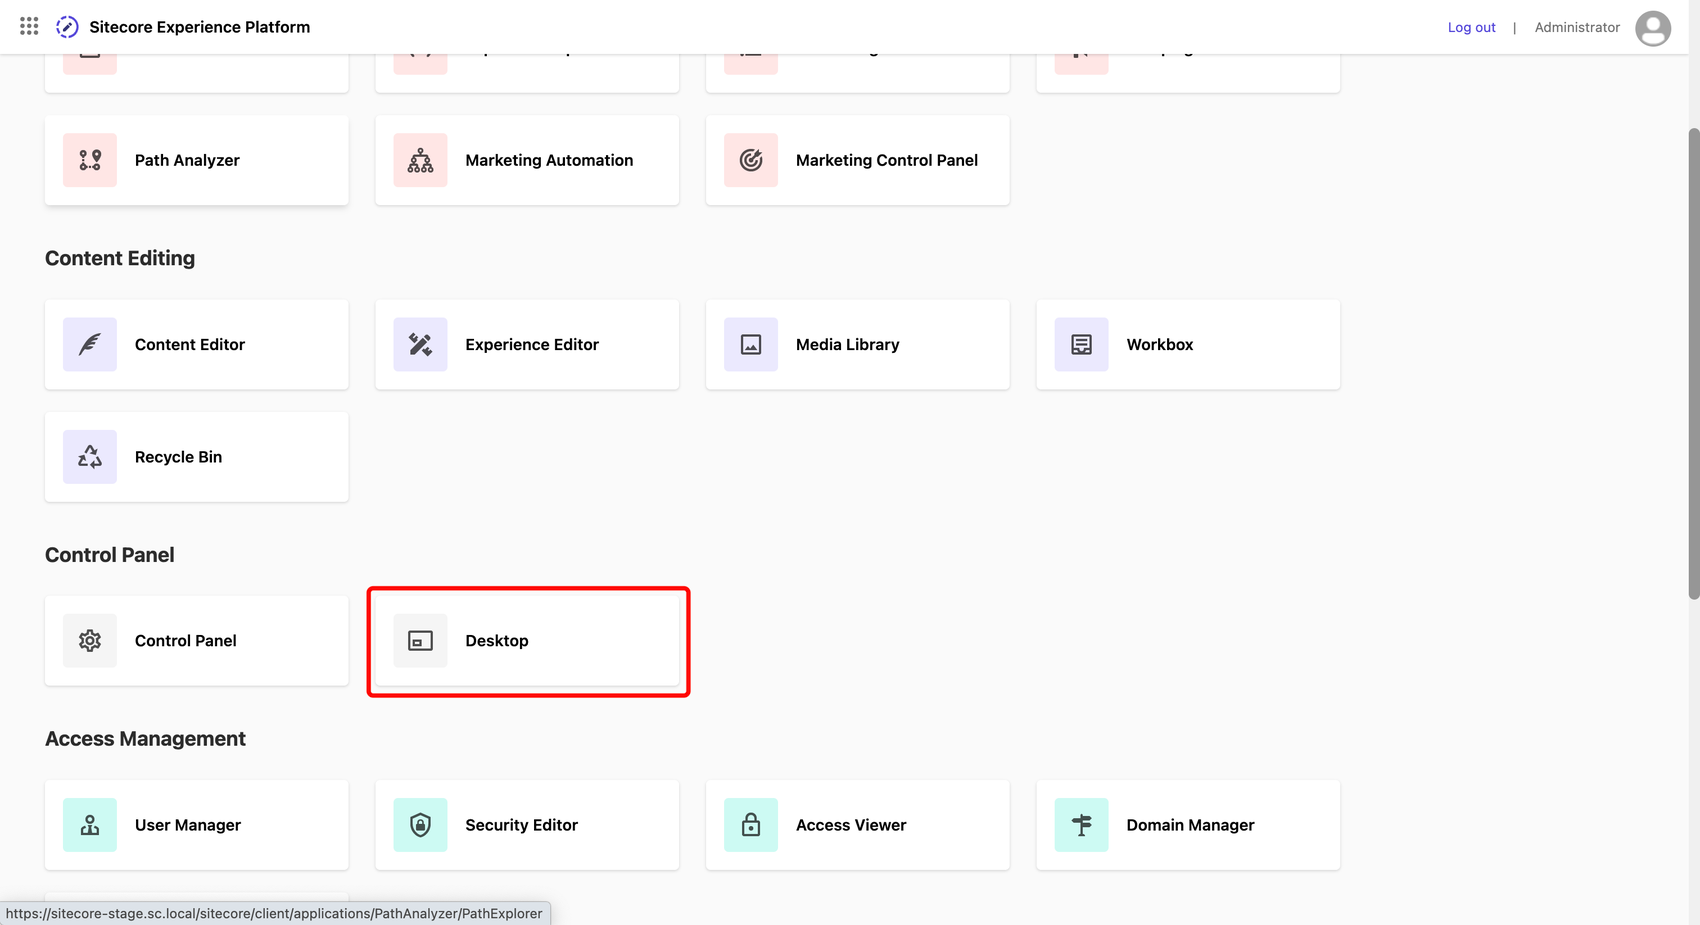
- Open Development Tools→Installation Wizard
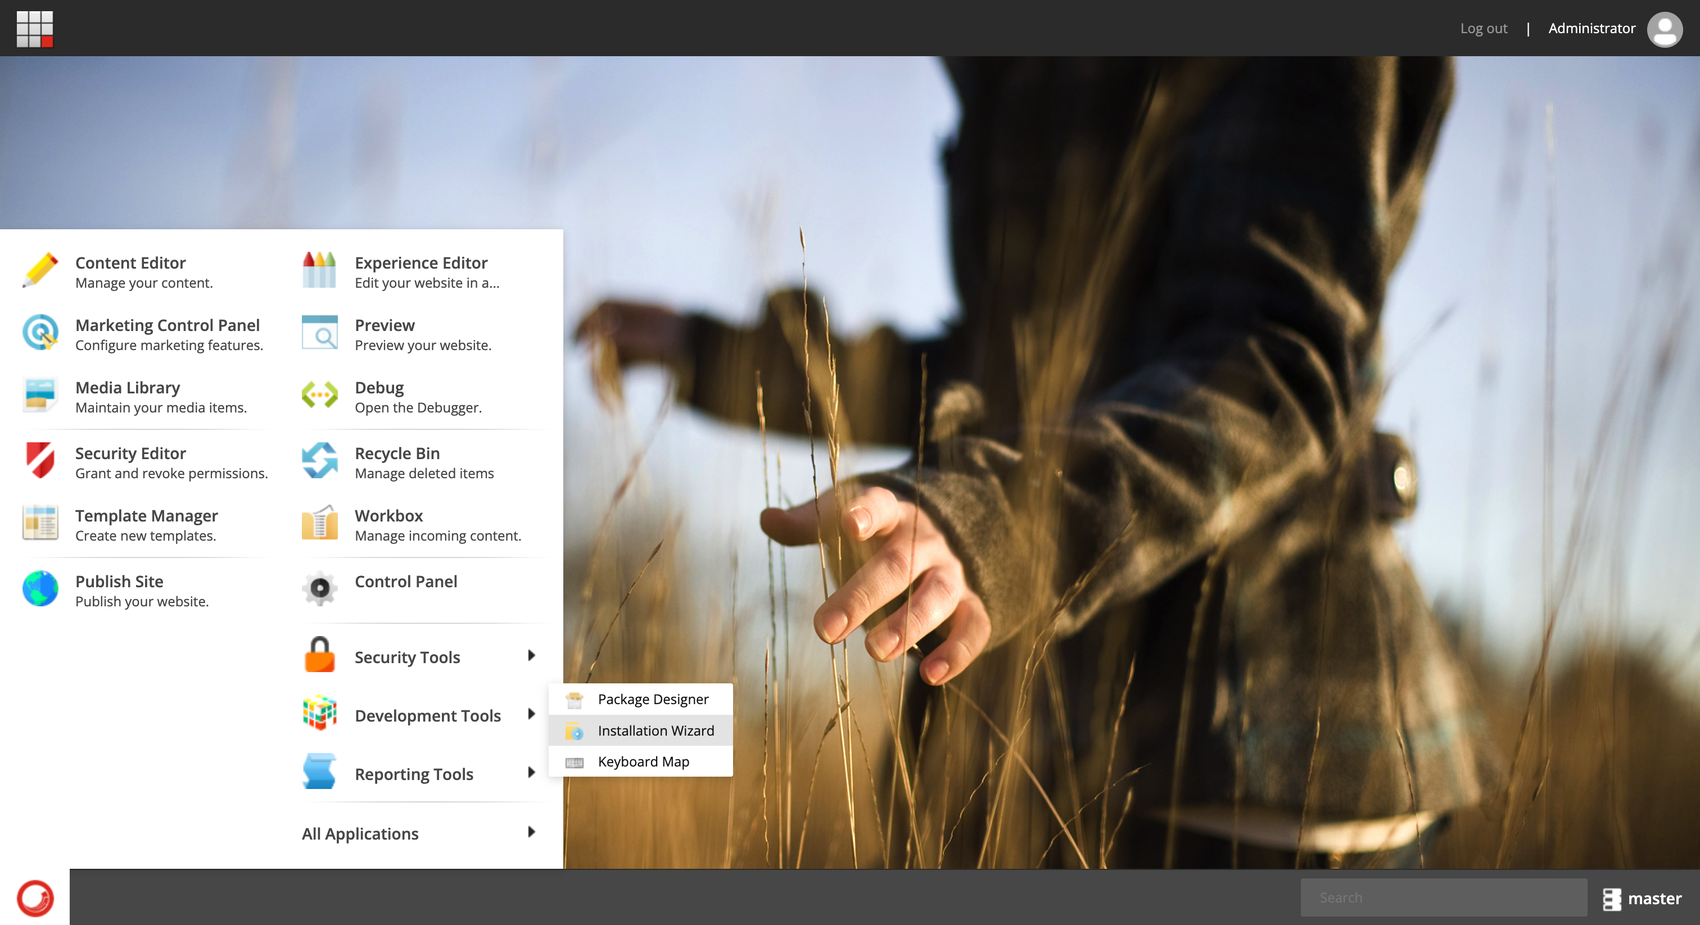
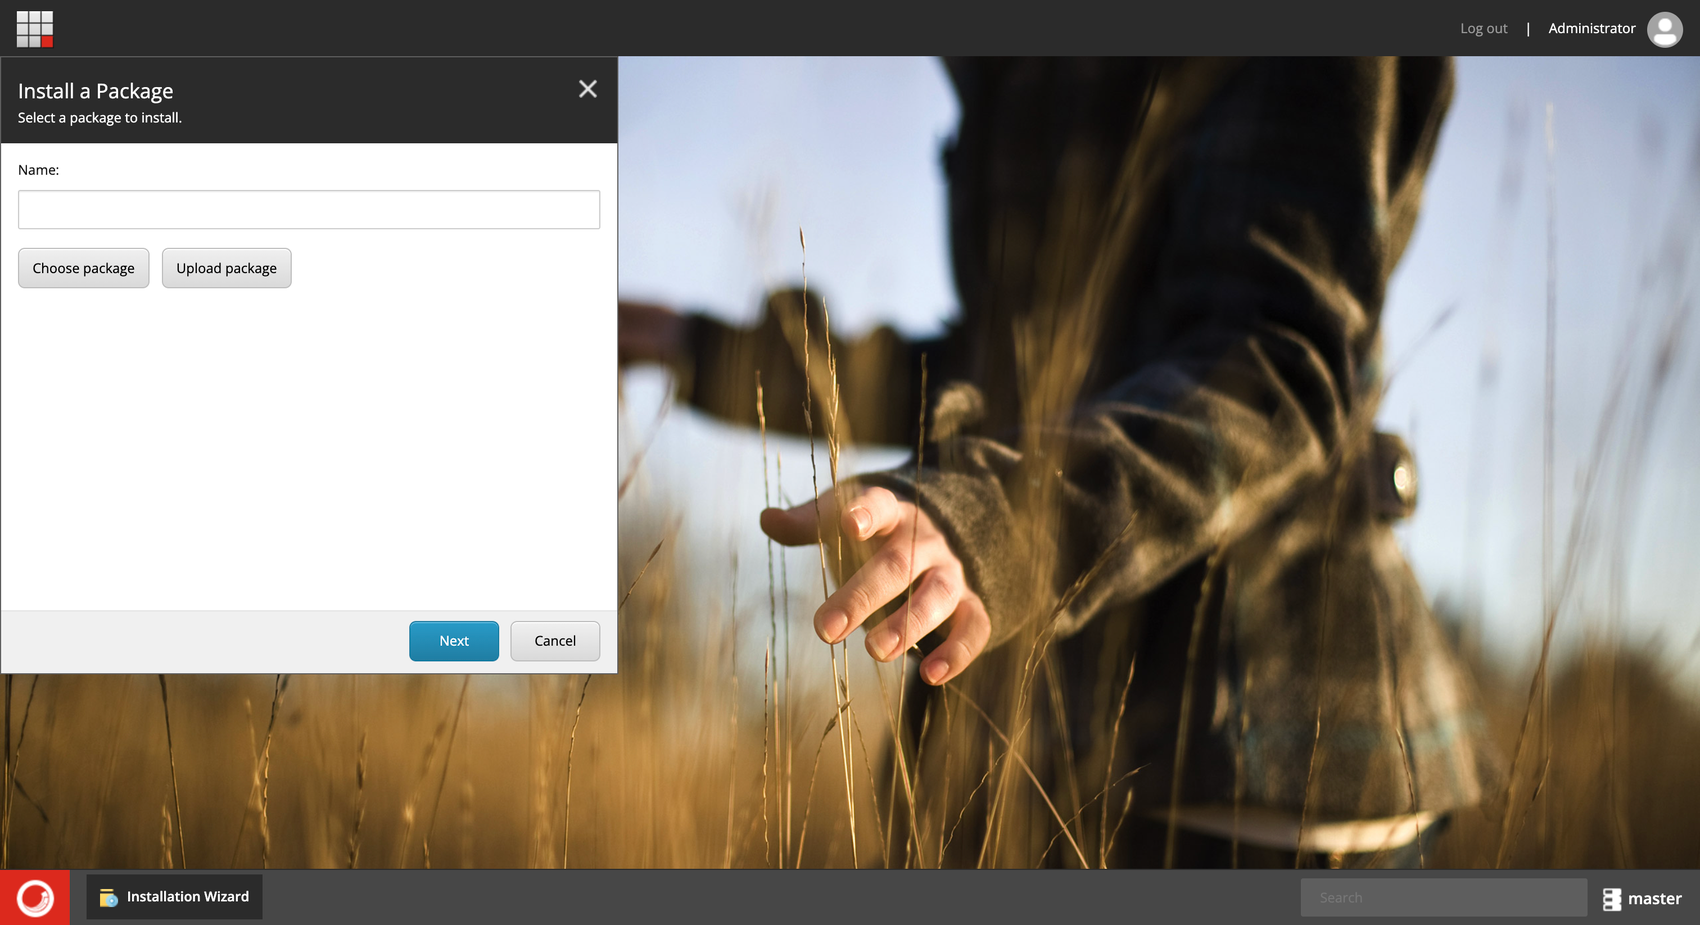
- Upload package
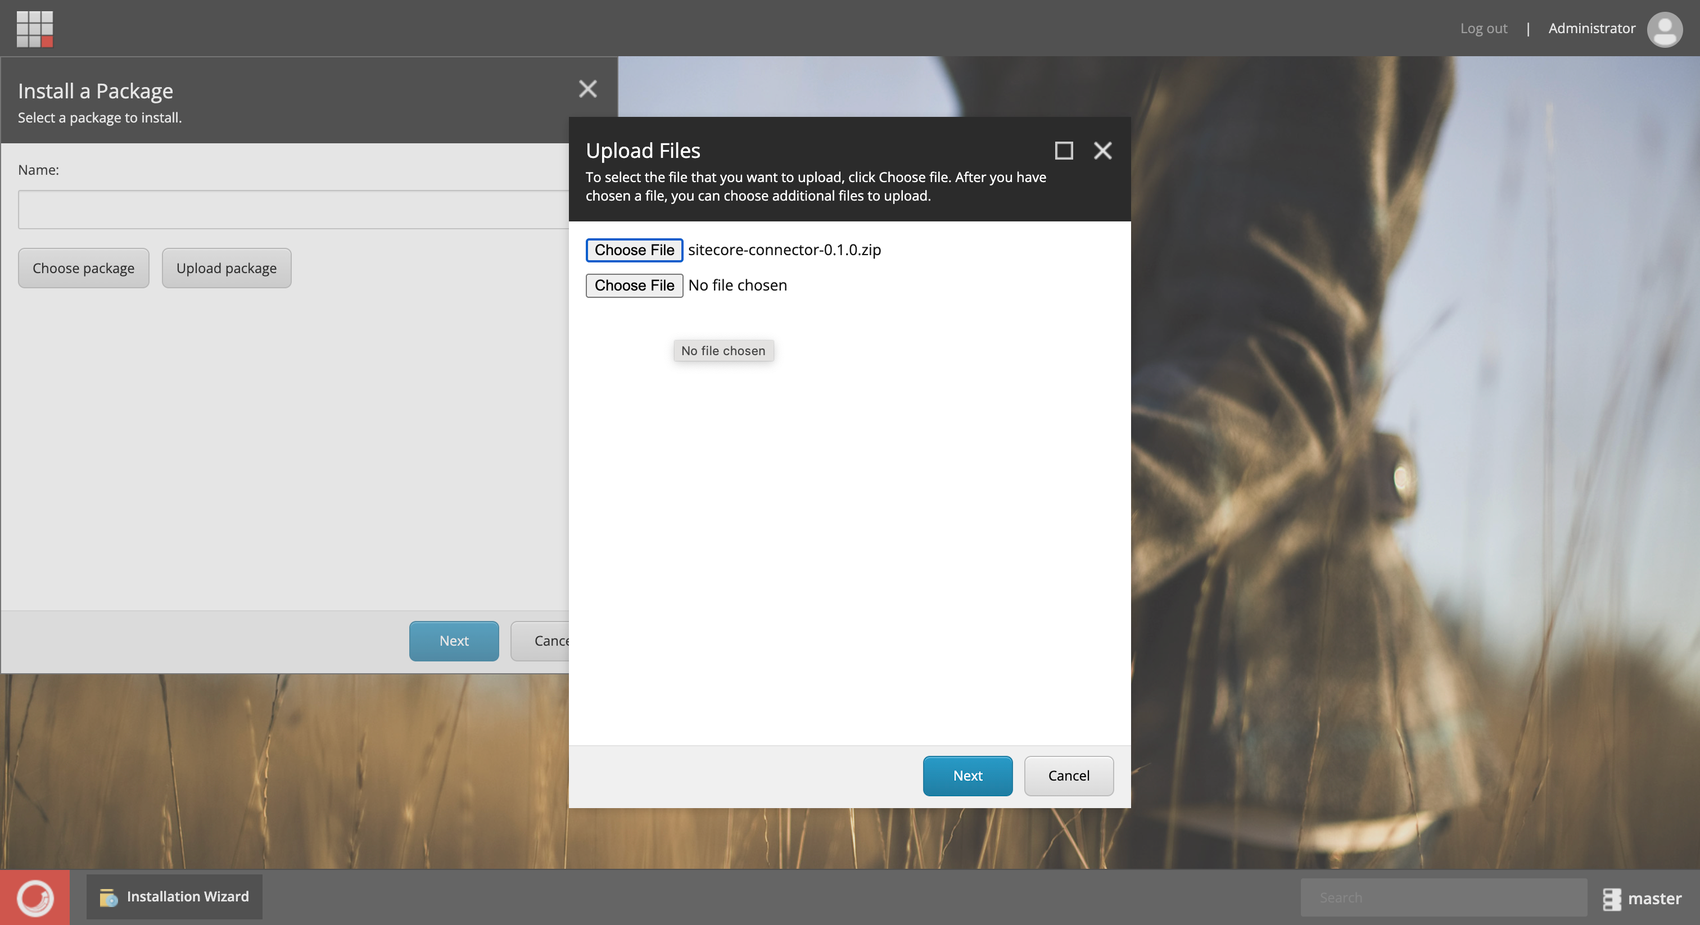
- Add zip-archive with Smartcat plugin
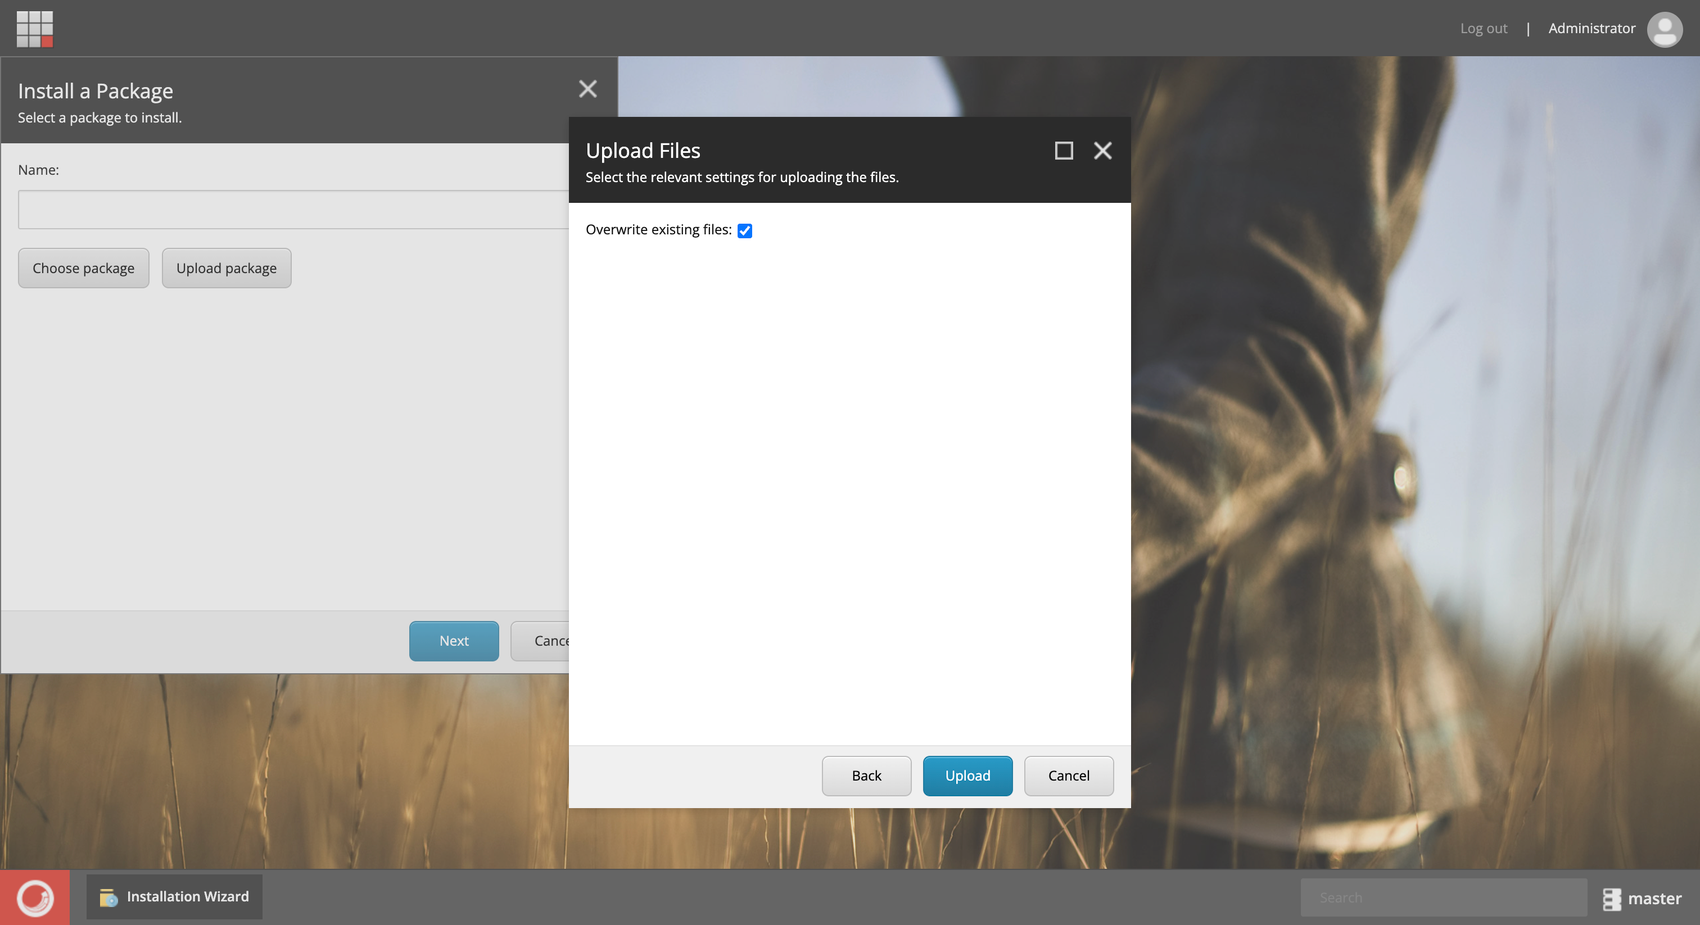
- Select override existing files and upload plugin
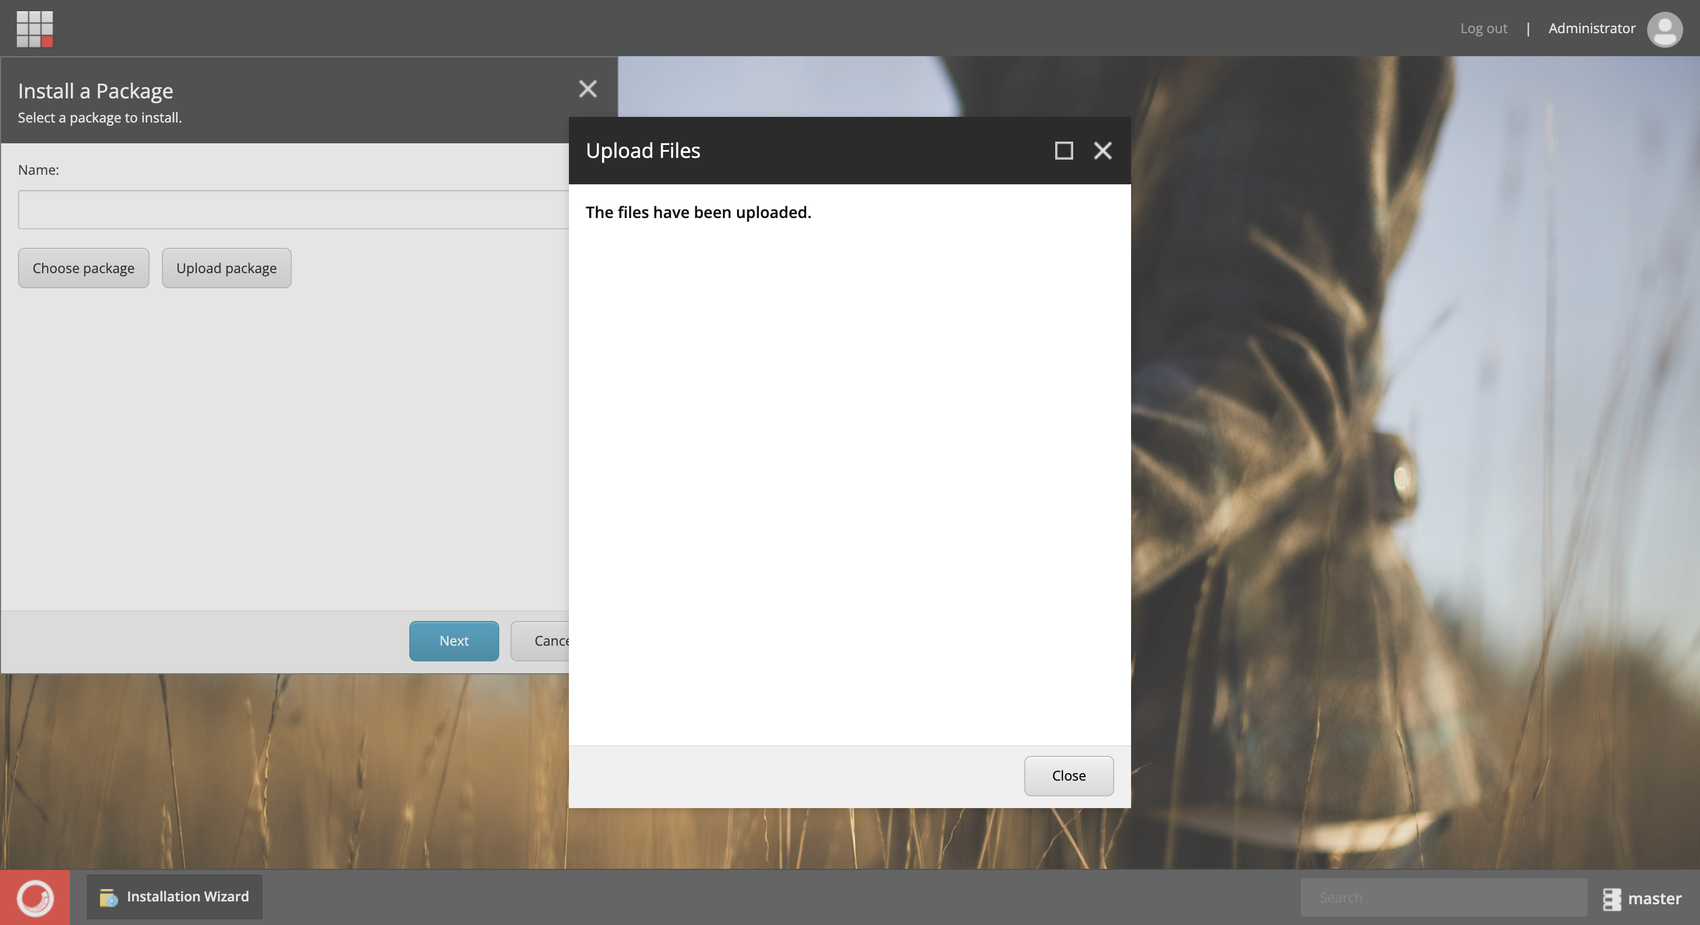
- Choose uploaded package and click Next
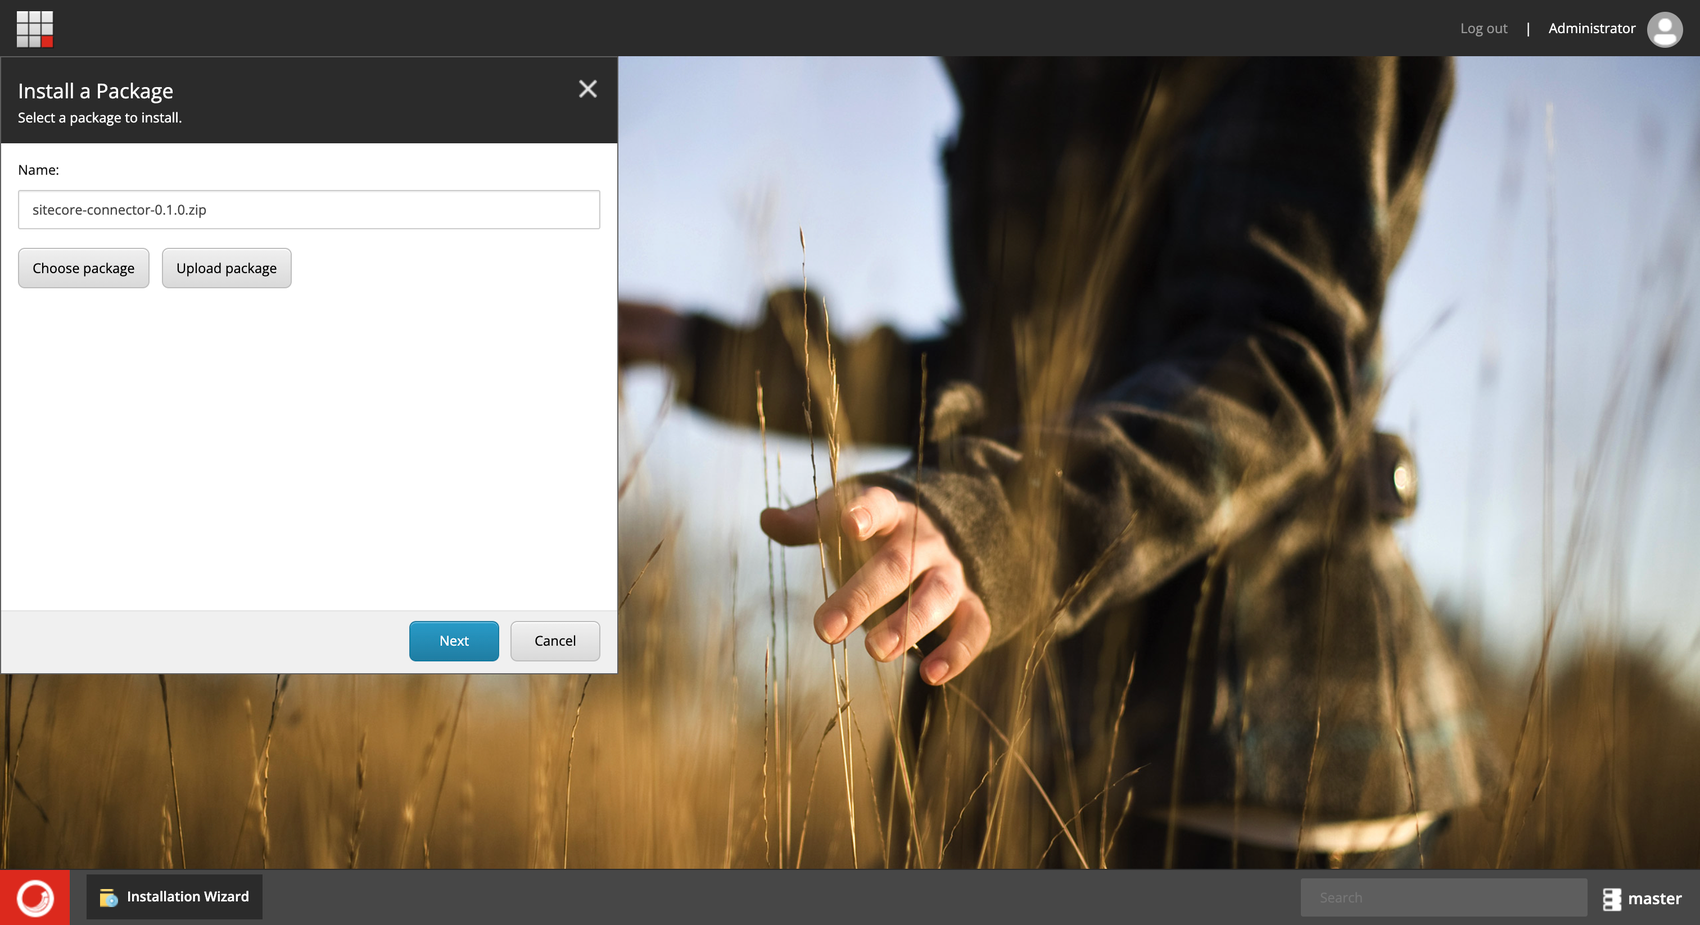
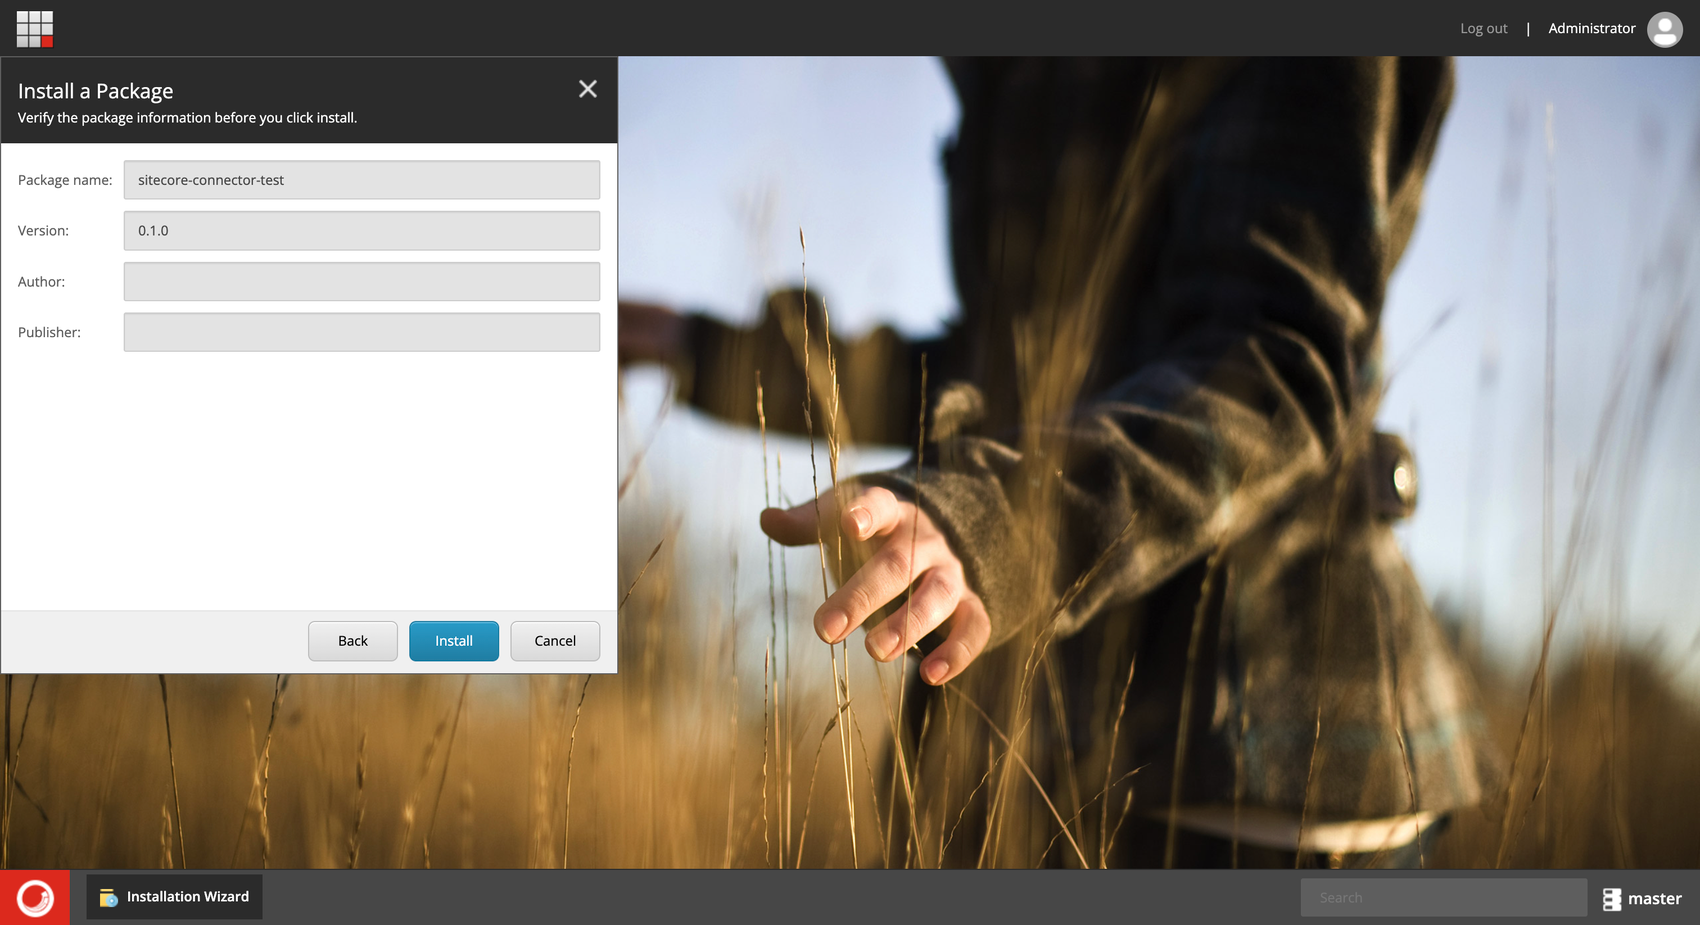
- Install plugin
- Restart the Sitecore client
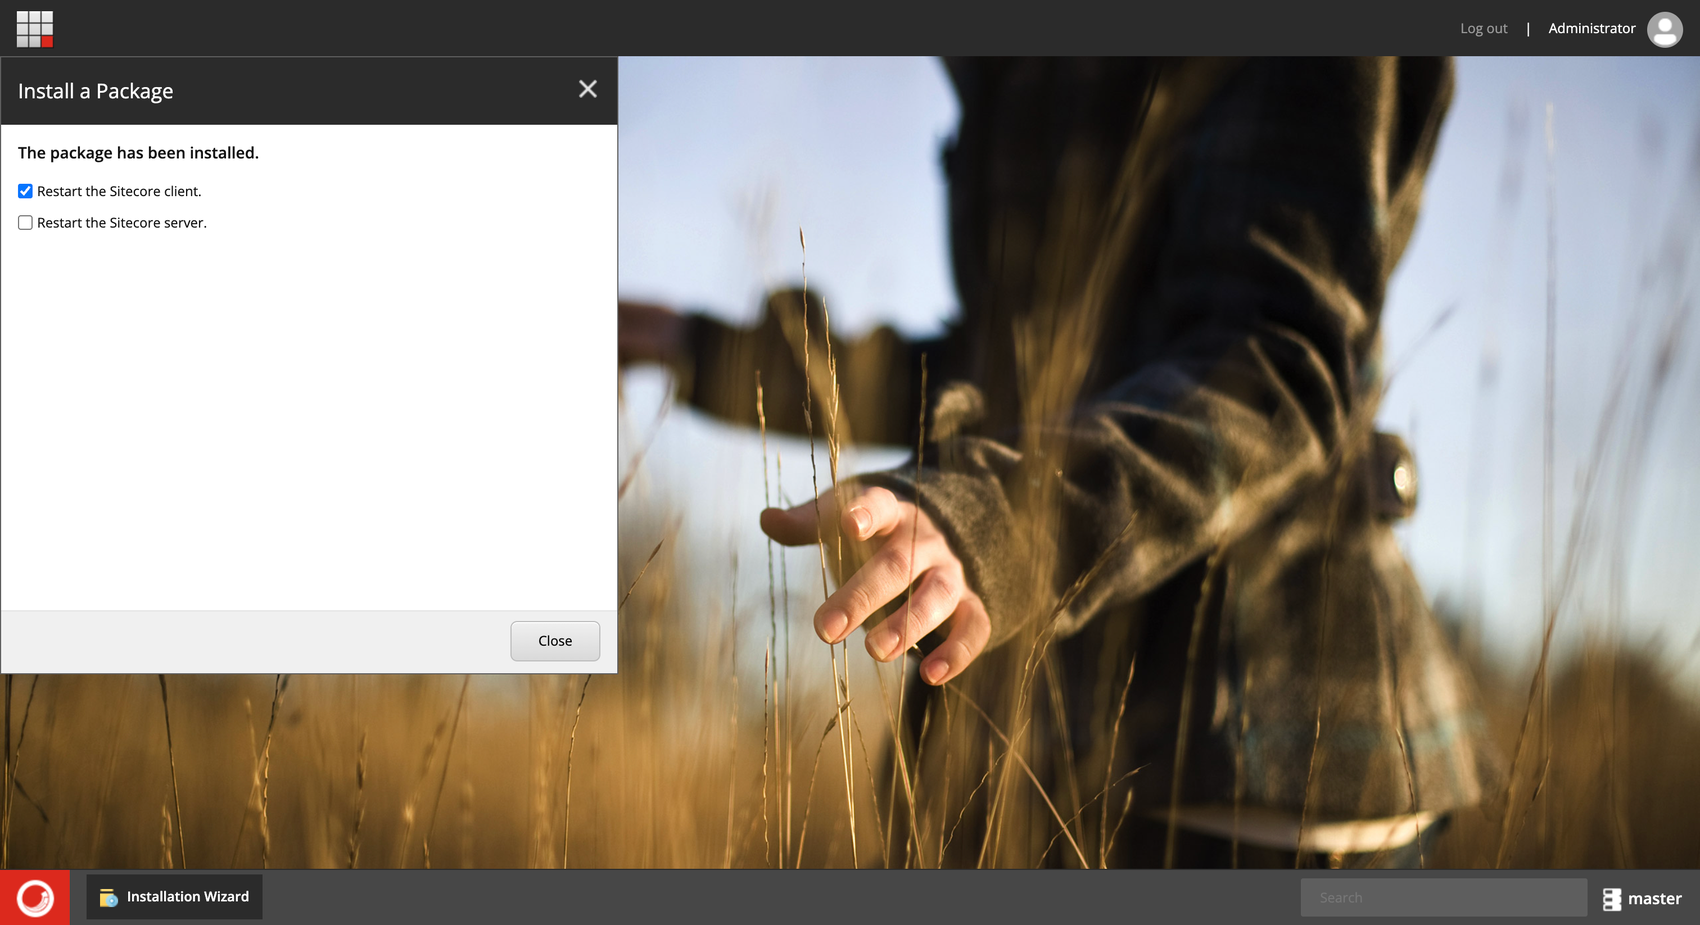
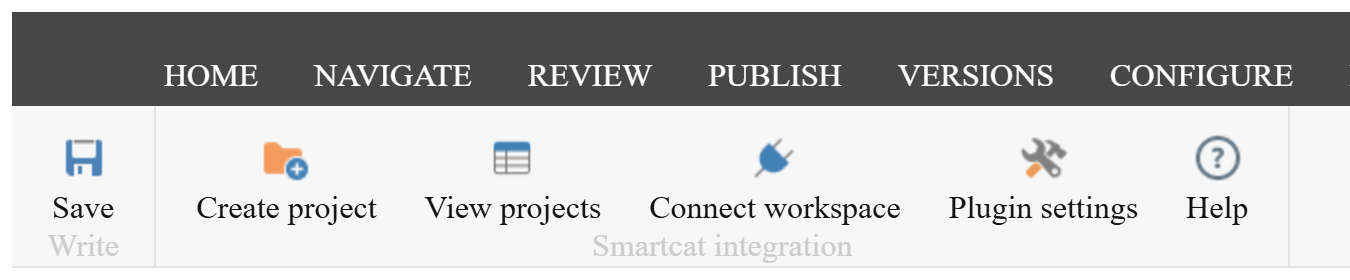
- Installation's completed. A SMARTCAT tab appears in the Content Editor ribbon.
Setting up connection with Smartcat
-
Generate a Smartcat API key
To generate a Smartcat API key, navigate to Settings → API in your Smartcat account. Click on Create New Key to generate a new API key. Make sure to copy the API key and your account ID for future use.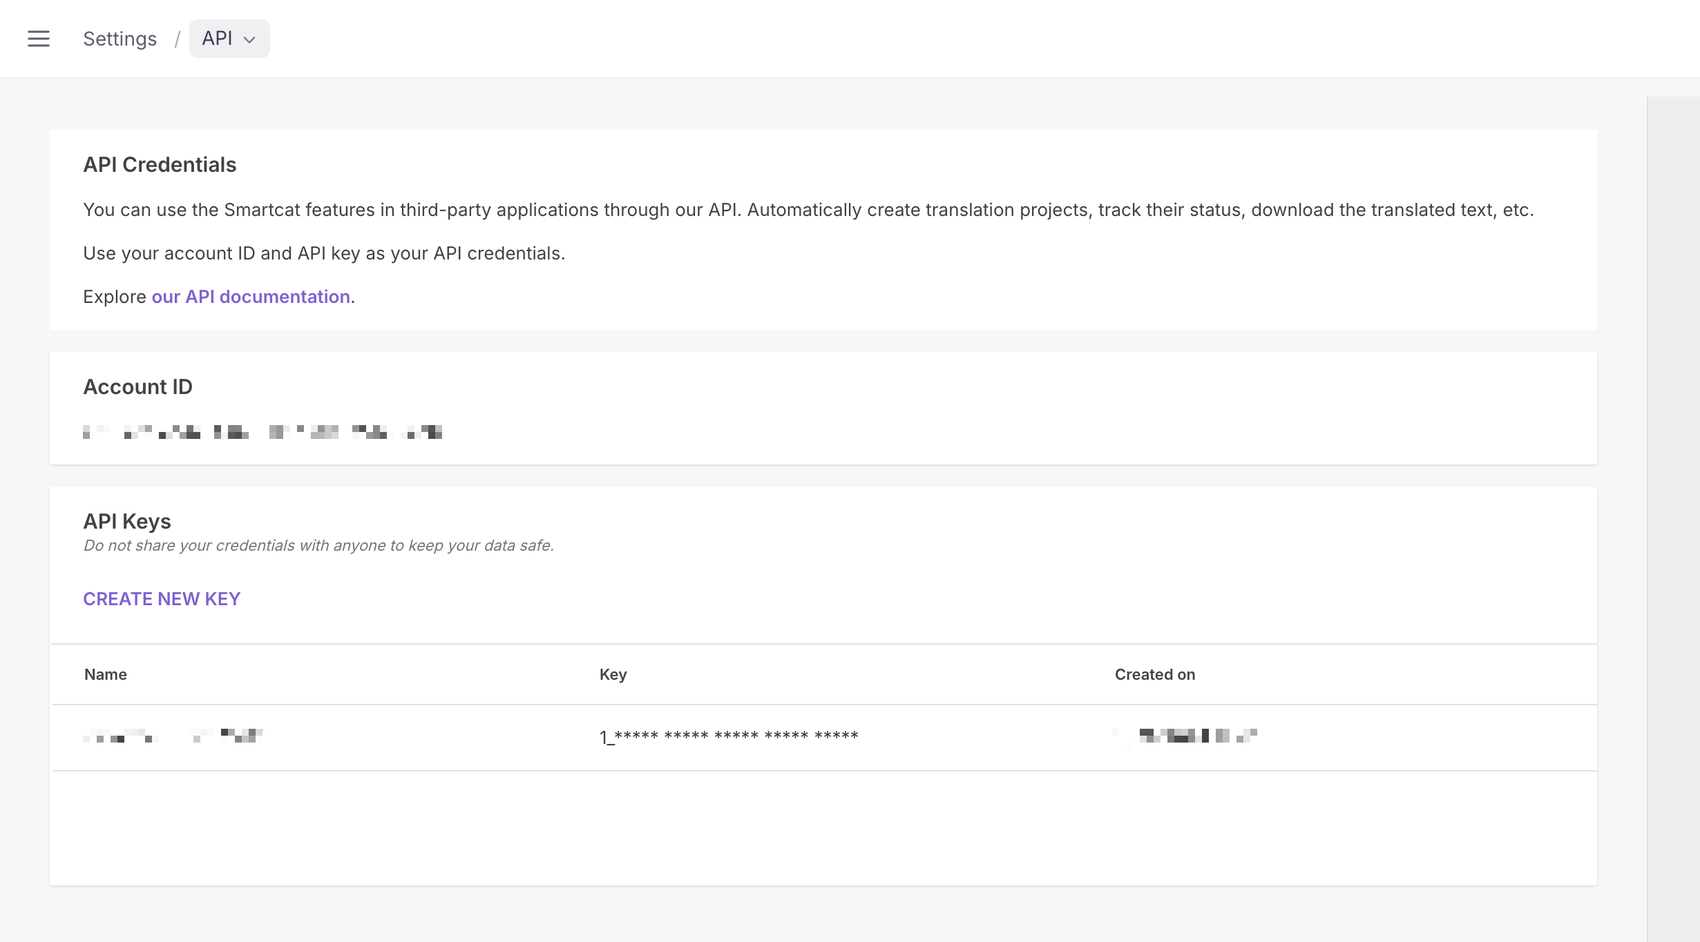
-
Set up the connection in the plugin
Open the SMARTCAT tab in the Sitecore Content Editor, click Connect workspace, paste the Account ID and API Key, and confirm the changes.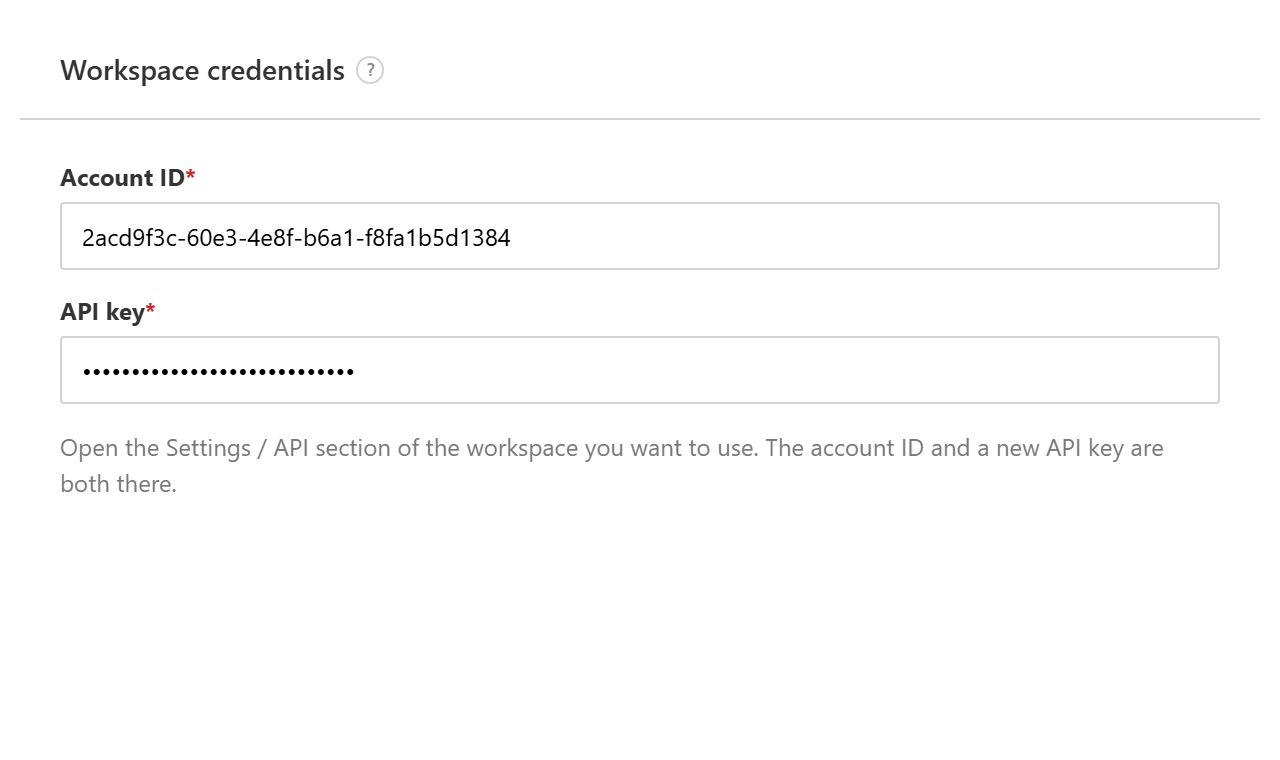
-
The plugin is now connected and ready for translation.
Setting up the translation scope (Plugin settings)
Before creating your first translation project, tell the plugin which content should be translated. On the SMARTCAT tab, click Plugin settings.
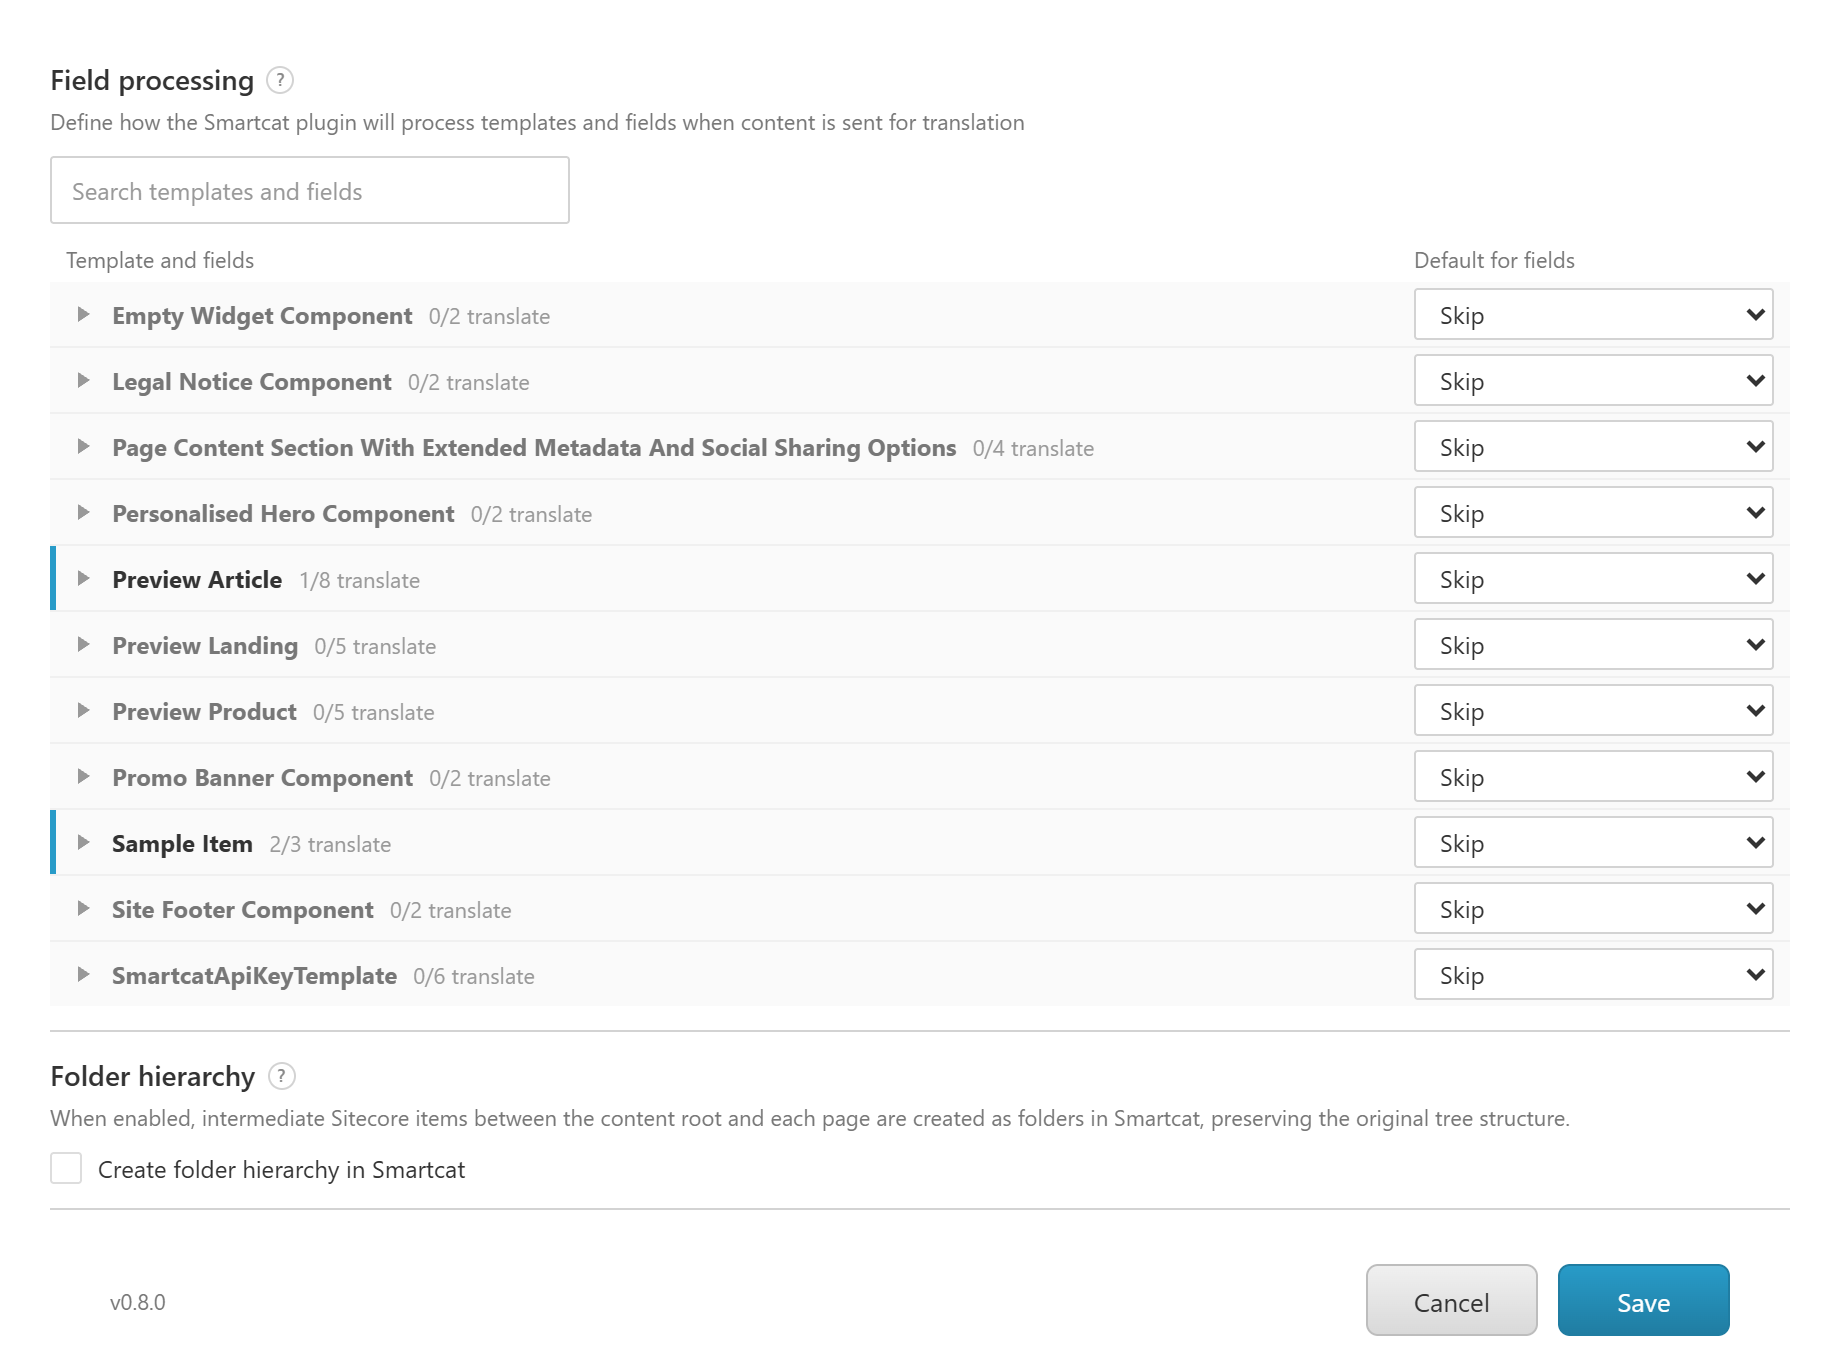
The settings list all your content templates and their fields. Every template and every field has one setting:
-
Translate - the field is sent to Smartcat for translation.
-
Copy from source - the field is not translated; its source value is copied into the language version.
-
Skip - the field is ignored: not translated and not copied.
A template's setting applies to all of its fields. A field set to Inherit from template (the default) follows its template; select a different value to override it for that field.
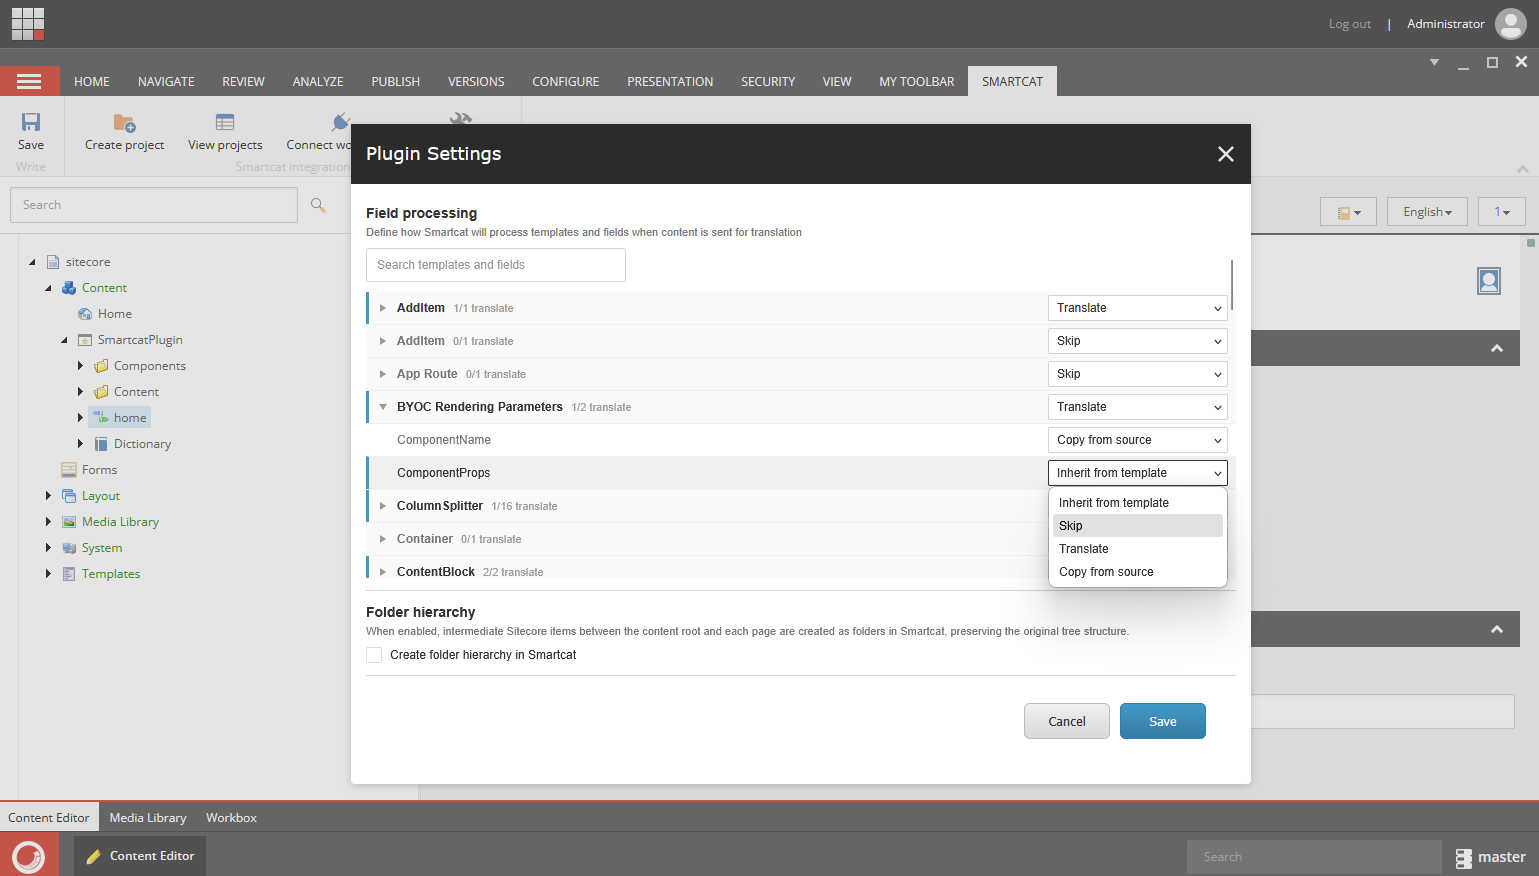
On a fresh installation nothing is selected for translation yet: set the templates you want to translate to Translate and click Save. (If you upgraded from a 0.6.x version, your previous configuration was converted automatically - just review it.)
Tips:
-
Use the search box to quickly find a template or field.
-
Rows indicated with a teal line on the left are sent for translation; greyed-out rows are not.
-
These settings are global. You can also change them from the Select content step while creating a project, and save them back here from there - see Translating pages.
Default project template
At the bottom of Plugin settings you can choose what the project wizard preselects for everyone who creates a translation project.
Default project template
-
Use the built-in default (AI Translation + Translation review) - the option the plugin has always used. This stays in effect until somebody changes it.
-
Any of your workflows or project templates - the wizard preselects that one instead.
The list shows the workflows the plugin offers, plus every project template in your connected Smartcat workspace.

Anyone who can open Plugin settings can change this; it is not restricted to a separate administrator role.
What your users see
On step 4 of the wizard, Project details, the list opens on whatever you chose here. It is labelled Templates and Workflow when your workspace has project templates, and Workflow Stages when it has none. Users can still pick something else for an individual project - this setting decides the starting point, not a restriction.
If you never open this setting, nothing changes: the wizard behaves exactly as it did before.
If the template you chose is removed
If the project template you selected is later deleted from your Smartcat workspace, the wizard does not guess. It preselects nothing and shows:
The default template is no longer available. Choose a template or workflow to continue.

The user picks a template or workflow and carries on. To clear the warning for everyone, open Plugin settings and choose a new default - the old selection is still listed there, marked as unavailable, so you can see what it was before you replace it.
Field help (0.8.0)
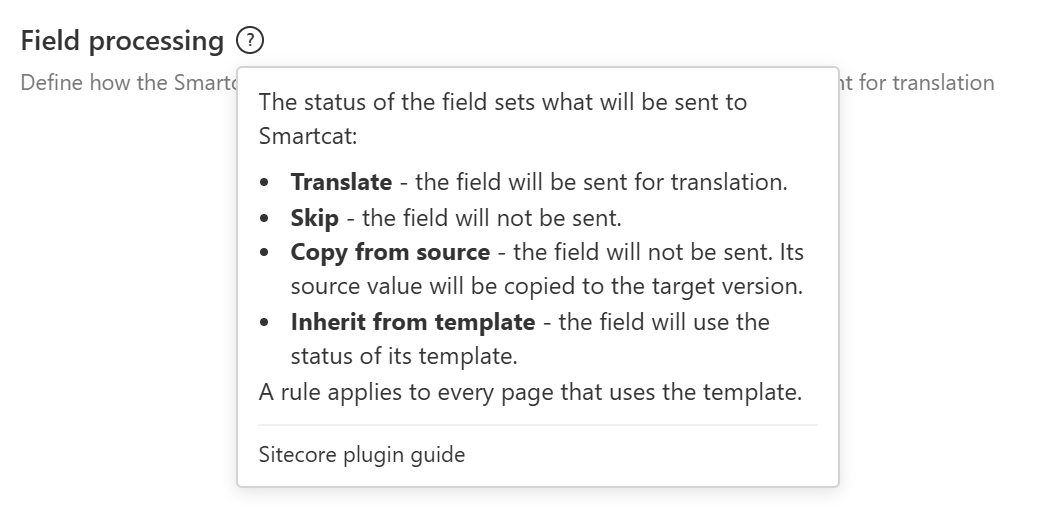
Each section heading carries a ?. Selecting it explains the section in place, so the meaning of a status is available at the moment you are choosing one. The plugin version is shown in the footer of the screen.
Translating pages
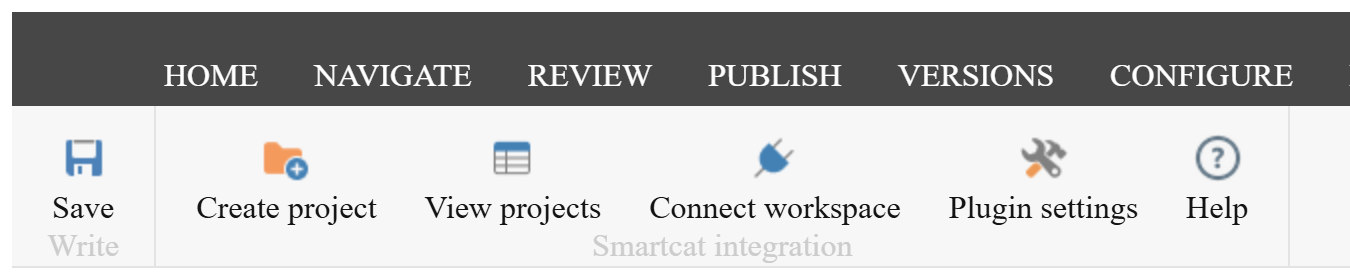
- Click on Create project on the SMARTCAT tab
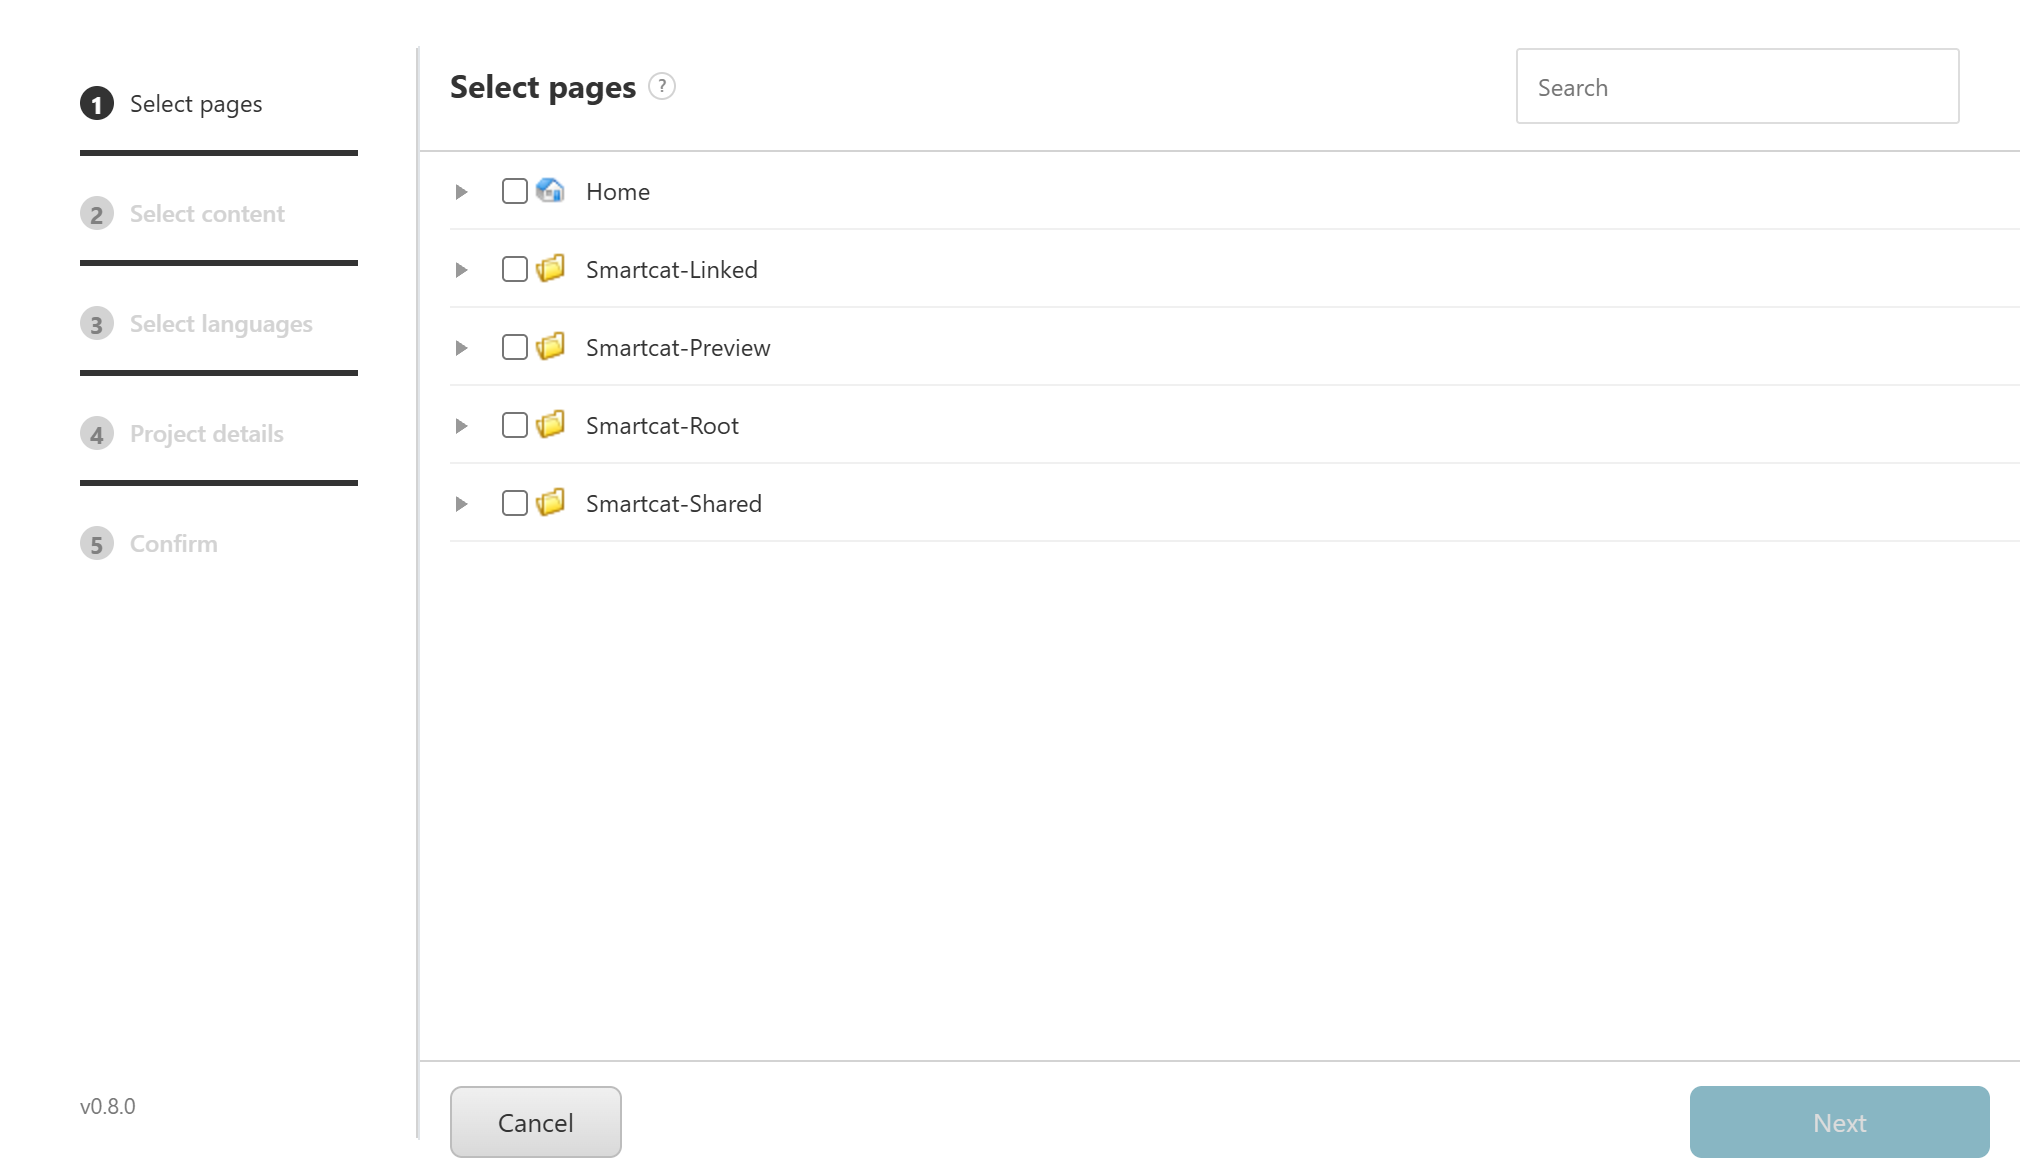
- Select one or several items for translation
-
Review the translation scope
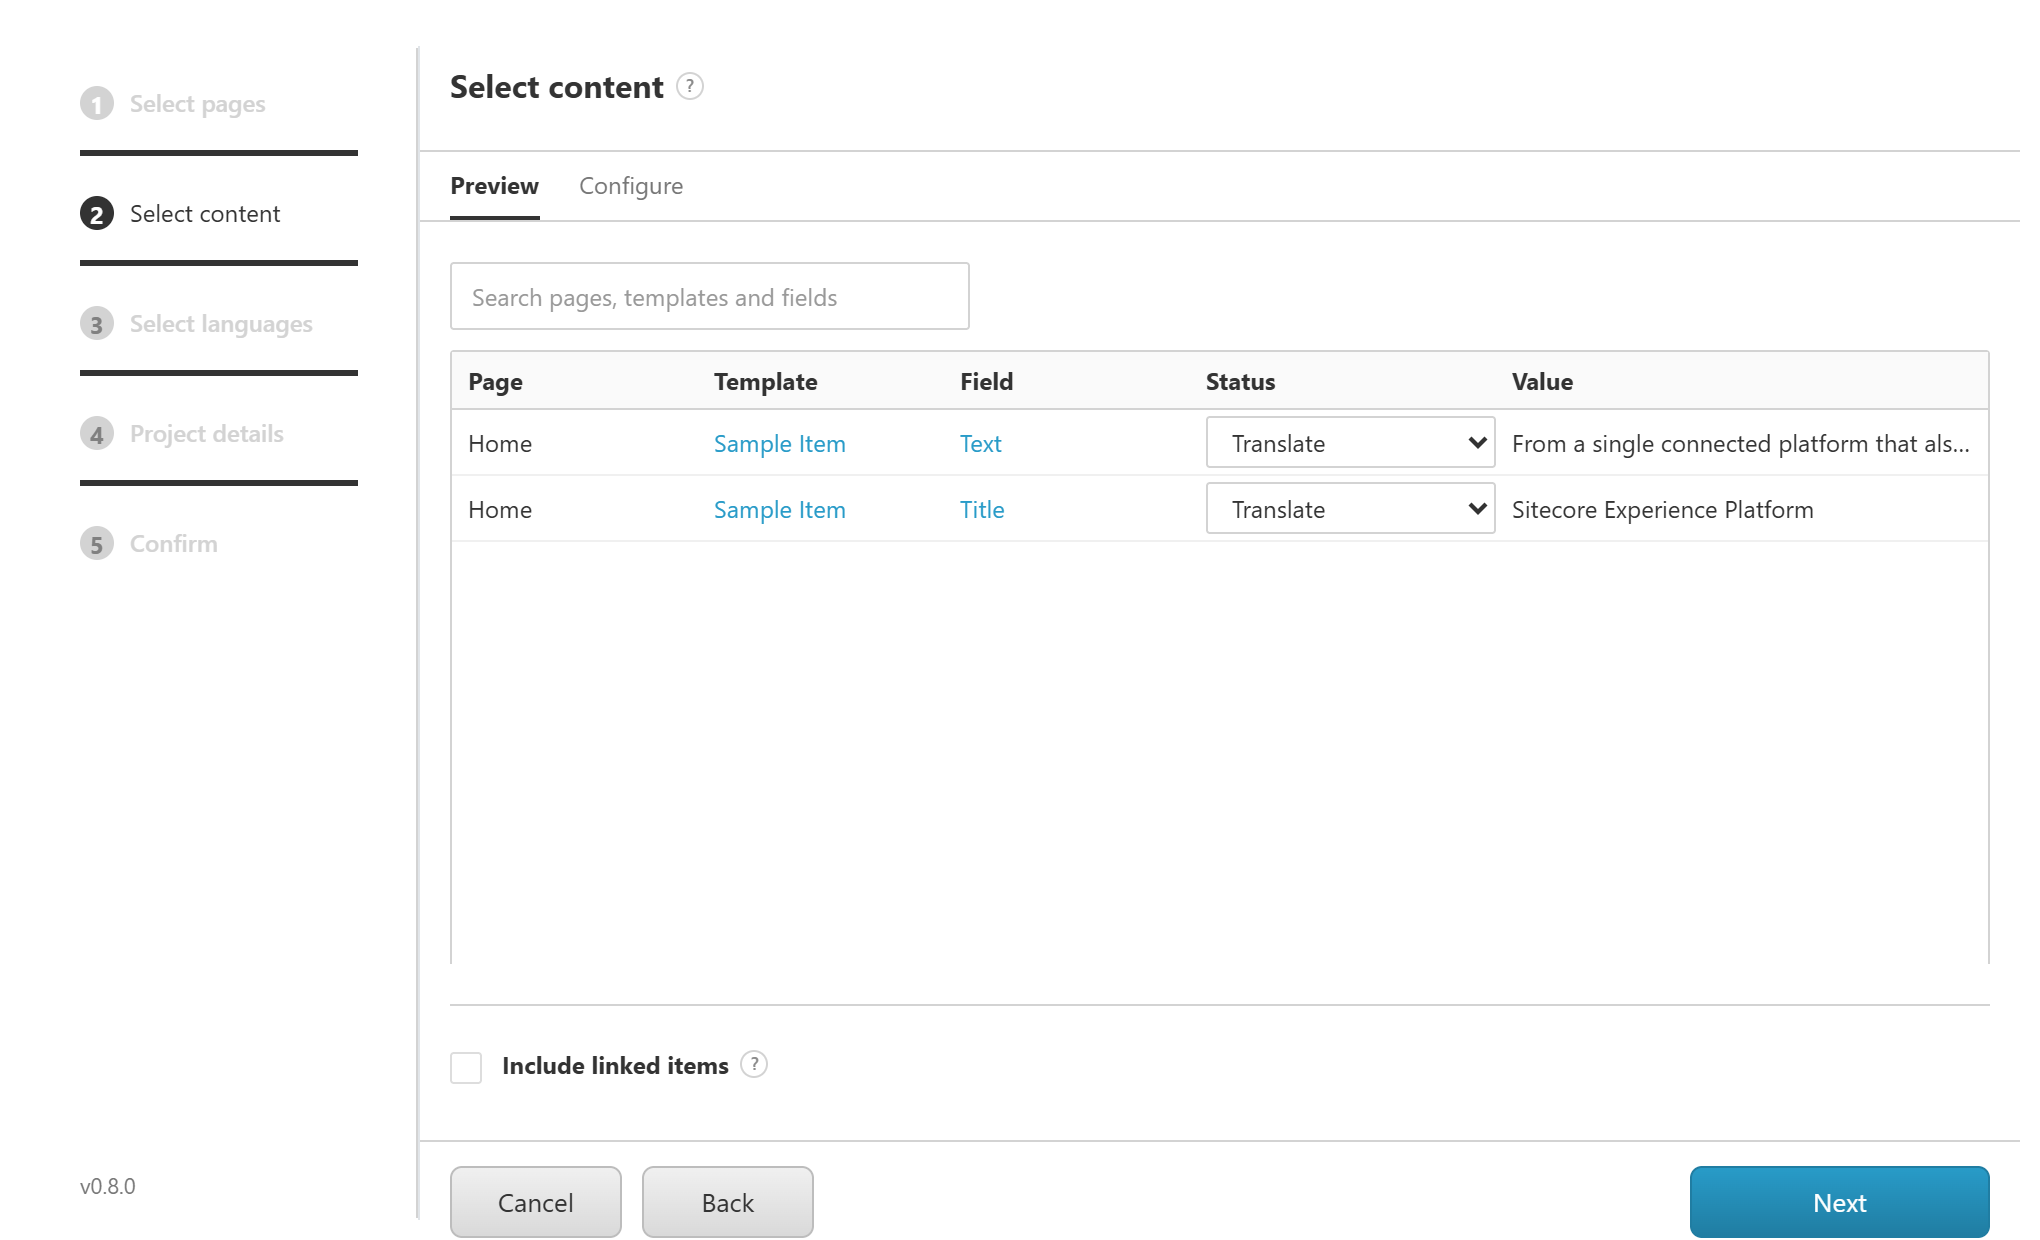
The Select content step shows the templates and fields used by the pages you selected, with the status each one already has in Plugin settings. Set a field to Skip to leave it out of the translation, or to Copy from source to keep the source value in the language versions.The step has two tabs, Preview and Configure. They are two views of one set of rules, and they stay in step with each other: a change made on one tab shows on the other at once, and both are carried into the project exactly as you leave them.
Preview opens first. It lists one row per page and field, under the columns Page, Template, Field, Status and Value, so you see the real source text behind every rule before you decide anything. A status you set here applies to every page built on the same template, not to that one row. The template and field names are links: selecting one opens that rule on the Configure tab.
Configure lists the same rules by template. Each template row carries its own status under Default for fields, and a count of how many of its fields are sent, such as 2/3 translate. Expand a template to give a single field a status of its own. A field marked no content is empty in every page you selected, so nothing would be sent for it.
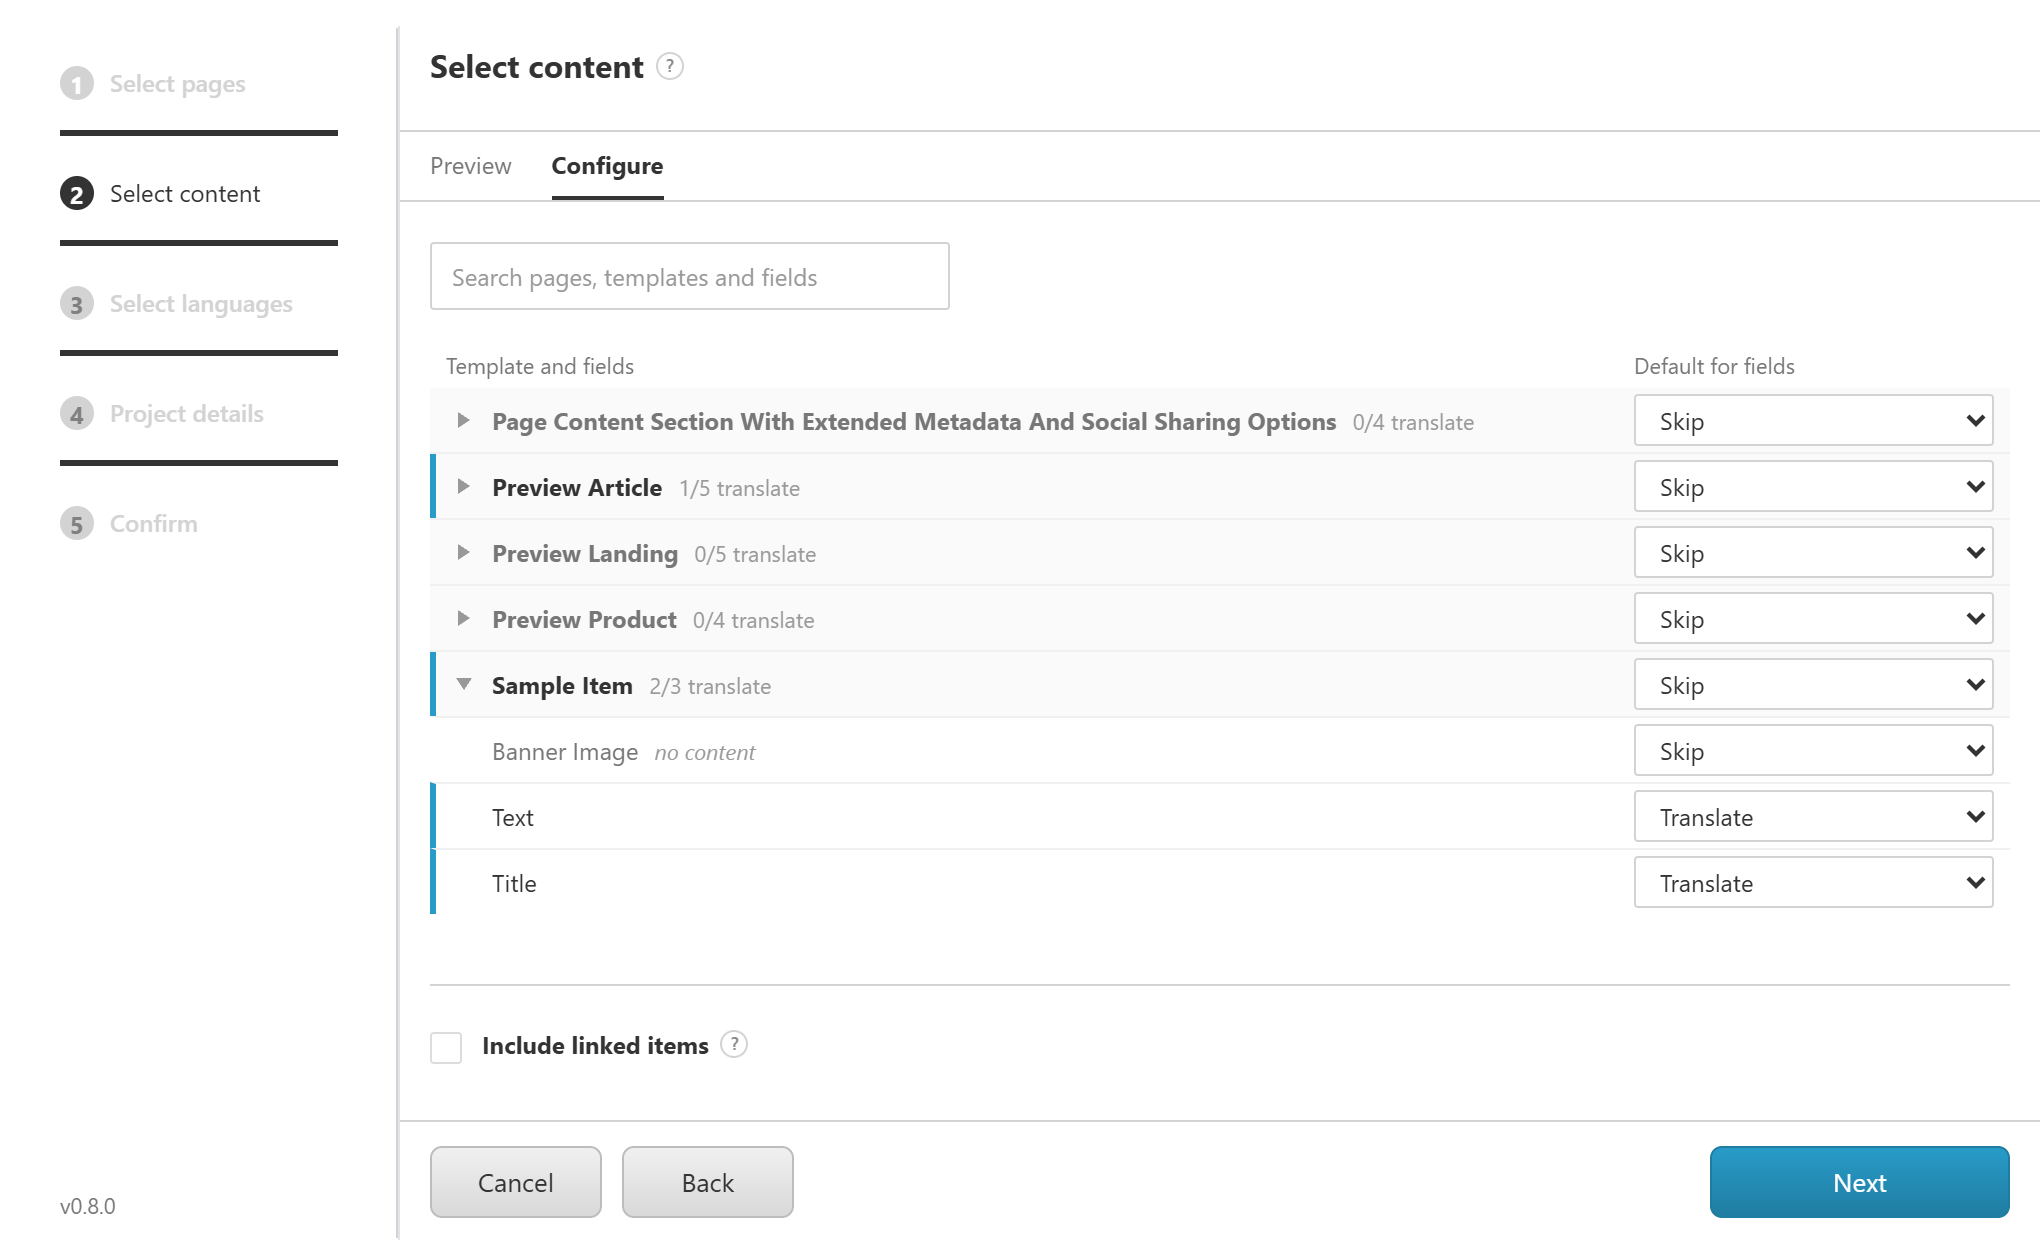
The search box under the tabs filters both views at once, across page, template and field names.
Changed values are highlighted, and Reset to defaults returns everything to your Plugin settings.
Whatever you leave the step with is saved: clicking Next writes your changes into Plugin settings, so your next project starts from them. There is nothing to confirm and no option to decline. A run where you change nothing writes nothing.
Only the templates behind the pages you selected are written; the rules for every other template are left as they are. If the save fails, the step says so, and pressing Next again continues without saving. Either way the project itself carries your rules.
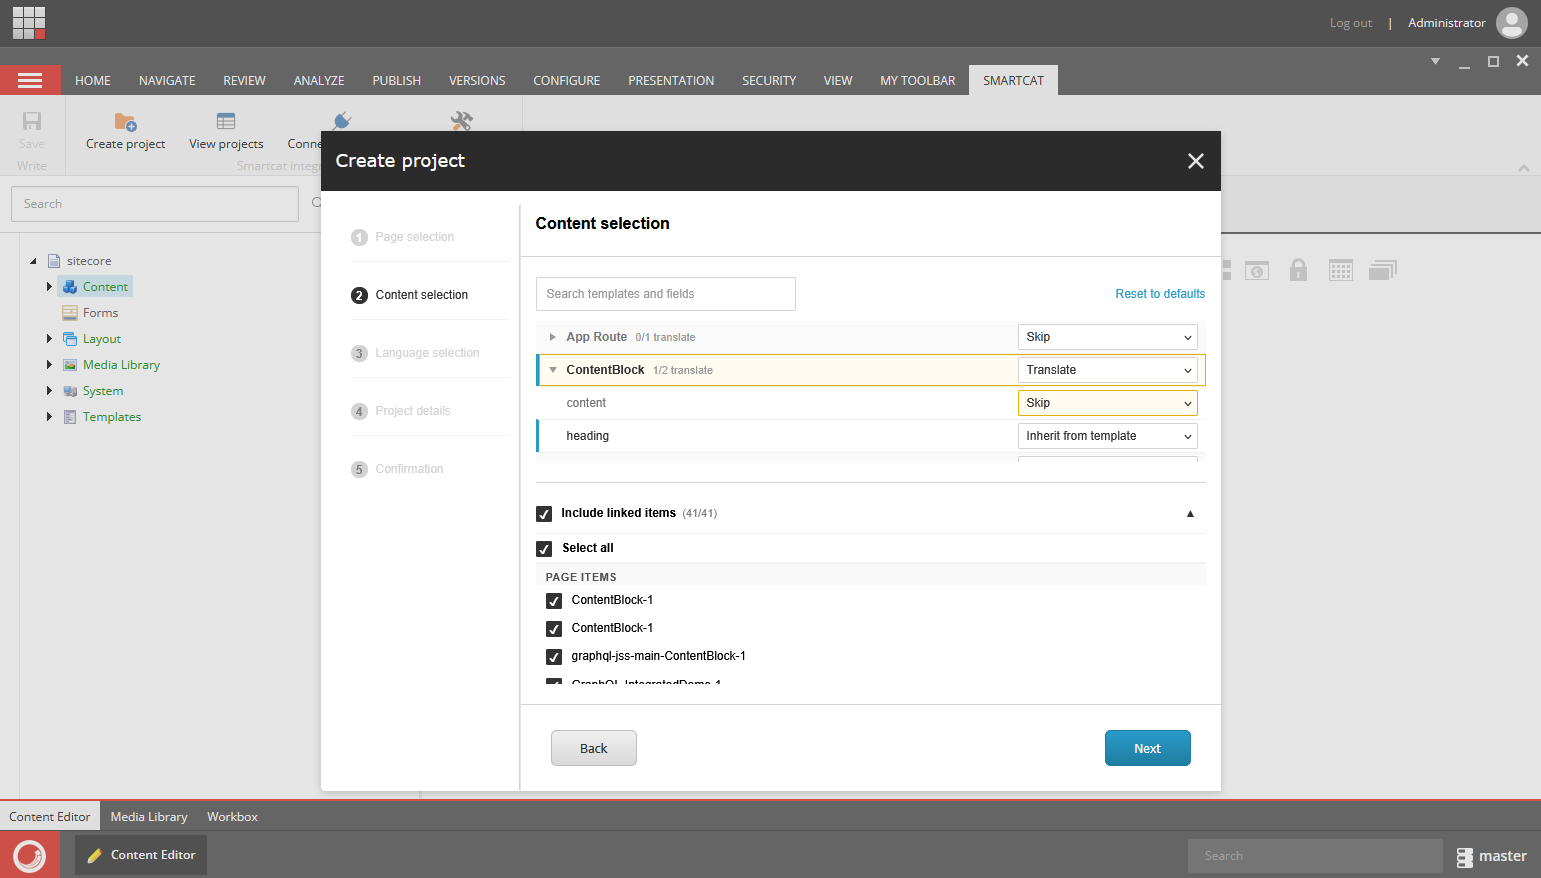
If a page has linked items, for example a banner added to the layout which is stored as a separate item, you can automatically include them in the translation scope of the main page by selecting Include linked items.
-
Set up target languages
Smartcat uses Sitecore's default system language as the source language for translations. Optionally, you can set up custom locale mappings to align your Sitecore locales with Smartcat ones - see Custom language mapping.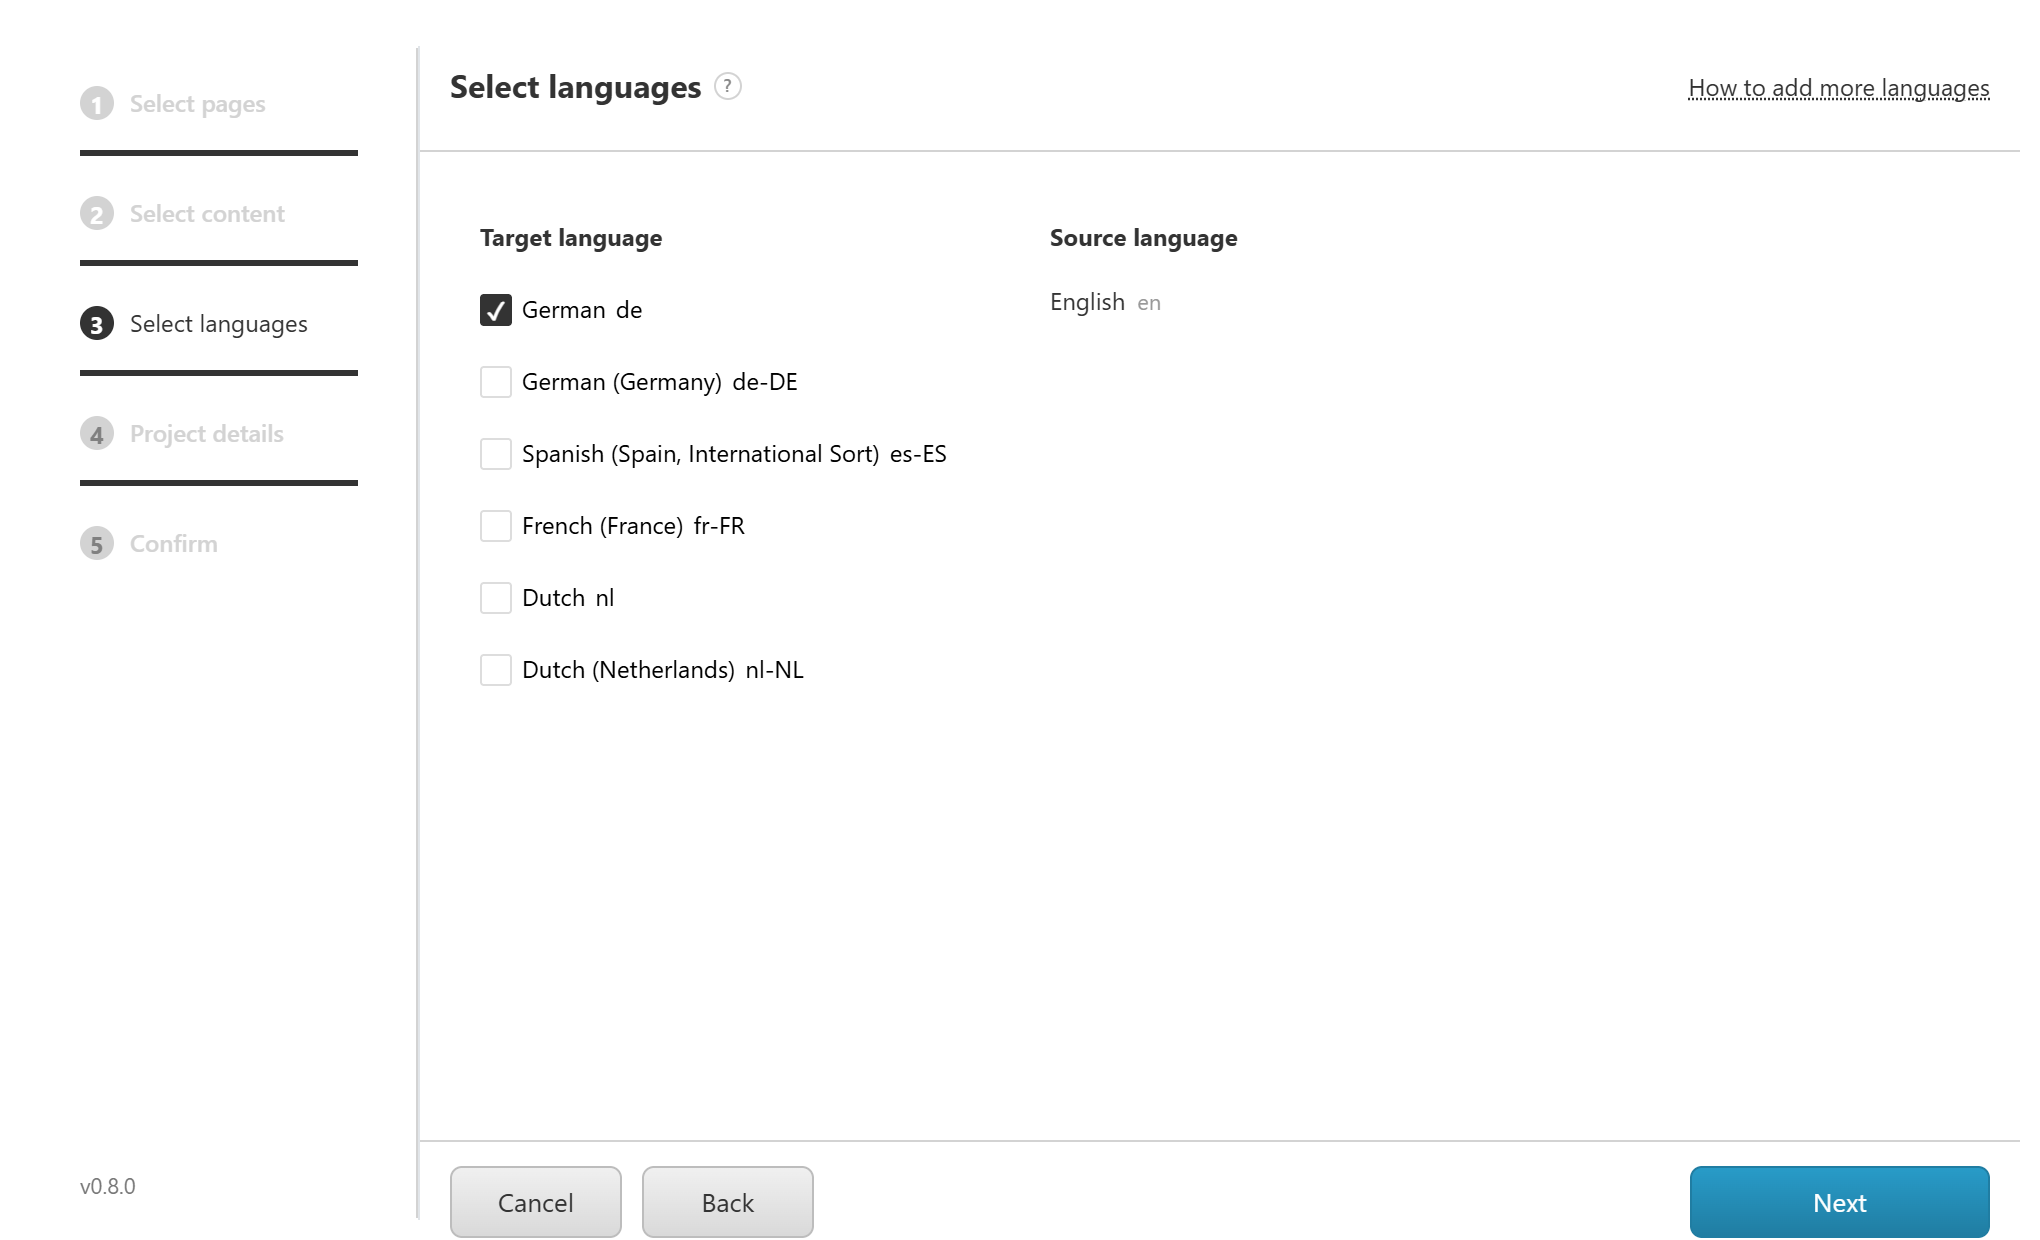
-
Specify translation project details
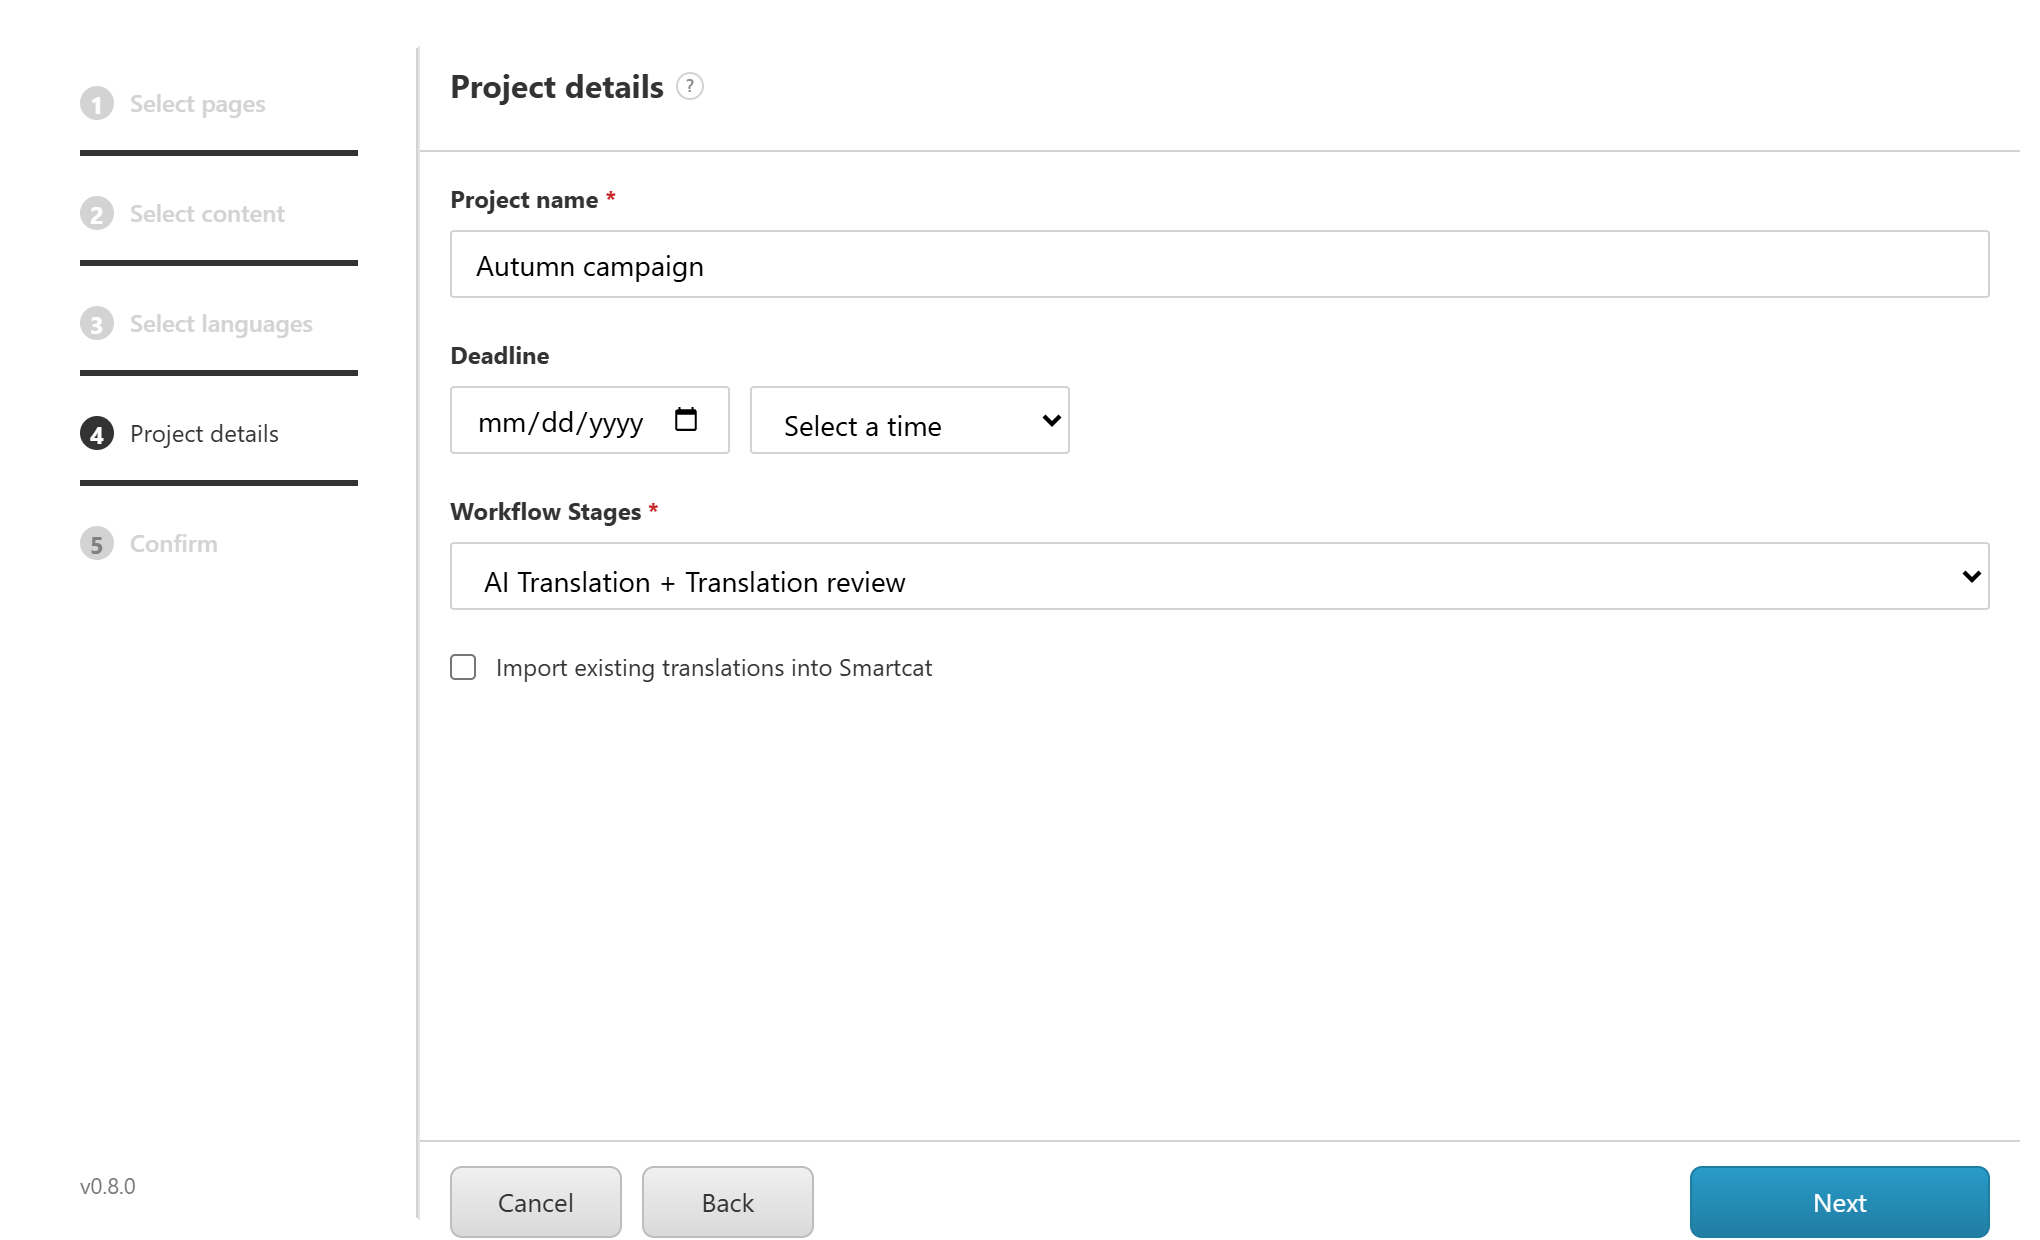
You need to set up:
-
Translation project title
-
Project deadline (optional)
-
Translation workflow — either the default Smartcat one or a custom one
-
Optionally, import existing translations for these locales into Smartcat
-
Confirm project creation
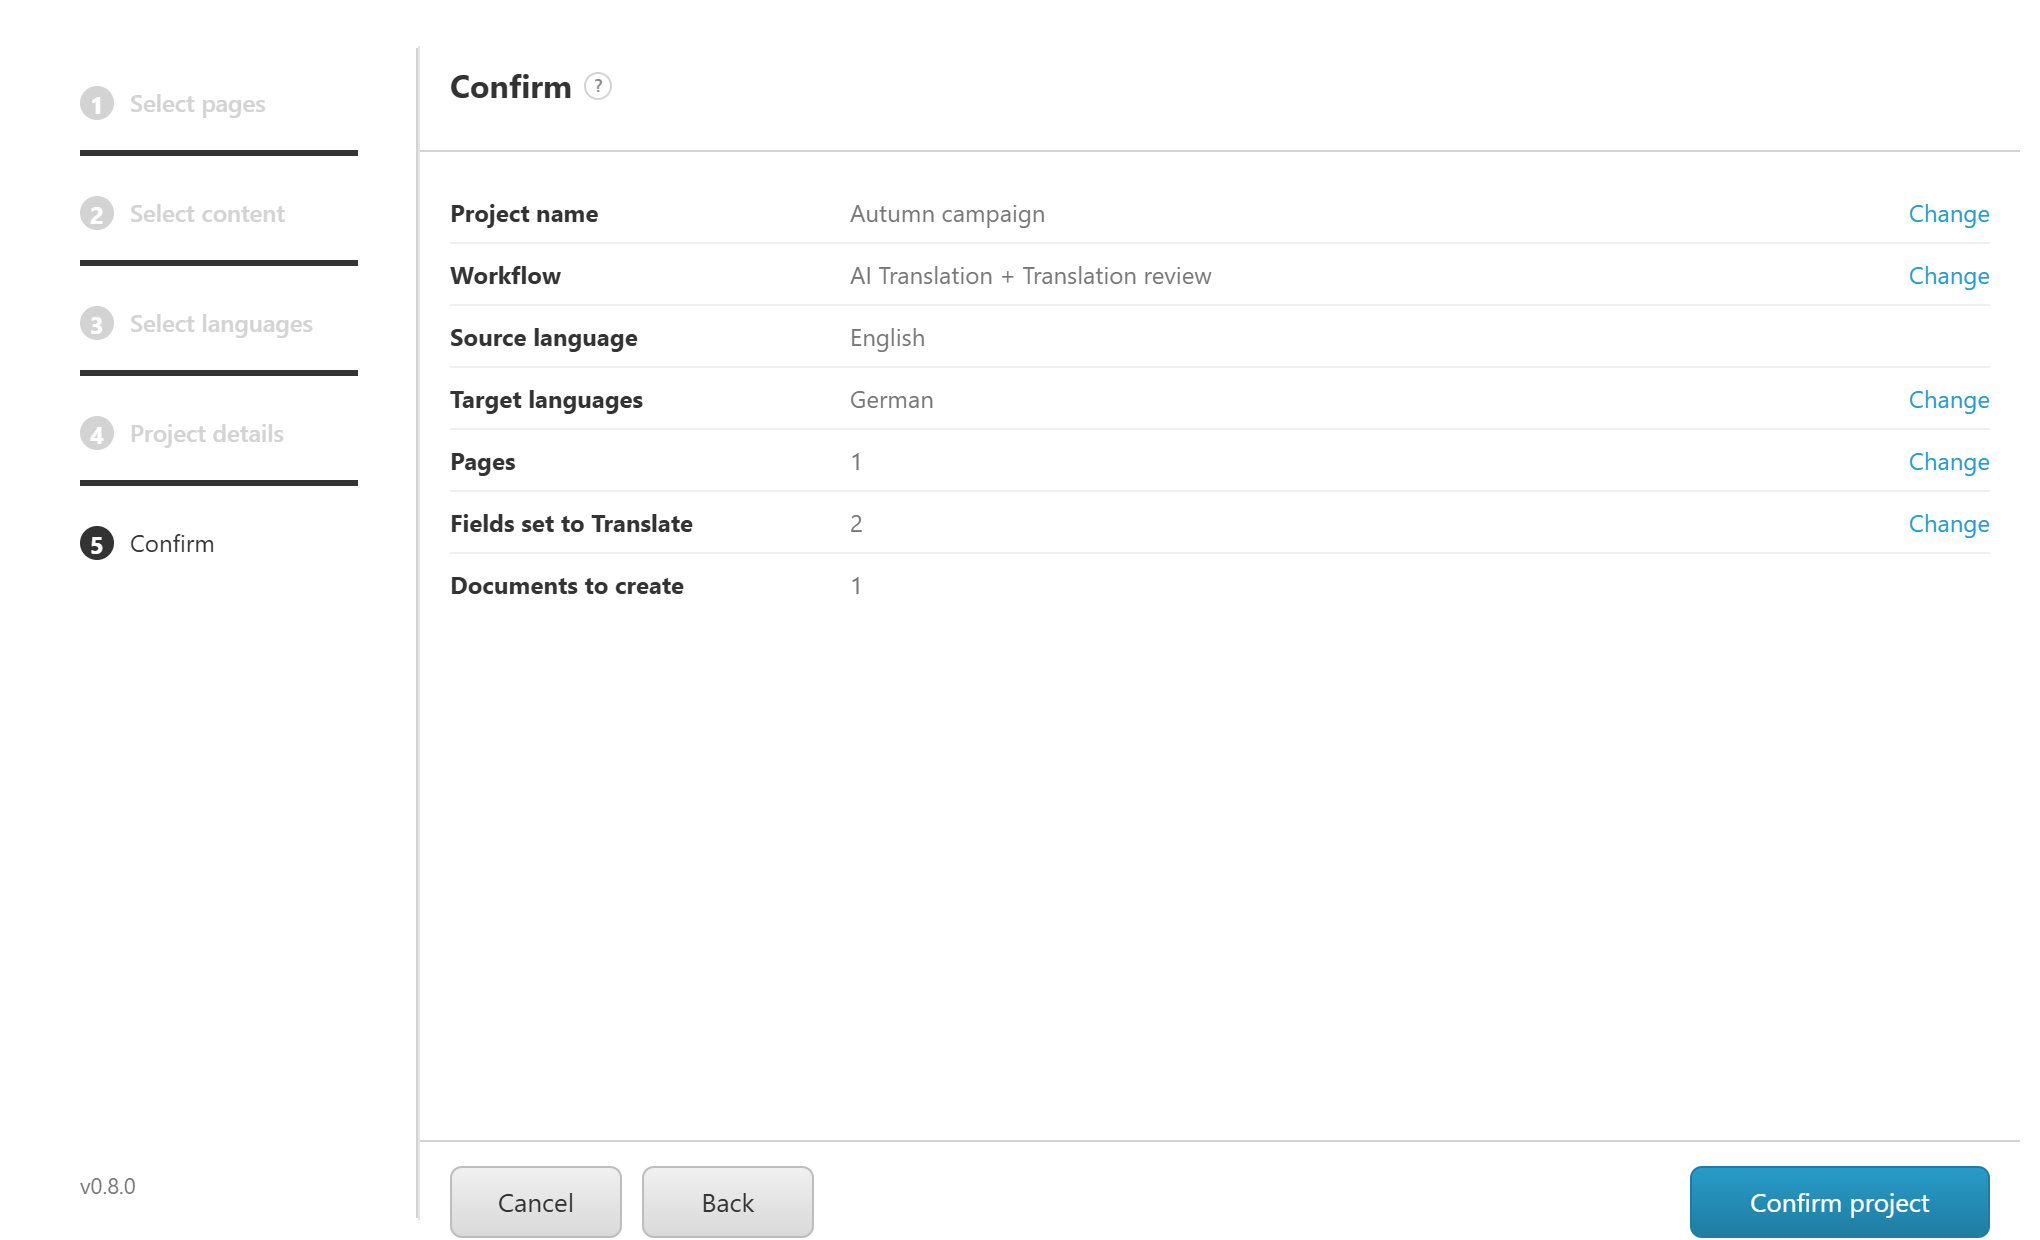
- On the SMARTCAT tab click View projects.
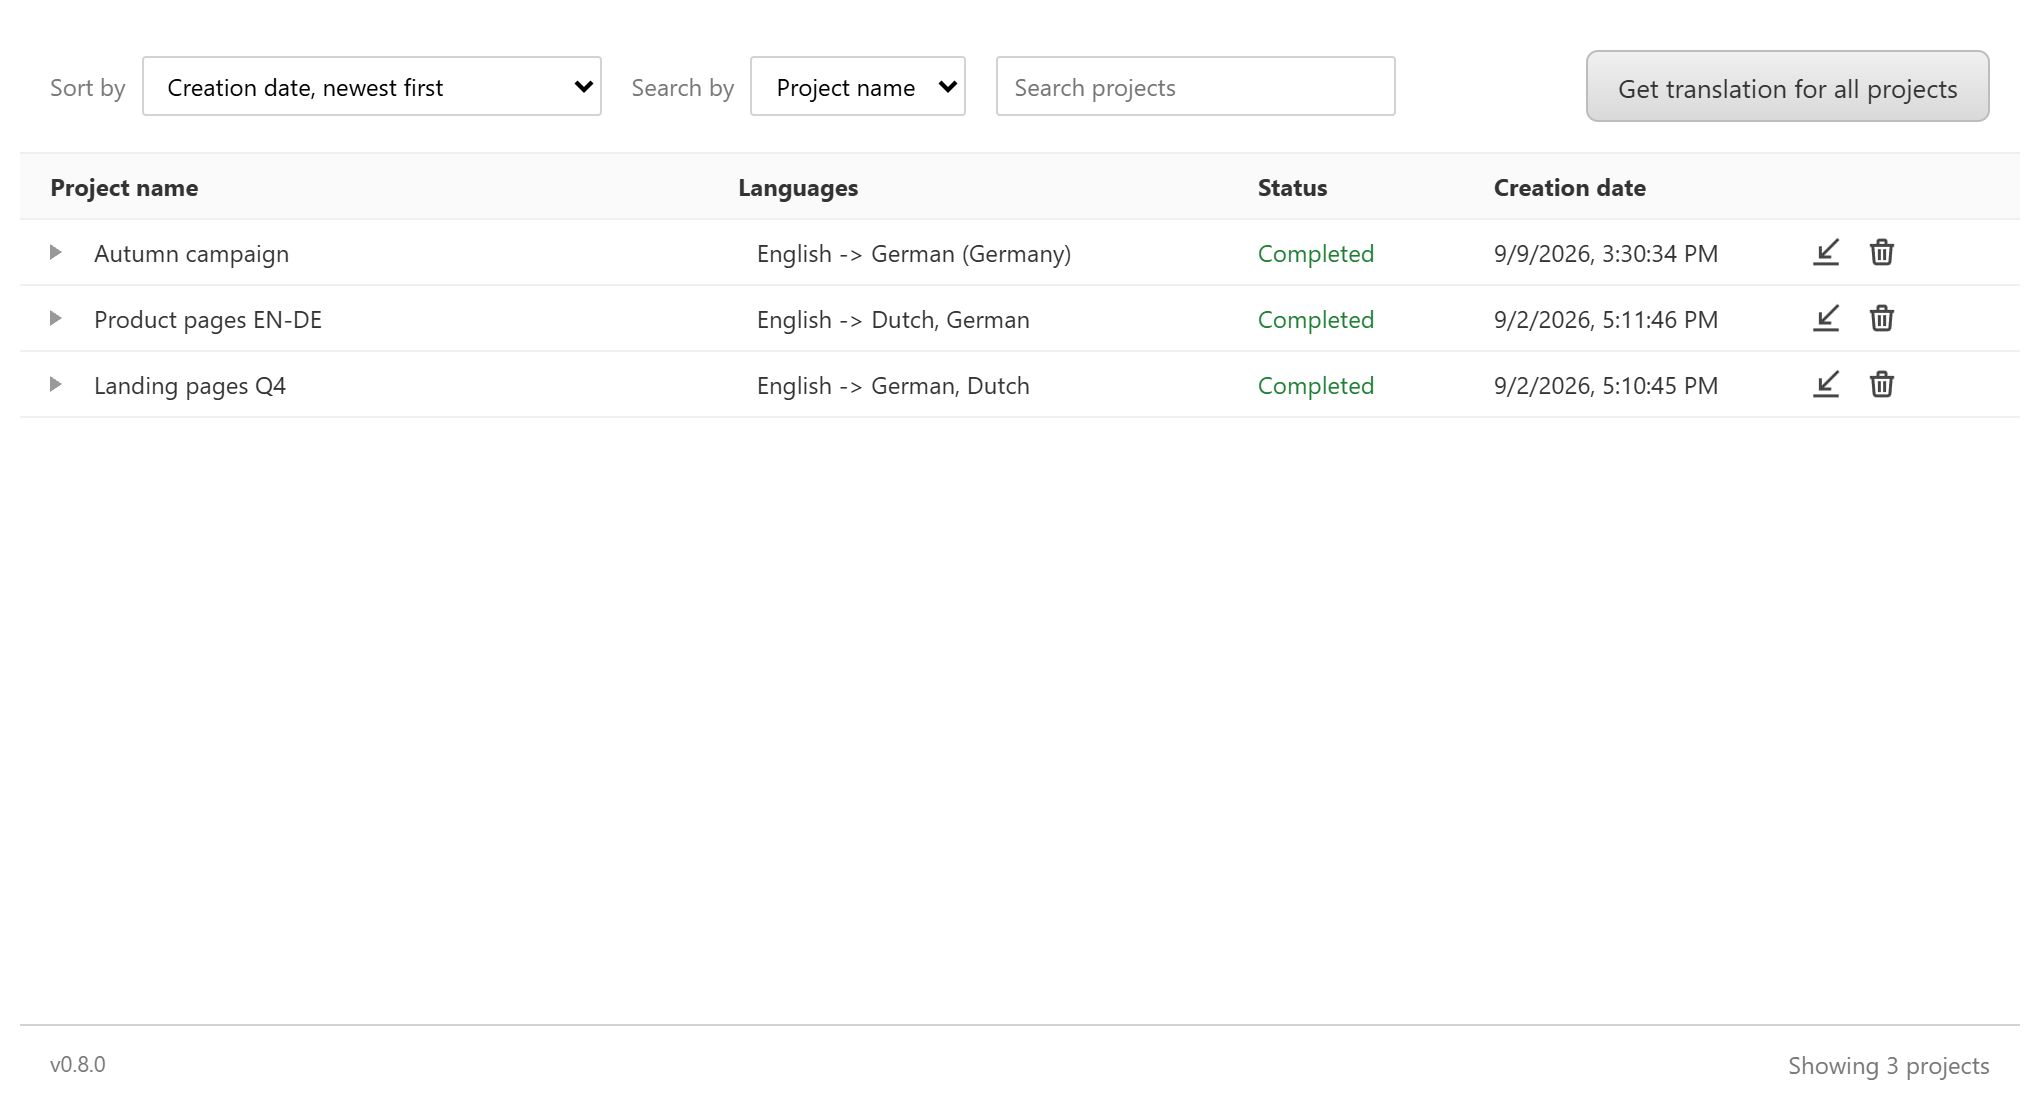
Select the project you just created and click the pencil icon to open it in Smartcat and review the page translations. Alternatively, you can open the Smartcat dashboard directly and navigate to the correct project from there. Expand a project row to see the pages it contains.
Complete translations in Smartcat:
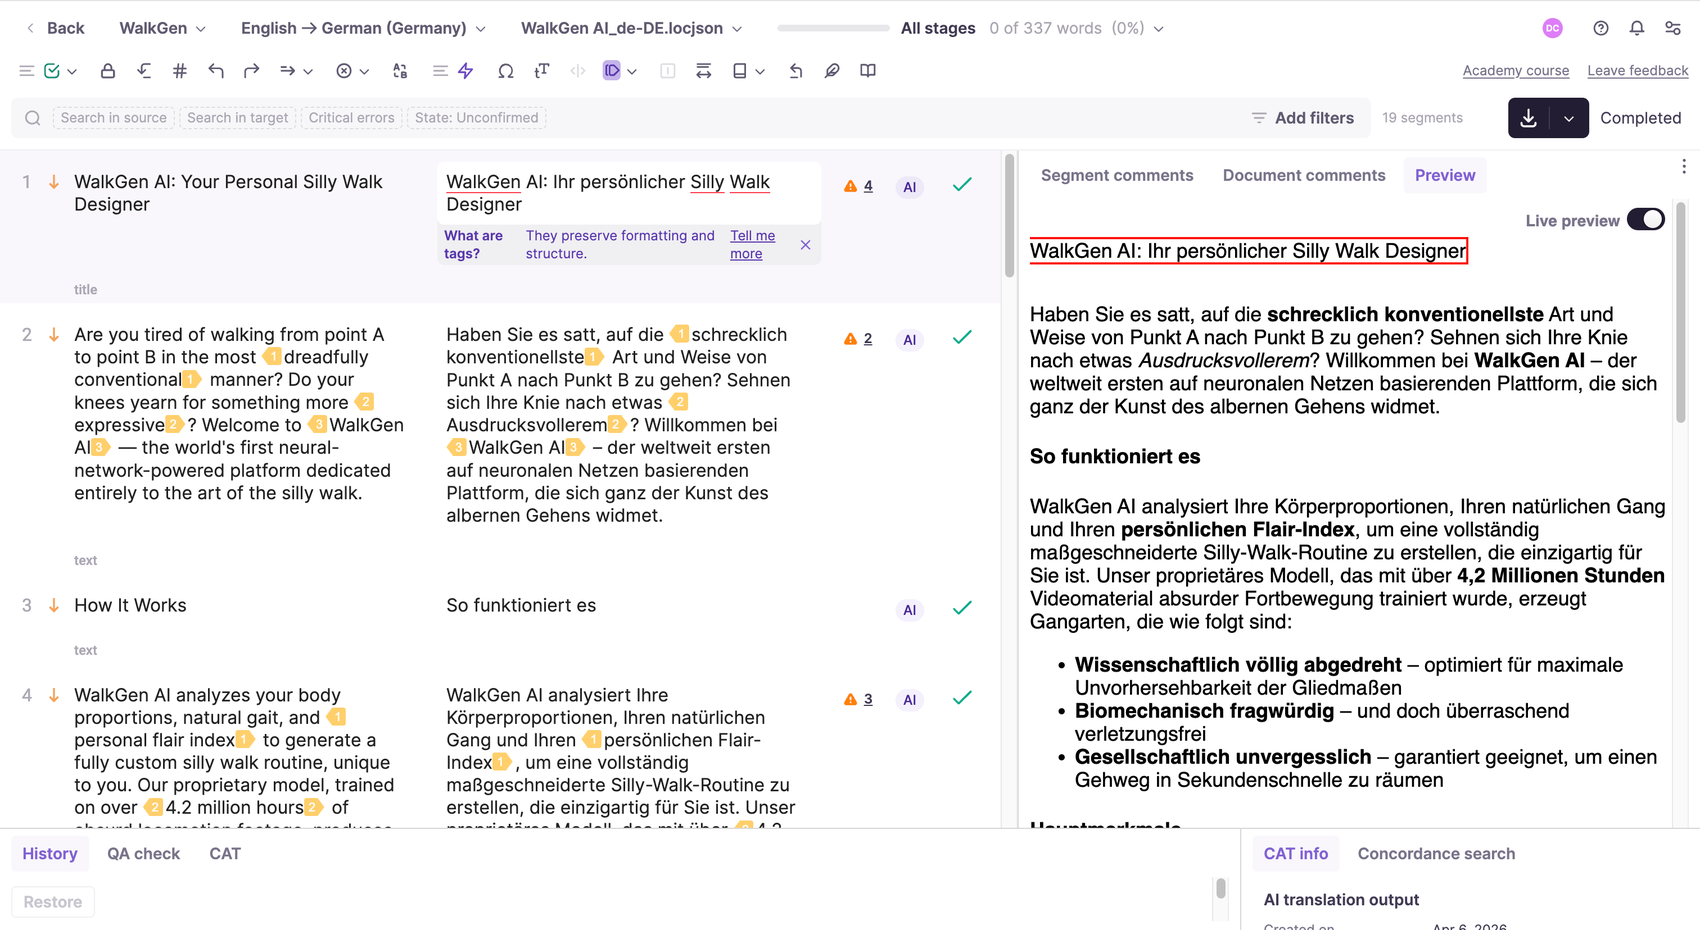
-
Pull translations to Sitecore
After the translation is completed, it can be pulled from Smartcat to Sitecore. It can be done for a specific language version, a selected translation project, or for all translation projects.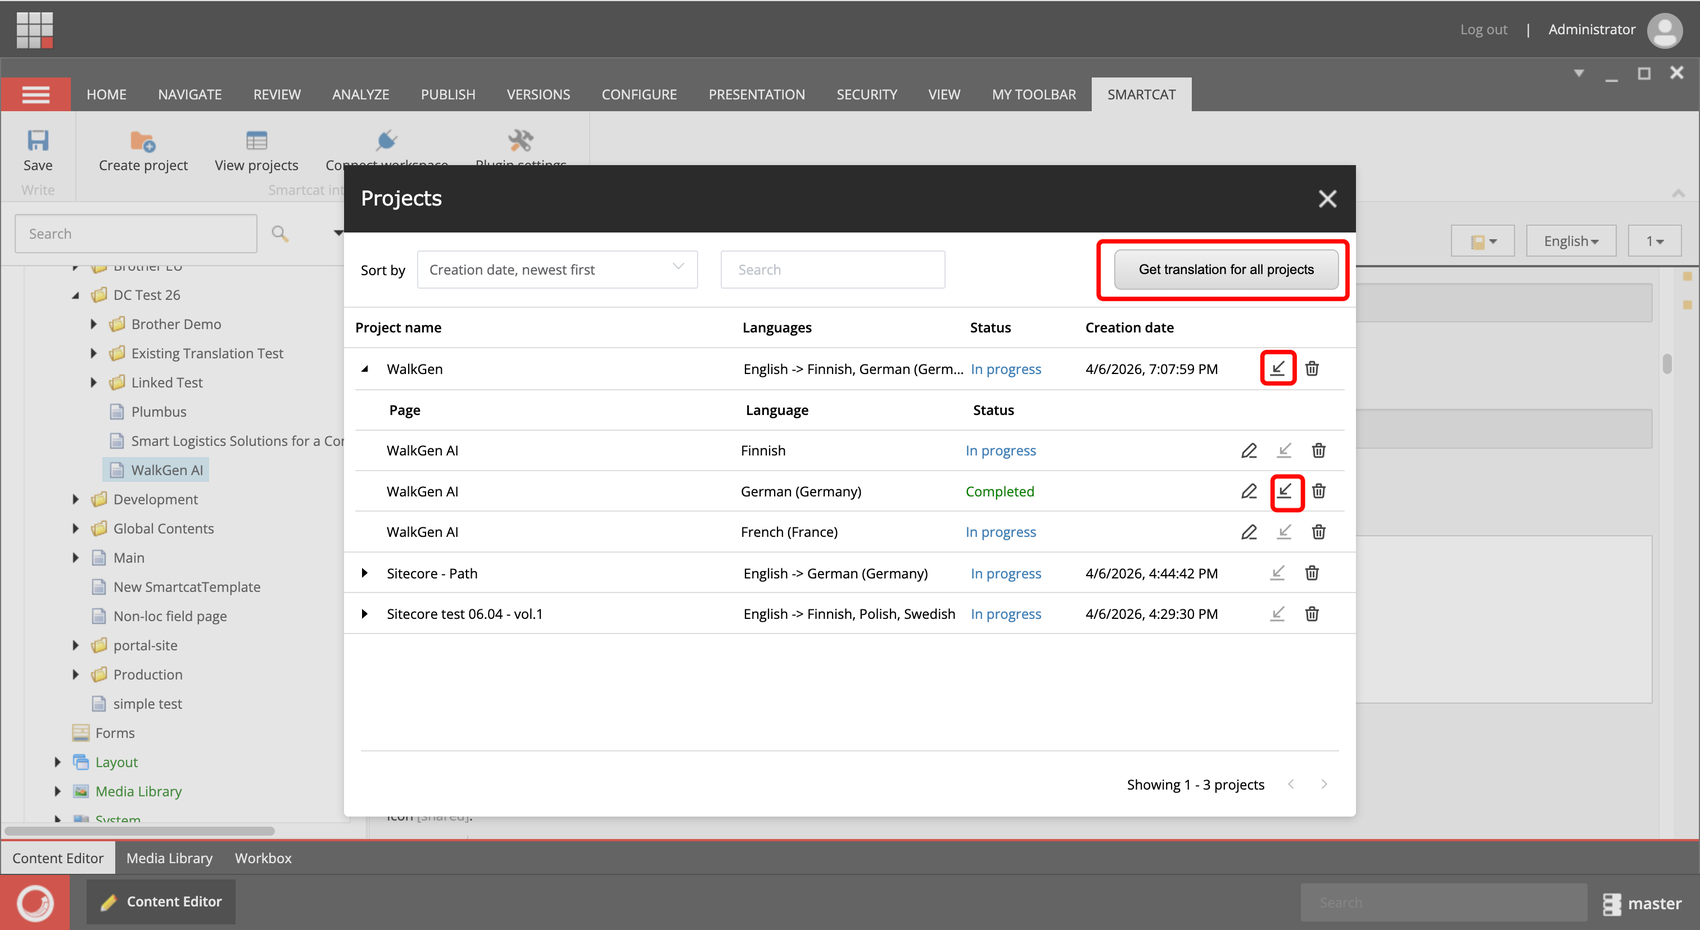
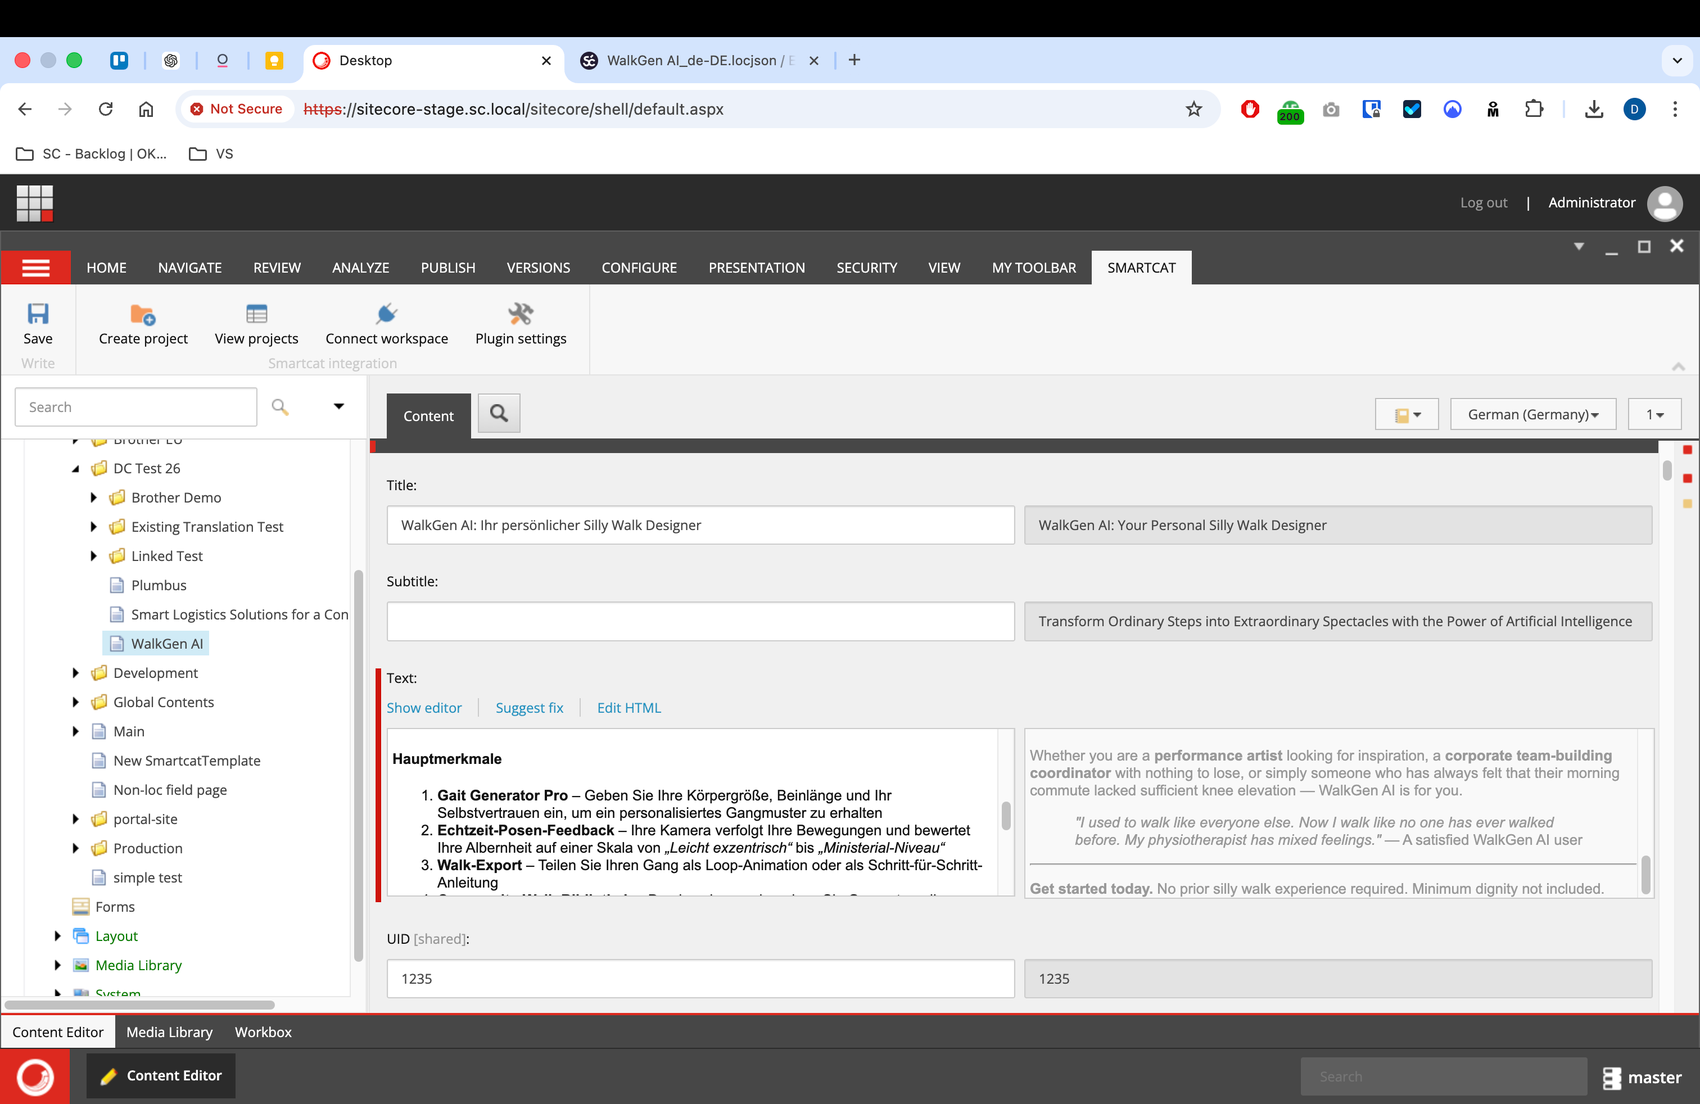
When a page's translation is updated, pulling it will create a new page version in that language in Sitecore.
Note that the Subtitle field was excluded from the translation scope.
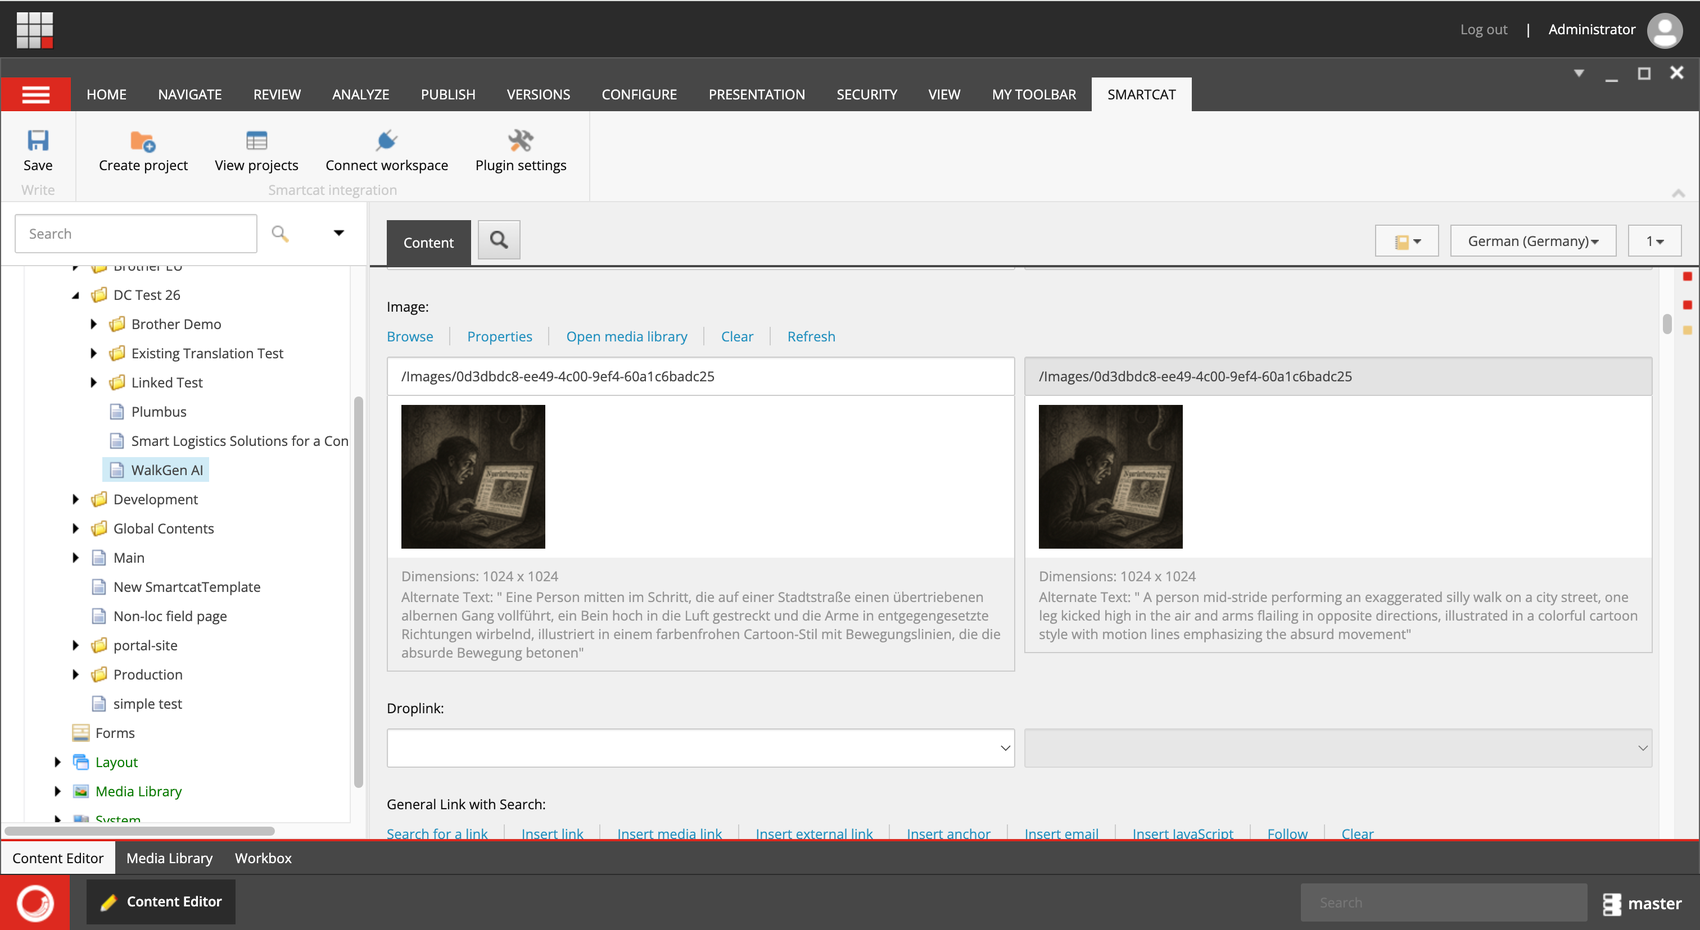
If a page has complex items such as images, links, etc., with their own text fields like alt text, description, etc., all these fields will also be automatically extracted and sent to Smartcat.
Updating translations
Smartcat allows you to update translations after an item's source content has been updated. In this case, the translation won't be done from scratch — only the parts that have changed will be translated.
Flow overview:
-
Send an item for translation in Smartcat for the first time. If it's fully or partly translated, include existing translations.
-
Update the source content of this item.
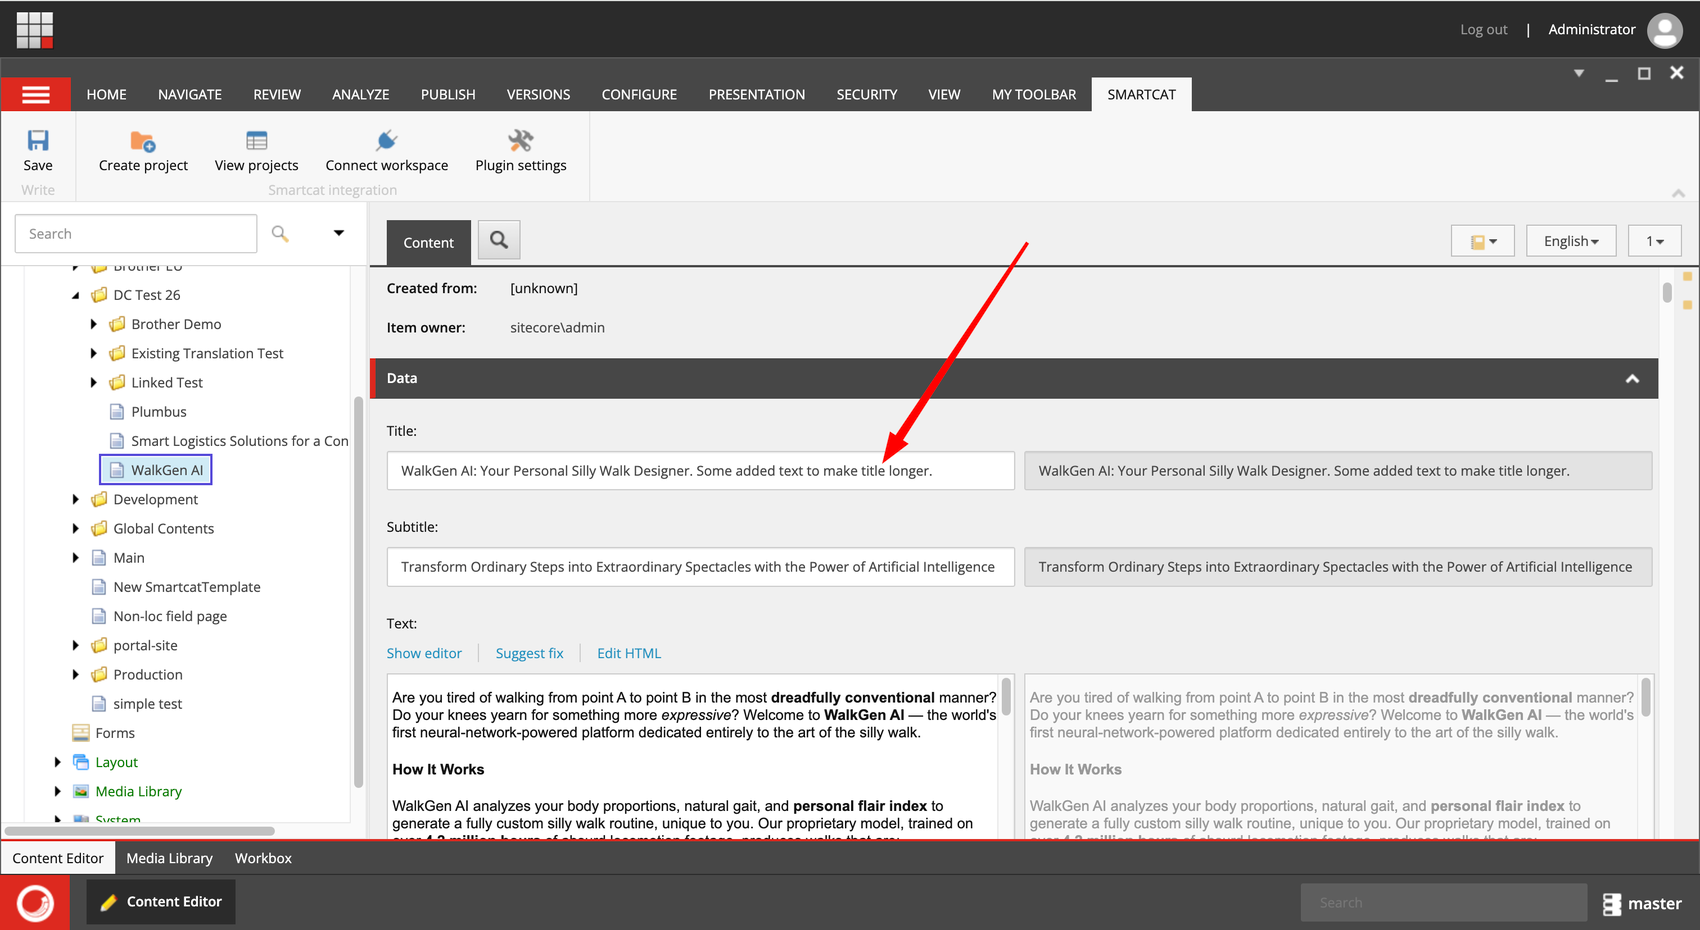
-
Send it for translation again by creating a translation project.
You can also select several pages at once, regardless of whether they were previously translated or not. Don't include existing translations this time. -
If a page was previously sent for translation, the Smartcat plugin will detect it and automatically send it to the corresponding translation project.
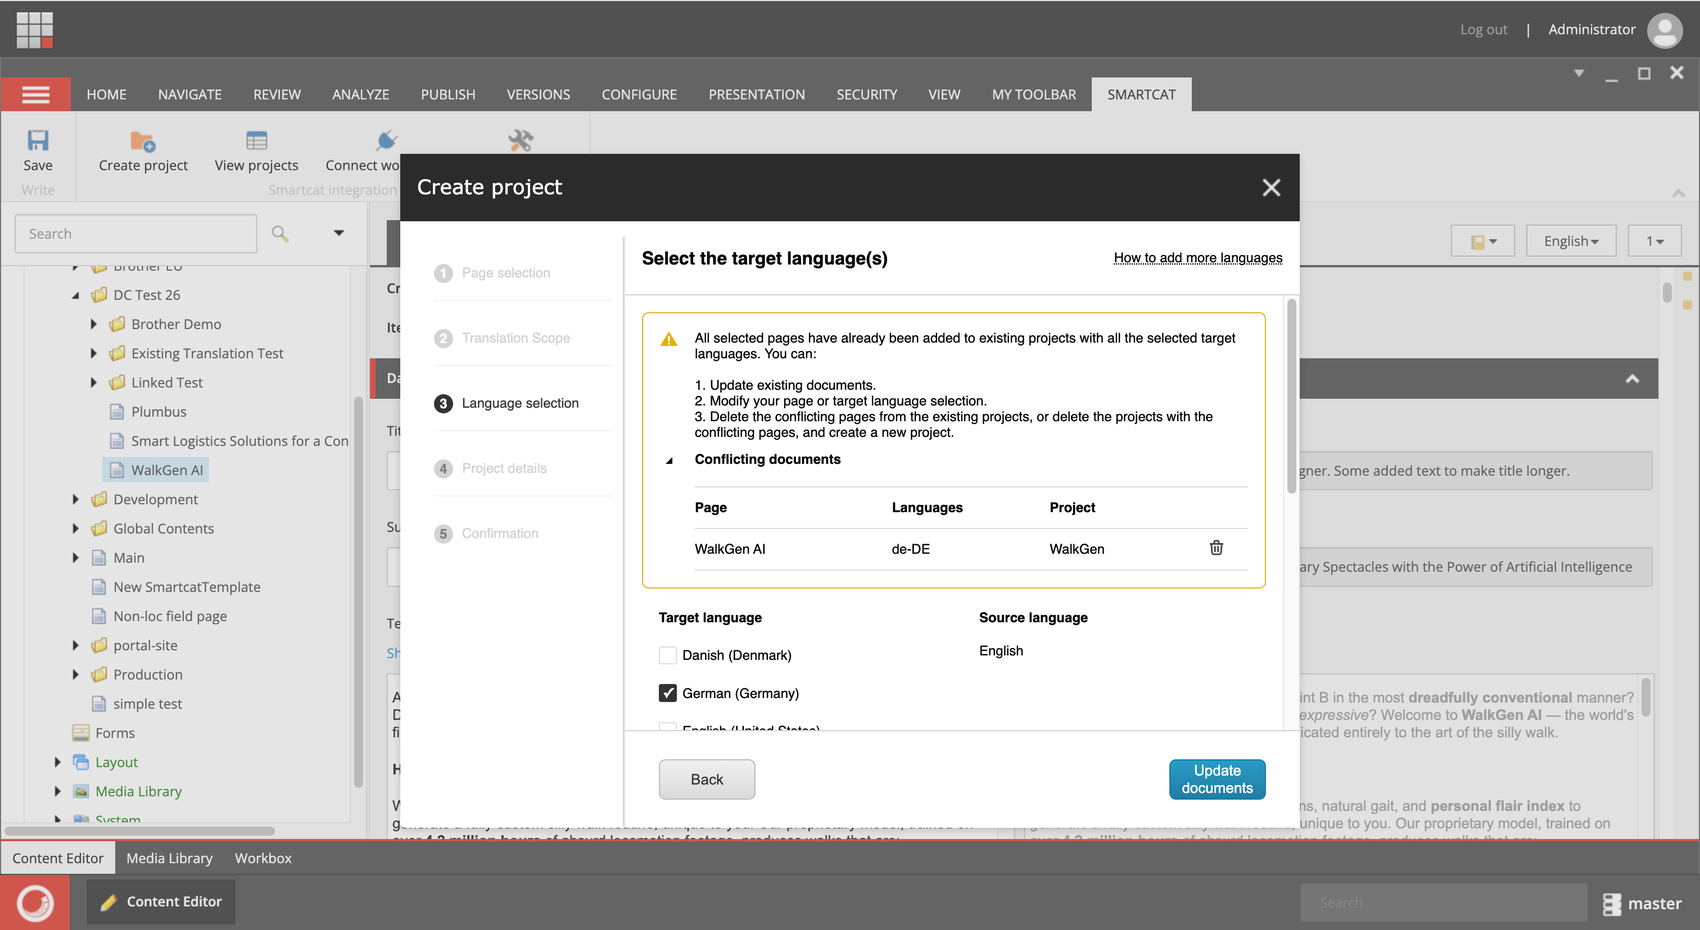
Previously created unchanged translations remain fully completed.
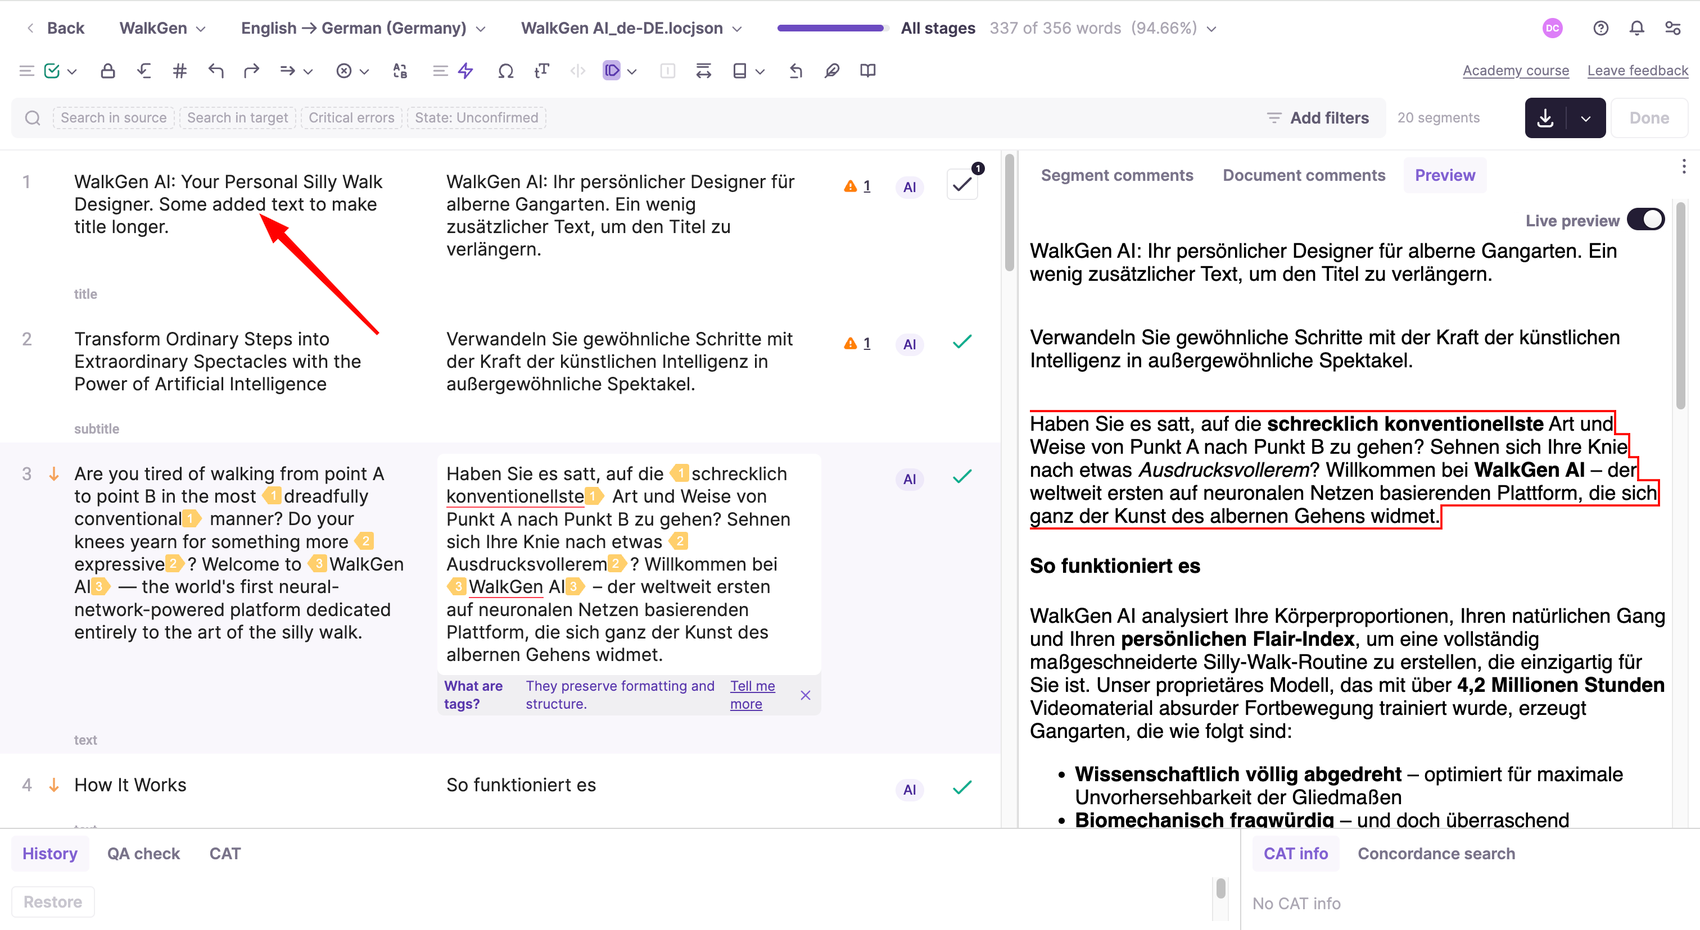
- The rest of the flow is the same as for translating your content. After the translation is completed, just pull the translations back to Sitecore.
Custom language mapping
Sitecore allows you to create highly custom locales. It may occur that Smartcat doesn't have a fully matching locale. The list of locales supported by Smartcat is here: https://smartcat.com/Home/Languages
In some cases you may also want to treat one of your Sitecore languages differently — for example, Spanish with the es locale might actually be Spanish (LATAM) when it comes to translation.
For both cases, Smartcat allows you to create custom locale mappings, essentially telling Smartcat to use a certain locale when translating from another locale in Sitecore.
To do this, open System → Settings → Smartcat → SmartcatSettings and edit the LocaleMap field. The format is %locale in Sitecore% <> %locale in Smartcat%, one entry per line.
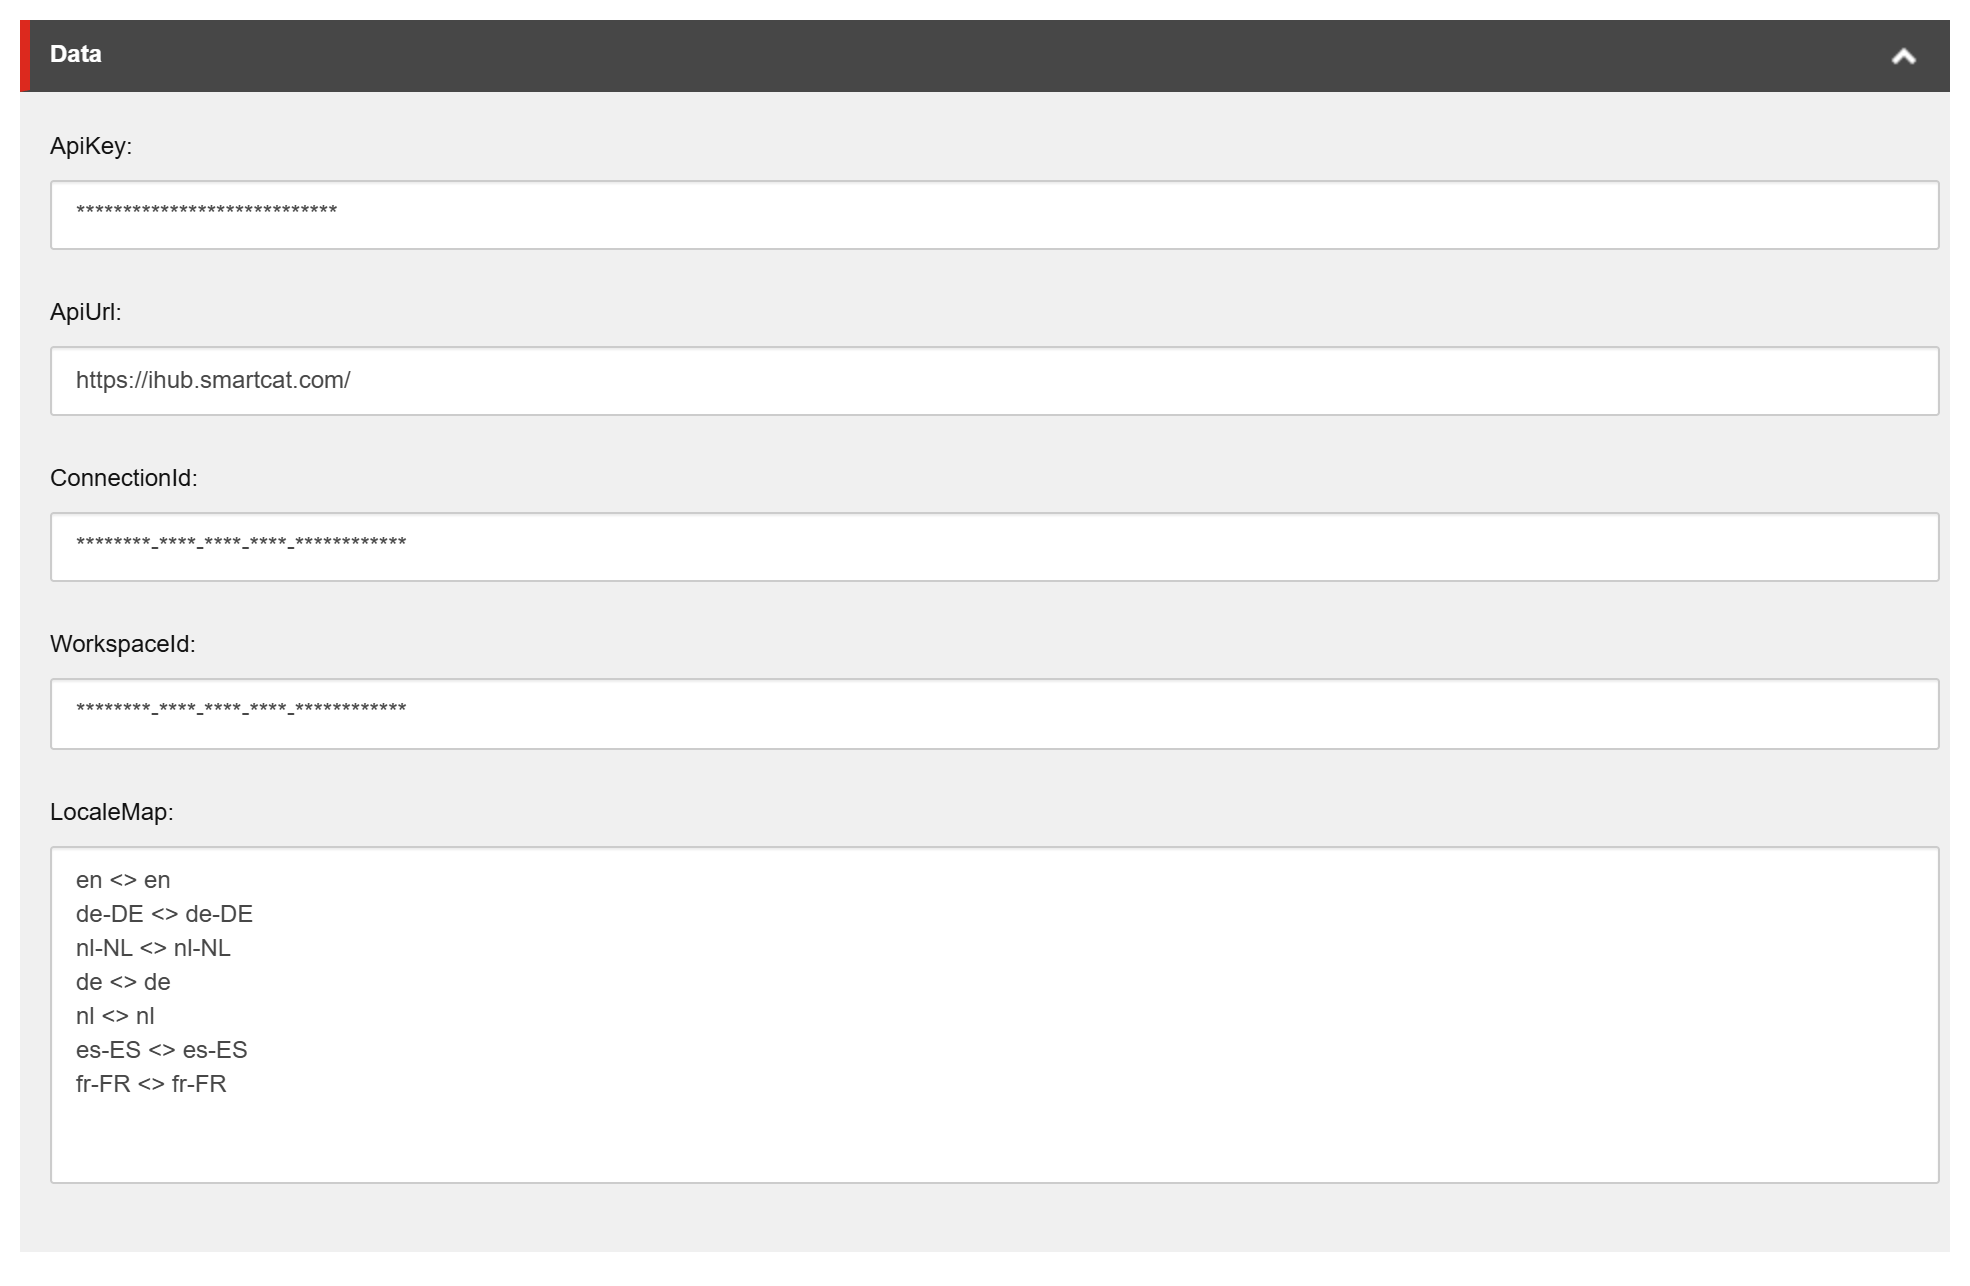
The credentials on this item were masked for the screenshot. Do not share a real ApiKey value.
Copying values from source to language copies
In some cases, field values should be the same across all languages.
In this case, you can either use the shared setting for this field in the item template, or configure the Smartcat plugin to copy the field value from the source to the language version when creating one using the plugin.
To do this, open the SMARTCAT tab and click Plugin settings. Find the template in the list (or use search) and set the field to Copy from source. The setting will be applied to all items created using this template.
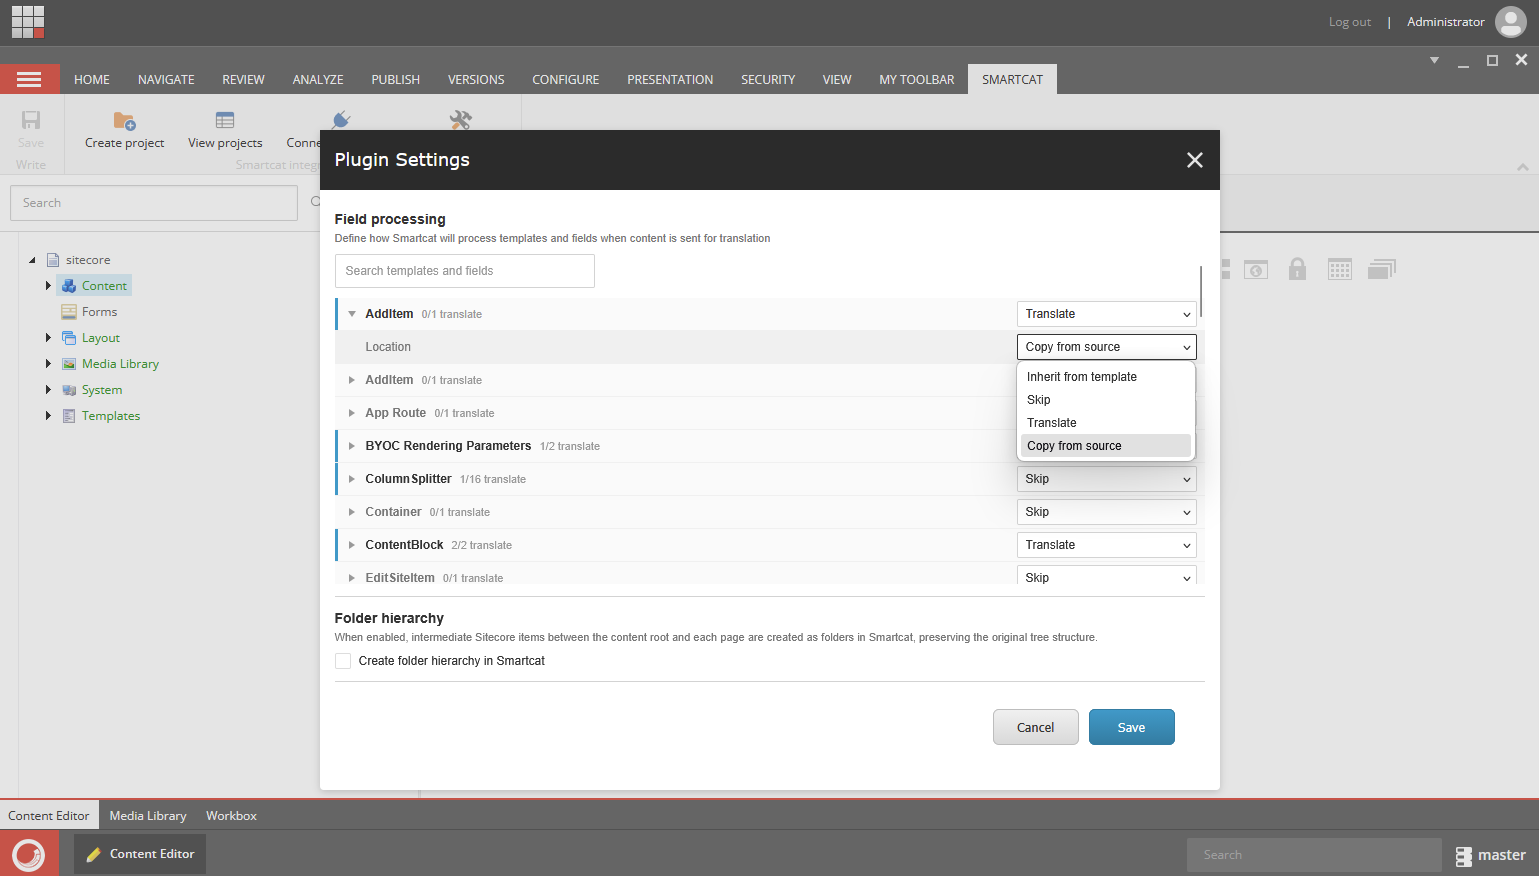
Copying is applied when translations are pulled: when the language version is created or updated, the plugin writes the source value into the copied fields. Fields set to Copy from source are never sent for translation.
Emulating Sitecore item path in Smartcat
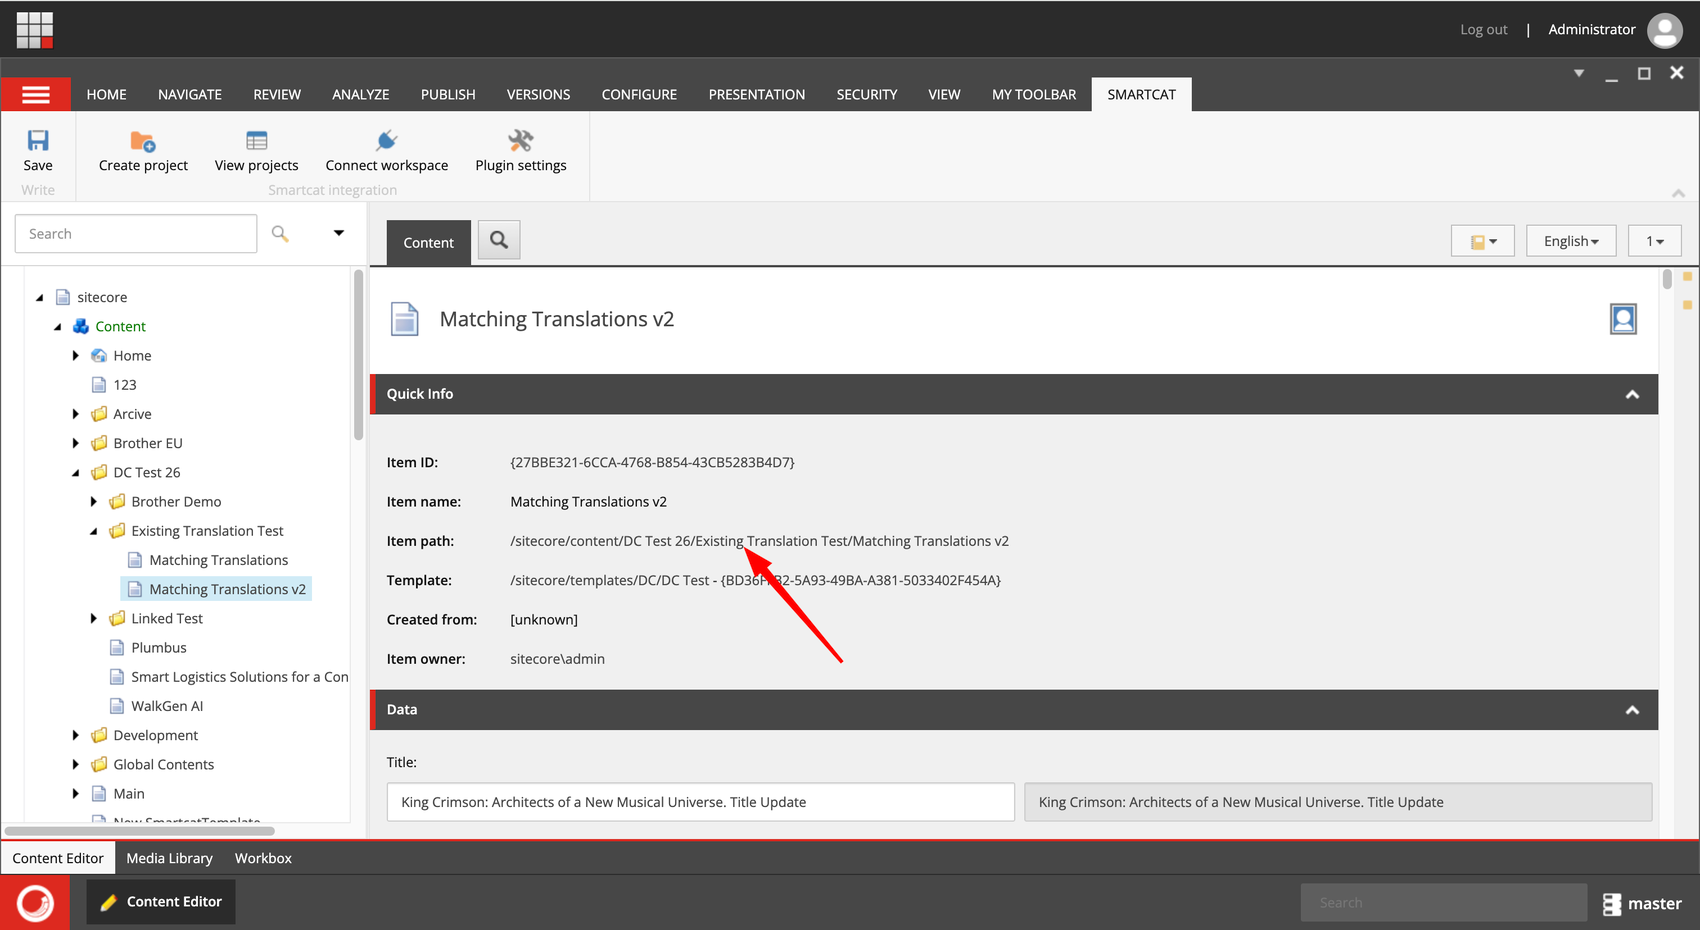
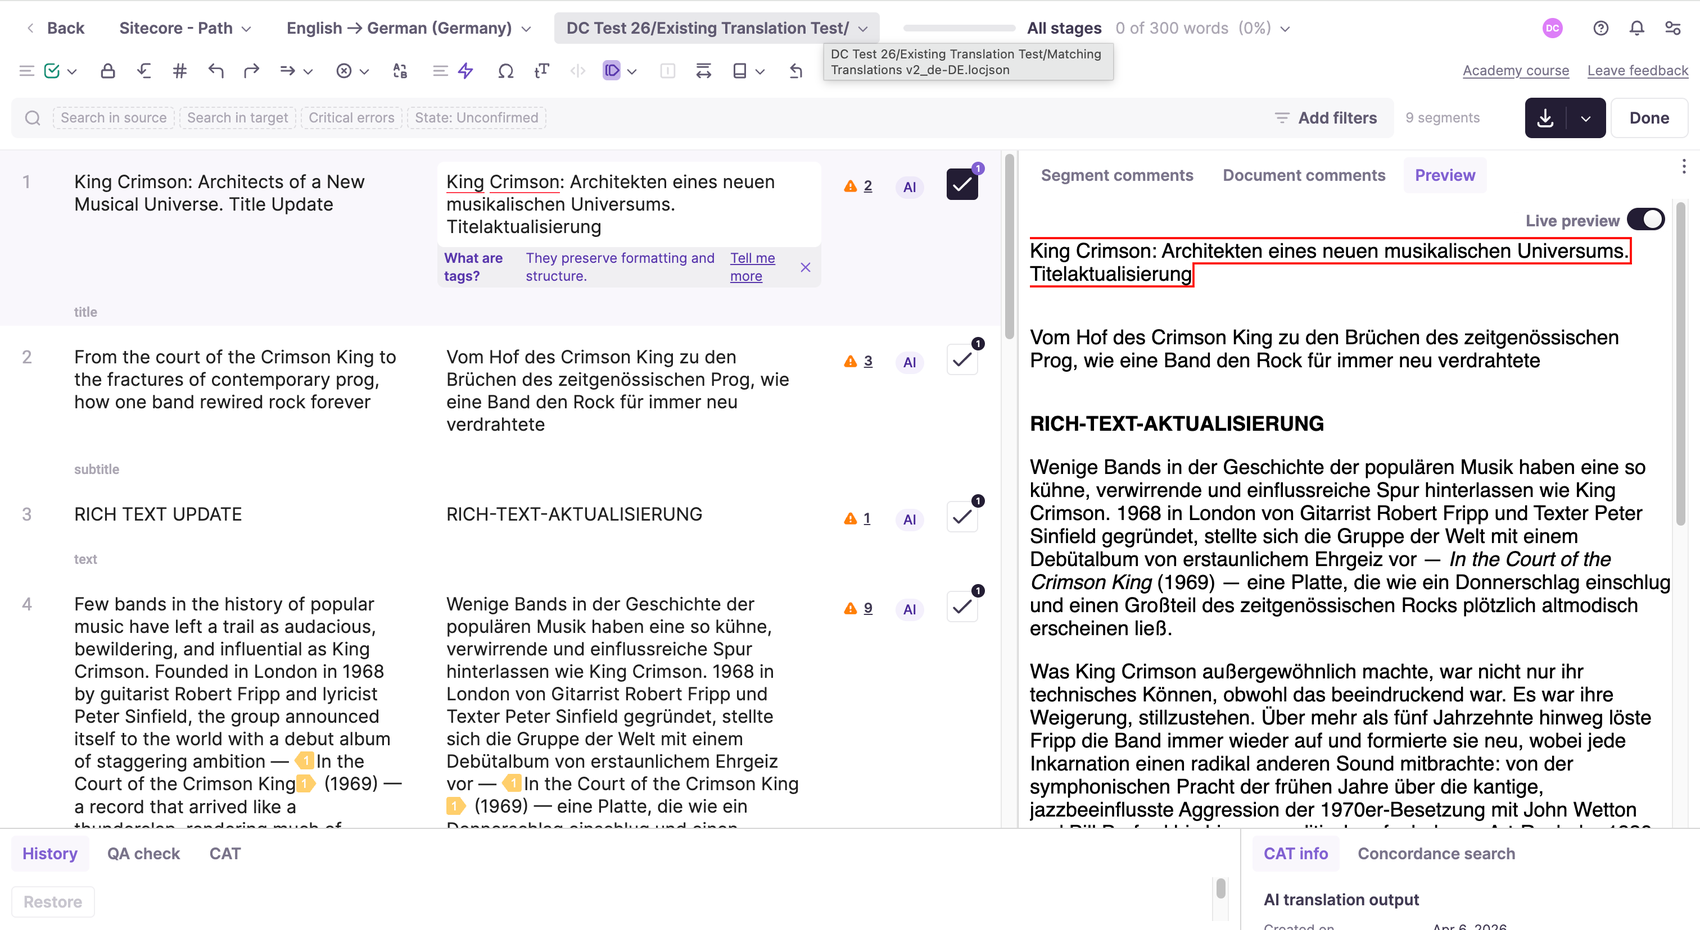
When a translation project is created in Smartcat, each translatable item is represented as a file. Optionally, you can configure Smartcat to mirror the item path from Sitecore inside Smartcat.
To enable this, open Plugin settings and select Create folder hierarchy in Smartcat.
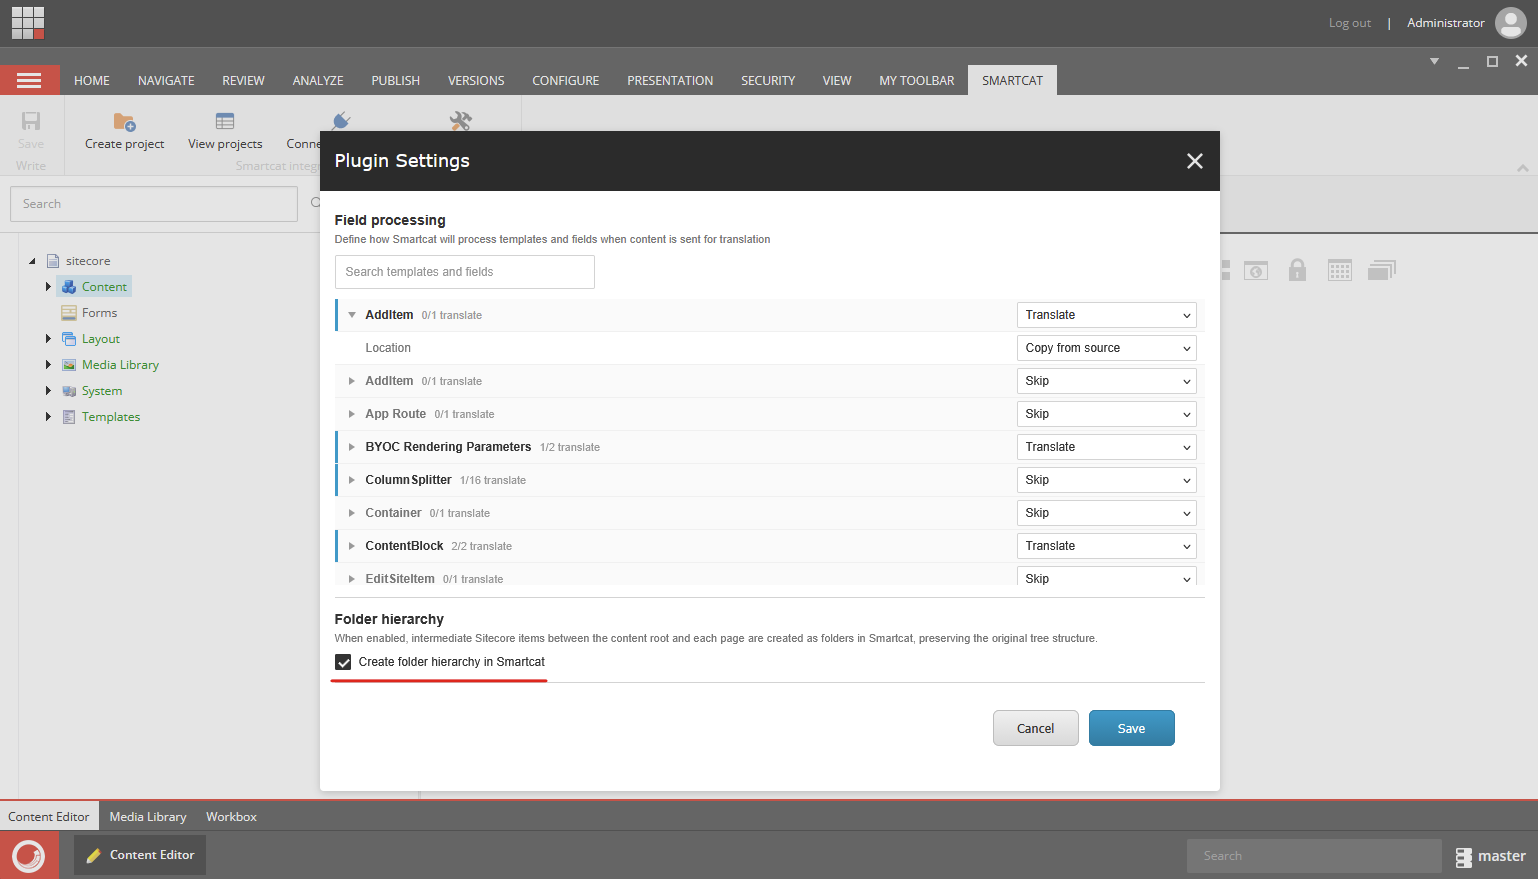
This can be useful when you want to see the exact item path while working in the Smartcat Editor.
Understanding field settings: Skip, Translate, and Copy from source
Every template and field in Plugin settings has exactly one behavior when content is sent for translation:
-
Translate - the field is sent to Smartcat and comes back translated.
-
Copy from source - the field is not translated. Its source value is copied into the language version when translations are pulled to Sitecore.
-
Skip - the field is ignored entirely: not translated and not copied.
Fields are set to Inherit from template by default, so in most cases you only need to configure the template behavior. A template that was never configured is treated as Skip: its content is not sent anywhere.
How the settings are applied:
-
Plugin settings are plugin-wide and apply to all projects. The Select content step of project creation is the other place you can change them: clicking Next there saves your changes back as the plugin-wide defaults.
-
What is sent for translation is decided when the project is created (or when its documents are updated). If you change a field from Skip to Translate, send the page for translation again to include it.
-
Copying from source is applied every time translations are pulled, using the current Plugin settings. If you add a Copy from source rule later, simply pull the project again: the values will be copied.
Getting help and reporting problems
The Help Menu
The SMARTCAT tab ends with a Help button, next to Plugin settings.
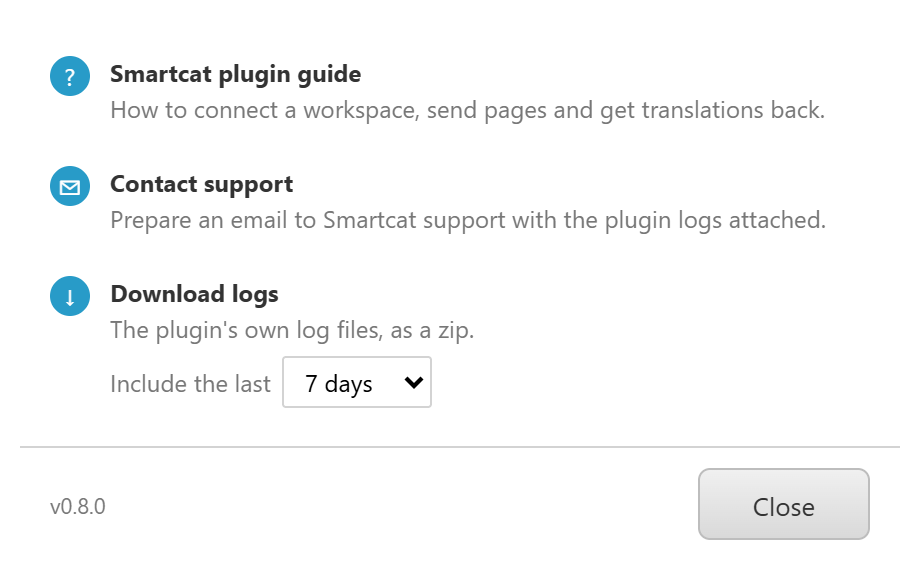
Nothing in the menu needs a connected workspace, so it still works when the plugin cannot reach Smartcat.
-
Smartcat plugin guide - opens this documentation in a new tab.
-
Contact support - prepares an email with the logs attached. See below.
-
Download logs - downloads the logs on their own as a zip, for attaching to a ticket you have already opened. Choose how far back to go with Include the last.
The version number in the corner is the plugin build installed on this Sitecore instance. Quote it when you report a problem. It is shown on all five plugin screens.
Sending Logs to Support
The plugin never sends mail itself. It builds the message and hands it to you; you review it and press Send in your own mail client. That way the address you write from is a real one support can reply to, and nothing depends on a mail server being configured in Sitecore.
-
Open Help and select Contact support
The form lists exactly which files will be attached and how large they are before anything is downloaded.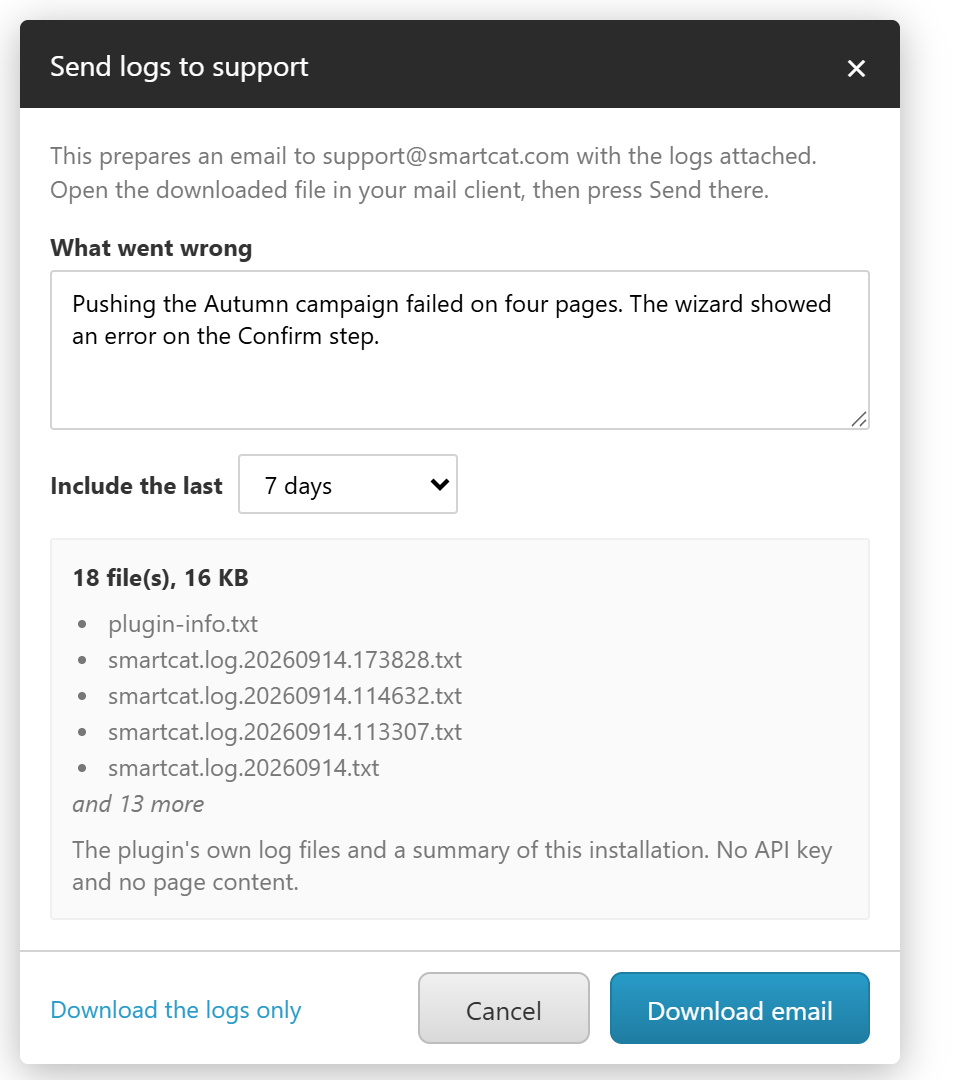
-
Describe what went wrong
What you were doing, which pages, and what you expected. This text becomes the body of the email. -
Choose how far back the logs should go
Include the last offers 1, 7 or 30 days. Seven days suits most cases; widen it if the problem started earlier. -
Select Download email
A.emlfile is saved. Open it in your mail client, check it reads the way you want, and press Send. If your client opens it read-only, forward it to the same address instead.
From an error message
Every failure the plugin reports carries the same link, so you do not have to find the ribbon first.

Selecting Send logs to support opens the form above, already on the screen where the error happened.
What the bundle contains
-
The plugin's own log files - and only those. Sitecore's own log carries every other module's traffic and is not sent.
-
A summary of this installation - plugin version, Sitecore version, server name and workspace ID.
-
No API key and no page text. The logs name pages, fields and projects so support can follow what happened, but the text of your content is never written to them. The workspace ID identifies the account for support without carrying the key that would let anyone use it.
The attachment is capped at 5 MB, which is what most mail clients accept. If the newest log file does not fit whole, its most recent lines are kept and the summary says which file was shortened.
Support address: support@smartcat.com. An installation routed through a reseller can point this at another desk with the Smartcat.SupportEmail setting.
Uninstalling the plugin
Sitecore has no built-in package uninstall, so removal is a manual procedure.
To move to a different plugin version you do not need to uninstall first — installing another package over the current one replaces the files and items. If you are going back to an older release, read Downgrading to an earlier version at the end of this section first.
Before you start
-
Back up the master and core databases. This is the only complete rollback for the Sitecore items.
-
Work on a Content Management instance, during a maintenance window. Content Delivery instances do not have the plugin.
-
Note the installed plugin version — you need it if you plan to reinstall.
-
Record your Smartcat API key. It is stored in
/sitecore/system/Settings/Smartcat, which is removed in the steps below. That item also holds the plugin's translation bookkeeping.
Step 1 — Remove the Sitecore items
Do the items before the files. Deleting files restarts the Sitecore application, which can interrupt the rest of the procedure.
Open the Content Editor and switch the database at the bottom right of the Sitecore Desktop.
In the core database, delete:
/sitecore/content/Applications/Content Editor/Ribbons/Ribbons/Default/Smartcat ref
/sitecore/content/Applications/Content Editor/Ribbons/Strips/Smartcat
/sitecore/content/Applications/Content Editor/Ribbons/Chunks/Smartcat
/sitecore/content/Applications/WebEdit/Ribbons/WebEdit/Smartcat
In the master database, delete:
/sitecore/templates/Smartcat
/sitecore/system/Settings/Smartcat
Accept the sub-item warnings. If Sitecore asks about links, choose Remove links — those links run between Smartcat items only.
Deleted items go to the Sitecore Recycle Bin and can be recovered.
Step 2 — Remove the files
Delete these from the Sitecore web root, leaving Smartcat.config until last:
-
bin\SmartcatPlugin.dllandbin\SmartcatPlugin.pdb -
bin\Smartcat.IntegrationHub.ApiClients.dll,bin\Smartcat.IntegrationHub.Contracts.dll,bin\Smartcat.IntegrationHub.Utils.CrossPlatform.dll,bin\Smartcat.Utils.dll -
bin\TSClientGen.Contract.dllandbin\MongoDB.Bson.dll -
the folder
sitecore modules\Shell\Smartcat\ -
the Smartcat icons in
sitecore\shell\Themes\Standard\Images\24x24\—create_project.png,plugin_settings.png,view_projects.png,workspace.pngandhelp.png -
App_Config\Include\Smartcat.config
Then recycle the application pool.
If you prefer, the script below performs both steps in one pass. Run it in the Sitecore PowerShell Extensions (SPE) ISE, after setting the web-root path on the line marked at the top. It removes the items first and the files second, for the reason given above.
Step 3 — verify
-
Re-open each item path listed in step 1. A confirmation dialog closed too early can leave an item in place without showing an error.
-
Open the Content Editor and confirm the Smartcat ribbon tab is gone. Ribbon definitions are cached, so refresh with Ctrl+F5.
-
Confirm the Content Editor opens and the site serves pages.
-
Check the newest log in
App_Data\logs\for errors.
The first page load after the recycle takes around two minutes. That is a normal Sitecore cold start, not a failed removal.
Restoring the plugin
-
Reinstall the plugin package for your Sitecore version. This recreates every file and item. You then re-enter your Smartcat API key.
-
Sitecore Recycle Bin, for items deleted in step 1.
-
Database restore, from the backup taken before you started.
What removal does not affect
-
Translations already delivered into Sitecore stay in place.
-
Projects, translation memories and glossaries in Smartcat stay in place.
-
Your own content, templates and Sitecore configuration are untouched.
Removing the plugin only takes away the connection and the ability to send new content for translation.
Downgrading to an earlier version
You do not need to uninstall before installing an older plugin package — it replaces the same files and Sitecore items. Three things to know first.
Use 0.6.67 or later. Earlier 0.6.x builds were shipped as plain file archives rather than installable Sitecore packages. They contain no Sitecore items and cannot be used with the Installation Wizard, so installing one over a newer version leaves the newer items in place and produces a mismatched setup.
Check whether Plugin Settings were saved since the upgrade. When you upgrade to 0.7.0 or later, the plugin converts your field configuration to a new format and keeps a copy in the old format, so an older version can still read it. That copy is discarded the first time anyone saves Plugin Settings on the newer version.
-
If nobody has saved Plugin Settings since the upgrade, your field configuration survives the downgrade.
-
If someone has, the older version will not find it and will fall back to its defaults. Note your Skip / Translate / Copy from source settings before downgrading, and set them again afterwards.
A few files are left behind. A package install adds and replaces files but never deletes them, so these remain after downgrading from 0.7.x or 0.8.0 and are unused by the older version:
sitecore modules\Shell\Smartcat\AshxEndpoints\Settings\GetFieldProcessingSettings.ashx (and .ashx.cs)
sitecore modules\Shell\Smartcat\AshxEndpoints\Settings\SaveFieldProcessingSettings.ashx (and .ashx.cs)
sitecore modules\Shell\Smartcat\VueApp\dist\smartcat-plugin-settings.css
sitecore modules\Shell\Smartcat\VueApp\dist\smartcat-plugin-settings.iife.js
They are inert — the older interface never calls them — but you can delete them for a clean result.
Recycle the application pool after the downgrade. Your Smartcat API key is kept.
FAQs
Which Sitecore versions does the Smartcat connector support?
Connector packages are provided for Sitecore 10.1, 10.2, 10.3, and 10.4.
Can I exclude specific fields from translation?
Yes — when configuring the translation scope, you can select fields from the item's template to exclude them from being sent to Smartcat.
What happens to fields I exclude from translation when a new language version is created?
They keep their source value in the new language version rather than being translated.
Can I translate items with unusual locale codes that Smartcat doesn't recognize directly?
Yes — you can create custom locale mappings in Sitecore's SmartcatSettings (System → Settings → Smartcat) to map a Sitecore locale to the corresponding Smartcat locale.
If I only update part of my source content, do I need to retranslate the whole page?
No — for updates, you can send just the changed item for translation again (including existing translations) rather than reprocessing the entire page from scratch.
What's the difference between "Copy field value" and "Do not copy field value" in Plugin Settings?
"Copy field value" acts as a whitelist — only the selected fields are copied as-is to the target language version. "Do not copy field value" acts as a blacklist — everything is copied except the selected fields. Only one mode is active at a time per template.
Want to learn more?
See how Smartcat can transform your localization workflow.
Still need help?
Our support team responds within one business day.