AI Translation Profiles: Configuring Linguistic Assets and Translation Engines
Overview
AI Translation Profiles are pre-configured settings that control how translation engines and linguistic assets work together in your Smartcat workspace. A profile defines which Translation Memories/Reviewed Translations and Glossaries/Terminology are applied, which AI/machine translation engine is used for each language pair, whether a fallback engine is used if the primary engine fails, and whether AI translation is used at all for a given workflow. Profiles can be created per client, department, brand, or use case, and applied automatically to new projects.
📌 A Project Template defines the structure of your project (languages, workflow stages, deadlines, assignees). An AI Translation Profile defines the quality and behavior of the AI translation itself (which TM/glossary to draw from, which engine, custom instructions). You need both, and — as noted below — you can't assign an AI Profile to a Template at creation time.
When to use it
Use AI Translation Profiles when you need to:
-
Apply different linguistic assets (TMs, glossaries) to different clients or departments
-
Control which translation engines are used for specific language pairs
-
Prevent new translation memories from being automatically added to all projects
-
Disable AI translation entirely for certain workflows
-
Maintain consistency across projects without manual configuration each time
Requirements and Limitations
-
AI Translation Profiles are available on all paid Smartcat plans
-
You must have workspace administrator permissions to create or modify profiles
-
Profiles apply at the workspace level. They cannot be shared across workspaces
-
By default, new translation memories are automatically added to all profiles unless you disable this setting
-
Profiles do not override project-level translation rules. They provide defaults that can be adjusted per project
-
For accounts managing linguistic assets across a very large number of distinct clients/brands (100+), we recommend working with your Smartcat account team to plan your profile structure — profiles are configured individually, so a tailored rollout plan ensures each is set up with the right assets from the start.
⚠️ If you need to use only specific TMs for certain clients, create a dedicated profile with only those TMs selected, then set it as the default or apply it during project creation.
⚠️ Changing the translation engine on an existing profile only affects new projects created after the change. Existing projects keep their current settings and must be updated individually.
How it works
Step 1 — Access AI Translation Profiles
- Go to Intelligence Fabric → Smartcat Coworkers → Translator → Translation Profiles in your Smartcat workspace, then select AI Translation Profiles from the menu.
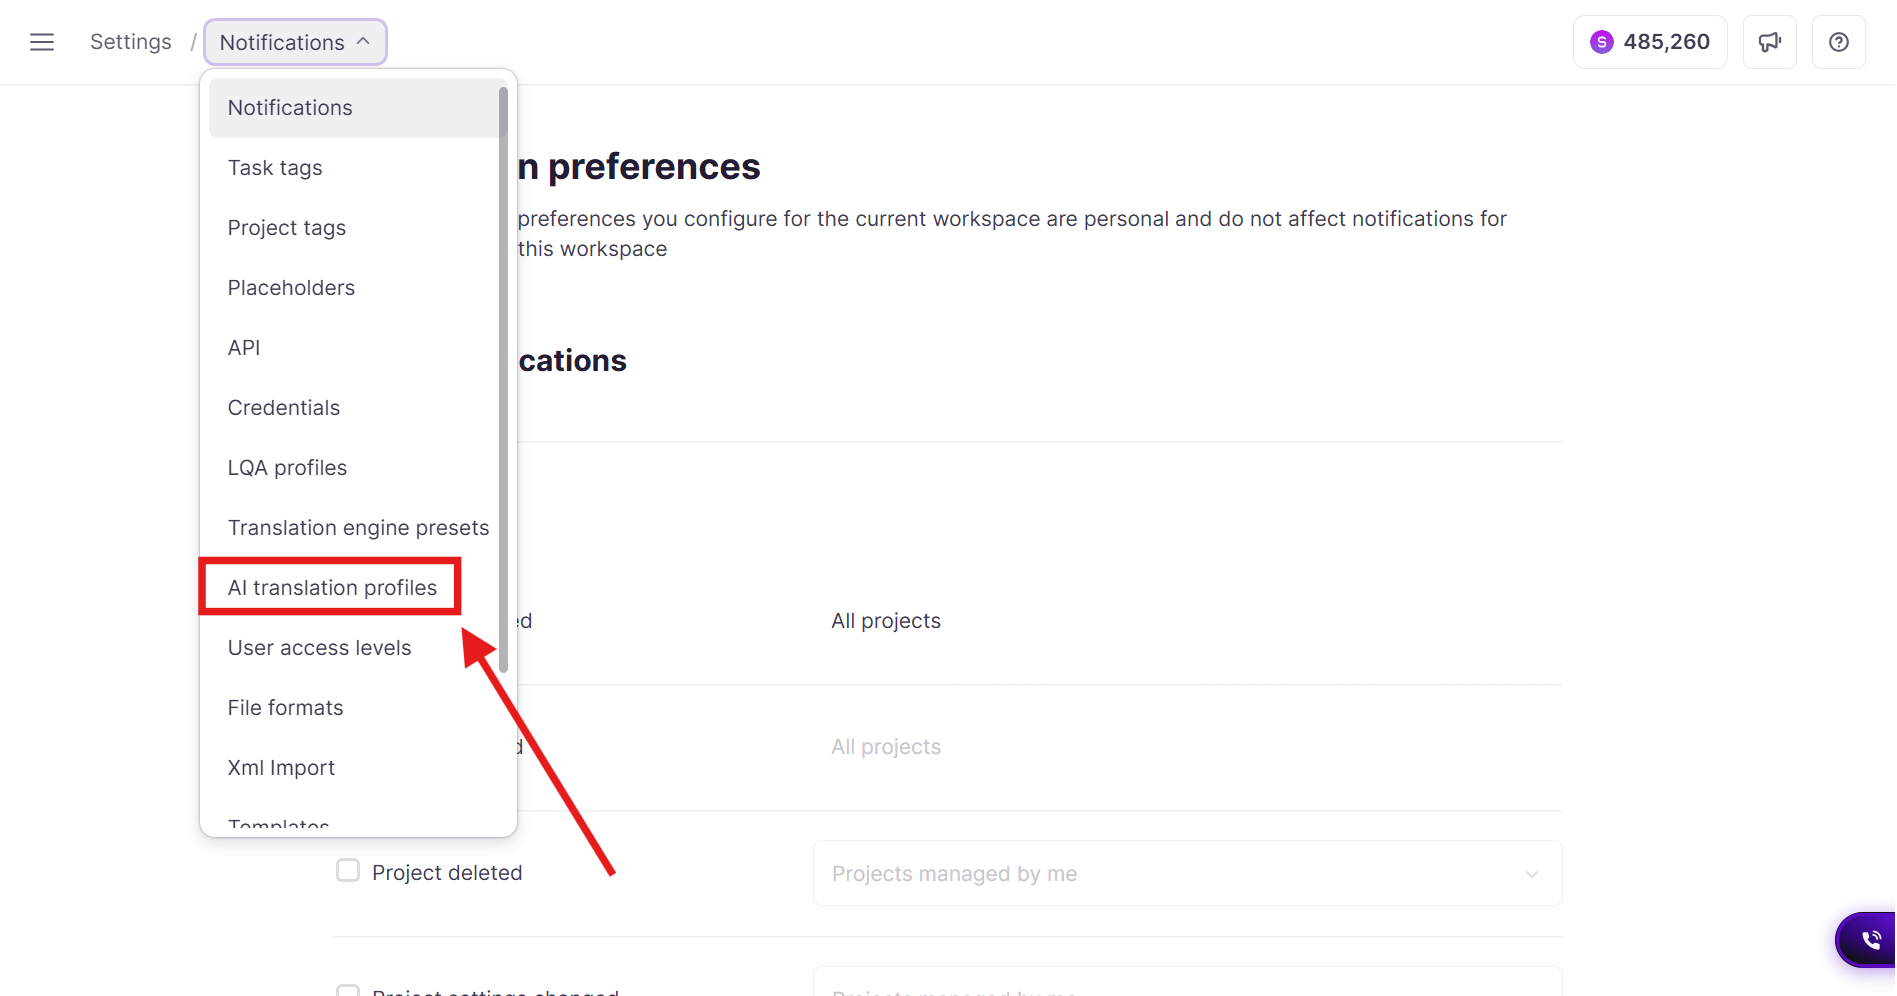
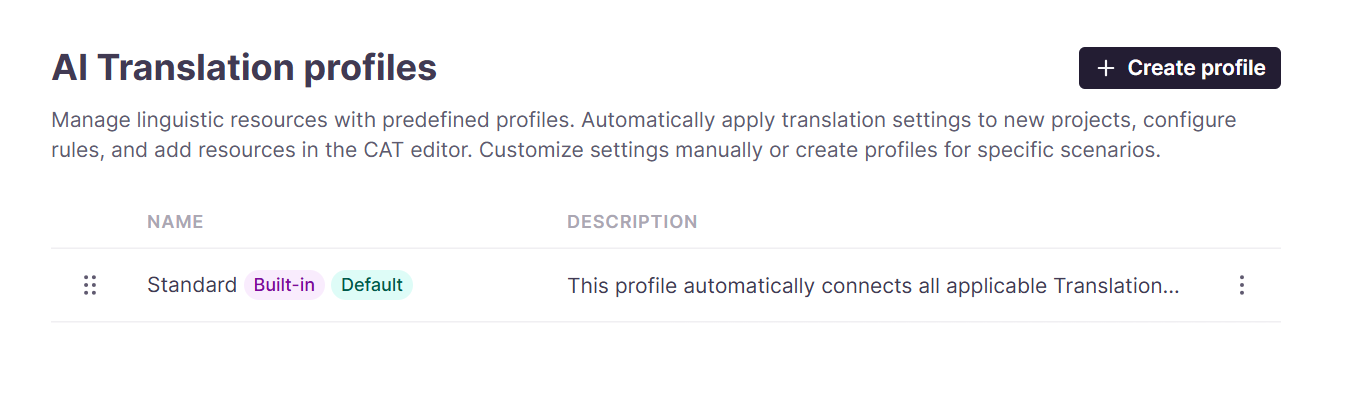
- Click + Create profile or select an existing profile to edit.
Step 2 — Configure basic profile settings
When creating a new profile, you can start from scratch by clicking + Create profile, create from an existing profile template by clicking the three dots to the right of an existing profile and selecting + Create from existing, or duplicate an existing profile in your workspace.
-
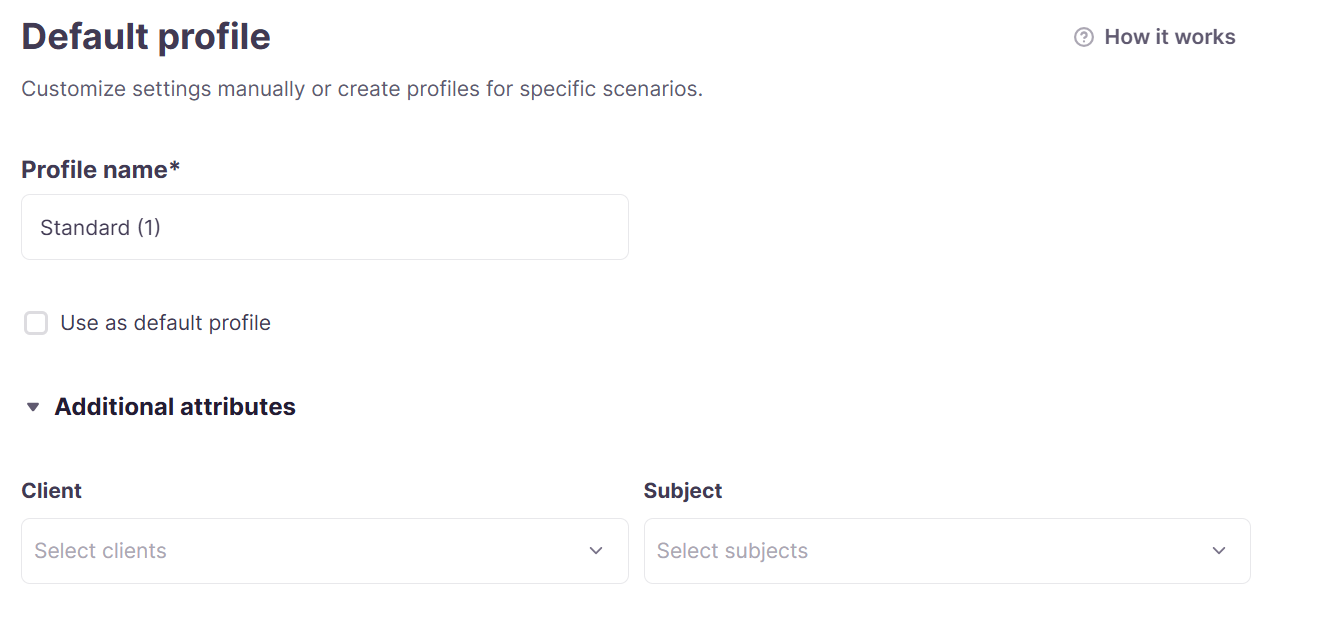
Enter a Profile name that identifies its purpose (e.g., "Client A - Marketing", "Legal Department").
-
Open Additional attributes to link the profile to specific clients or departments. Select the Clients and Subjects from the menus.
Step 3 — Configure translation memories
- In the Translation Memories configuration section select which TMs to include in this profile. Smartcat adds all TMs by default, and you can remove TMs by clicking the Unlink icon to the right of the TM. You can connect TMs to the profile by clicking Connect Translation Memories and selecting one from the list.
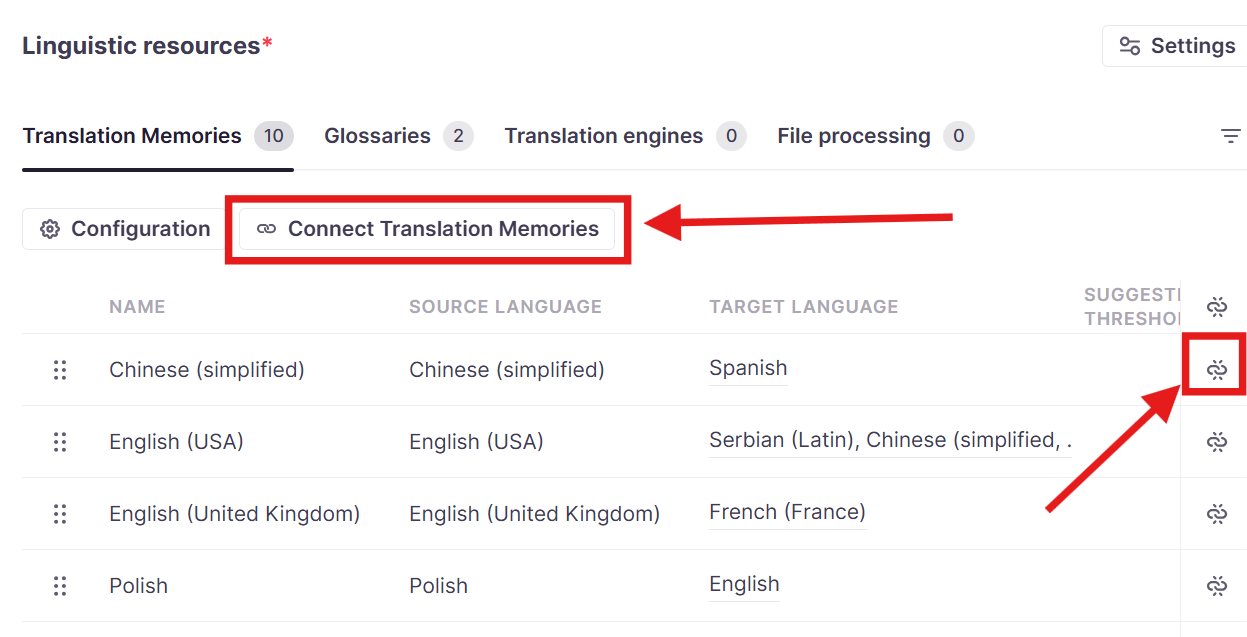
- Click Configuration and enable Auto-link new translation memories to automatically add newly created linguistic resources to this profile. Disable this option to prevent new TMs from being automatically added.
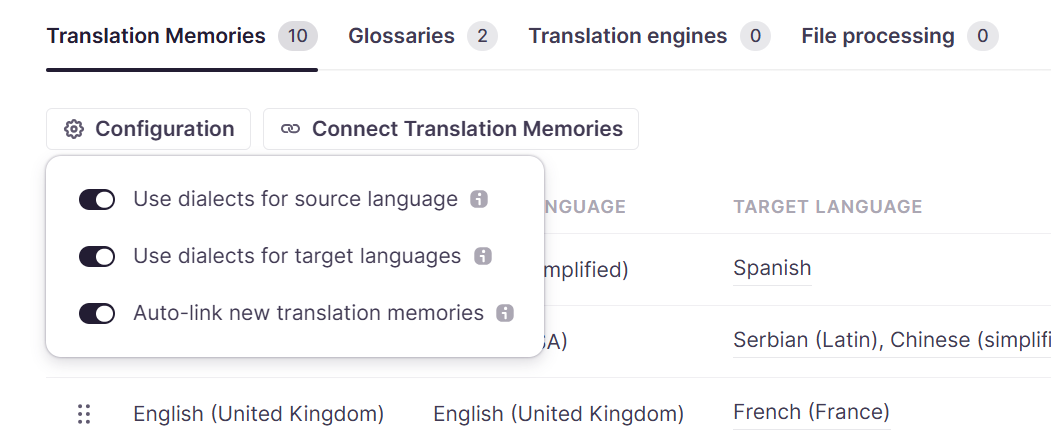
- Toggle dialect/root language settings for source and target languages if needed.
⚠️You can add up to 250 Translation Memories to a single AI Translation Profile.
Step 3 — Configure glossaries
-
Under Linguistic resources, click the Glossaries tab
-
Select which glossaries to include in this profile. Smartcat adds all glossaries by default, and you can remove glossaries by clicking the Unlink icon to the right of the glossary. You can connect glossaries to the profile by clicking Connect Glossaries and selecting one from the list.
-
Click Configuration and enable Auto-link new translation memories to automatically add newly created linguistic resources to this profile. Disable this option to prevent new TMs from being automatically added.
-
Toggle dialect/root language settings for source and target languages if needed.
Step 4 — Configure Translation Engines
-
Under Linguistic resources, click the Translation engines tab.
-
To use only TMs without AI translation, disable translation engines by clicking Settings to the right of Linguistic resources and disabling Translation engines.
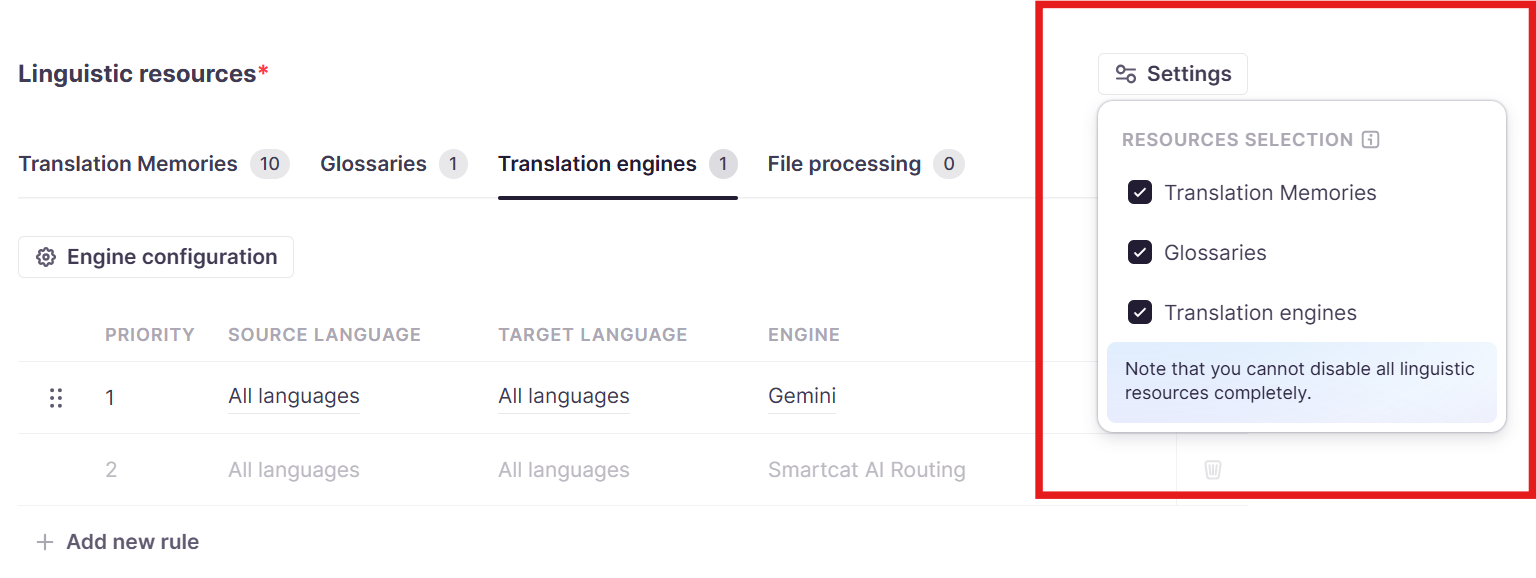
- To keep AI translation enabled, proceed to engine configuration.
Step 5 — Set engine rules for language pairs
-
Under Linguistic resources, click the Translation Engines tab.
-
Click Add new rule to select a specific engine for a language pair.
-
Add multiple engines if needed. Drag and drop rules to set priority order (lower numbers = higher priority).
-
Google NMT remains available as a fallback option. When the fallback engine is enabled, Smartcat automatically reruns translation using Google NMT as a reliable backup if the primary engine fails.
Step 6 — Configure advanced engine settings
-
In the Translation Engines tab, click Engine configuration.
-
Toggle Fallback translation off if you want only your chosen engine used (empty segments will require human review if the engine fails).
-
Toggle Use LLMs off to keep translations consistent with TMs and glossaries only.
Step 7 — Apply the profile
-
Click Save as new profile
-
Set the profile as your workspace default, or
-
Select the profile when creating new projects
⚠️ A Project Template cannot currently have an AI Profile assigned to it at creation time. You must choose either a template or an AI profile when creating a new project.
Controlling translation style or formality
AI Translation Profiles do not include a dedicated formality or language style setting. Instead, formality is controlled through the System prompt of your Translator Coworker.
This method works with LLM-based engines: OpenAI GPT, Gemini, and Anthropic. Non-LLM engines such as Google NMT, DeepL, and Microsoft Translator do not support custom prompt instructions for formality. Some workspaces may have access to additional engine variants with built-in formality options — contact your Smartcat account manager if you need formality control without an LLM engine.
If you previously configured a language style setting and can no longer find it after a recent UI update: the style instruction lives in the AI translation engine preset (Settings → AI translation engine presets), not on the AI Translation Profile screen itself. The profile controls which preset is used for each language pair — the style instruction is inside the preset.
Setting up a quote-only project
If you're creating a project purely to get Statistics and a Quote for approval, AI translation can run — and consume Smartwords — before anyone has approved anything. This happens because AI translation runs automatically on any segment without a Translation Memory match, independent of the workflow stages you select. The workflow selector (Translation / Editing / Proofreading) does not control this — it only determines which human review stages exist in the project.
The correct fix depends on how the project is created, because the two creation paths use different mechanisms:
-
Path A — via an AI Translation Profile (no template): disable Translation Engines on the profile.
-
Path B — via a Project Template: a template always places AI translation as a fixed first stage that cannot be removed, and a template cannot have a Profile assigned to it at the same time — so the fix is configured directly on the template's own linguistic asset rules (no TM, no engine assigned), not through a Profile.
Both paths still generate Statistics and a Quote normally, because both are computed from segment/TM-match counts, not from AI-translated output.
Path A — Creating a project with an AI Translation Profile (no template)
-
Go to Intelligence Fabric → Smartcat Coworkers → Translator → Translation Profiles → AI Translation Profiles.
-
Click + Create profile (or duplicate an existing one) and name it for this purpose, e.g. "Quote-only — no AI."
-
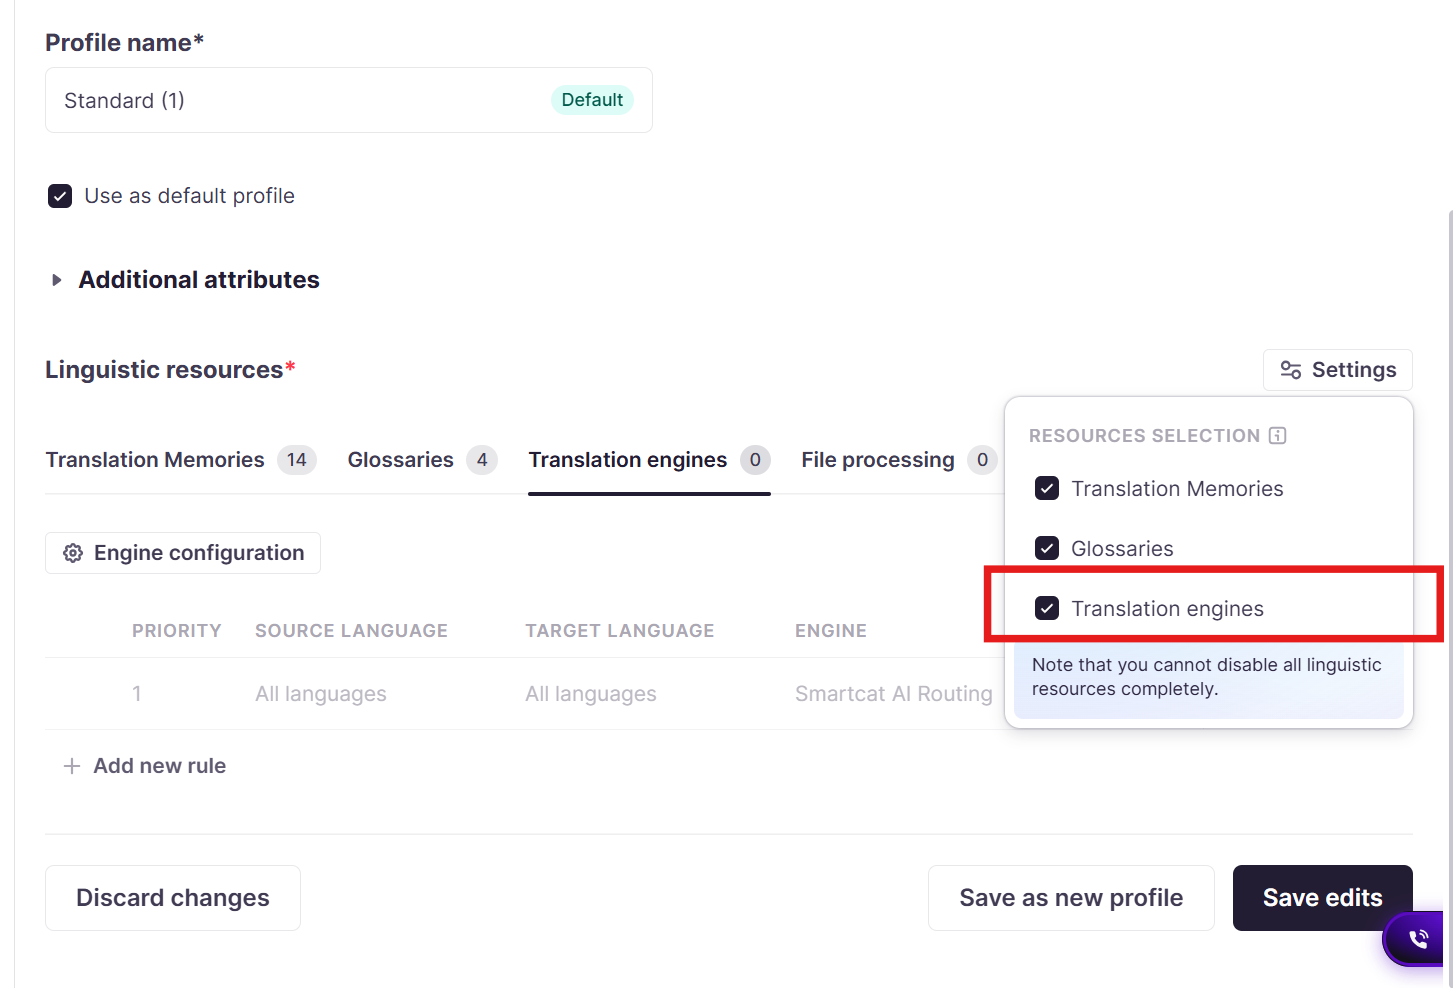
Click Settings next to Linguistic resources and disable Translation engines entirely.
-
Click Save as new profile.
-
When creating your project, select this profile instead of your default profile (with engines enabled).
-
Upload your files and generate Statistics and the Quote as normal — unmatched segments are left for human translation rather than sent to the AI engine, so no Smartwords are consumed.
-
Once the quote is approved, switch the project to a profile with engines enabled (or edit this profile's engine settings) and re-run translation to populate AI output.
Path B — Creating a project from a Project Template
Because AI translation is a fixed first stage on every template-based project (it cannot be moved or removed), and a Project Template cannot have an AI Translation Profile assigned to it at the same time, disabling engines on a Profile has no effect here. Configure the template's own rules instead:
-
From the homepage, click Projects → + New Project → Change template → + Create template → Project template (or edit an existing template).
-
In Step 5 — Set up linguistic assets, do not attach any Translation Memory.
-
In Step 6 — Set Linguistic asset rules, leave AI Translation Rules with no translation engine assigned to any language pair.
-
Save the template.
-
Create your project from this template, upload files, and generate Statistics and the Quote as normal — with no TM and no engine configured, segments are left unconfirmed for human review rather than AI-translated, so no Smartwords are consumed.
-
Once the quote is approved, either edit the template's AI Translation Rules to add an engine and select Save and Run, or move the project to a different template/profile that has an engine configured.
Troubleshooting
Problem: All my translation memories are being added to every project.
Solution: Create a custom profile with only the TMs you need, disable "Automatically add new Translation Memories" in the profile settings, and set this profile as your default.
Problem: The wrong translation engine is being used for a specific language pair.
Solution: In your profile's Translation Engines tab, add a rule for that specific language pair and set your preferred engine. Ensure the rule has higher priority (lower number) than other rules.
Problem: I want to use only TMs without any AI translation.
Solution: In the profile's Linguistic resources block, click Settings and switch off Translation Engines entirely.
Problem: I'm not sure whether glossary terms are being applied correctly during AI translation.
Solution: When a Translation Profile has glossaries connected, Smartcat runs a glossary-term QA fix step after AI translation completes, which checks the output and corrects any mistranslated glossary terms automatically. This runs as part of standard AI translation whenever a glossary is linked to the profile — no separate setup is needed.
FAQs
What exactly does an AI Translation Profile control?
Which Translation Memories/Reviewed Translations and Glossaries/Terminology are applied, which AI/MT engine (or engines, in priority order) is used per language pair, whether a fallback engine (Google NMT) is used, and whether AI translation is used at all for a workflow.
Can I apply different profiles to different clients or departments?
Yes. Create a separate profile per client, brand, or department, link only the relevant TMs/Glossaries/Terminology to it, and apply it to that client's or department's projects — either as the workspace default or selected per project/template.
Will every Translation Memory automatically get applied to every project?
By default, Smartcat links all TMs to a profile. If you don't want that, create a dedicated profile containing only the TMs you need and disable "Auto-link new translation memories" in that profile's configuration so future TMs aren't added automatically.
Can I use only my Translation Memories/Reviewed Translations without any AI translation?
Yes. In the profile's Linguistic resources section, open the Translation engines tab and disable translation engines entirely. Segments without a TM match will then require human translation/review rather than being sent to an AI engine.
How does Smartcat decide which AI engine to use for a language pair?
It uses the engine rules you've defined in the profile, in the priority order you set (lower number = higher priority). If the top-priority engine fails, an automatic fallback to another engine is initiated.
Can I control formality or translation style (e.g., formal vs. informal address)?
Yes, but not directly on the profile itself. Formality is set via the System prompt of a custom AI translation engine preset (using an LLM-based engine — OpenAI GPT, Gemini, or Anthropic), which you then assign to the relevant language-pair rule inside your AI Translation Profile.
Can I use an AI Translation Profile together with a Project Template?
Not simultaneously today — when creating a new project you currently choose either a Project Template or an AI Translation Profile, not both at once.
Is there a limit on how many Translation Memories/Reviewed Translations I can add to one profile?
Yes — up to 250 Translation Memories/Reviewed Translations per AI Translation Profile.
Do I need special permissions to create or edit a profile?
Yes — you need workspace administrator permissions.
Can profiles be shared across workspaces?
No. Profiles apply at the workspace level and cannot currently be shared across workspaces.
What happens if I already translated a document and didn't have a Translation Profile set up before running the project?
The translation was generated using Smartcat's default settings at the time (default MT engine, no custom prompt/TM/glossary). Creating a profile afterward does not retroactively apply to already-translated content — it only affects translations going forward. To apply the new profile's settings to existing content, you'll need to re-run translation on those segments.
Want to learn more?
See how Smartcat can transform your localization workflow.
Still need help?
Our support team responds within one business day.