Project Templates in Smartcat
Overview
Project templates are pre-configured workflows that save your standard project settings — language pairs, workflow stages, translation memories, glossaries, and automatic translation rules — so you can reuse them for future projects. Instead of configuring the same settings each time you translate marketing content or localize software, you create a template once and apply it to new projects with a single click.
Templates are ideal for teams with recurring translation needs: weekly marketing updates, monthly product releases, or ongoing documentation localization.
Purpose
The purpose of a Project Template is consistency, speed, and control. Without a template, every new project has to be configured from scratch — increasing the risk that someone forgets to attach the right glossary, picks the wrong workflow, or skips a required review step. A Project Template removes that risk and that repetitive setup work. Benefits include:
-
Speed — new projects of a recurring type can be created in a few clicks, with all settings pre-filled, instead of being configured manually each time.
-
Consistency — every project created from the same template uses the same languages, workflow stages, TMs, and glossaries, so quality and process don't vary from one project to the next.
-
Governance — administrators define the "correct" way to run a given type of project once, and every team member who uses that template inherits that correct configuration automatically.
-
Scalability — target languages are predefined on the template, so every project created from it consistently covers the same language set; if an individual project later needs one more language than the template specifies, that target language can still be added to that specific project afterward from its project settings.
-
Fewer errors — because linguistic assets (TM, glossary) and workflow stages are locked into the template, the chance of a project going out without the right terminology or review step is greatly reduced.
Project Templates and Translation Profiles
Project templates define the structure of a project — workflow stages, languages, deadlines, and custom fields. AI Translation Profiles define the quality and behavior of the AI translation itself — which TM/glossary to draw from, which engine, custom instructions — and can be assigned directly to a project. A Project Template and an AI Translation Profile cannot both be assigned to the same project at the same time — you choose one or the other. Within a template, you configure the equivalent linguistic behavior explicitly via the template's own Translation Memory Rules and AI Translation Rules (see Linguistic Asset Rules Reference above), rather than by referencing a shared Profile.
Prerequisites
-
Permission to create projects in your workspace
-
At least one completed project (so you understand which settings work for your content type)
-
Translation memories and glossaries already created (if you want to include them in the template)
How it works
Creating a template from the project wizard
Step 1 — Start a new project
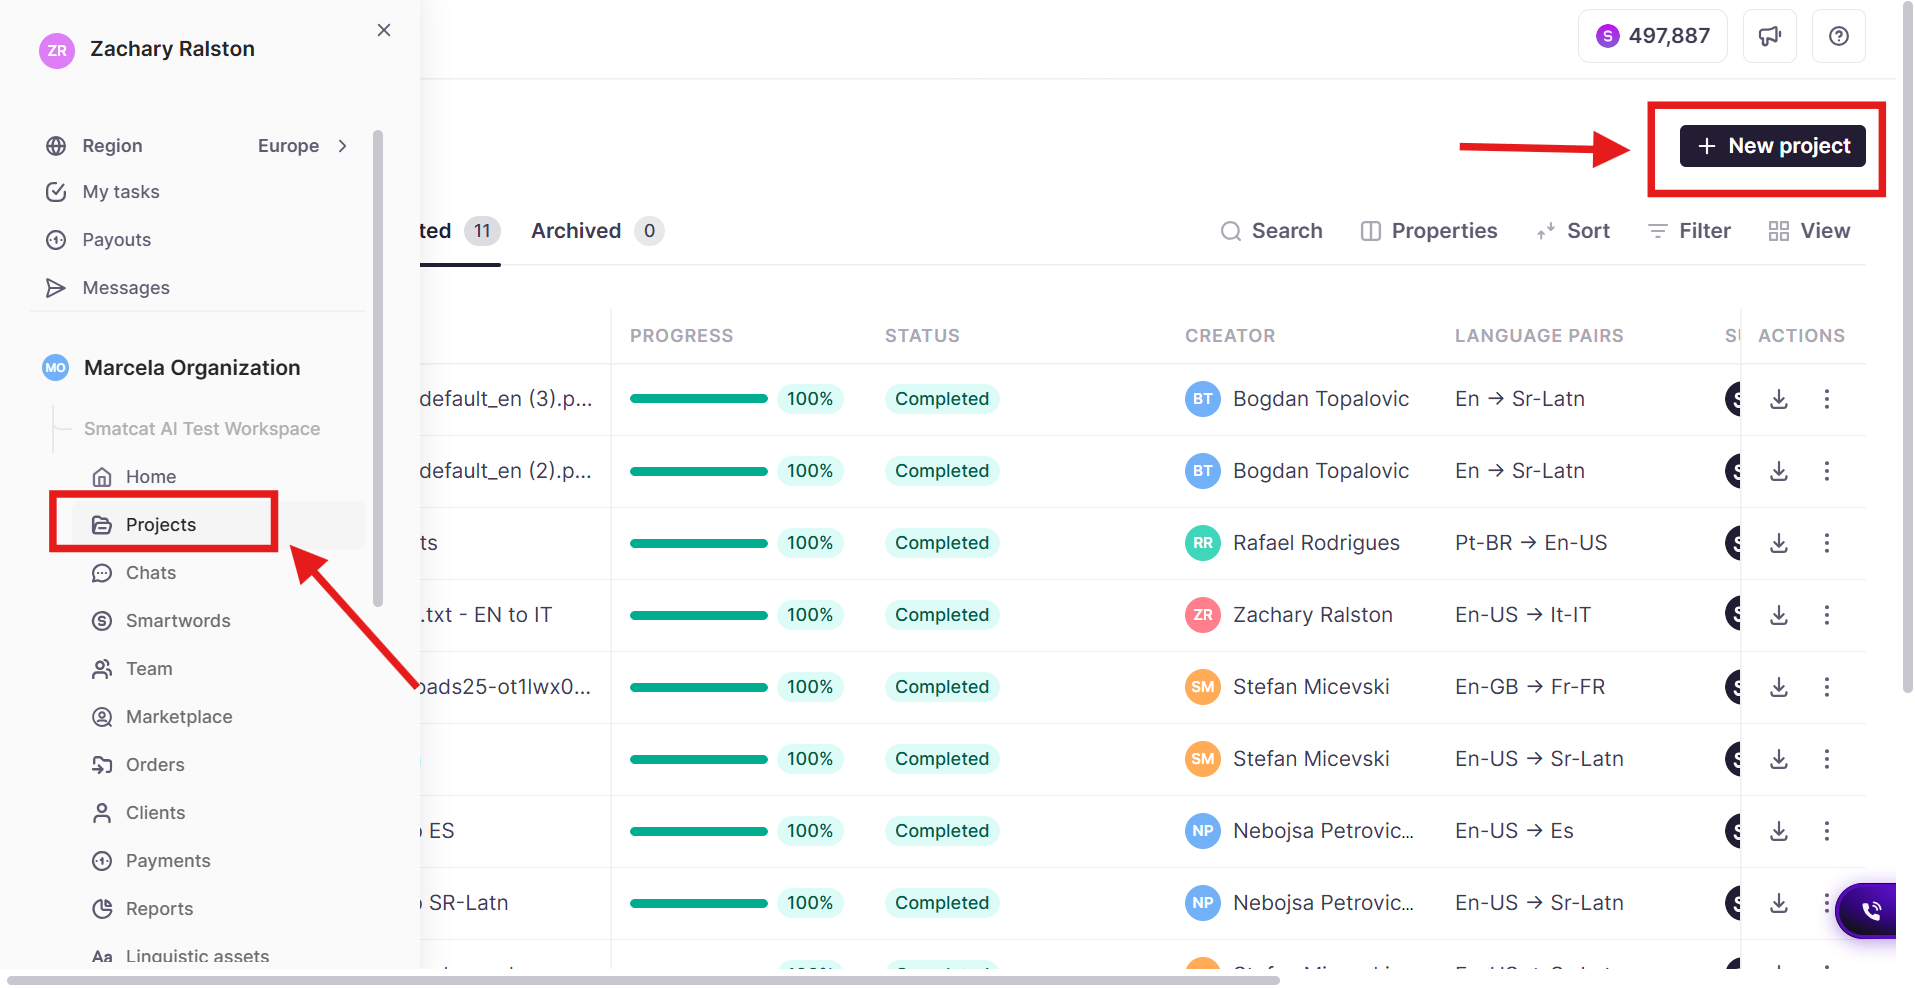
- From your workspace homepage, select Projects in the left navigation and click + New Project
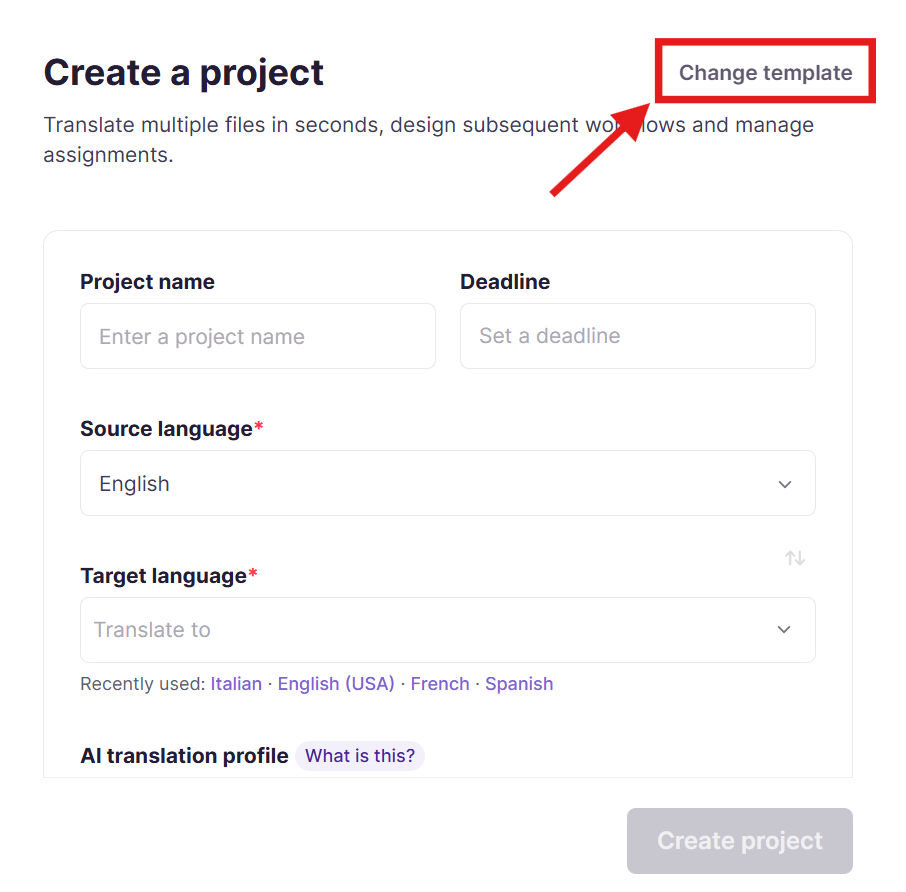
- Click the Change template button at the top right of the workflow
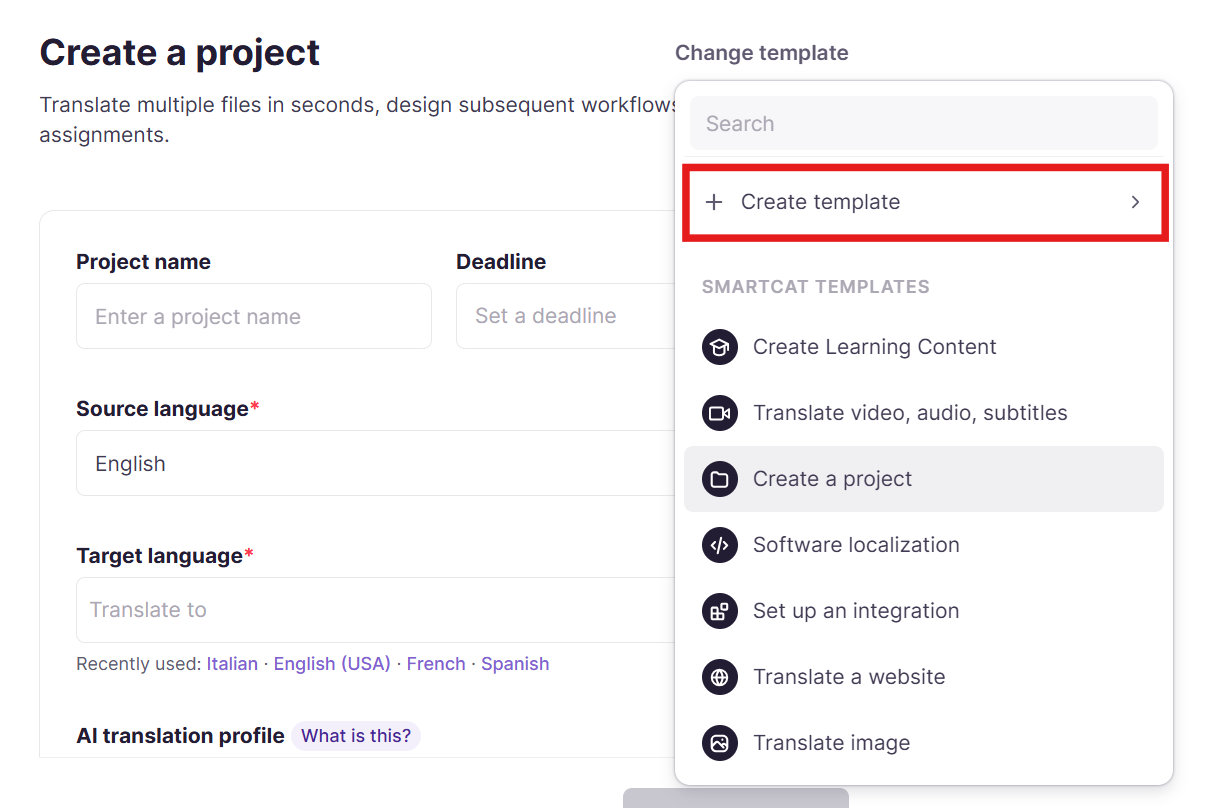
- Select + Create template > Project template to configure a custom template. You can also apply an existing template from this menu.
Step 2 — Define your template
-
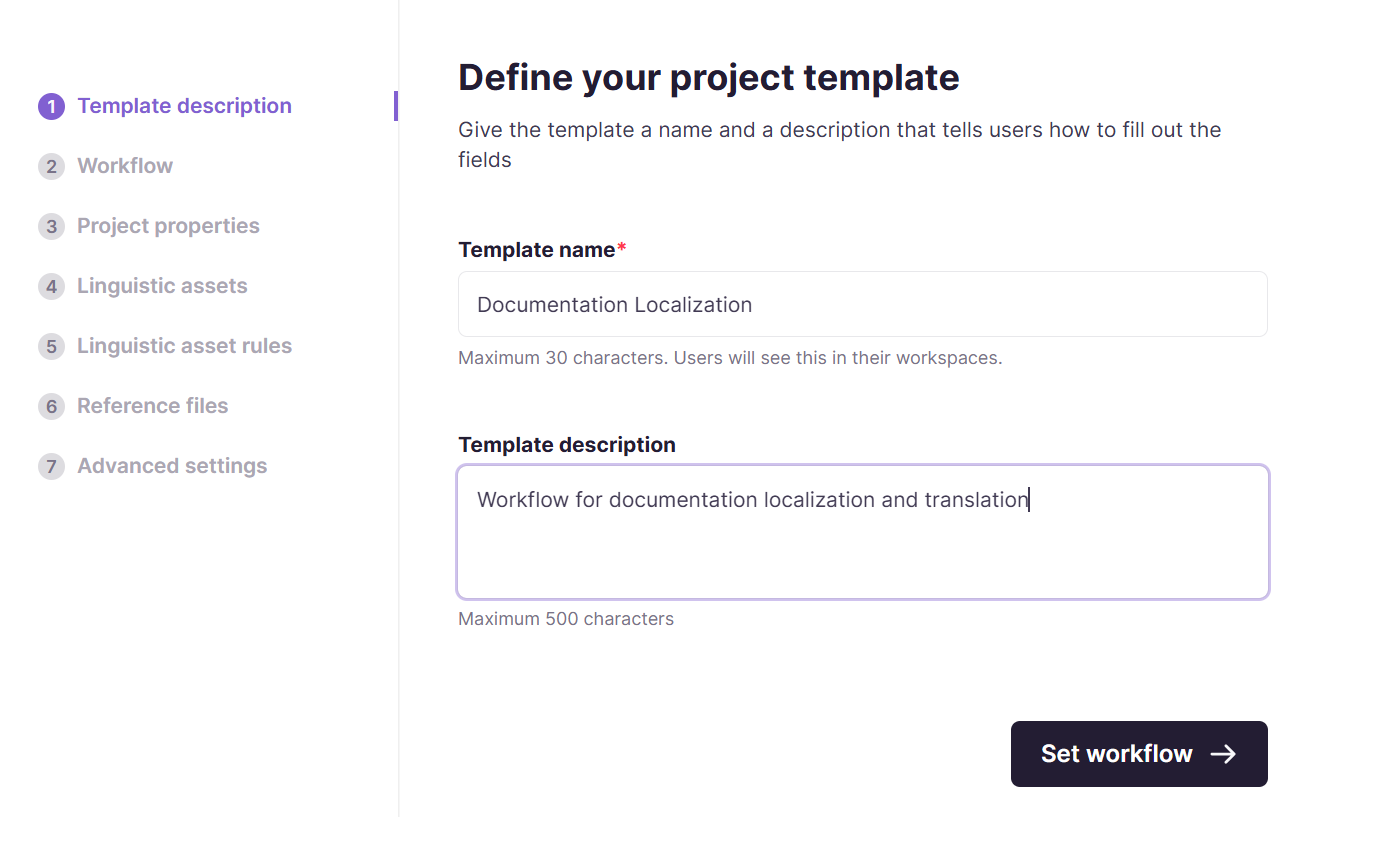
Enter a template name that describes the use case (e.g., "Marketing Content - EN to DE/FR/ES")
-
Add a description explaining when to use this template and any special instructions
-
Click Set workflow to move to the next step
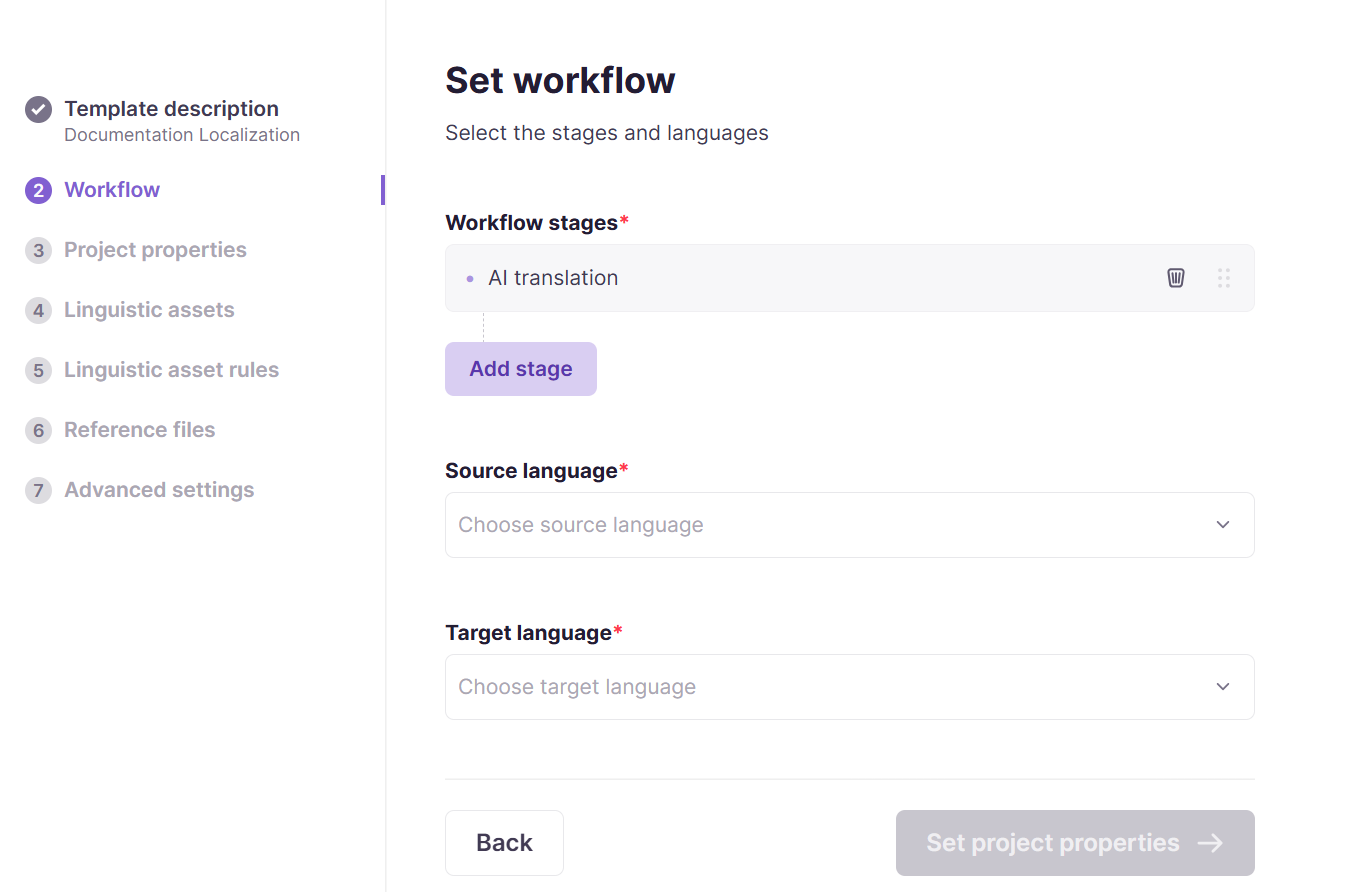
Step 3 — Set your workflow stages
-
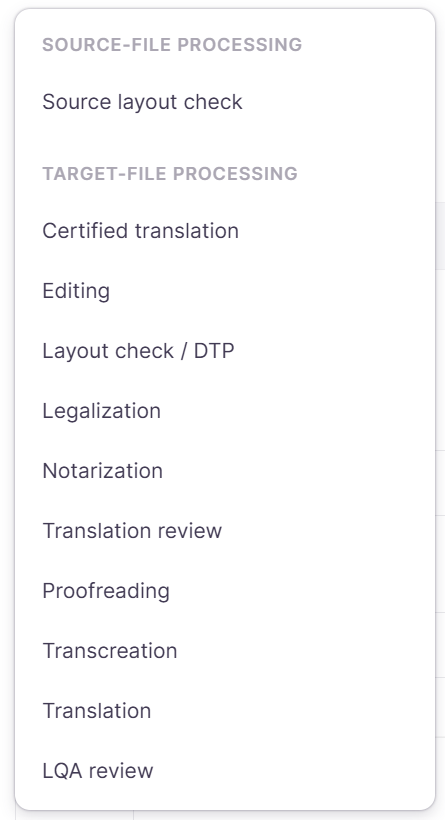
AI translation is placed as the first workflow stage by default and cannot be moved. Click Add stage to open the stage selection menu.
-
Select stages from source-file processing (e.g., Source layout check) and target-file processing (e.g., Translation, Editing, Review, QA)
-
Drag and drop stages to reorder them as needed
-
Click Set project properties to move to the next step
Available Workflow Stages
When creating your template, you can select from these workflow stages (in order):
-
Source layout check - Review source file formatting and layout
-
Certified translation - Official translation requiring certification
-
Editing - Content editing and refinement
-
Layout check/DTP - Desktop publishing and layout verification
-
Legalization - Legal document processing
-
Notarization - Notary services for official documents
-
Translation review - Quality review of translated content
-
Proofreading - Final proofreading and error correction
-
Transcreation - Creative adaptation for target market
-
Translation - Core translation work
-
LQA review - Linguistic Quality Assurance review
Stage selection rules:
-
The Source layout check stage can only be added once at the beginning or end
-
All other stages (Translation, Editing, Review, etc.) can be added multiple times
-
If you select two or more source languages, linguistic assets and automatic translation options are disabled
Step 4 — Set project properties
Configure optional fields:
-
Deadline — Set a default deadline offset. This number of days will be added to the date of the project creation and will be set as the deadline
-
Project name mask — Create a naming pattern for projects using this template. Enter any text or [Date] variable to make a project name mask. Every project name will start with the text added by user.
-
Project description — Select to allow users to enter or edit the project description. Clicking the box opens a field to write a default description.
-
Client — Select this field and a client in your workspace to automatically add the linguistic assets associated with that client
-
Subject — Select this field and one or more subjects from the dropdown to automatically add translation memories associated with the subject(s).
-
Custom fields — Add values for any custom fields configured in your workspace (Settings > Custom fields)
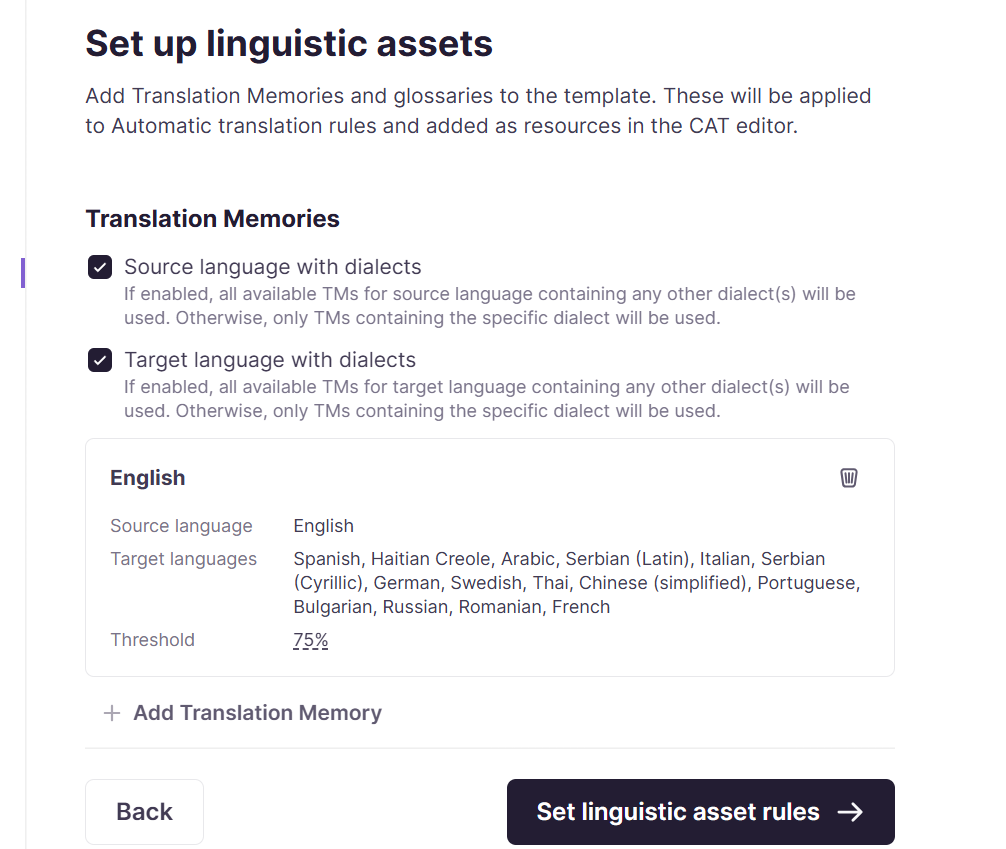
Step 5 — Set up linguistic assets
-
Select any of the with dialects fields desired. When selected, Smartcat matches the specified linguistic asset with any dialect for the identified language. If not selected, only linguistic assets matching that specific dialect are used.
-
Select translation memories (TMs). Click the percentage next to Threshold to specify match thresholds from the dropdown
-
Select glossaries to apply terminology rules
-
The TMs you select here can be used in automatic translation rules
⚠️ If you skip this step, you can still add TMs and glossaries when creating individual projects from this template.
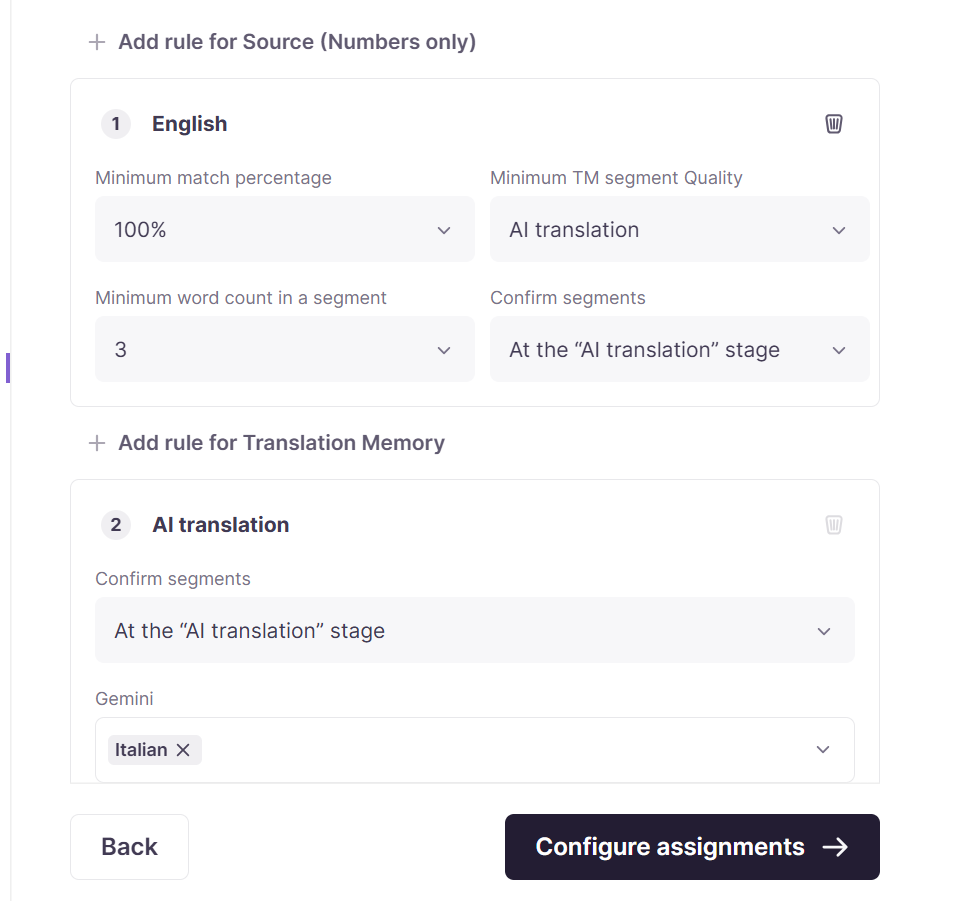
Step 6 — Set Linguistic asset rules
-
Configure translation memory rules — set the order and thresholds for TM matches.
-
Configure AI translation rules — select AI engines for specific target languages
-
Drag and drop rules to set priority order
💡See the Linguistic Assets Rules Reference section of this article for additional details.
Step 7 — Configure assignments
Choose the source of suppliers you want to invite for all project tasks. Use the auto-launch feature, located at the bottom of the page, to invite suppliers right after creating the project from a template.
Select an assignment source to determine how the agent determines which suppliers to invite:
-
AI assignments: Smartcat selects the most suitable suppliers using an AI-driven translator search
-
Template assignments: Assign a custom template to determine the assignments for this project
Step 8 — Upload reference files
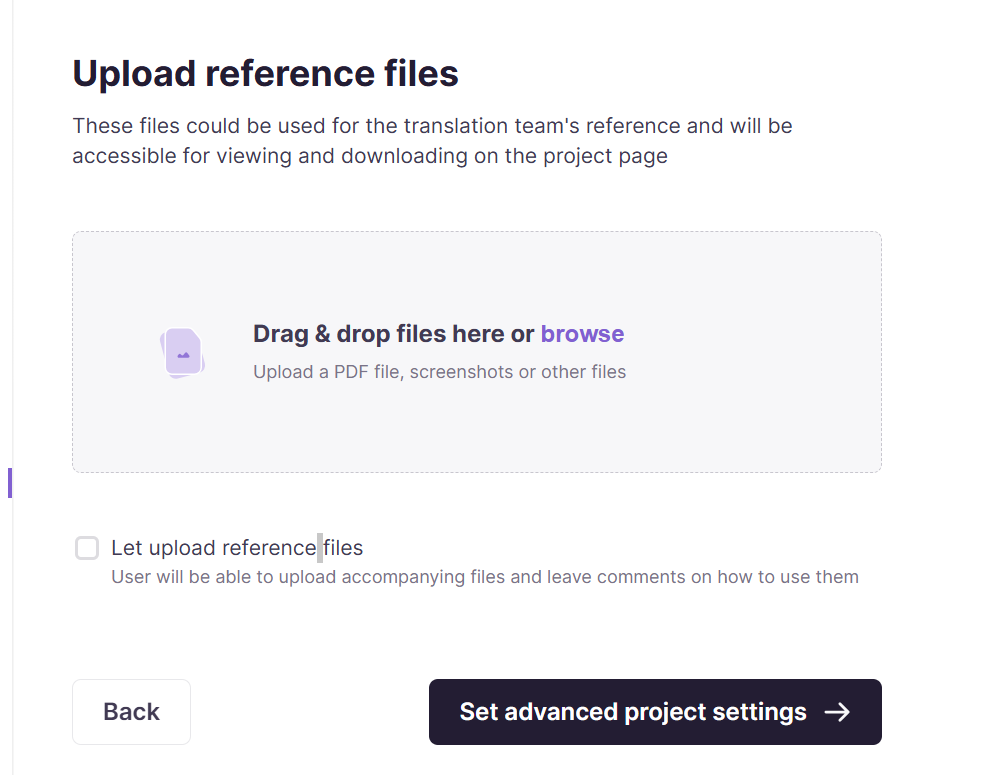
Drag and drop, or browse your files, to add reference documents which may assist translating and editing projects with this template.
Step 9 — Configure advanced settings and save the template
-
Set repetitions settings for how duplicate segments are handled
-
Configure quality assurance settings for automated checks
-
Enable reference file uploads if your workflow requires them
-
Click Create a project template to save your configuration. The template appears in your template list on the homepage. It's best practice to make final touches on a new template on a call with your Smartcat contact — confirming naming, workflow stages, and asset assignments together — before rolling it out to your team.
Once you have created a template it appears as a tile on your Smartcat Home screen.
💡See the Advanced Configuration Settings Explained section at the bottom of this article for additional details regarding these steps.
Using a template
Option 1 — From the homepage
-
On your workspace homepage, locate the Custom Templates section
-
Click the template you want to use
-
Upload your files and adjust any project-specific settings
-
Click Create project
Option 2 — From Smartcat AI chat
-
Upload your file to the Smartcat AI chat
-
Tell Smartcat AI you want to use a custom template (e.g., "Use my Marketing Content template for this file")
-
Smartcat AI applies the template and creates the project
-
Follow the link to continue in the project interface
⚠️ Custom templates work the same way in both the traditional interface and Smartcat AI — the template settings are applied, and you continue work in the standard project view.
Editing a template
-
From the homepage, locate your template in the Custom Templates section
-
Click the template options menu (three dots)
-
Select Edit template
-
Modify settings as needed and save
⚠️ Changes to a template do not affect projects already created from that template.
⚠️Change template in the project wizard only switches which template is applied to the new project — it does not edit the template itself.
What templates save
| Setting | Saved in template |
|---|---|
| Source and target languages | ✓ |
| Workflow stages and order | ✓ |
| Translation memories | ✓ |
| Glossaries | ✓ |
| Automatic translation rules | ✓ |
| AI translation engine selection | ✓ |
| Deadline offset | ✓ |
| Project name mask | ✓ |
| Custom field values | ✓ |
| QA settings | ✓ |
| Repetitions settings | ✓ |
Linguistic Asset Rules Reference
Configure rules that control how segments are automatically translated before human review.
Translation Memory Rules
Translation memory rules determine when and how TM matches are applied to segments. For each TM you add, configure:
-
Minimum match percentage — The lowest fuzzy match percentage to accept (e.g., 75%, 85%, 100%). Higher values mean stricter matching. A 100% match requires exact source text; lower values allow partial matches with differences.
-
Minimum TM segment quality — The quality level required for TM entries to be used:
-
AI translation — Segments from machine/AI translation (lowest quality tier)
-
Lightly reviewed — Segments with minimal human review
-
Reviewed — Segments that have been reviewed by a linguist
-
Professionally edited ★ — Segments that have been professionally edited (highest quality tier)
-
Minimum word count in a segment — Only apply TM matches to segments with at least this many words (0-10). Use this to skip very short segments where TM matches may be unreliable.
-
Confirm segments — Choose when to auto-confirm TM matches:
-
Do not confirm — Leave segments unconfirmed for human review
-
At the "[Stage]" stage — Auto-confirm at a specific workflow stage (e.g., "At the Translation stage")
AI Translation Rules
AI translation rules control how automatic translation is applied. Configure:
-
Confirm segments — Choose when to auto-confirm AI-translated segments:
-
Do not confirm — Leave for human review (disabled if AI translation stage is in workflow)
-
At the "[Stage]" stage — Auto-confirm at a specific workflow stage
-
Translation engines — Select which AI engines to use for specific target languages. Click Add translation engine to assign engines to language pairs.
Drag and drop rules to set their priority order. Rules are applied in sequence — the first matching rule wins. Place stricter rules (higher match %, higher quality) before looser ones.
Advanced Configuration Settings Explained
Repetitions settings
Repetitions settings control how Smartcat handles duplicate segments that appear within individual documents or across all documents in a project. These settings prevent translators from translating the same text multiple times and ensure consistency.
Key options include:
-
Allow auto-propagation — When enabled, translations of repeated segments are automatically copied to all instances of that segment throughout the project
-
Propagate to segments with different case — Controls how to handle repetitions with different capitalization:
-
Use the original case — Matches the case of the new segment (e.g., "continued" vs "Continued")
-
Use the match case — Uses the capitalization from the previously translated segment
-
Propagate to confirmed segments — Determines whether translations are copied even to segments that have already been confirmed
-
Confirm auto-propagated segments — Automatically confirms all repeated segments when one instance is confirmed
Quality assurance settings
Quality assurance settings configure automated checks that monitor translation quality in real-time as translators work in the Editor. The system checks for spelling errors, punctuation issues, terminology consistency, formatting problems, and consistency with translation memory.
Three levels of error criticality are available:
-
Ignore errors — Disables warnings for specific error types
-
Notify me about errors — Shows yellow triangle warnings in the Editor (default)
-
Require error correction — Shows red triangle warnings and prevents segment confirmation until the error is fixed
💡 Some errors (like "Target exceeds character length limit" and tag-related errors) are critical by default and cannot be disabled.
Reference file uploads
Enable this option if your workflow requires reference materials. When enabled, users creating projects from this template can upload supporting documents that translators can consult while working. Reference files are not translated — they provide additional context such as:
-
Style guides and brand guidelines
-
Previous versions of documents
-
Visual references and context materials
Limitations
-
Templates cannot be shared between workspaces
-
If you select multiple source languages, you cannot configure linguistic assets or automatic translation rules in the template
-
Template editing is done through the traditional wizard interface (not in Smartcat AI chat)
-
A template also doesn't support specifying a QA Coworker's automation rule directly — as with AI Translation Profiles, this is handled by configuring the template's own Translation Memory Rules and AI Translation Rules explicitly.
FAQs
What exactly gets saved in a Project Template?
Source and target languages, workflow stages, Translation Coworkers, translation memories, glossaries, deadline offsets, project name mask, and (optionally) an assignment template for automatic supplier/linguist assignment.
Can I set an AI translation profile directly on a Project Template?
Not currently — and note that a Project Template and an AI Translation Profile cannot both be assigned to the same project at the same time; you choose one or the other. Within a template, you configure the equivalent behavior explicitly — Translation Coworkers, TM, and glossaries.
Can I set a QA Coworker's automation rule directly on a Project Template?
Not currently. As with AI translation profiles, this is handled by configuring Translation Coworkers, TM, and glossaries explicitly in the template.
Can one template cover multiple target languages?
A template's target languages are predefined when you build it — include all the target languages your recurring scenario needs at that time. If an individual project later needs one more language than the template specifies, that language can be added to that specific project afterward from its own project settings.
Can a template have more than one source language?
You can set up a template with multiple source languages, but doing so disables the ability to configure linguistic assets (TM, glossary) and automatic pre-translation rules on that template. If your workflow depends on TM/glossary automation, build separate single-source-language templates instead.
How do I make sure the right people are automatically assigned to new projects?
Link an Assignment Template to your Project Template. This pre-shortlists suppliers or internal linguists per language pair and automatically invites them when a new project is created from the template.
Can I control how projects created from a template are named?
Yes, using a Project Name Mask. Set a prefix on the template (e.g., "Quarterly –") and every project created from it will automatically start with that text, making it easy to identify and filter later.
Should we build one template, or several?
Generally, build one template per recurring scenario — for example, per business unit, content type, or workflow configuration. Templates should be named according to your needs so your team can quickly identify and select the right one.
Who should be involved in setting up our templates?
Your Smartcat contact will help configure the underlying settings, but it's best practice to finalize the template details — naming, workflow, and asset assignments — together on a call, since these decisions are specific to how your team works.
Can templates be updated after they're created?
Yes. Templates should be reviewed and refined over time as your languages, content types, or process requirements change — updates apply to future projects created from the template going forward.
Is a Project Template the same as the Project Wizard?
No. The Project Wizard is the step-by-step flow for creating a single project manually. A Project Template is a saved, reusable configuration that pre-fills that flow automatically, so recurring project types can be created consistently and quickly.
Want to learn more?
See how Smartcat can transform your localization workflow.
Still need help?
Our support team responds within one business day.