Setting up the Smartcat WordPress (WPML) integration
Overview
The Smartcat integration with WordPress lets you translate WordPress pages and posts directly from your WordPress admin panel with no manual file exports or imports. It works through the WPML plugin: content is sent to Smartcat for translation and synced back into WordPress when complete.
Integration type: Plugin — content is managed within WordPress's native interface (via WPML), not inside Smartcat's integration view.
Prerequisites
Before setting up this integration, ensure you have:
-
A Smartcat workspace with an active subscription
-
A WordPress site where you can install plugins
-
The WPML plugin installed, including WPML Multilingual CMS and WPML String Translation
Installation and setup
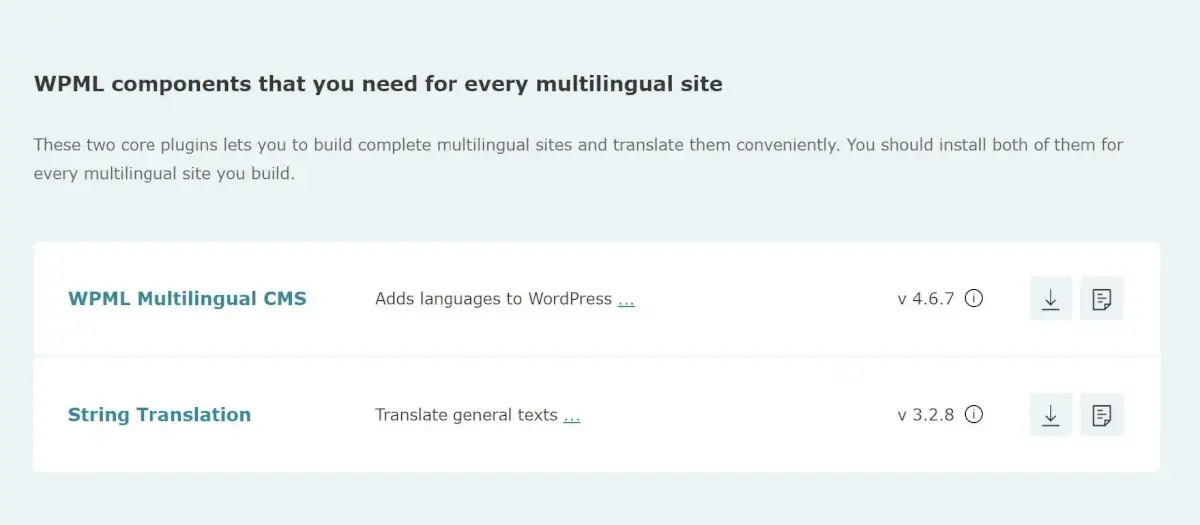
- If the WPML plugin is not yet installed, please install it. Note that you need to install WPML Multilingual CMS and String Translation.
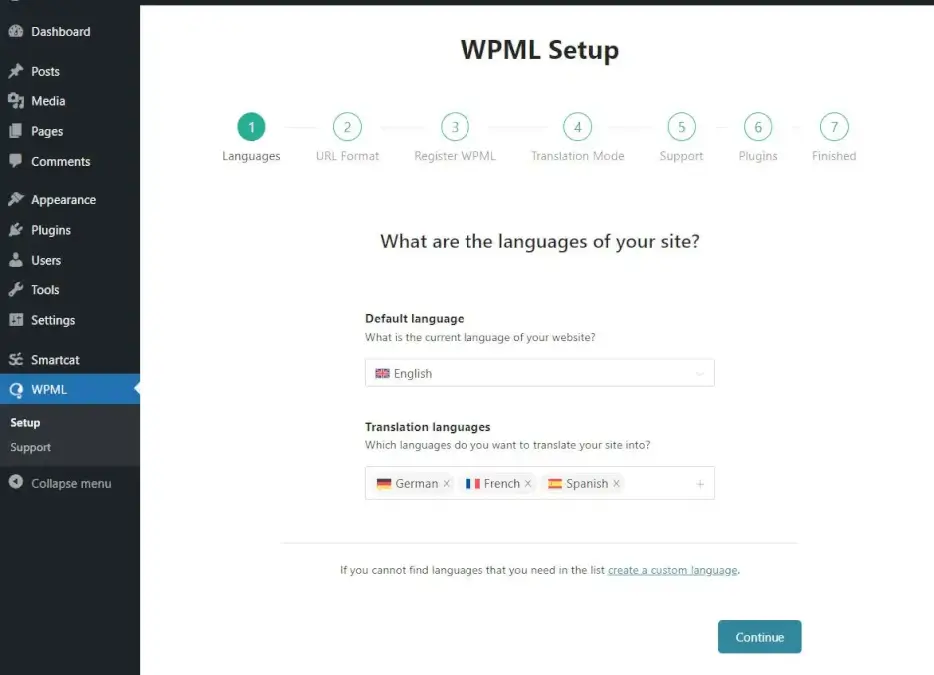
- If you haven't used WPML before, go through the setup process by navigating to WPML → Setup.
-
Install the Smartcat plugin.
-
Smartcat plugin settings can be found in the left sidebar of the WordPress admin panel.
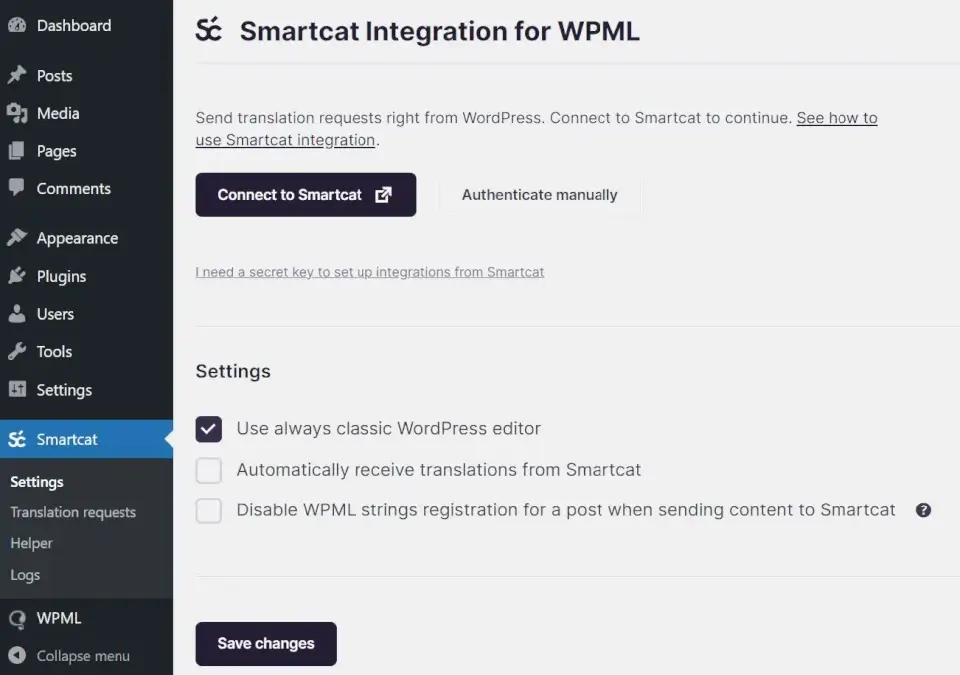
- The next step is to log in to your Smartcat account. There are two ways to do this:
a. Automatic login using the Connect to Smartcat button. After clicking the button, you will be automatically redirected to Smartcat and then back to WordPress. Note: If you use "basic auth" or your site is only accessible from certain IP addresses, this method may not be suitable. In that case, consider the next option.
b. Manually, using an API key. To generate a secret key, refer to our developer documentation.
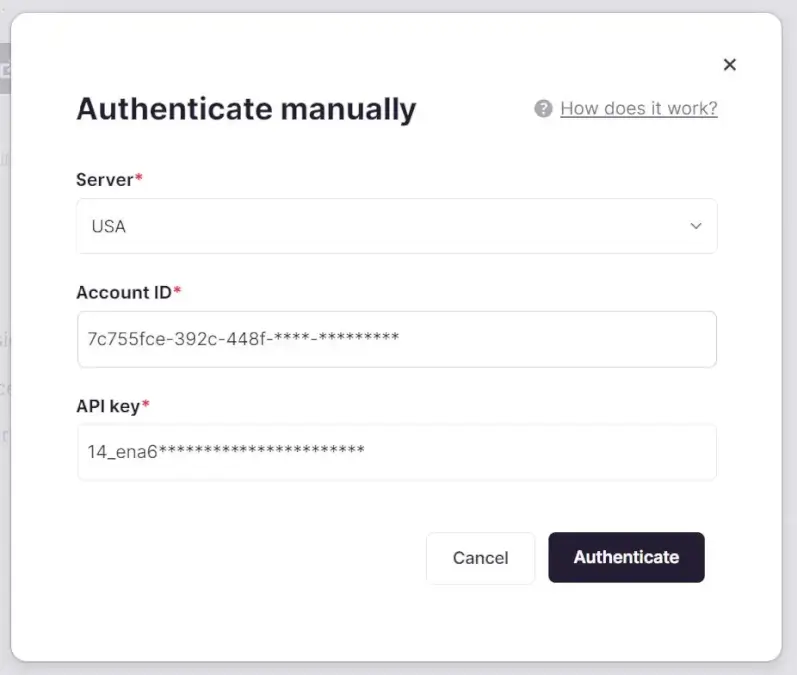
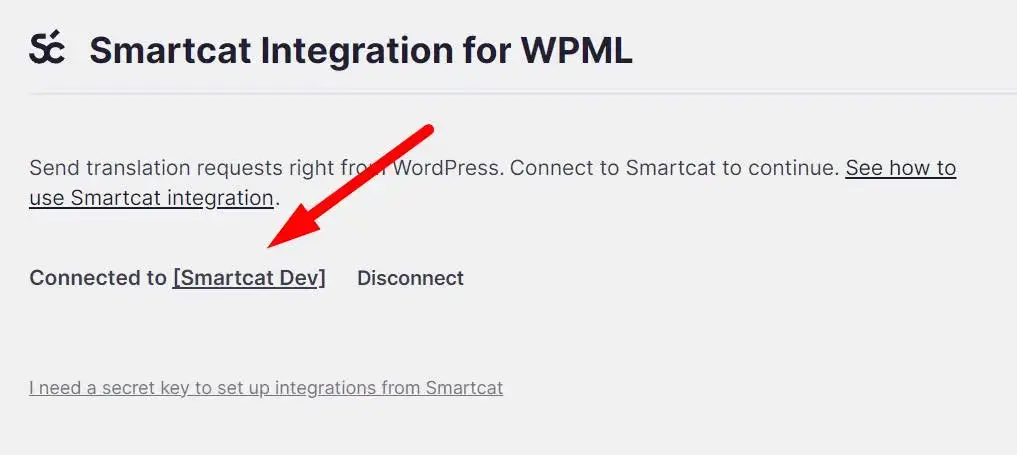
- If all the previous steps were successfully completed, the name of your workspace in Smartcat will be displayed in the settings.
Translating content
Step 1: Select content for translation
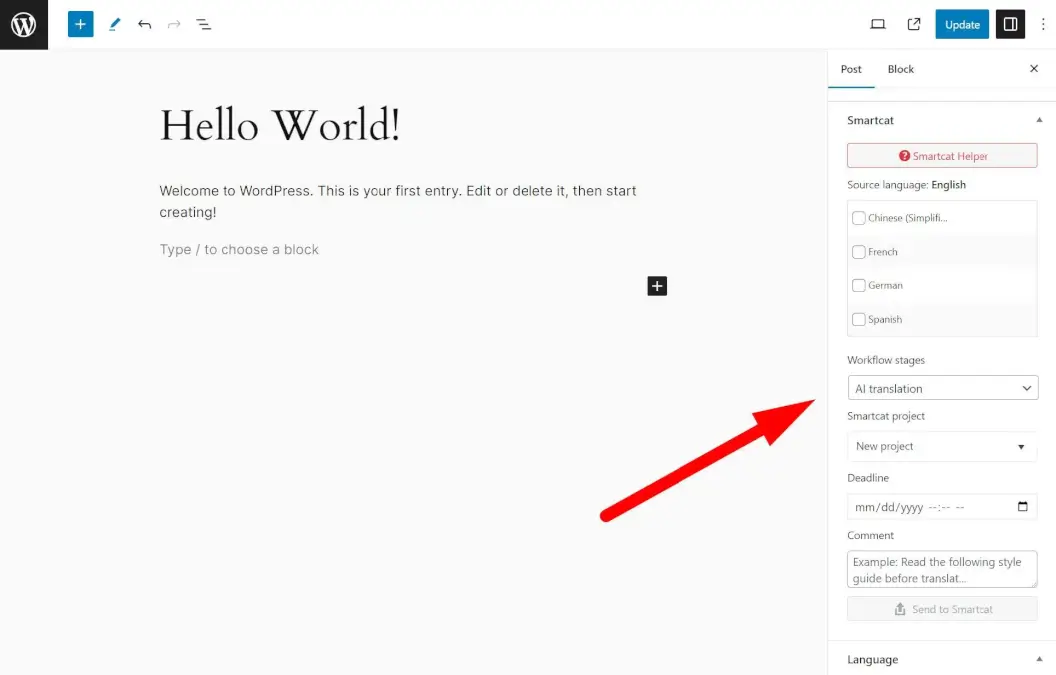
Start by selecting the article or page you want to translate with Smartcat. In the right sidebar of the article, or at the bottom, after the editor, you'll find the Smartcat translation control panel.
📌 If the "Smartcat" panel is not displayed, make sure that the selected content type is marked as Translatable. You can check this by going to WPML → Settings → Post Types Translation. Usually, the Post and Page content types are already marked as Translatable.
Step 2: Choose target languages
Choose the target languages for translating the article. If you lack specific languages, you can add them in WPML settings: WPML → Languages.
Step 3: Select the workflow stage
Select the Workflow stage:
AI translation — automatic AI translation
-
AI translation + human review — automatic AI translation with subsequent confirmation
-
Manual translation — manual translation by a linguist
Step 4: Choose the Smartcat project
Choose the Smartcat project.
📌 The dropdown list shows only those projects created through the Smartcat plugin. If you haven't sent content for translation yet, choose the New project option.
Step 5: Set optional details and send
If needed, specify the Smartcat project deadline and a comment to be displayed in the project documents. Then click Send to Smartcat to send the content.
After sending the content, the Smartcat panel status changes. You can track the translation process directly from WordPress. Use the Refresh button to update the status of translated documents. Languages currently being translated in Smartcat are marked with checkmarks.
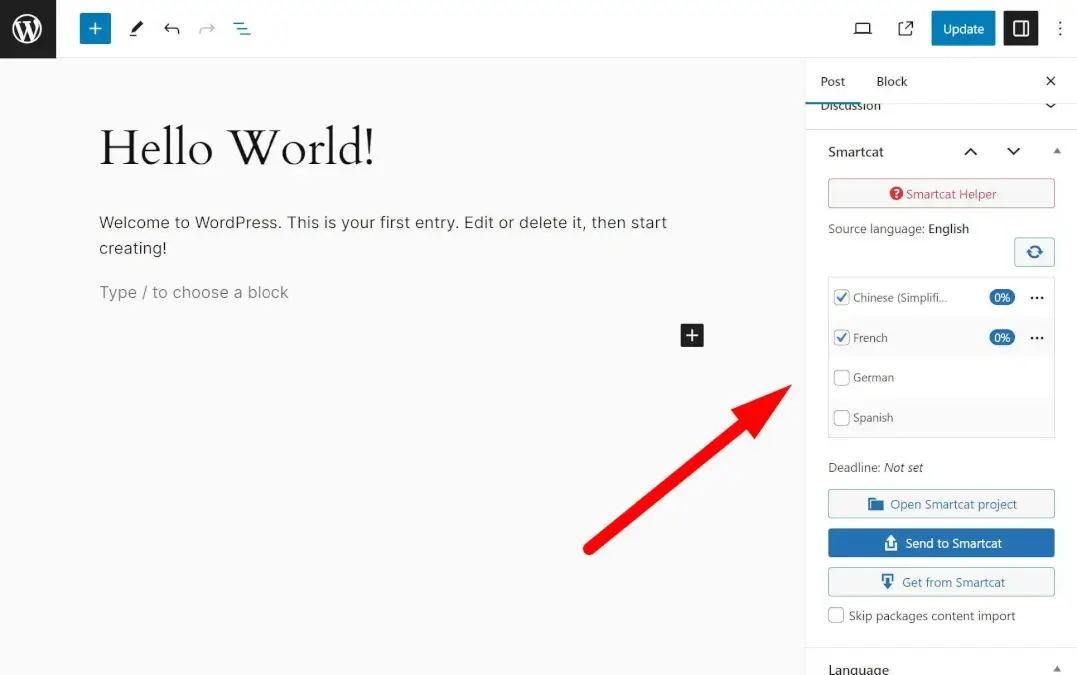
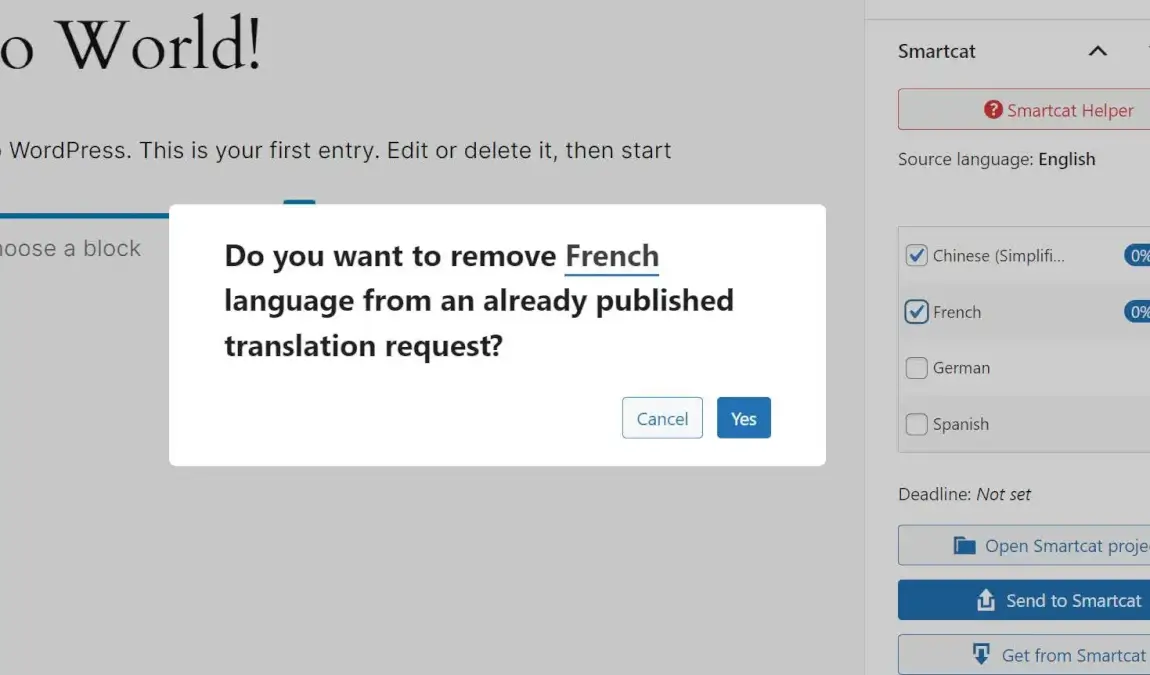
You can always add or remove a language for translation.
Available actions
-
Open Smartcat project — opens the project page in Smartcat
-
Send to Smartcat — resends content to Smartcat, updating documents. Use this action if your article content has changed.
-
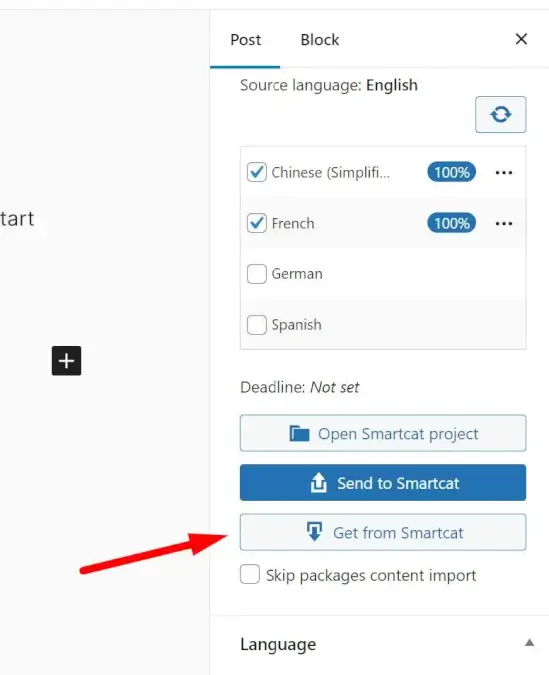
Get from Smartcat — retrieves completed translations from the Smartcat project and imports them into WordPress, creating or updating the target article.
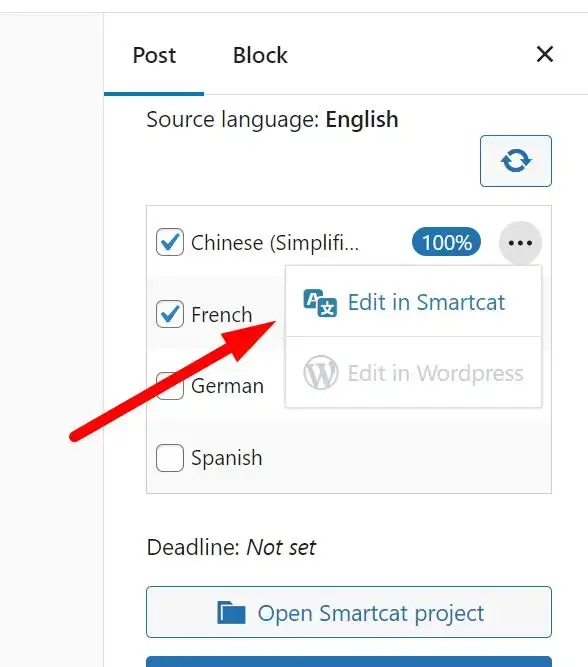
You can open the document in Smartcat by clicking the Edit in Smartcat link for the desired language.
Retrieving translations
Once you finish the translation, you can get the translations by clicking the Get from Smartcat button.
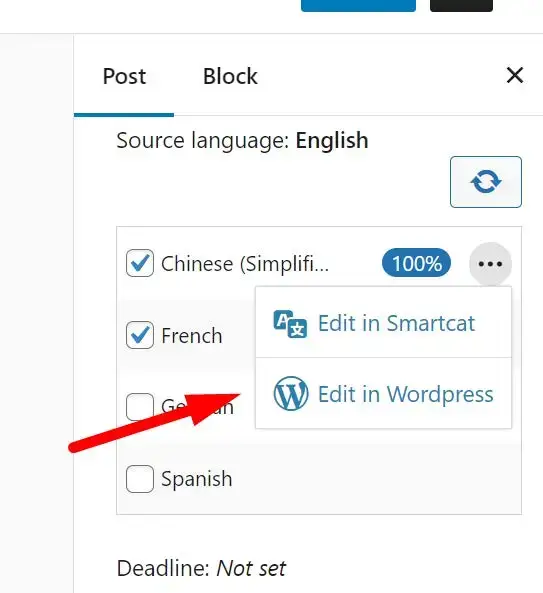
After importing translations into WordPress, you'll have an Edit in WordPress link that redirects you to the target article.
Imported translations arrive as drafts by default and you must manually publish them in Wordpress to appear on your website. The plugin has an optional setting to force translations to import as "Published" status automatically.
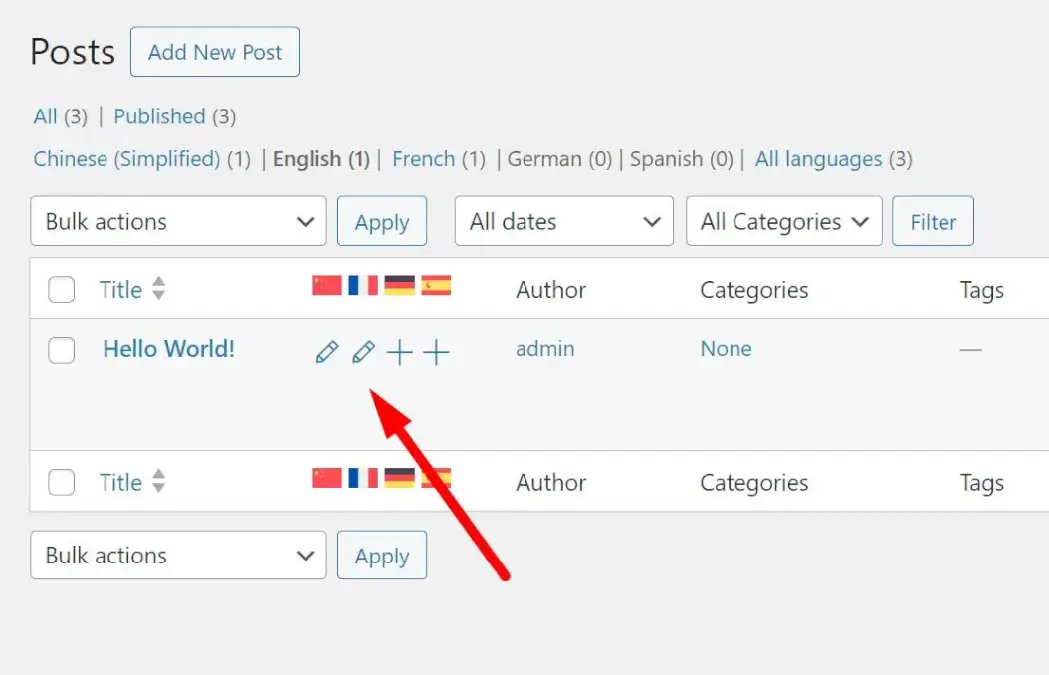
You can also view available translations in the list of your articles.
Sending multiple articles
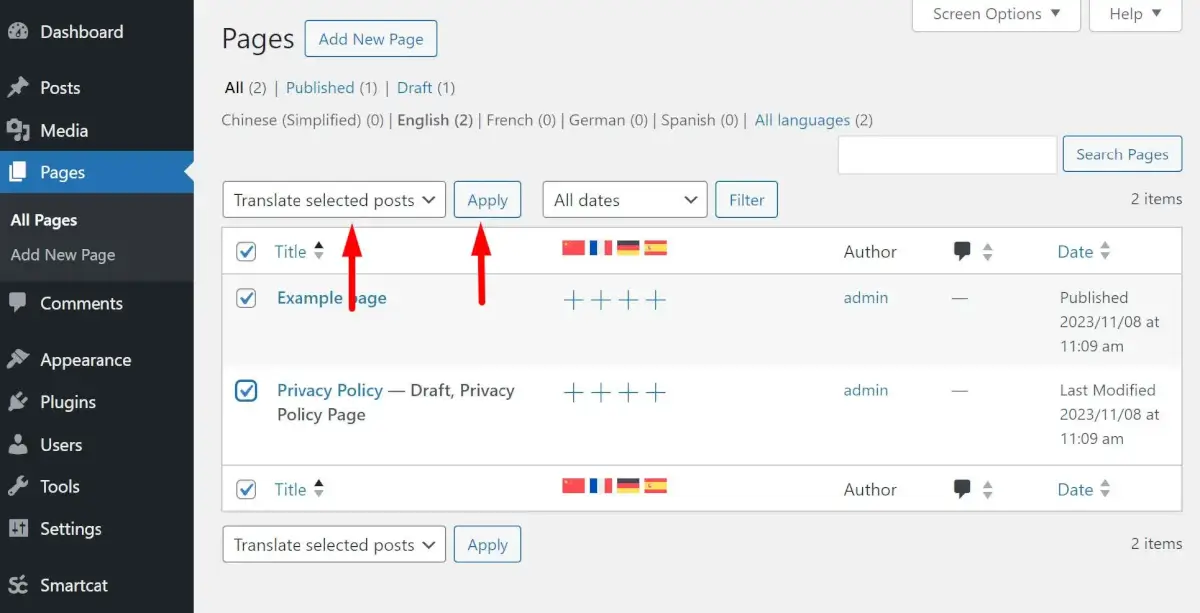
In addition to sending individual articles for translation, you can also send multiple articles at once using the Bulk actions feature in WordPress. To do this, go to the list of the content you're interested in, select the items, choose the Translate selected posts option, and click Apply.
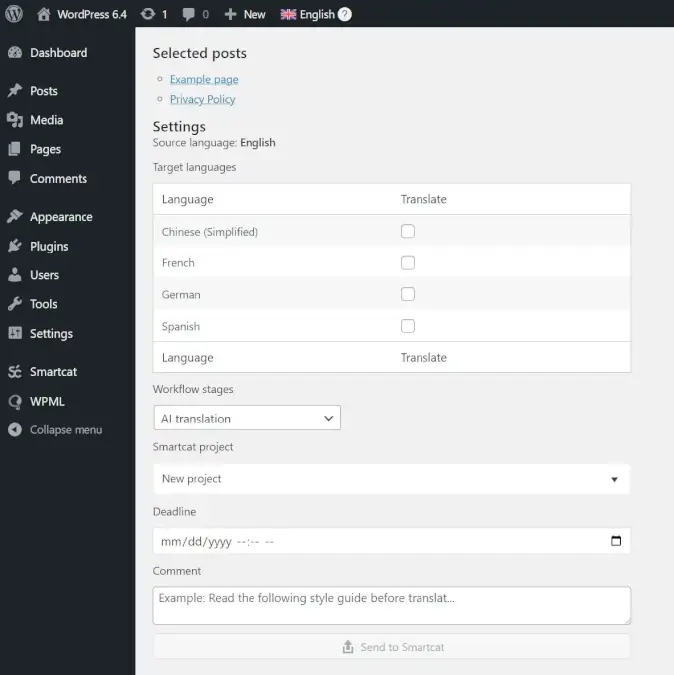
On the resulting page, the same settings as when sending a single article for translation are available.
Managing content with Translation requests
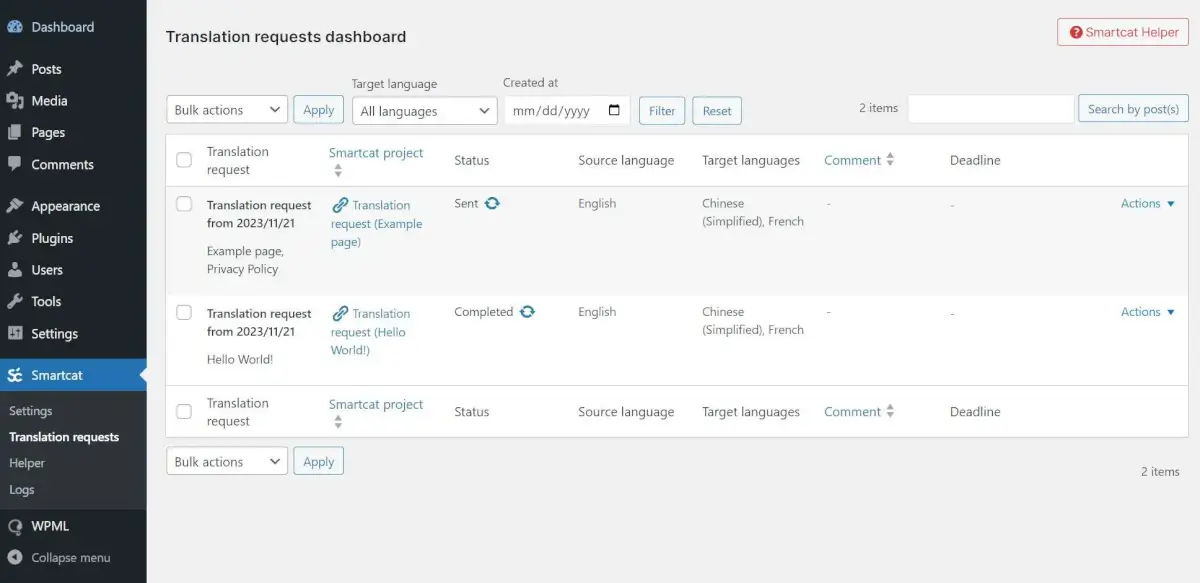
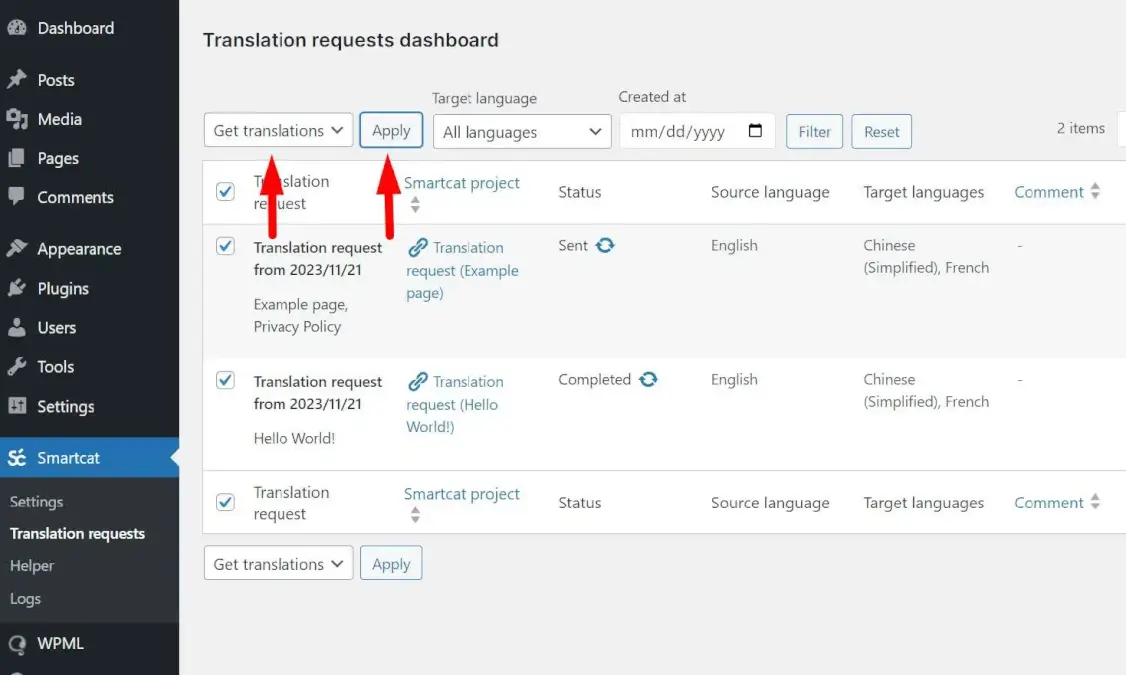
Whether you're sending one or several articles for translation, they are always in a Translation request. A Translation request is a request containing all the content sent to Smartcat, allowing you to conveniently manage it.
Translation requests are found in Smartcat → Translation requests.
You can always get translations for all articles in a translation request. This is convenient as you don't have to do it for each article separately.
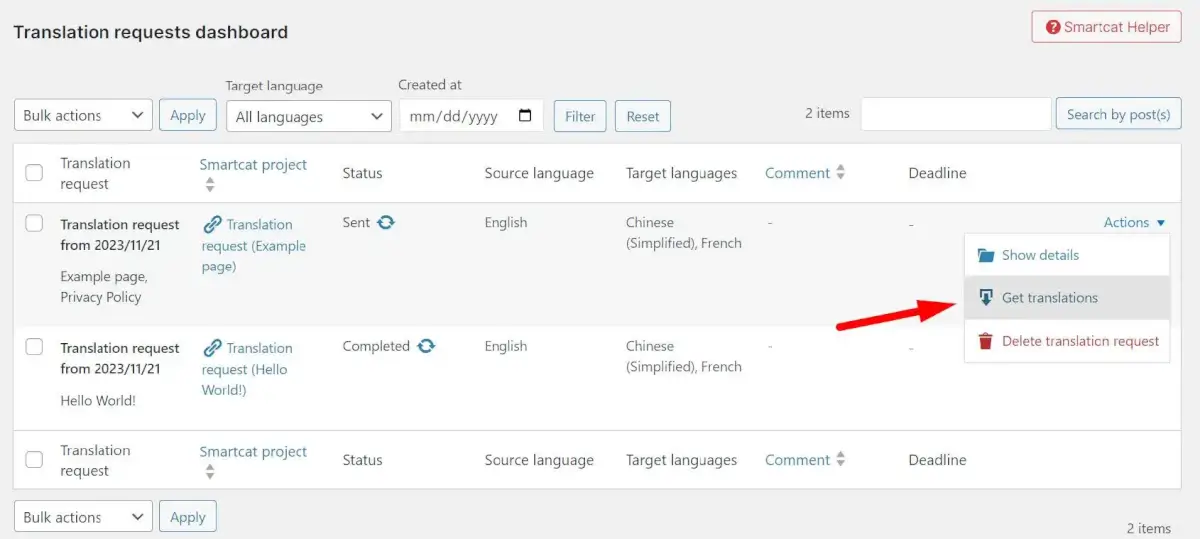
You can also request translations for multiple translation requests at once using the Bulk actions feature.
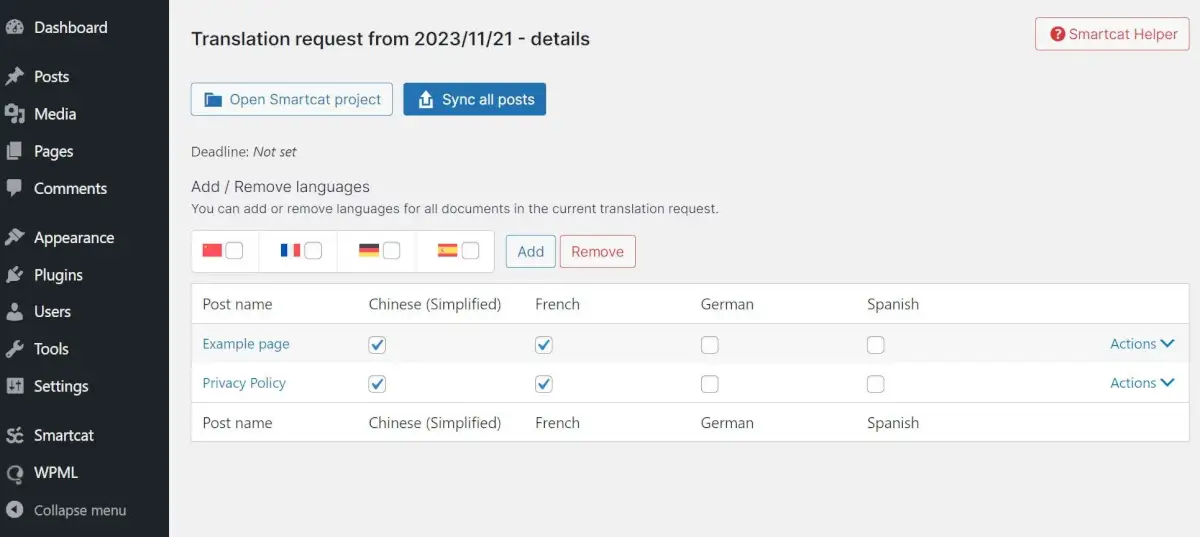
By going into the details of a translation request with the Show details button, you get the flexibility to manage the translated content. Using the Sync all posts button, you can update the original content of all documents in the current project. You can always add or remove a language for all translatable articles, or manage this individually for each article.
Supported plugins
Smartcat App supports content translation for popular plugins such as Advanced Custom Fields (ACF), CMB2, VC/WPBakery, Elementor, and others.
Our plugin works directly through WPML, so you can check the support status for your desired plugins on the official WPML website.
Troubleshooting
Getting help
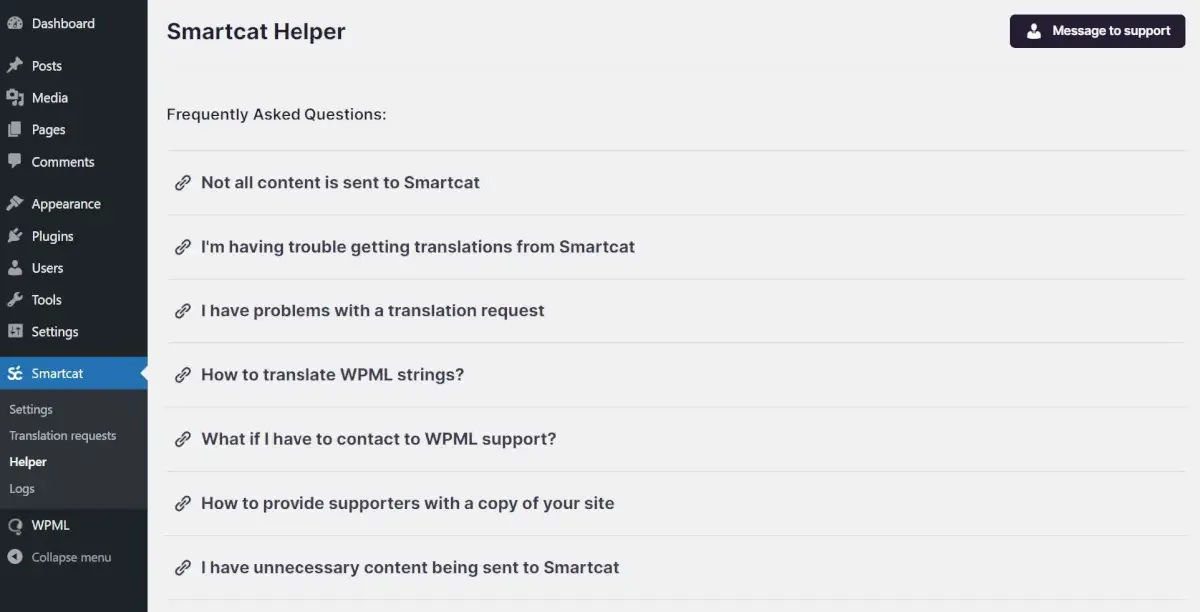
The plugin has an FAQ available on the Smartcat → Helper page. Here, solutions to most potential issues you might encounter are presented. You can also reach out to Support by clicking the Message to support button.
If you encounter issues not covered there:
-
Confirm the WPML plugin (including Multilingual CMS and String Translation) is installed and active.
-
Verify your Smartcat connection is active and your workspace name is shown in the plugin settings.
-
If the Smartcat panel does not appear on a post or page, confirm the content type is marked as "Translatable" under WPML → Settings → Post Types Translation.
Related articles
-
Smartcat Integrations: Overview and Full List
-
Setting Up Integrations in Smartcat: An Overview
Still need help?
Our support team responds within one business day.