Website Translation in Smartcat
Overview
Website Translation in Smartcat allows teams to translate and publish multilingual versions of their websites directly from a visual interface. Website Translation in Smartcat requires no connector; simply upload the URL of the website you want to translate and it's instantly translated with AI. Reviewers can review the translation with a visual editor to see how the translation will render before it's live in production.
Translations are powered by AI translation, supported by Smartcat's Intelligent Fabric that stores translation memories (TMs), glossaries, and continually learn from your experts. Once translations are ready, they can be published using a lightweight JavaScript snippet that displays translated versions of each page through a language selector widget.
Smartcat Website Translation includes SEO settings which allow search engines to access localized versions of the translated website. By exposing translated pages through language-specific URLs, Smartcat helps ensure that titles, descriptions, and search snippets appear in the correct language for each market.
This approach helps global teams maintain consistent messaging, reduce manual website localization work, and launch multilingual websites that reach new business faster using Smartcat's unified workflows and expert-enabled AI agents.
When to Use It
Website Translation Projects are useful when you want to:
-
Launch a multilingual version of an existing website, and review translations directly in context to how it will render on the website
-
Maintain terminology consistency across translated website text using glossaries and translation memories
-
Ensure translated pages remain visible to search engines
How to Use It
1. Create a Website Translation Project
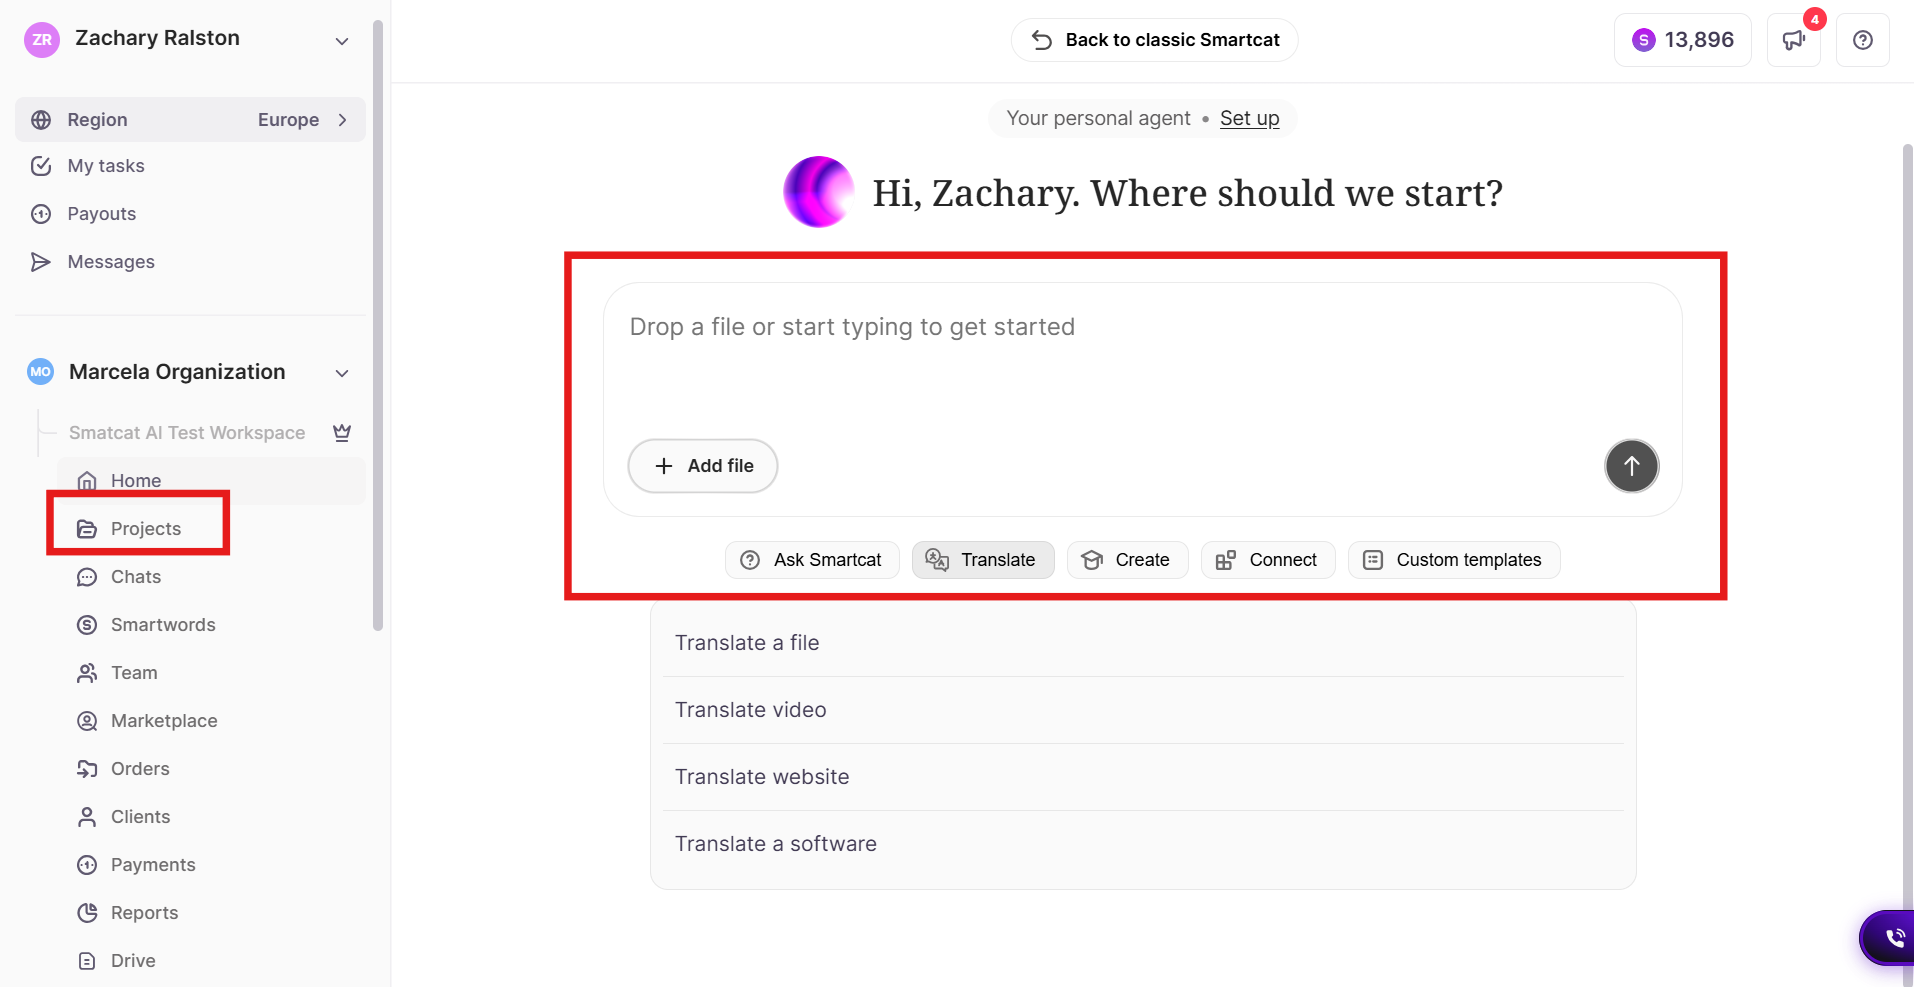
- In the left navigation sidebar, click Projects. Alternatively, if you have access to Smartcat AI, use the chat window to ask Smartcat AI to translate your website.
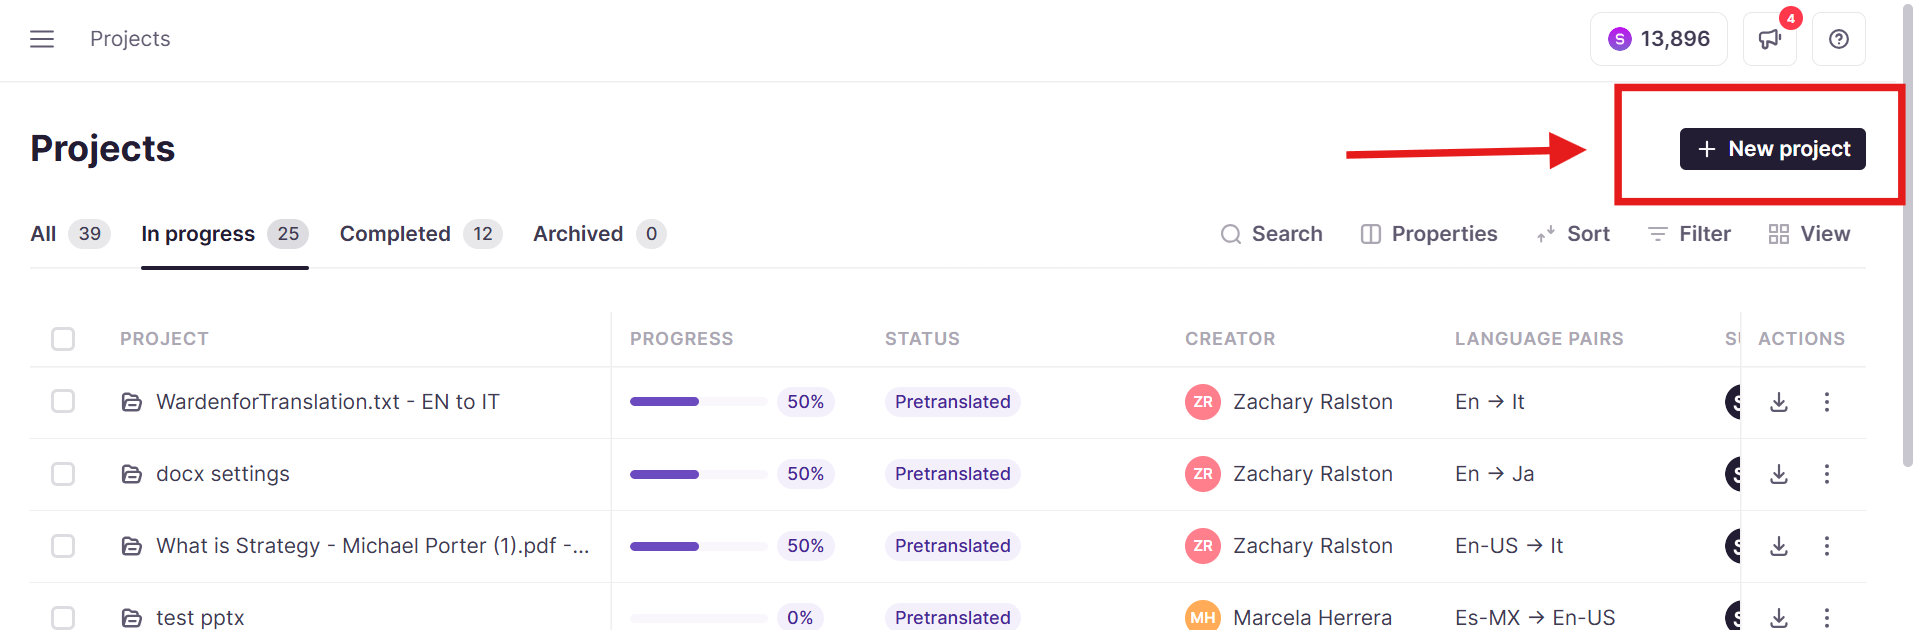
- On the Projects page, click + New project.
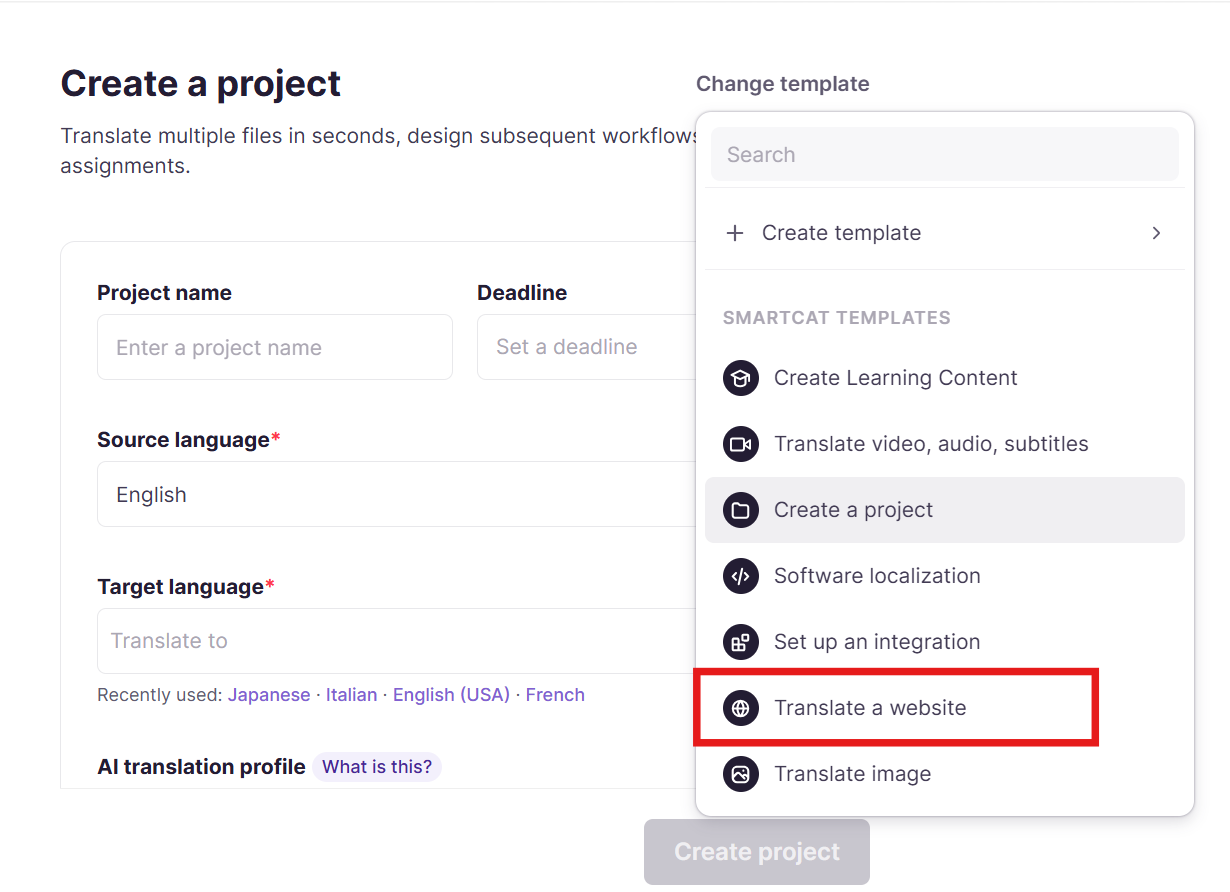
- If you are not on the website template, click Change template and select Translate a website
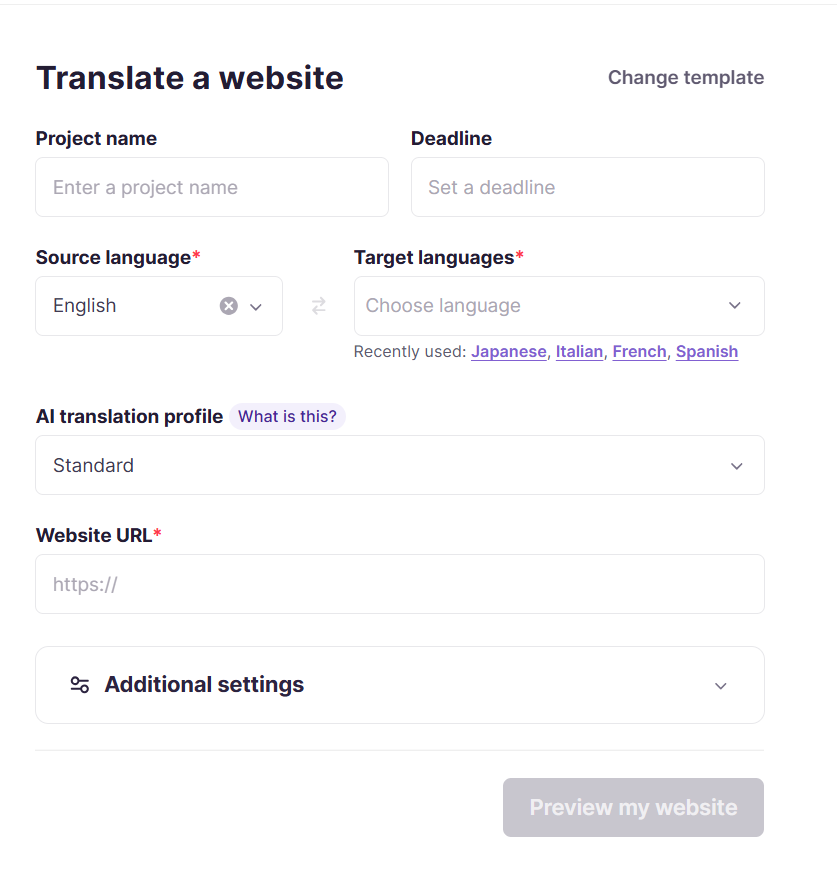
- Enter a Project Name to describe your website translation project
-
Set a Deadline (optional)
-
Select the Source Language of the website from the dropdown
-
Select one or more Target Languages from the dropdown
-
Choose an AI Translation Profile. The Standard profile automatically connects all applicable Translation Memories and Glossaries to your projects and uses Smartcat AI Routing to select the best engines for each language pair. The profile defines which resources the agent uses, including:
-
Translation Memories (TMs)
-
Glossaries
-
Translation engine settings
-
Paste the Website URL you want to translate
-
(Optional) Open Additional settings dropdown to configure workflow stages
-
Click Preview my website to load the Visual Editor.
3. Translate Content in the Visual Editor
The visual editor integrates with your website, with full navigation and in real-time, with editable translation fields.
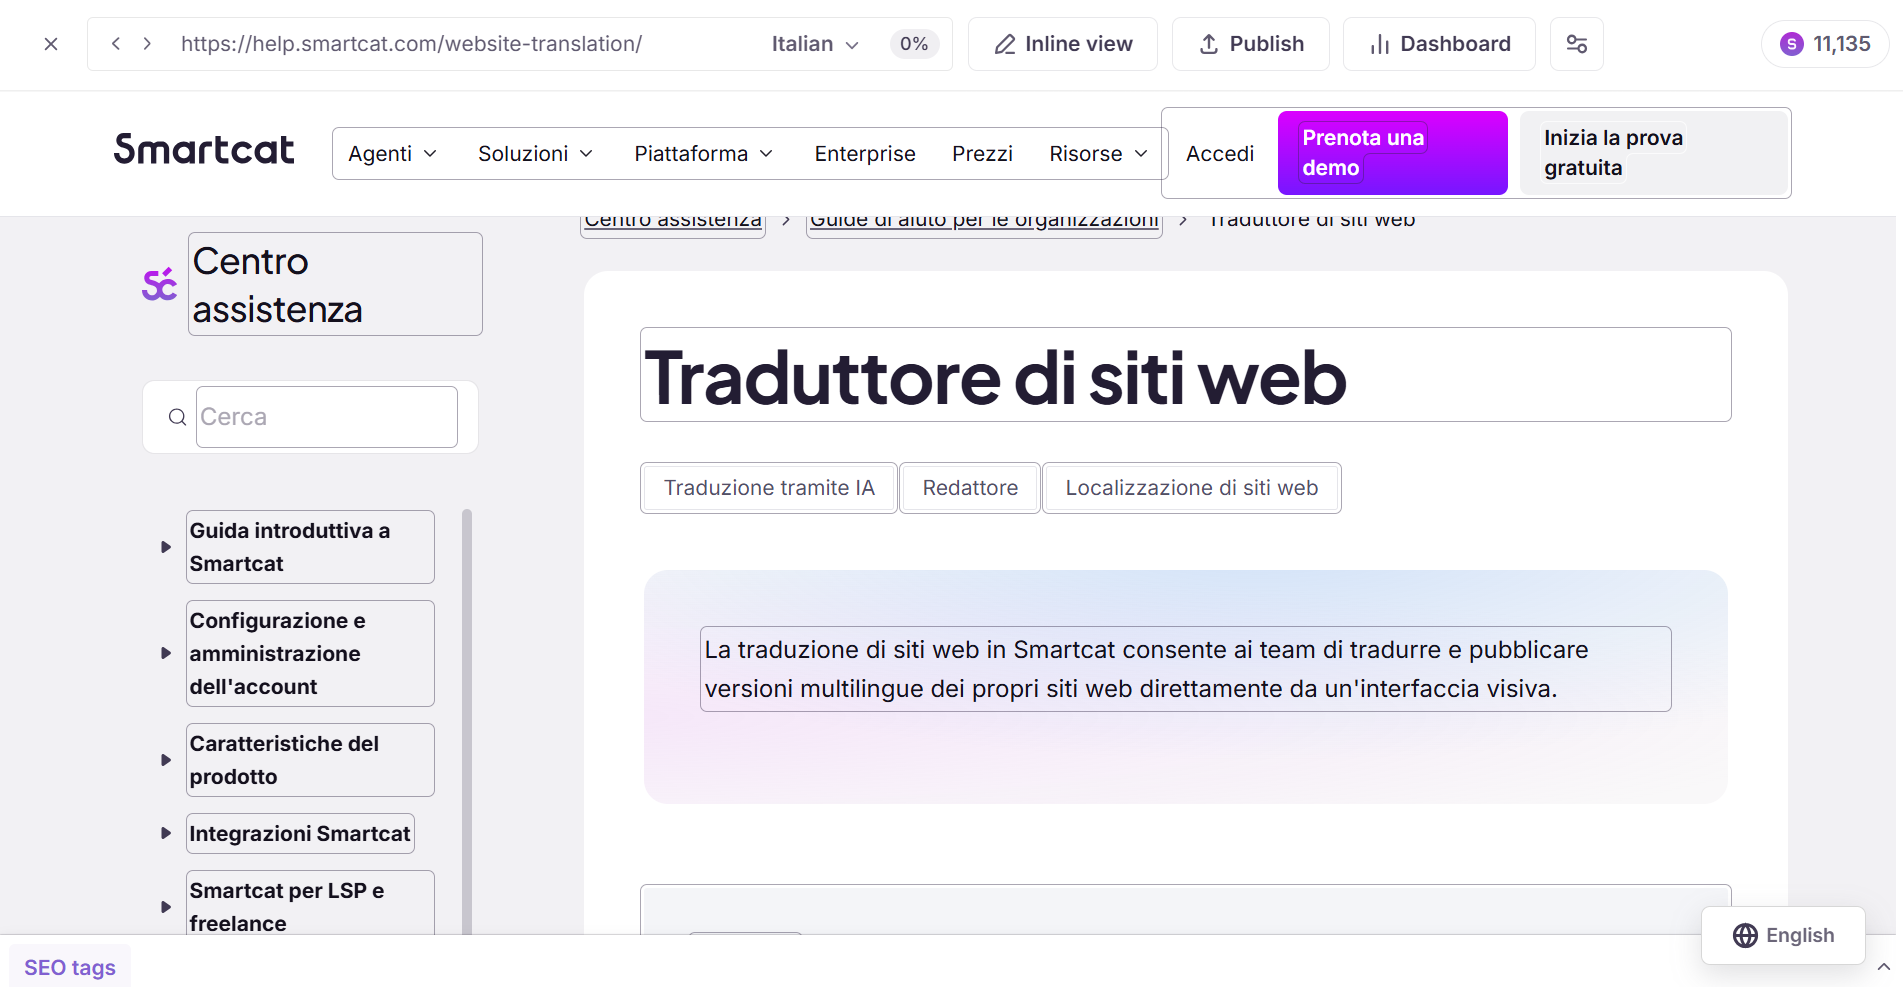
Key features:
-
Automatic text detection – Smartcat identifies translatable content automatically
-
In-context editing – Click a text box to edit the translation directly within the page preview
-
Live updates – Edits appear instantly in the preview
-
Segment confirmation – Click Confirm to save the translation and add it to the translation memory
To review and edit translations:
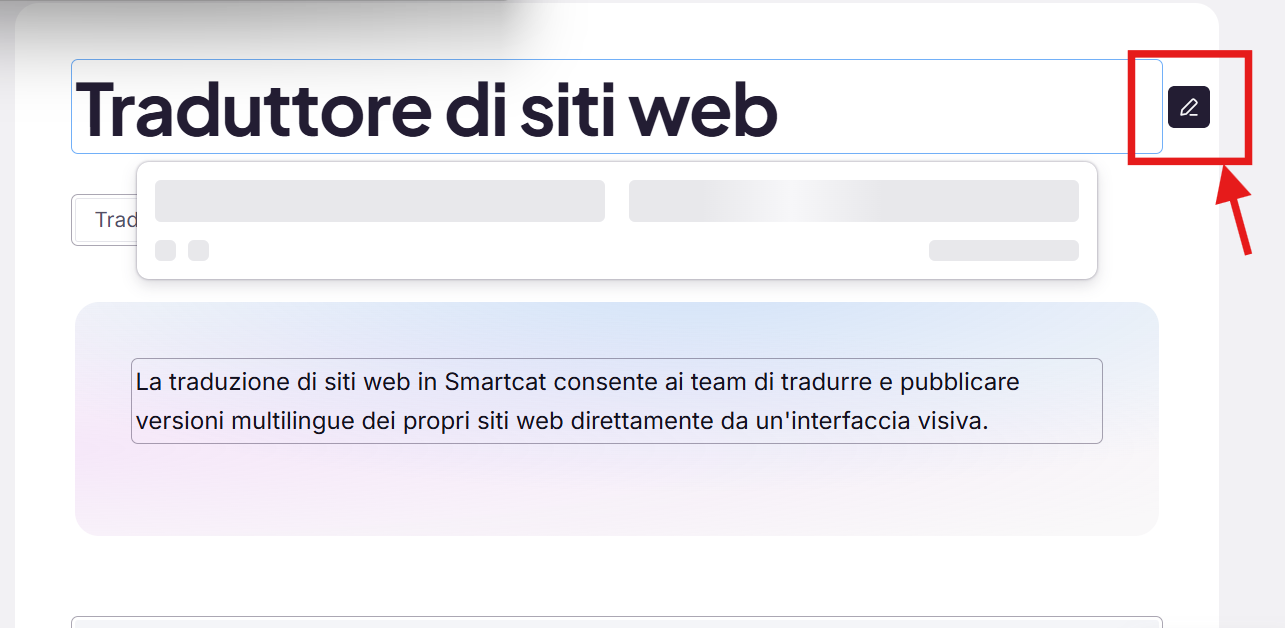
- Hover over a text block and click the pencil button
- Click the checkmark to confirm the translation
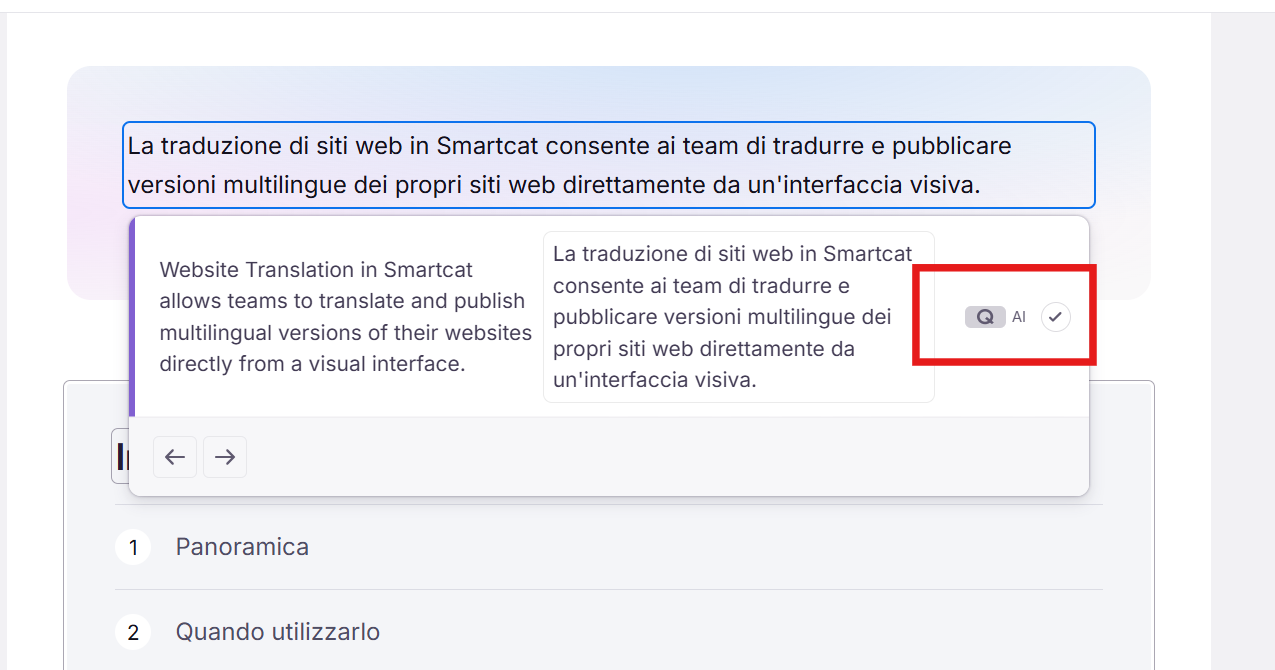
- (Optional) Navigate to the next translated element by clicking the arrows
Large text blocks:
-
Long paragraphs are automatically divided into smaller segments
-
Confirm each segment individually for better quality control
Dropdown menus and interactive elements
-
Hover over the element.
-
Click the pencil button
⚠️ Keep edited text in dropdowns close to the original length to avoid breaking the page layout.
4. Configure Preview and Display Settings
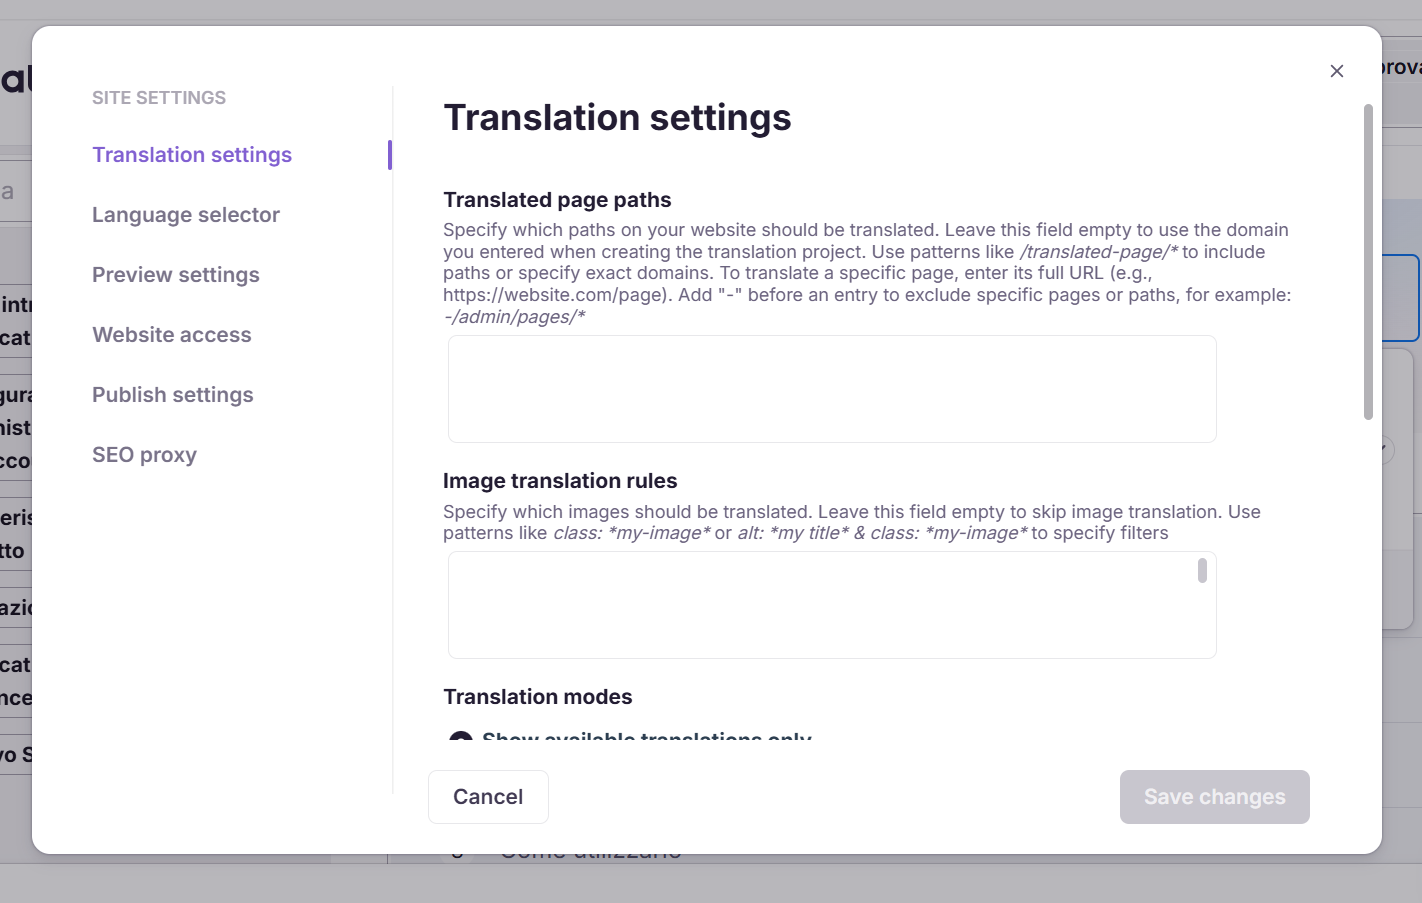
Click the settings button in the upper right corner to adjust:
-
Translation settings – How translated pages are displayed to visitors
-
Language selector – Placement and style of the language switcher
-
Preview settings – How translated pages appear during editing
-
Publish settings – Select which languages to publish. This is useful when translating multiple languages but publishing them at different times.
-
SEO Proxy – Configure search engine access to localized pages
5. Publish Your Translated Website
Click Publish at the top of the visual editor.

When publishing for the first time:
-
Smartcat generates a JavaScript snippet
-
Click Copy code
-
Add the snippet to your website's header section
-
After the code is installed, return to Smartcat and click Validate and continue
-
Smartcat verifies the snippet and publishes your translated pages
When publishing updates to an already published site:
-
Click Publish
-
Smartcat updates the translated pages automatically
Visitors now see the Language Selector Widget on your website to switch between available languages.
Manage Linguistic Assets in Website Translation Projects
Website Translation projects in Smartcat use AI translation profiles to determine which translation memories, glossaries, and translation engines are applied during translation.
By default, Smartcat automatically selects the most effective translation agent using AI routing, which evaluates multiple large language models (LLMs) to choose the most appropriate translation engine.
If a project requires specific terminology or previously approved translations, users can modify the project's translation profile from the Linguistic Assets page. This allows teams to select specific glossaries, translation memories, and translation engines so that new website content is translated according to those preferences.
How to Use It
-
Open your Website Translation project in Smartcat.
-
In the left sidebar, click Linguistic Assets
-
Click Change Profile
-
Choose one of the following: Select an existing translation profile or Create a new translation profile from this screen
-
Configure the profile by selecting:
-
The glossaries you want to apply
Adding and Managing Pages
As your website grows, you can bring additional pages into an existing Website Translation project either by re-crawling the site or by adding a specific URL.
How to Add New Pages
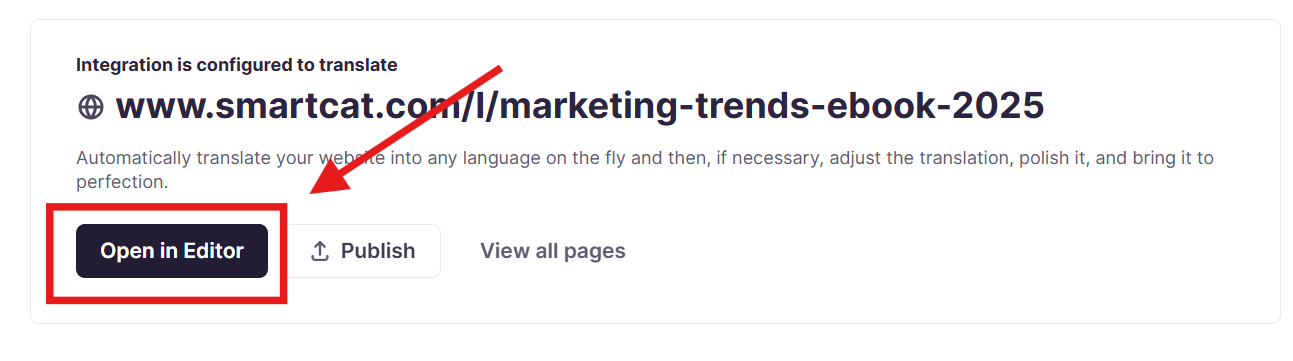
- Open your Website Translation project and click Open in Editor to open the Website Translator interface, in the Pages view.
-
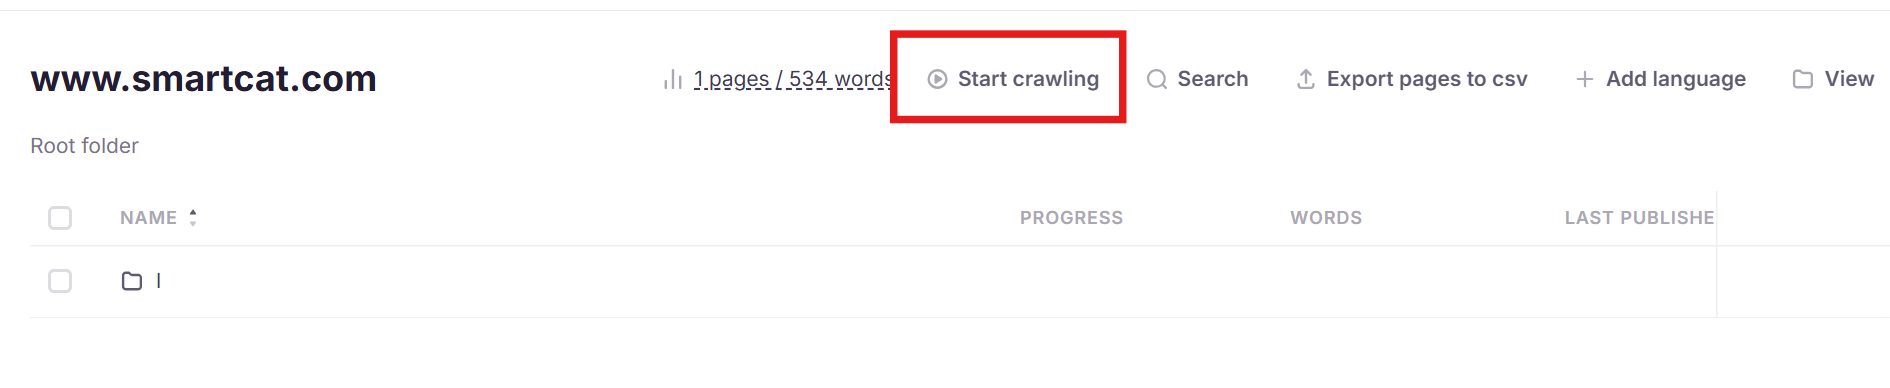
Click Dashboard to view the website structure.
-
Choose one of two ways to bring in new pages:
-
Re-crawl the site — Click Start crawling to re-run the crawler to rediscover the full URL inventory. Any new pages that now exist on your live site are picked up automatically and added to the pages list.
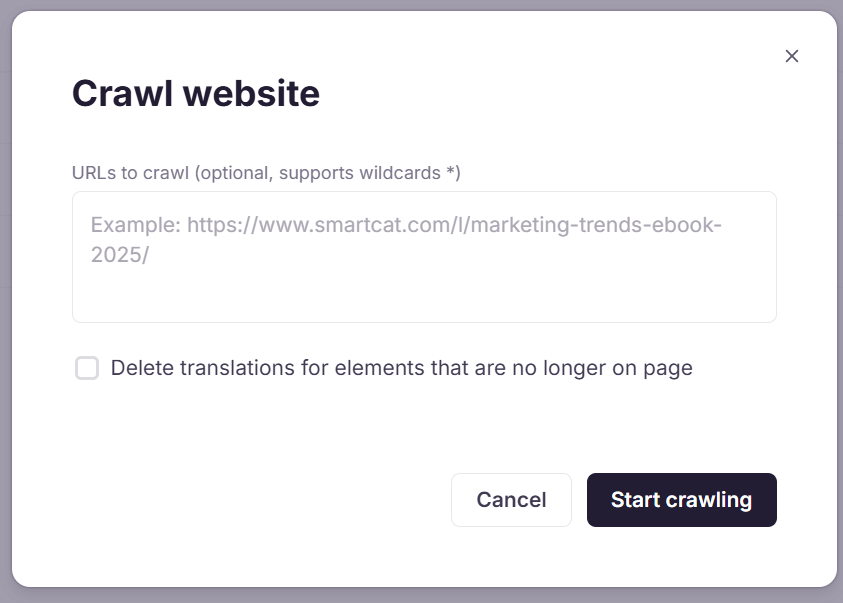
- Add a specific page by URL — Provide a specific URL in the dialog box you see after you click Start crawling. Point the crawler at one URL to fetch and add that single page to the inventory, without waiting for or re-running a full site crawl.
-
Confirm the new pages fall within your URL scope rules (see below) before translating them.
-
Translate the new content.
-
Click Publish to push the newly translated pages live.
Crawl Input Syntax
When specifying a website address for crawling (at project setup or when re-crawling):
-
Entering a bare URL, for example https://yourdomain.com/, tells the crawler to fetch only that exact page.
-
To crawl the entire site, either add a trailing wildcard — https://yourdomain.com/* — or leave the URL field empty, which crawls the entire site by default.
Omitting the trailing * is a common cause of a crawl appearing to capture only one page instead of the whole site.
URL Scope Rules (Inclusion/Exclusion)
Discovered pages are filtered into or out of translation using inclusion and exclusion rules:
-
Inclusion rule: https://yourdomain.com/path/* (no prefix)
-
Exclusion rule: -https://yourdomain.com/path/* (prefixed with a dash). Exclusion rules typically apply to new crawls. Pages already crawled before the exclusion was added may still appear in the Files view until a re-crawl or manual cleanup is performed.
-
The asterisk is a wildcard that matches any characters
-
A base rule like https://yourdomain.com/* captures the whole site; exclusion rules then trim specific paths back out
If a newly discovered page falls outside your inclusion rules, or matches an exclusion rule, it appears in View All Pages but remain out of translation scope. Make sure your inclusion rules cover any new section or path before you expect those pages to translate.
Requirements / Limitations
-
Your website must allow inserting a JavaScript snippet in the header
-
Translation profiles must exist at the workspace level to appear during project setup
-
Linguistic assets (TMs and glossaries) must be configured in the workspace
-
Previously translated pages keep their original translation profile settings unless retranslated
Right-to-Left (RTL) Language Support
Smartcat supports RTL languages such as Arabic and Hebrew. When translating into RTL languages:
-
Text direction automatically switches
-
Page layout may change to match RTL reading patterns
-
Navigation and UI elements adjust accordingly
Review the page layout after translation to ensure the design renders correctly. Some websites may require manual layout adjustments to fully support RTL languages.
FAQs
Can I control which translation engines are used? Yes. You can configure specific engines within the AI Translation Profile or override AI routing in project settings.
FAQs
Can I add a single new page without re-crawling the whole site? Yes. Point the crawler at the specific URL of the new page in the Pages view to fetch and add it to the inventory. Confirm the URL is covered by your inclusion rules so it enters translation scope.
Why did my crawl only pick up one page instead of my whole site? The website address passed to the crawler was likely a bare URL without a trailing wildcard. Use https://yourdomain.com/* (or leave the field empty) to crawl the entire site.
Still need help?
Our support team responds within one business day.